User Guide
Page 5
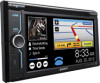
... operation 47 General Settings 48 Sound Settings 50 Visual Settings 52 Source Settings 53 Using Optional Equipment Auxiliary audio/video equipment 55 Rear view camera 55 Rear view camera settings 55 Additional Information Precautions 56 5 Notes on your smartphone - Custom Color 35 Using Gesture Command 35 Handsfree Calling and Audio Streaming - List...
... operation 47 General Settings 48 Sound Settings 50 Visual Settings 52 Source Settings 53 Using Optional Equipment Auxiliary audio/video equipment 55 Rear view camera 55 Rear view camera settings 55 Additional Information Precautions 56 5 Notes on your smartphone - Custom Color 35 Using Gesture Command 35 Handsfree Calling and Audio Streaming - List...
User Guide
Page 7
...of a sudden movement of Dolby Laboratories. Do not operate the unit or watch the surroundings carefully for a long time. Notes on the rear view camera exclusively. • While operating - Do not expose the unit surface to turn the ignition off. Otherwise, the finish of the unit may be .... - Do not use of this product is automatically switched to the background screen after you try to install this technology outside of such marks by Sony Corporation is in motion. If you park the car and set the parking brake. "DVD VIDEO," "DVD-R," "DVD-RW," "DVD+R," and "DVD...
...of a sudden movement of Dolby Laboratories. Do not operate the unit or watch the surroundings carefully for a long time. Notes on the rear view camera exclusively. • While operating - Do not expose the unit surface to turn the ignition off. Otherwise, the finish of the unit may be .... - Do not use of this product is automatically switched to the background screen after you try to install this technology outside of such marks by Sony Corporation is in motion. If you park the car and set the parking brake. "DVD VIDEO," "DVD-R," "DVD-RW," "DVD+R," and "DVD...
User Guide
Page 12
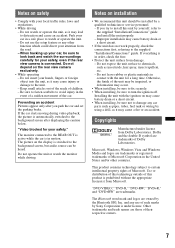
... to change the source: "Tuner" (Radio), "MirrorLink™," "Phone" (Bluetooth Phone), "iPod," "USB Music," "USB Video," "USB Photo," "Disc," "BT Audio" (Bluetooth Audio), "Navigation,*2" "Rear Camera," "AUX" (Auxiliary equipment), "Settings." *1 Select 2D/3D Mode to activate Zone × Zone. Screen displays Indication list: Home Screen: 12 A ATT (Attenuate) B ZONE × ZONE...
... to change the source: "Tuner" (Radio), "MirrorLink™," "Phone" (Bluetooth Phone), "iPod," "USB Music," "USB Video," "USB Photo," "Disc," "BT Audio" (Bluetooth Audio), "Navigation,*2" "Rear Camera," "AUX" (Auxiliary equipment), "Settings." *1 Select 2D/3D Mode to activate Zone × Zone. Screen displays Indication list: Home Screen: 12 A ATT (Attenuate) B ZONE × ZONE...
User Guide
Page 46
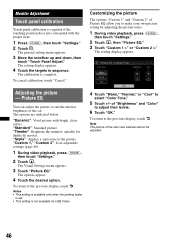
...." Note The picture of Picture EQ allow you to select "Color Tone." 5 Touch +/- Customizing the picture The options "Custom 1" and "Custom 2" of the rear view camera cannot be adjusted. 46 suitable for USB Video. 4 Touch "Warm," "Normal," or "Cool" to make your own picture setting by adjusting the picture tones. 1 During...
...." Note The picture of Picture EQ allow you to select "Color Tone." 5 Touch +/- Customizing the picture The options "Custom 1" and "Custom 2" of the rear view camera cannot be adjusted. 46 suitable for USB Video. 4 Touch "Warm," "Normal," or "Cool" to make your own picture setting by adjusting the picture tones. 1 During...

User Guide
Page 47
...) • : Visual Settings (page 52) • : Source Settings (page 53) Basic setting operation You can set . • The screen aspect ratio of the rear view camera cannot be changed. • When you change the screen aspect ratio. To return to the previous display, touch . 47 For example, when setting the Key...
...) • : Visual Settings (page 52) • : Source Settings (page 53) Basic setting operation You can set . • The screen aspect ratio of the rear view camera cannot be changed. • When you change the screen aspect ratio. To return to the previous display, touch . 47 For example, when setting the Key...

User Guide
Page 49
... lights up. Purpose To change the color of connected Bluetooth devices, etc. 49 To display the software licenses. Reverse Rear View Camera Setting - (page 55) Output Color System Changes the color system according to NTSC. To update the Firmware version. Unit status ... buttons. - Open Source Licenses - To display the picture from the Bluetooth device. To display the picture from the connected rear view Normal (z) camera. To not connect the Bluetooth device. To set to PAL. Item Option Key Illumination (page 35) Rainbow (z) (12 preset colors, customized color...
... lights up. Purpose To change the color of connected Bluetooth devices, etc. 49 To display the software licenses. Reverse Rear View Camera Setting - (page 55) Output Color System Changes the color system according to NTSC. To update the Firmware version. Unit status ... buttons. - Open Source Licenses - To display the picture from the Bluetooth device. To display the picture from the connected rear view Normal (z) camera. To not connect the Bluetooth device. To set to PAL. Item Option Key Illumination (page 35) Rainbow (z) (12 preset colors, customized color...
User Guide
Page 55
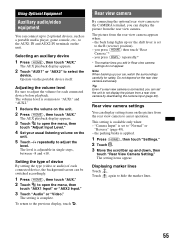
... AUX playback display appears. 3 Touch to open the menu, then touch "AUX1 Input" or "AUX2 Input." 3 Touch "Audio" or "Video." Rear view camera settings You can set to "Normal" or "Reverse" (page 49). - Touch again to the previous display, touch . The AUX playback display appears. 2 ... the unit. 5 Touch -/+ repeatedly to adjust the level. you press (DSPL) repeatedly.* * The marker lines you press (HOME) then touch "Rear Camera."* - Using Optional Equipment Auxiliary audio/video equipment You can be switched accordingly. 1 Press (HOME), then touch "AUX." 2 Touch to open the menu,...
... AUX playback display appears. 3 Touch to open the menu, then touch "AUX1 Input" or "AUX2 Input." 3 Touch "Audio" or "Video." Rear view camera settings You can set to "Normal" or "Reverse" (page 49). - Touch again to the previous display, touch . The AUX playback display appears. 2 ... the unit. 5 Touch -/+ repeatedly to adjust the level. you press (DSPL) repeatedly.* * The marker lines you press (HOME) then touch "Rear Camera."* - Using Optional Equipment Auxiliary audio/video equipment You can be switched accordingly. 1 Press (HOME), then touch "AUX." 2 Touch to open the menu,...
User Guide
Page 62
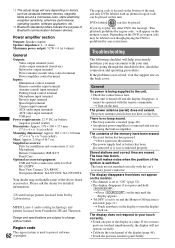
... controller input terminal Antenna (aerial) input terminal Parking break control terminal Microphone input terminal Reverse input terminal Speed input terminal Camera input terminal AUX audio input terminals AUX video input terminals USB port Power requirements: 12 V DC car battery (negative ...215; 111 × 160 mm (7 1/4 × 4 3/8 × 6 3/8 in amplifier. Please ask the dealer for iPod: RC-202IPV Rear View Camera: XA-R800C Navigation Module: XA-NV100T, XA-NV200TL Your dealer may be operated with the car's accessory power connector. Design and specifications are erased. Stored...
... controller input terminal Antenna (aerial) input terminal Parking break control terminal Microphone input terminal Reverse input terminal Speed input terminal Camera input terminal AUX audio input terminals AUX video input terminals USB port Power requirements: 12 V DC car battery (negative ...215; 111 × 160 mm (7 1/4 × 4 3/8 × 6 3/8 in amplifier. Please ask the dealer for iPod: RC-202IPV Rear View Camera: XA-R800C Navigation Module: XA-NV100T, XA-NV200TL Your dealer may be operated with the car's accessory power connector. Design and specifications are erased. Stored...
User Guide
Page 63
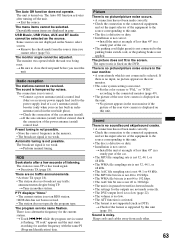
... to the connected equipment, and set the input selector of the equipment to the source corresponding to the power supply lead of the rear view camera is not correct. "PI seek" appears and the unit starts searching for the current station. t No picture appears in the rear monitor if ... • The station does not specify the program type. The monitor angle cannot be selected as DTS). t Tune in a sturdy part of the rear view camera is not correct. If there is no input, no sound/sound skips/sound cracks. • A connection has not been made correctly. • The DVD ...
... to the connected equipment, and set the input selector of the equipment to the source corresponding to the power supply lead of the rear view camera is not correct. "PI seek" appears and the unit starts searching for the current station. t No picture appears in the rear monitor if ... • The station does not specify the program type. The monitor angle cannot be selected as DTS). t Tune in a sturdy part of the rear view camera is not correct. If there is no input, no sound/sound skips/sound cracks. • A connection has not been made correctly. • The DVD ...


