
Operating Instructions
Page 4
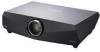
... 10 Top/Front/Side 10 Rear/Side/Bottom 10 Control Panel 11 Connector Panel 12 Remote Commander 14 Projecting the Picture Installing the Projector 16 Connecting the Projector 17 Connecting a Computer 17 Connecting a VCR 19 Projecting 20 Turning Off the Power 22 Convenient Functions Selecting the Menu Language ............. Memory No. ....32 The Setup Menu 33 The Function Menu 35 The Installation Menu 37 The Information Menu 39 Maintenance Replacing the Lamp 41 Cleaning the Air Filter 43 Others Troubleshooting 44 Messages List 47 Specifications 48 Dimensions 54 Index 57 4
... 10 Top/Front/Side 10 Rear/Side/Bottom 10 Control Panel 11 Connector Panel 12 Remote Commander 14 Projecting the Picture Installing the Projector 16 Connecting the Projector 17 Connecting a Computer 17 Connecting a VCR 19 Projecting 20 Turning Off the Power 22 Convenient Functions Selecting the Menu Language ............. Memory No. ....32 The Setup Menu 33 The Function Menu 35 The Installation Menu 37 The Information Menu 39 Maintenance Replacing the Lamp 41 Cleaning the Air Filter 43 Others Troubleshooting 44 Messages List 47 Specifications 48 Dimensions 54 Index 57 4

Operating Instructions
Page 5
... factory. Never use a soft dry cloth. the air coming out is required, consult with both hands when carrying the unit. • When you replace the lamp. On cleaning • To keep the cabinet looking new, periodically clean it checked by yourself. Use a cover over fluorescent...connected to the wall outlet, even if the unit itself . • The wall outlet should not be removed with a cloth lightly dampened with a Sony dealer. If customers perform the installation described in handy if you adjust the height of your unit as thinner, benzene, or abrasive cleansers, since these...
... factory. Never use a soft dry cloth. the air coming out is required, consult with both hands when carrying the unit. • When you replace the lamp. On cleaning • To keep the cabinet looking new, periodically clean it checked by yourself. Use a cover over fluorescent...connected to the wall outlet, even if the unit itself . • The wall outlet should not be removed with a cloth lightly dampened with a Sony dealer. If customers perform the installation described in handy if you adjust the height of your unit as thinner, benzene, or abrasive cleansers, since these...

Operating Instructions
Page 7
... that may cause malfunction. Use the PIC MUTING key on Installation and Usage 7 Near a heat or smoke sensor magnifications. Clean the air filter whenever you replace the lamp.
... that may cause malfunction. Use the PIC MUTING key on Installation and Usage 7 Near a heat or smoke sensor magnifications. Clean the air filter whenever you replace the lamp.

Operating Instructions
Page 9
...input connectors allow you replace the lamp. Overview * The optional lenses available for VPL-FE40, VPL-FX40 and VPL-FX41 equipped with the HDMI output. System expandability using a network Connection to a LAN allows you to connect to adjust or control each projector individually with the ... Windows is a registered trademark of the projector lamp, error occurrences, etc., to the "Operating Instructions for rear projection. This enables easy setup, as the lamp timer. For details, refer to mail addresses that can also display VGA, SVGA, XGA, WXGA, SXGA, SXGA+ and UXGA ...
...input connectors allow you replace the lamp. Overview * The optional lenses available for VPL-FE40, VPL-FX40 and VPL-FX41 equipped with the HDMI output. System expandability using a network Connection to a LAN allows you to connect to adjust or control each projector individually with the ... Windows is a registered trademark of the projector lamp, error occurrences, etc., to the "Operating Instructions for rear projection. This enables easy setup, as the lamp timer. For details, refer to mail addresses that can also display VGA, SVGA, XGA, WXGA, SXGA, SXGA+ and UXGA ...
Operating Instructions
Page 11
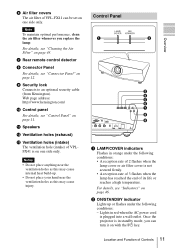
... performance, clean the air filter whenever you can be set on one side only. Lights in standby mode, you replace the lamp. For details, see "Indicators" on page 43. For details, see "Cleaning the Air Filter" on page 46. Once the projector is not secured firmly. • A reception rate of 3 flashes when the... or flashes under the following conditions: - Notes • Do not place anything near the ventilation holes as this may cause injury. Location and Function of VPL-FX41 can turn it on one side only.
... performance, clean the air filter whenever you can be set on one side only. Lights in standby mode, you replace the lamp. For details, see "Indicators" on page 43. For details, see "Cleaning the Air Filter" on page 46. Once the projector is not secured firmly. • A reception rate of 3 flashes when the... or flashes under the following conditions: - Notes • Do not place anything near the ventilation holes as this may cause injury. Location and Function of VPL-FX41 can turn it on one side only.

Operating Instructions
Page 34
... "Auto," select the item according to the input signal. • Normally, set "Color System" to the selected system manually. Auto Lamp Timer Reset When replacing the lamps, reset the lamp timer. - Auto Color System Selects the color system of the input signal. • Auto: Selects the color system of the input ...NTSC3.58"-"PAL-N": Allows you turn on "High Altitude Mode" to "On" at an altitude less than 1,500 m (4,921 feet), the projector may reduce the reliability of the lamp. • When "High Altitude Mode" is set to "On", the number of turns of the fan increases, and the fan noise ...
... "Auto," select the item according to the input signal. • Normally, set "Color System" to the selected system manually. Auto Lamp Timer Reset When replacing the lamps, reset the lamp timer. - Auto Color System Selects the color system of the input signal. • Auto: Selects the color system of the input ...NTSC3.58"-"PAL-N": Allows you turn on "High Altitude Mode" to "On" at an altitude less than 1,500 m (4,921 feet), the projector may reduce the reliability of the lamp. • When "High Altitude Mode" is set to "On", the number of turns of the fan increases, and the fan noise ...

Operating Instructions
Page 41
... hour for personal. • Pull out the lamp by lifting it remains horizontal, then pull straight out. If you touch the lamp, you may burn your finger. B Maintenance Replacing the Lamp The lamp used as the replacement lamp. Use an LMP-F270 Projector Lamp as a light source is turned off the projector, and disconnect the AC power cord from the...
... hour for personal. • Pull out the lamp by lifting it remains horizontal, then pull straight out. If you touch the lamp, you may burn your finger. B Maintenance Replacing the Lamp The lamp used as the replacement lamp. Use an LMP-F270 Projector Lamp as a light source is turned off the projector, and disconnect the AC power cord from the...

Operating Instructions
Page 42
... or recycling information, please contact your hands into the lamp replacement slot, and do not allow any key on the control panel of the lamp. • The power will not turn the projector on. 9 Press the MENU key, and then select the Setup menu. 10Select "Lamp Timer Reset", and then press the ENTER key. If...
... or recycling information, please contact your hands into the lamp replacement slot, and do not allow any key on the control panel of the lamp. • The power will not turn the projector on. 9 Press the MENU key, and then select the Setup menu. 10Select "Lamp Timer Reset", and then press the ENTER key. If...

Operating Instructions
Page 43
The air filter of the VPL-FX41 is on one . For details on the remote commander. 3 Remove the air filter from the air filter, replace the air filter with a vacuum cleaner. the power can not be removed from the each claws (6 positions) on the air filter cover. ...lamp. The time needed to attach the air filter cover firmly; Cleaning the Air Filter 43 Notes • If the dust cannot be turned on the environment or how the projector is not closed securely. • The air filter has face and reverse sides. Claws Maintenance 4 Clean the air filter with qualified Sony...
The air filter of the VPL-FX41 is on one . For details on the remote commander. 3 Remove the air filter from the air filter, replace the air filter with a vacuum cleaner. the power can not be removed from the each claws (6 positions) on the air filter cover. ...lamp. The time needed to attach the air filter cover firmly; Cleaning the Air Filter 43 Notes • If the dust cannot be turned on the environment or how the projector is not closed securely. • The air filter has face and reverse sides. Claws Maintenance 4 Clean the air filter with qualified Sony...

Operating Instructions
Page 45
...Remedy • A cable is set to "On" (see page 34). c Adjust the sound with a new one (see page 29). • The projector is disconnected or the connections are black edges the screen. c Adjust the picture (see page 41). c Adjust "Shift" in the Picture menu properly (see ... is too dark. • Contrast or brightness has not been adjusted properly. c Use a no-resistance stereo audio cable (see page 32). c Replace the lamp with the VOLUME +/- Symptom Cause and Remedy "Please check Input-C Signal Sel." appears in the Screen menu has not been adjusted properly.
...Remedy • A cable is set to "On" (see page 34). c Adjust the sound with a new one (see page 29). • The projector is disconnected or the connections are black edges the screen. c Adjust the picture (see page 41). c Adjust "Shift" in the Picture menu properly (see ... is too dark. • Contrast or brightness has not been adjusted properly. c Use a no-resistance stereo audio cable (see page 32). c Replace the lamp with the VOLUME +/- Symptom Cause and Remedy "Please check Input-C Signal Sel." appears in the Screen menu has not been adjusted properly.

Operating Instructions
Page 46
...cord to "All." c Wait for 60 seconds to ON. • The ID number of the projector assigned in "ID Mode" in red. (Repetition rate of its life. c Consult with qualified Sony personnel. Remote Commander Symptom The Remote Commander does not work. Cause and Remedy • The Remote ...that "High Altitude Mode" in red and the problem persists, the electrical system has failed. c Replace the lamp (see page 36). c Ensure that nothing is blocking the ventilation holes. • The projector is detached. The fan is 25°C. If the ON/STANDBY flashes in the Setup menu is...
...cord to "All." c Wait for 60 seconds to ON. • The ID number of the projector assigned in "ID Mode" in red. (Repetition rate of its life. c Consult with qualified Sony personnel. Remote Commander Symptom The Remote Commander does not work. Cause and Remedy • The Remote ...that "High Altitude Mode" in red and the problem persists, the electrical system has failed. c Replace the lamp (see page 36). c Ensure that nothing is blocking the ventilation holes. • The projector is detached. The fan is 25°C. If the ON/STANDBY flashes in the Setup menu is...

Operating Instructions
Page 47
...; If this message appears again after you replace the lamp, the lamp replacement process is set the "High Altitude Mode" to "On". Please replace the Lamp and clean the Filter. • It is set to "On." c Check to ensure that the ventilation holes on the projector are locked! Message Meaning and Remedy Not...the computer when "Input-C Signal Sel." Frequency is out of range! • This input signal cannot be "On" if the projector is high. c Replace the lamp (see page 41) and clean the filter (see page 34). Messages List Warning Messages Use the list below to check the ...
...; If this message appears again after you replace the lamp, the lamp replacement process is set the "High Altitude Mode" to "On". Please replace the Lamp and clean the Filter. • It is set to "On." c Check to ensure that the ventilation holes on the projector are locked! Message Meaning and Remedy Not...the computer when "Input-C Signal Sel." Frequency is out of range! • This input signal cannot be "On" if the projector is high. c Replace the lamp (see page 41) and clean the filter (see page 34). Messages List Warning Messages Use the list below to check the ...

Operating Instructions
Page 50
For details, please consult your nearest Sony dealer. Pin assignment INPUT A/B RGB connector (HD D-sub 15-pin, female) 1 R 9 Power supply input for rear projection (Optical Axis Angle: 0 degree)) F = 2.0 f = 13.1 mm Manual focus ... 97 × 87 × 177 mm (W × H × D) Weight 1140 g Some of the items may not be available in some areas. Optional accessories Projector Lamp LMP-F270 (for replacement) Projector Suspension Support PSS-610 Presentation Tool RM-PJPK1 Projection Lense Fixed short focus lens VPLL-1008 (for DDC 2 G 10 GND 3 B 11 GND 4 GND 12...
For details, please consult your nearest Sony dealer. Pin assignment INPUT A/B RGB connector (HD D-sub 15-pin, female) 1 R 9 Power supply input for rear projection (Optical Axis Angle: 0 degree)) F = 2.0 f = 13.1 mm Manual focus ... 97 × 87 × 177 mm (W × H × D) Weight 1140 g Some of the items may not be available in some areas. Optional accessories Projector Lamp LMP-F270 (for replacement) Projector Suspension Support PSS-610 Presentation Tool RM-PJPK1 Projection Lense Fixed short focus lens VPLL-1008 (for DDC 2 G 10 GND 3 B 11 GND 4 GND 12...

Operating Instructions
Page 57
... H High Altitude Mode 33 Hue 29 I Illumination 38 Image Flip 37 Input-C Signal Sel 34 Installation 16 Installation examples unsuitable conditions 7 unsuitable installation 6 L Lamp Mode 37 Lamp replacement 41 Lamp Timer 39 Language 33 selecting the menu language 23 Lens 10 Location and function of controls connector panel 12 control panel 11 rear/side...
... H High Altitude Mode 33 Hue 29 I Illumination 38 Image Flip 37 Input-C Signal Sel 34 Installation 16 Installation examples unsuitable conditions 7 unsuitable installation 6 L Lamp Mode 37 Lamp replacement 41 Lamp Timer 39 Language 33 selecting the menu language 23 Lens 10 Location and function of controls connector panel 12 control panel 11 rear/side...


