

Operating Instructions
Page 2
... Projected image 13 Turning Off the Power 14 Adjustments and Settings Using a Menu Using a MENU 15 The Picture Menu 16 The Screen Menu 17 The Function Menu 19 The Operation Menu 20 The Connection/Power Menu .......... 21 The Installation Menu 22 The Information Menu 23 Network Using Network Features 24 Displaying the Control Window of the Projector with a Web Browser 24 Confirming the Information regarding the Projector 25 Operating the Projector from a Computer 25 Using the e-mail report Function 25 Others Indicators 27 Messages List 28 Troubleshooting...
... Projected image 13 Turning Off the Power 14 Adjustments and Settings Using a Menu Using a MENU 15 The Picture Menu 16 The Screen Menu 17 The Function Menu 19 The Operation Menu 20 The Connection/Power Menu .......... 21 The Installation Menu 22 The Information Menu 23 Network Using Network Features 24 Displaying the Control Window of the Projector with a Web Browser 24 Confirming the Information regarding the Projector 25 Operating the Projector from a Computer 25 Using the e-mail report Function 25 Others Indicators 27 Messages List 28 Troubleshooting...
Operating Instructions
Page 5
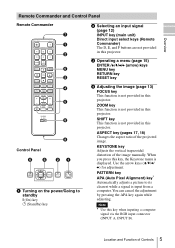
... this projector. Location and Function of the image manually. SHIFT key This function is not provided in this projector. PATTERN key APA (Auto Pixel Alignment) key* Automatically adjusts a picture to standby ? (On) key 1 (Standby) key b Selecting an input signal (page 12) INPUT key (main unit) Direct input select keys (Remote Commander) The D, E, and F buttons are not provided in this projector. Overview Remote Commander and Control Panel Remote Commander STANDBY ON INPUT A B C D E F VIDEO S VIDEO MENU ECO MODE ENTER RETURN RESET FOCUS ZOOM SHIFT ASPECT KEYSTONE...
... this projector. Location and Function of the image manually. SHIFT key This function is not provided in this projector. PATTERN key APA (Auto Pixel Alignment) key* Automatically adjusts a picture to standby ? (On) key 1 (Standby) key b Selecting an input signal (page 12) INPUT key (main unit) Direct input select keys (Remote Commander) The D, E, and F buttons are not provided in this projector. Overview Remote Commander and Control Panel Remote Commander STANDBY ON INPUT A B C D E F VIDEO S VIDEO MENU ECO MODE ENTER RETURN RESET FOCUS ZOOM SHIFT ASPECT KEYSTONE...
Operating Instructions
Page 6
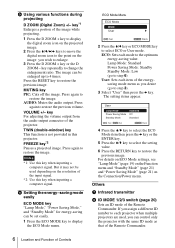
... 6) User: Sets each item of the energysaving mode menu as that of the Remote Commander. 6 Location and Function of the input signal. *2: Use this key when inputting a computer signal. AUDIO: Mutes the audio output. FREEZE key*2 Pauses a projected image. Lamp Mode: Standard Power Saving Mode: Standby Standby Mode: Low (go to enlarge. 3 Press the D ZOOM + key or the D ZOOM - Press the RESET key to restore the previous image. ECO: Sets each projector when multiple projectors are used depending on the Connection/Power menu. For...
... 6) User: Sets each item of the energysaving mode menu as that of the Remote Commander. 6 Location and Function of the input signal. *2: Use this key when inputting a computer signal. AUDIO: Mutes the audio output. FREEZE key*2 Pauses a projected image. Lamp Mode: Standard Power Saving Mode: Standby Standby Mode: Low (go to enlarge. 3 Press the D ZOOM + key or the D ZOOM - Press the RESET key to restore the previous image. ECO: Sets each projector when multiple projectors are used depending on the Connection/Power menu. For...
Operating Instructions
Page 7
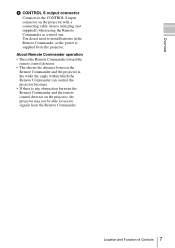
Location and Function of Controls 7 Overview i CONTROL S output connector Connects to the CONTROL S input connector on the projector with a connecting cable (stereo mini plug (not supplied)) when using the Remote Commander as the power is any obstruction between the Remote Commander and the projector is, the wider the angle within which the Remote Commander can control the projector becomes. • If there is supplied from the Remote Commander. About Remote Commander operation • Direct the Remote Commander toward the remote control detector...
Location and Function of Controls 7 Overview i CONTROL S output connector Connects to the CONTROL S input connector on the projector with a connecting cable (stereo mini plug (not supplied)) when using the Remote Commander as the power is any obstruction between the Remote Commander and the projector is, the wider the angle within which the Remote Commander can control the projector becomes. • If there is supplied from the Remote Commander. About Remote Commander operation • Direct the Remote Commander toward the remote control detector...

Operating Instructions
Page 12
... display by changing your computer to output to the projector varies, depending on the projector. Press the INPUT key on the Remote Commander (page 5). 6 Switch your computer's setting. Press the INPUT key repeatedly or the V/v key to select an image to display the input select window. Install the projector so that the projected image fits the screen size. You can select the input source using Direct input select keys on the projector to be projected. B Projecting/Adjusting an Image Projecting...
... display by changing your computer to output to the projector varies, depending on the projector. Press the INPUT key on the Remote Commander (page 5). 6 Switch your computer's setting. Press the INPUT key repeatedly or the V/v key to select an image to display the input select window. Install the projector so that the projected image fits the screen size. You can select the input source using Direct input select keys on the projector to be projected. B Projecting/Adjusting an Image Projecting...
Operating Instructions
Page 15
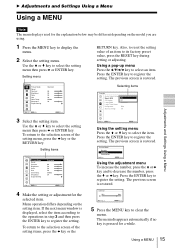
... Lamp Timer Reset Background Blue Start Up Image On 3 Select the setting item. If the next menu window is displayed, select the item according to the operations in step 3 and then press the ENTER key to decrease the number, press the v or B key. Picture Mode Dynamic Standard Presentation Sel Back Using the adjustment menu To increase the number, press the V or b key and to register the setting. The previous screen...
... Lamp Timer Reset Background Blue Start Up Image On 3 Select the setting item. If the next menu window is displayed, select the item according to the operations in step 3 and then press the ENTER key to decrease the number, press the v or B key. Picture Mode Dynamic Standard Presentation Sel Back Using the adjustment menu To increase the number, press the V or b key and to register the setting. The previous screen...
Operating Instructions
Page 16
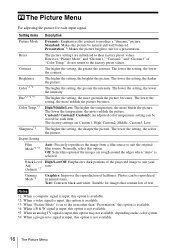
... for each input signal. Text: Contrasts black and white. Contrast The higher the setting, the greater the contrast. Brightness Color*2 *4 Hue*2 *4 *5 Color Temp.*3 Sharpness*2 The higher the setting, the brighter the picture. The higher the setting, the sharper the picture. Off: Select this option if the images are Custom1: High, Custom2: Middle, Custom3: Low. Setting items Description Picture Mode Dynamic: Emphasizes the contrast to their factory preset...
... for each input signal. Text: Contrasts black and white. Contrast The higher the setting, the greater the contrast. Brightness Color*2 *4 Hue*2 *4 *5 Color Temp.*3 Sharpness*2 The higher the setting, the brighter the picture. The higher the setting, the sharper the picture. Off: Select this option if the images are Custom1: High, Custom2: Middle, Custom3: Low. Setting items Description Picture Mode Dynamic: Emphasizes the contrast to their factory preset...
Operating Instructions
Page 17
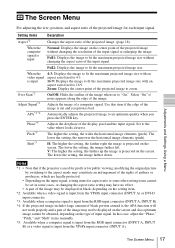
... each input signal. Zoom: Display the center point of a computer signal. Adjustments and Settings Using a Menu The Screen Menu For adjusting the size, position, and aspect ratio of the projected image. (page 18). The Screen Menu 17 In this item if the edge of the display pixel and the input signal. Setting items Description Aspect*1 Changes the aspect ratio of the projected image for public viewing, modifying the original picture by switching to zoom. The lower the setting, the image...
... each input signal. Zoom: Display the center point of a computer signal. Adjustments and Settings Using a Menu The Screen Menu For adjusting the size, position, and aspect ratio of the projected image. (page 18). The Screen Menu 17 In this item if the edge of the display pixel and the input signal. Setting items Description Aspect*1 Changes the aspect ratio of the projected image for public viewing, modifying the original picture by switching to zoom. The lower the setting, the image...

Operating Instructions
Page 18
... on the input signal, the projected image may be projected as the input signal without changing the aspect ratio of the image. Video signal 18 The Screen Menu Aspect Input signal (4:3) Recommended setting value and projected image (Full1)*1 *1: If you select "Full2," the image is projected to fit the projected image size, regardless of the aspect ratio of the original image. (16:9) (Full1)*1 *2 *2: If you select "Normal," the image is projected in the same resolution as illustrated...
... on the input signal, the projected image may be projected as the input signal without changing the aspect ratio of the image. Video signal 18 The Screen Menu Aspect Input signal (4:3) Recommended setting value and projected image (Full1)*1 *1: If you select "Full2," the image is projected to fit the projected image size, regardless of the aspect ratio of the original image. (16:9) (Full1)*1 *2 *2: If you select "Normal," the image is projected in the same resolution as illustrated...
Operating Instructions
Page 19
... signal is used for setting various functions of the projector. Black/Blue: Selects the background color of the projector. When replacing the lamps, resets the lamp timer (page 31). Smart APA CC Display Lamp Mode Lamp Timer Reset Background Start Up Image Description The higher the setting, the higher an audio level output from the audio output connector. When set to "On," the Start Up Image is displayed on the screen upon startup of the projected image when no signal is input...
... signal is used for setting various functions of the projector. Black/Blue: Selects the background color of the projector. When replacing the lamps, resets the lamp timer (page 31). Smart APA CC Display Lamp Mode Lamp Timer Reset Background Start Up Image Description The higher the setting, the higher an audio level output from the audio output connector. When set to "On," the Start Up Image is displayed on the screen upon startup of the projected image when no signal is input...

Operating Instructions
Page 20
.... (The default password setting is "ENTER, ENTER, ENTER, ENTER.") 3 Input a new password with the Remote Commander independently of the Remote Commander on . c The projector turns on. • Press and hold the ?/1 key for the menus, message when turning off the on the front and rear of the projector. Front & Rear/Front/Rear: Selects the remote control detectors (IR Receiver) on -screen displays except for approximately 10 seconds during power on...
.... (The default password setting is "ENTER, ENTER, ENTER, ENTER.") 3 Input a new password with the Remote Commander independently of the Remote Commander on . c The projector turns on. • Press and hold the ?/1 key for the menus, message when turning off the on the front and rear of the projector. Front & Rear/Front/Rear: Selects the remote control detectors (IR Receiver) on -screen displays except for approximately 10 seconds during power on...
Operating Instructions
Page 21
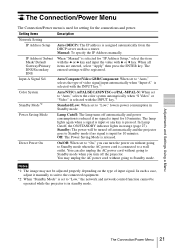
.... Adjustments and Settings Using a Menu The Connection/Power Menu 21 Power Saving Mode Lamp Cutoff: The lamp turns off the projector. Setting items Description Network Setting IP Address Setup Auto (DHCP): The IP address is used for setting for 10 minutes. Standby: The power will be operated while the projector is input for the connections and power. Direct Power On On/Off: When set to "On," you turn the power on the type of video signal input automatically when "Input-A" is selected with the INPUT key.*1 Color System Standby Mode*2 Auto/NTSC3...
.... Adjustments and Settings Using a Menu The Connection/Power Menu 21 Power Saving Mode Lamp Cutoff: The lamp turns off the projector. Setting items Description Network Setting IP Address Setup Auto (DHCP): The IP address is used for setting for 10 minutes. Standby: The power will be operated while the projector is input for the connections and power. Direct Power On On/Off: When set to "On," you turn the power on the type of video signal input automatically when "Input-A" is selected with the INPUT key.*1 Color System Standby Mode*2 Auto/NTSC3...
Operating Instructions
Page 24
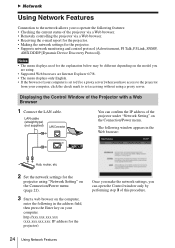
..., router, etc 2 Set the network settings for the projector using a proxy server. LAN cable (straight type) (not supplied) LAN Connector You can open the Control window only by performing step 3 of this procedure. 24 Using Network Features The following window appears in the address field, then press the Enter key on your computer, click the check mark to set accessing without using "Network Setting" on the Connection/Power menu (page 21). 3 Start a web browser on...
..., router, etc 2 Set the network settings for the projector using a proxy server. LAN cable (straight type) (not supplied) LAN Connector You can open the Control window only by performing step 3 of this procedure. 24 Using Network Features The following window appears in the address field, then press the Enter key on your computer, click the check mark to set accessing without using "Network Setting" on the Connection/Power menu (page 21). 3 Start a web browser on...
Operating Instructions
Page 27
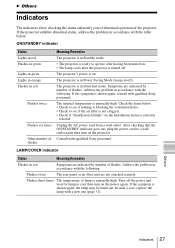
... turned on . The projector's power is unusually high. Unplug the AC power cord from a wall outlet. Consult with the following . LAMP/COVER indicator Status Meaning/Remedies Flashes in Standby mode. • The projector is in red Symptoms are indicated by number of lamp is on . • The lamp cools after the projector is in abnormal status. ON/STANDBY indicator Status Lights in red Flashes in green Lights in green Lights in orange Flashes in red Flashes twice Flashes six times Other number of the projector. Address the problem in accordance with a new...
... turned on . The projector's power is unusually high. Unplug the AC power cord from a wall outlet. Consult with the following . LAMP/COVER indicator Status Meaning/Remedies Flashes in Standby mode. • The projector is in red Symptoms are indicated by number of lamp is on . • The lamp cools after the projector is in abnormal status. ON/STANDBY indicator Status Lights in red Flashes in green Lights in green Lights in orange Flashes in red Flashes twice Flashes six times Other number of the projector. Address the problem in accordance with a new...
Operating Instructions
Page 28
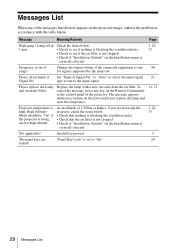
... are not using the projector, check the items below . Message Meaning/Remedy Page High temp.! Lamp off in accordance with a new one 40 for signals supported by the projector. Please check Input-A Set "Input-A Signal Sel." The message appears whenever you turn on the power until you are "Panel Key Lock" is high. Change the output setting of the connected equipment to see if the air filter is not clogged. • Check if "Installation Attitude" on the Installation menu is correctly...
... are not using the projector, check the items below . Message Meaning/Remedy Page High temp.! Lamp off in accordance with a new one 40 for signals supported by the projector. Please check Input-A Set "Input-A Signal Sel." The message appears whenever you turn on the power until you are "Panel Key Lock" is high. Change the output setting of the connected equipment to see if the air filter is not clogged. • Check if "Installation Attitude" on the Installation menu is correctly...
Operating Instructions
Page 29
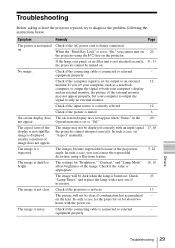
... cannot turn on 20 the projector using a Keystone feature. 5, 22 The image is muted. 6 On-screen display does The on-screen display does not appear when "Status" in focus. 13 The picture will be displayed correctly with a new one if necessary. If the lamp, rear panel, or air filter unit is set "Aspect" manually. The images become trapezoidal because of the external monitor may not be dark when the lamp is connected to...
... cannot turn on 20 the projector using a Keystone feature. 5, 22 The image is muted. 6 On-screen display does The on-screen display does not appear when "Status" in focus. 13 The picture will be displayed correctly with a new one if necessary. If the lamp, rear panel, or air filter unit is set "Aspect" manually. The images become trapezoidal because of the external monitor may not be dark when the lamp is connected to...

Operating Instructions
Page 31
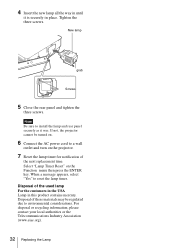
... specified part, you to replace the lamp (page 27). If you touch the lamp, you pull out the lamp while the projector is turned off the projector, and disconnect the AC power cord from a wall outlet. 2 When the lamp has cooled sufficiently, open the rear panel by loosening the three screws. Do not put your finger. Replacing the Lamp Replace the lamp with a new one if a message displayed on the lamp then...
... specified part, you to replace the lamp (page 27). If you touch the lamp, you pull out the lamp while the projector is turned off the projector, and disconnect the AC power cord from a wall outlet. 2 When the lamp has cooled sufficiently, open the rear panel by loosening the three screws. Do not put your finger. Replacing the Lamp Replace the lamp with a new one if a message displayed on the lamp then...
Operating Instructions
Page 32
... turn on the projector. 7 Reset the lamp timer for notification of the used lamp For the customers in the USA Lamp in this product contains mercury. Disposal of the next replacement time. Select "Lamp Timer Reset" on . 6 Connect the AC power cord to environmental considerations. For disposal or recycling information, please contact your local authorities or the Telecommunications Industry Association (www.eiae.org). 32 Replacing the Lamp New lamp grab Screws...
... turn on the projector. 7 Reset the lamp timer for notification of the used lamp For the customers in the USA Lamp in this product contains mercury. Disposal of the next replacement time. Select "Lamp Timer Reset" on . 6 Connect the AC power cord to environmental considerations. For disposal or recycling information, please contact your local authorities or the Telecommunications Industry Association (www.eiae.org). 32 Replacing the Lamp New lamp grab Screws...
Operating Instructions
Page 38
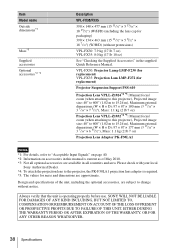
VPL-FX30: Projector Lamp LMP-F230 (for replacement) VPL-FX35: Projection Lam LMP-F272 (for replacement) Projector Suspension Support PSS-610 Projection Lens VPLL-Z1024*4 *5: Manual focus/ zoom (when attaching to this projector), Projected image size: 40" to 600" (1.02 m to 15.24 m), Maximum external dimensions (W × H × D): 97 × 87 × 180 mm (3 13/16" × 3 7/16" × 7 3/32"), Mass: 1.1 kg (2 lb 7 oz) Projection Lens VPLL-Z1032*4 *5: Manual focus/ zoom (when attaching to this...
VPL-FX30: Projector Lamp LMP-F230 (for replacement) VPL-FX35: Projection Lam LMP-F272 (for replacement) Projector Suspension Support PSS-610 Projection Lens VPLL-Z1024*4 *5: Manual focus/ zoom (when attaching to this projector), Projected image size: 40" to 600" (1.02 m to 15.24 m), Maximum external dimensions (W × H × D): 97 × 87 × 180 mm (3 13/16" × 3 7/16" × 7 3/32"), Mass: 1.1 kg (2 lb 7 oz) Projection Lens VPLL-Z1032*4 *5: Manual focus/ zoom (when attaching to this...
Operating Instructions
Page 47
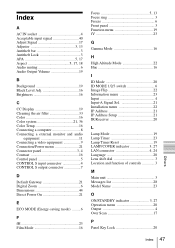
... Focus ring 3 Freeze 6 Front panel 3 Function menu 19 fV 23 G Gamma Mode 16 H High Altitude Mode 22 Hue 16 I ID Mode 20 ID MODE 1/2/3 switch 6 Image Flip 22 Information menu 23 Input 4 Input-A Signal Sel 21 Installation menu 22 IP Address 21 IP Address Setup 21 IR Receiver 20 L Lamp Mode 19 Lamp Timer 23 Lamp Timer Reset 19 LAMP/COVER indicator 3, 27 LAN connector 4, 24 Language 20 Lens shift dial 3 Location and function of controls 3 M Main unit 3 Messages list 28 Model Name 23 O ON/STANDBY indicator 3, 27 Operation menu...
... Focus ring 3 Freeze 6 Front panel 3 Function menu 19 fV 23 G Gamma Mode 16 H High Altitude Mode 22 Hue 16 I ID Mode 20 ID MODE 1/2/3 switch 6 Image Flip 22 Information menu 23 Input 4 Input-A Signal Sel 21 Installation menu 22 IP Address 21 IP Address Setup 21 IR Receiver 20 L Lamp Mode 19 Lamp Timer 23 Lamp Timer Reset 19 LAMP/COVER indicator 3, 27 LAN connector 4, 24 Language 20 Lens shift dial 3 Location and function of controls 3 M Main unit 3 Messages list 28 Model Name 23 O ON/STANDBY indicator 3, 27 Operation menu...


