Operating Instructions
Page 4
... 9 Location and Function of Controls .. 10 Top/Right Side/Front 10 Rear/Bottom 10 Control Panel 12 Connector Panel 14 Remote Commander 15 Projecting the Picture Installing the Projector 17 Connecting the Projector 18 Connecting a Computer 18 Connecting a VCR 19 Projecting 20 Turning Off the Power 22 Convenient Functions Selecting the Menu Language...
... 9 Location and Function of Controls .. 10 Top/Right Side/Front 10 Rear/Bottom 10 Control Panel 12 Connector Panel 14 Remote Commander 15 Projecting the Picture Installing the Projector 17 Connecting the Projector 18 Connecting a Computer 18 Connecting a VCR 19 Projecting 20 Turning Off the Power 22 Convenient Functions Selecting the Menu Language...
Operating Instructions
Page 9
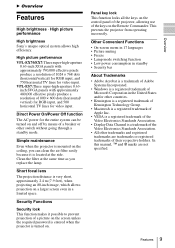
...control panel of the projector, allowing use of the keys on . Overview B Overview Features High brightness · High picture performance High brightness Sony's unique optical system ...other switch without going through a standby mode. Simple maintenance Even when the projector is turned on the Remote Commander. Direct Power On/Power Off function The AC power for video ... trademarks and registered trademarks are not specified. High picture performance VPL-EX70/EX7:Three super-high-aperture 0.63-inch XGA panels with approximately 480,000 effective pixels produce a resolution of...
...control panel of the projector, allowing use of the keys on . Overview B Overview Features High brightness · High picture performance High brightness Sony's unique optical system ...other switch without going through a standby mode. Simple maintenance Even when the projector is turned on the Remote Commander. Direct Power On/Power Off function The AC power for video ... trademarks and registered trademarks are not specified. High picture performance VPL-EX70/EX7:Three super-high-aperture 0.63-inch XGA panels with approximately 480,000 effective pixels produce a resolution of...
Operating Instructions
Page 11
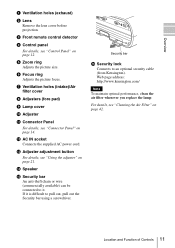
... cover before projection. Web page address: http://www.kensington.com/ Note To maintain optimal performance, clean the air filter whenever you replace the lamp. c Front remote control detector d Control panel For details, see "Cleaning the Air Filter" on page 12. For details, see "Control Panel" on page 42.
... cover before projection. Web page address: http://www.kensington.com/ Note To maintain optimal performance, clean the air filter whenever you replace the lamp. c Front remote control detector d Control panel For details, see "Cleaning the Air Filter" on page 12. For details, see "Control Panel" on page 42.
Operating Instructions
Page 15
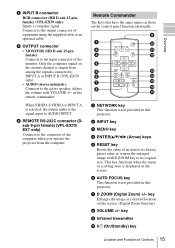
When VIDEO, S VIDEO or INPUT A is selected, the output audio is not provided in this projector. f REMOTE RS-232C connector (Dsub 9-pin female) (VPL-EX70/ EX7 only) Connects to the connector of Controls 15 f AUTO FOCUS key This function is the signal input to its original... size. This key functions when the menu or a setting item is not provided in this projector. g D ZOOM (Digital Zoom) +/- key i Infrared ...
When VIDEO, S VIDEO or INPUT A is selected, the output audio is not provided in this projector. f REMOTE RS-232C connector (Dsub 9-pin female) (VPL-EX70/ EX7 only) Connects to the connector of Controls 15 f AUTO FOCUS key This function is the signal input to its original... size. This key functions when the menu or a setting item is not provided in this projector. g D ZOOM (Digital Zoom) +/- key i Infrared ...
Operating Instructions
Page 16
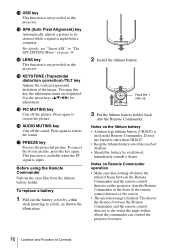
...frozen picture, press the key again. This function is available when the PC signal is limited. Before using the Remote Commander Pull out the clear film from a computer. Notes on the projector. l APA (Auto Pixel Alignment) key Automatically adjusts a picture to a hole, as shown the illustration. 2...• A button type lithium battery (CR2025) is , the wider the angle within which the commander can control the projector becomes. 16 Location and Function of the remote control detector or the screen. • The operation range is input. m LENS key This function is not provided in ...
...frozen picture, press the key again. This function is available when the PC signal is limited. Before using the Remote Commander Pull out the clear film from a computer. Notes on the projector. l APA (Auto Pixel Alignment) key Automatically adjusts a picture to a hole, as shown the illustration. 2...• A button type lithium battery (CR2025) is , the wider the angle within which the commander can control the projector becomes. 16 Location and Function of the remote control detector or the screen. • The operation range is input. m LENS key This function is not provided in ...
Operating Instructions
Page 21
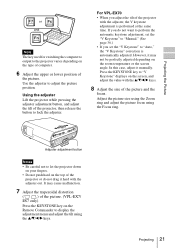
... Notes • Be careful not to "V Keystone" displays on the top of the picture and the focus. Press the KEYSTONE key to let the projector down on your fingers. • Do not push hard on the screen, and adjust the value with the adjuster out. It may not be perfectly... adjusted depending on the Remote Commander to adjust the picture position. Projecting 21 For VPL-EX70 • When you set the "V Keystone" to "Manual." (See page 36.) • If you adjust the tilt of the picture. (VPL-EX7/ ES7 only) Press the KEYSTONE key on the room ...
... Notes • Be careful not to "V Keystone" displays on the top of the picture and the focus. Press the KEYSTONE key to let the projector down on your fingers. • Do not push hard on the screen, and adjust the value with the adjuster out. It may not be perfectly... adjusted depending on the Remote Commander to adjust the picture position. Projecting 21 For VPL-EX70 • When you set the "V Keystone" to "Manual." (See page 36.) • If you adjust the tilt of the picture. (VPL-EX7/ ES7 only) Press the KEYSTONE key on the room ...
Operating Instructions
Page 25
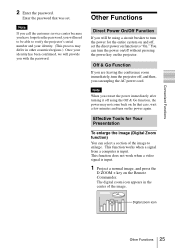
...is input. Enter the password that case, wait a few minutes and turn the projector off using a circuit breaker to verify the projector's serial number and your identity. (This process may not come back on the Remote Commander. Note When you restart the power immediately after turning it off , and... then, you with the password. In that was set the direct power on the projector. The digital zoom icon appears in other countries/regions...
...is input. Enter the password that case, wait a few minutes and turn the projector off using a circuit breaker to verify the projector's serial number and your identity. (This process may not come back on the Remote Commander. Note When you restart the power immediately after turning it off , and... then, you with the password. In that was set the direct power on the projector. The digital zoom icon appears in other countries/regions...
Operating Instructions
Page 28
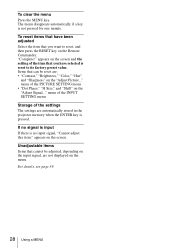
... for one minute. menu of the INPUT SETTING menu Storage of the PICTURE SETTING menu • "Dot Phase," "H Size," and "Shift" on the Remote Commander. For details, see page 39. 28 Using a MENU appears on the screen and the setting of the item that can be adjusted, depending on... the item that cannot be reset are: • "Contrast," "Brightness," "Color," "Hue" and "Sharpness" on the input signal, are automatically stored in the projector memory when the ENTER key is reset to reset, and then press the RESET key on the "Adjust Signal..." menu of the settings The settings...
... for one minute. menu of the INPUT SETTING menu Storage of the PICTURE SETTING menu • "Dot Phase," "H Size," and "Shift" on the Remote Commander. For details, see page 39. 28 Using a MENU appears on the screen and the setting of the item that can be adjusted, depending on... the item that cannot be reset are: • "Contrast," "Brightness," "Color," "Hue" and "Sharpness" on the input signal, are automatically stored in the projector memory when the ENTER key is reset to reset, and then press the RESET key on the "Adjust Signal..." menu of the settings The settings...
Operating Instructions
Page 33
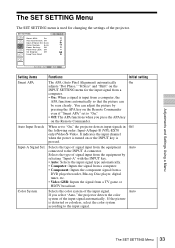
... key on the Remote Commander. If the picture is pressed. You can be seen clearly. If you press the APA key on the Remote Commander even if "Smart APA" set to "On," the projector detects input signals in Off the following order: Input-A/Input-B (VPL-EX70 only)/Video/S-Video.... Selects the type of the projector. Adjustments and Settings Using a Menu The SET SETTING...
... key on the Remote Commander. If the picture is pressed. You can be seen clearly. If you press the APA key on the Remote Commander even if "Smart APA" set to "On," the projector detects input signals in Off the following order: Input-A/Input-B (VPL-EX70 only)/Video/S-Video.... Selects the type of the projector. Adjustments and Settings Using a Menu The SET SETTING...
Operating Instructions
Page 34
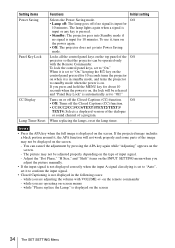
... of the dialogue or sound channel of input signal. - while you press and hold the MENU key for 10 seconds turns the projector on when it , turn on the remote commander - To use it is in the following cases: - Turns on the screen 34 The SET SETTING Menu When replacing the ...no signal is input for 10 minutes. To lock the control panel keys, set to "Off." is not displayed in standby mode, and turns the projector to "On." You can be adjusted properly depending on -screen menus - Setting items Power Saving Panel Key Lock CC Display Lamp Timer Reset Functions Initial...
... of the dialogue or sound channel of input signal. - while you press and hold the MENU key for 10 seconds turns the projector on when it , turn on the remote commander - To use it is in the following cases: - Turns on the screen 34 The SET SETTING Menu When replacing the ...no signal is input for 10 minutes. To lock the control panel keys, set to "Off." is not displayed in standby mode, and turns the projector to "On." You can be adjusted properly depending on -screen menus - Setting items Power Saving Panel Key Lock CC Display Lamp Timer Reset Functions Initial...
Operating Instructions
Page 36
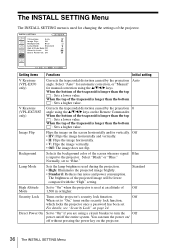
...on page 24. Image Flip Flips the image on the projector's security lock function. Standard High Altitude Set to the projector. Security Lock Turns on the screen horizontally and/or vertically. For details, see "Security Lock" on the Remote Commander. When the top of Off Mode 1,500 m ... a password has been set to "On," turns on /off without pressing the power key on the projector. 36 The INSTALL SETTING Menu Auto V Keystone (VPL-EX7/ES7 only) Corrects the trapezoidal distortion caused by the projection angle. Off • HV: Flips the image horizontally and vertically. ...
...on page 24. Image Flip Flips the image on the projector's security lock function. Standard High Altitude Set to the projector. Security Lock Turns on the screen horizontally and/or vertically. For details, see "Security Lock" on the Remote Commander. When the top of Off Mode 1,500 m ... a password has been set to "On," turns on /off without pressing the power key on the projector. 36 The INSTALL SETTING Menu Auto V Keystone (VPL-EX7/ES7 only) Corrects the trapezoidal distortion caused by the projection angle. Off • HV: Flips the image horizontally and vertically. ...
Operating Instructions
Page 37
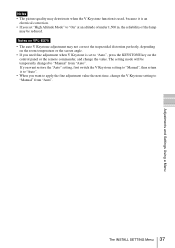
Notes on VPL-EX70 • The auto V Keystone adjustment may not correct the trapezoidal distortion perfectly, depending on the room temperature or the screen angle. • If you ... the V Keystone function is used, because it to "Auto". • When you set to "Auto", press the KEYSTONE key on the control panel or the remote commander, and change the V Keystone setting to "Manual" from "Auto". Adjustments and Settings Using a Menu Notes • The picture quality may be temporarily changed to...
Notes on VPL-EX70 • The auto V Keystone adjustment may not correct the trapezoidal distortion perfectly, depending on the room temperature or the screen angle. • If you ... the V Keystone function is used, because it to "Auto". • When you set to "Auto", press the KEYSTONE key on the control panel or the remote commander, and change the V Keystone setting to "Manual" from "Auto". Adjustments and Settings Using a Menu Notes • The picture quality may be temporarily changed to...
Operating Instructions
Page 44
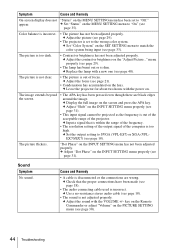
...burnt out or is out of the acceptable range of focus. The picture flickers. key on the Remote Commander or adjust "Volume" on the PICTURE SETTING menu (see page 33). c Set "Color System...page 30). 44 Troubleshooting c Display the full image on . c Set the output setting to SVGA (VPL-ES7) or XGA (VPLEX70/EX7) (see page 31). c Adjust "Dot Phase" on the INPUT SETTING menu properly (see page 18...c Input a signal that the proper connections have been made (see page 35). c Leave the projector for about two hours with the power on the screen and press the APA key. Symptom Cause and...
...burnt out or is out of the acceptable range of focus. The picture flickers. key on the Remote Commander or adjust "Volume" on the PICTURE SETTING menu (see page 33). c Set "Color System...page 30). 44 Troubleshooting c Display the full image on . c Set the output setting to SVGA (VPL-ES7) or XGA (VPLEX70/EX7) (see page 31). c Adjust "Dot Phase" on the INPUT SETTING menu properly (see page 18...c Input a signal that the proper connections have been made (see page 35). c Leave the projector for about two hours with the power on the screen and press the APA key. Symptom Cause and...
Operating Instructions
Page 45
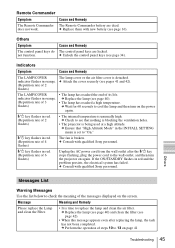
... after replacing the lamp, the task has not been completed. c Ensure that nothing is blocking the ventilation holes. • The projector is being used at a high altitude. Others Messages List Warning Messages Use the list below to replace the lamp and clean the air... rate of 2 flashes) The LAMP/COVER indicator flashes in red. (Repetition rate of its life. c Replace them with qualified Sony personnel. Remote Commander Symptom Cause and Remedy The Remote Commander The Remote Commander battery are locked. c Wait for 60 seconds to see page 16).
... after replacing the lamp, the task has not been completed. c Ensure that nothing is blocking the ventilation holes. • The projector is being used at a high altitude. Others Messages List Warning Messages Use the list below to replace the lamp and clean the air... rate of 2 flashes) The LAMP/COVER indicator flashes in red. (Repetition rate of its life. c Replace them with qualified Sony personnel. Remote Commander Symptom Cause and Remedy The Remote Commander The Remote Commander battery are locked. c Wait for 60 seconds to see page 16).
Operating Instructions
Page 46
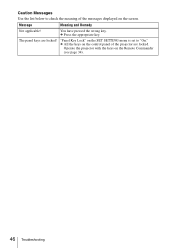
Caution Messages Use the list below to "On." The panel keys are locked. c All the keys on the control panel of the messages displayed on the screen. Operate the projector with the keys on the SET SETTING menu is set to check the meaning of the projector are locked! You have pressed the wrong key. "Panel Key Lock" on the Remote Commander (see page 34). 46 Troubleshooting Message Meaning and Remedy Not applicable! c Press the appropriate key.
Caution Messages Use the list below to "On." The panel keys are locked. c All the keys on the control panel of the messages displayed on the screen. Operate the projector with the keys on the SET SETTING menu is set to check the meaning of the projector are locked! You have pressed the wrong key. "Panel Key Lock" on the Remote Commander (see page 34). 46 Troubleshooting Message Meaning and Remedy Not applicable! c Press the appropriate key.
Operating Instructions
Page 48
For details, please consult your nearest Sony dealer. Optional accessories Projector Lamp LMP-E191 (for replacement) Some of the items may not be available in standby: 3 W) Heat dissipation 884 BTU (VPL-EX70/EX7) 816 BTU (VPL-ES7) Operating temperature 0°C to 35°C (32...or less REMOTE (VPL-EX70/EX7 only) RS-232C: D-sub 9 pin General Dimensions 314 × 109 × 269 mm (12 3/8 × 4 3/8 × 10 5/8 inches) (w/h/d) (without projecting parts) Mass VPL-EX70: Approx. 3.0 kg (6 lb 10 oz) VPL-EX7/ES7: Approx. 2.9 kg (6 lb 6 oz) Power requirements VPL-EX70/EX7: AC 100...
For details, please consult your nearest Sony dealer. Optional accessories Projector Lamp LMP-E191 (for replacement) Some of the items may not be available in standby: 3 W) Heat dissipation 884 BTU (VPL-EX70/EX7) 816 BTU (VPL-ES7) Operating temperature 0°C to 35°C (32...or less REMOTE (VPL-EX70/EX7 only) RS-232C: D-sub 9 pin General Dimensions 314 × 109 × 269 mm (12 3/8 × 4 3/8 × 10 5/8 inches) (w/h/d) (without projecting parts) Mass VPL-EX70: Approx. 3.0 kg (6 lb 10 oz) VPL-EX7/ES7: Approx. 2.9 kg (6 lb 6 oz) Power requirements VPL-EX70/EX7: AC 100...
Operating Instructions
Page 58
... Reset 34 Language 35 selecting the menu language 23 Lens 11 Location and function of controls connector panel 14 control panel 12 rear/bottom 10 Remote Commander 15 top/right side/front 10 M Menu clearing the menu display 28 INFORMATION Menu 38 INPUT SETTING menu 31 INSTALL SETTING menu 36 MENU... P Panel Key Lock 34 Picture Mode 29 Pin assignment 49 Power turn on 20 Power Saving 34 Presentation 25 Preset Memory No 32 Projecting 20 R Remote Commander 15 front remote control detector 10 location and function of controls .........15 58 Index
... Reset 34 Language 35 selecting the menu language 23 Lens 11 Location and function of controls connector panel 14 control panel 12 rear/bottom 10 Remote Commander 15 top/right side/front 10 M Menu clearing the menu display 28 INFORMATION Menu 38 INPUT SETTING menu 31 INSTALL SETTING menu 36 MENU... P Panel Key Lock 34 Picture Mode 29 Pin assignment 49 Power turn on 20 Power Saving 34 Presentation 25 Preset Memory No 32 Projecting 20 R Remote Commander 15 front remote control detector 10 location and function of controls .........15 58 Index


