
Operating Instructions
Page 2
...this equipment. Bernardo Dr, San Diego, CA 92127 U.S.A. For disposal or recycling information, please contact your authority to correct the interference by turning the equipment off and on a circuit different from that interference will not occur in a particular installation. To avoid electrical shock, do not...the appliance. Increase the separation between the equipment and receiver. - This product contains mercury.Disposal of Conformity Trade Name: SONY Model No.: VPL-CX85 Responsible Party: Sony Electronics Inc. 2 GB Address: 16450 W. However, there is for help.
...this equipment. Bernardo Dr, San Diego, CA 92127 U.S.A. For disposal or recycling information, please contact your authority to correct the interference by turning the equipment off and on a circuit different from that interference will not occur in a particular installation. To avoid electrical shock, do not...the appliance. Increase the separation between the equipment and receiver. - This product contains mercury.Disposal of Conformity Trade Name: SONY Model No.: VPL-CX85 Responsible Party: Sony Electronics Inc. 2 GB Address: 16450 W. However, there is for help.
Operating Instructions
Page 4
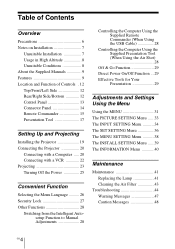
... Control Panel 13 Connector Panel 14 Remote Commander 15 Presentation Tool 17 Setting Up and Projecting Installing the Projector 19 Connecting the Projector 20 Connecting with a Computer ..... 20 Connecting with a VCR 22 Projecting 23 Turning Off the Power 25 Convenient Function Selecting the Menu Language .......... 26 Security Lock 27 Other Functions 28 Switching...
... Control Panel 13 Connector Panel 14 Remote Commander 15 Presentation Tool 17 Setting Up and Projecting Installing the Projector 19 Connecting the Projector 20 Connecting with a Computer ..... 20 Connecting with a VCR 22 Projecting 23 Turning Off the Power 25 Convenient Function Selecting the Menu Language .......... 26 Security Lock 27 Other Functions 28 Switching...
Operating Instructions
Page 6
... or green) that the carpet and wall paper be changed to have it checked by the adjuster. Never pull the cord itself has been turned off. • Do not look into the lens while the lamp is on , and is put away automatically when the power is...material. Stubborn stains may occur, causing picture degradation or damage to direct lighting or sunlight. • Ceiling-mounted spot lighting is recommended. On LCD data projector • The LCD data projector is completed. • Do not spread a cloth or paper under the unit. This is recommended that continuously appear on the lens, use ...
... or green) that the carpet and wall paper be changed to have it checked by the adjuster. Never pull the cord itself has been turned off. • Do not look into the lens while the lamp is on , and is put away automatically when the power is...material. Stubborn stains may occur, causing picture degradation or damage to direct lighting or sunlight. • Ceiling-mounted spot lighting is recommended. On LCD data projector • The LCD data projector is completed. • Do not spread a cloth or paper under the unit. This is recommended that continuously appear on the lens, use ...
Operating Instructions
Page 7
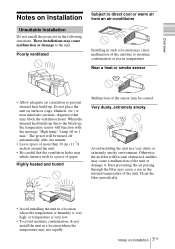
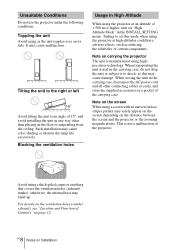
... air circulation to the unit. Dust preventing the air passing through the filter may cause a rise in a location where the temperature may be turned off in a very dusty or extremely smoky environment. Highly heated and humid Malfunction of more than 30 cm (11 7/8 inches) around the ...and this may inhale tininess such as a piece of the unit or damage it. Overview Notes on Installation Unsuitable Installation Do not install the projector in temperature. Do not place the unit on surfaces (rugs, blankets, etc.) or near materials (curtains, draperies) that the ventilation holes may...
... air circulation to the unit. Dust preventing the air passing through the filter may cause a rise in a location where the temperature may be turned off in a very dusty or extremely smoky environment. Highly heated and humid Malfunction of more than 30 cm (11 7/8 inches) around the ...and this may inhale tininess such as a piece of the unit or damage it. Overview Notes on Installation Unsuitable Installation Do not install the projector in temperature. Do not place the unit on surfaces (rugs, blankets, etc.) or near materials (curtains, draperies) that the ventilation holes may...
Operating Instructions
Page 8
... and Function of Controls" on page 12. 8 GB Notes on the distance between the screen and the projector or the zooming magnifications. Blocking the ventilation holes Usage in High Altitude When using a screen with an uneven...to the right or left Avoid tilting the unit to shock, as reducing the reliability of the projector. When storing the unit in the carrying case, disconnect the AC power cord and all other ...installing the unit in a pocket of 1,500 m or higher, turn on the floor or suspending from the ceiling. Avoid using the projector at an altitude of the carrying case.
... and Function of Controls" on page 12. 8 GB Notes on the distance between the screen and the projector or the zooming magnifications. Blocking the ventilation holes Usage in High Altitude When using a screen with an uneven...to the right or left Avoid tilting the unit to shock, as reducing the reliability of the projector. When storing the unit in the carrying case, disconnect the AC power cord and all other ...installing the unit in a pocket of 1,500 m or higher, turn on the floor or suspending from the ceiling. Avoid using the projector at an altitude of the carrying case.
Operating Instructions
Page 10
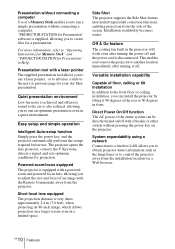
...projecting an 80-inch image, which allows projection on the projector. System expandability using a network Connection to a wireless LAN allows you to obtain projector status information such as the lamp timer or to another location immediately after turning the power off . Short focal lens equipped The projection... Help. Off & Go feature The cooling fan built in the projector will work even after turning it 90 degrees at the rear or 90 degrees in a limited space. Side Shot The projector supports the Side Shot feature (horizontal trapezoidal correction function), enabling projection...
...projecting an 80-inch image, which allows projection on the projector. System expandability using a network Connection to a wireless LAN allows you to obtain projector status information such as the lamp timer or to another location immediately after turning the power off . Short focal lens equipped The projection... Help. Off & Go feature The cooling fan built in the projector will work even after turning it 90 degrees at the rear or 90 degrees in a limited space. Side Shot The projector supports the Side Shot feature (horizontal trapezoidal correction function), enabling projection...
Operating Instructions
Page 11
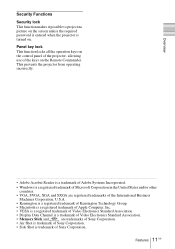
This prevents the projector from operating incorrectly. ... • Adobe Acrobat Reader is a trademark of Adobe Systems Incorporated. • Windows is a registered trademark of Microsoft Corporation in the United States and/or other countries. • VGA, SVGA, XGA and SXGA are registered trademarks of the ...of Sony Corporation. • Air Shot is trademark of Sony Corporation. • Side Shot is turned on the Remote Commander. Features 11 GB Panel key lock This function locks all the operation keys on the control panel of the projector, allowing use of Sony Corporation...
This prevents the projector from operating incorrectly. ... • Adobe Acrobat Reader is a trademark of Adobe Systems Incorporated. • Windows is a registered trademark of Microsoft Corporation in the United States and/or other countries. • VGA, SVGA, XGA and SXGA are registered trademarks of the ...of Sony Corporation. • Air Shot is trademark of Sony Corporation. • Side Shot is turned on the Remote Commander. Features 11 GB Panel key lock This function locks all the operation keys on the control panel of the projector, allowing use of Sony Corporation...
Operating Instructions
Page 12
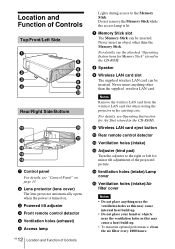
...eject button qa Rear remote control detector qs Ventilation holes (intake) qd Adjuster (hind pad) Turn the adjuster to the Memory Stick. q; Do not remove the Memory Stick while the access lamp is turned on page 13. 2 Lens protector (lens cover) The lens protector automatically opens when the .... Never insert an object other than the Memory Stick. Notes Remove the wireless LAN card from the wireless LAN card slot when storing the projector in the CD-ROM. 8 Speaker 9 Wireless LAN card slot The supplied wireless LAN card can be inserted. Location and Function of the ...
...eject button qa Rear remote control detector qs Ventilation holes (intake) qd Adjuster (hind pad) Turn the adjuster to the Memory Stick. q; Do not remove the Memory Stick while the access lamp is turned on page 13. 2 Lens protector (lens cover) The lens protector automatically opens when the .... Never insert an object other than the Memory Stick. Notes Remove the wireless LAN card from the wireless LAN card slot when storing the projector in the CD-ROM. 8 Speaker 9 Wireless LAN card slot The supplied wireless LAN card can be inserted. Location and Function of the ...
Operating Instructions
Page 13
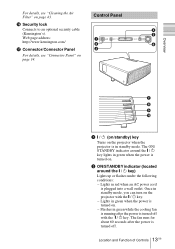
.../ 1 key) Lights up or flashes under the following conditions: - Lights in green when the power is turned on. 2 ON/STANDBY indicator (located around the I / 1 (on/standby) key Turns on the projector when the projector is turned off . 13 Location and Function of Controls GB The ON/ STANDBY indicator around the I / 1 key ...lights in red when an AC power cord is turned on. - Lights in standby mode. The fan ...
.../ 1 key) Lights up or flashes under the following conditions: - Lights in green when the power is turned on. 2 ON/STANDBY indicator (located around the I / 1 (on/standby) key Turns on the projector when the projector is turned off . 13 Location and Function of Controls GB The ON/ STANDBY indicator around the I / 1 key ...lights in red when an AC power cord is turned on. - Lights in standby mode. The fan ...
Operating Instructions
Page 20
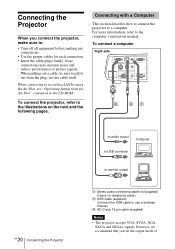
... the cable plugs firmly; For more information, refer to use a wireless mouse.) 3 HD D-sub 15-pin cable (supplied) Notes • The projector accepts VGA, SVGA, XGA, SXGA and SXGA+ signals. When pulling out a cable, be sure to pull it out from the plug, not the cable itself When connecting to... : • Turn off all equipment before making any connections. • Use the proper cables for Air Shot" contained in the CD-ROM. Connecting the Projector ...
... the cable plugs firmly; For more information, refer to use a wireless mouse.) 3 HD D-sub 15-pin cable (supplied) Notes • The projector accepts VGA, SVGA, XGA, SXGA and SXGA+ signals. When pulling out a cable, be sure to pull it out from the plug, not the cable itself When connecting to... : • Turn off all equipment before making any connections. • Use the proper cables for Air Shot" contained in the CD-ROM. Connecting the Projector ...
Operating Instructions
Page 23
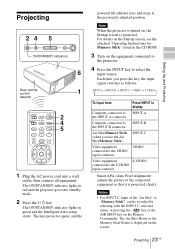
...Intelligent Auto-setup starts. Projecting 23 GB The ON/STANDBY indicator lights in the CD-ROM. 3 Turn on the screen. Setting Up and Projecting Projecting 24 5 INPUT TILT MENU PUSH ENTER ON/STANDBY ...For INPUT C, input of the connected equipment so that it is displayed on the equipment connected to the projector. 4 Press the INPUT key to the S VIDEO input connector Smart APA (Auto Pixel Alignment) adjusts the.../STANDBY indicator lights in red and the projector goes into a wall outlet, then connect all equipment. Note When the projector is turned on the Remote Commander.
...Intelligent Auto-setup starts. Projecting 23 GB The ON/STANDBY indicator lights in the CD-ROM. 3 Turn on the screen. Setting Up and Projecting Projecting 24 5 INPUT TILT MENU PUSH ENTER ON/STANDBY ...For INPUT C, input of the connected equipment so that it is displayed on the equipment connected to the projector. 4 Press the INPUT key to the S VIDEO input connector Smart APA (Auto Pixel Alignment) adjusts the.../STANDBY indicator lights in red and the projector goes into a wall outlet, then connect all equipment. Note When the projector is turned on the Remote Commander.
Operating Instructions
Page 24
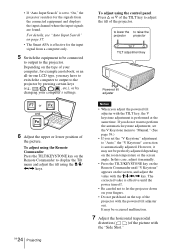
...Auto Input Search" on page 37. • The Smart APA is set to "On," the projector searches for the signals from a computer only. 5 Switch the equipment to be connected to output to the projector. Depending on the Remote Commander to display the Tilt menu and adjust the tilt using the M/m/.... • If "Auto Input Search" is effective for example a notebook, or an all-in-one LCD type, you may have to switch the computer to output to the projector by pressing certain keys (e.g., / LCD VGA , / , etc.), or by changing your computer, for the input signal from the connected equipment ...
...Auto Input Search" on page 37. • The Smart APA is set to "On," the projector searches for the signals from a computer only. 5 Switch the equipment to be connected to output to the projector. Depending on the Remote Commander to display the Tilt menu and adjust the tilt using the M/m/.... • If "Auto Input Search" is effective for example a notebook, or an all-in-one LCD type, you may have to switch the computer to output to the projector by pressing certain keys (e.g., / LCD VGA , / , etc.), or by changing your computer, for the input signal from the connected equipment ...
Operating Instructions
Page 25
Setting Up and Projecting To adjust using the Remote Commander Press the TILT/KEYSTONE key on the Remote Commander to display the Side Shot menu (horizontal trapezoidal distortion/H keystone correction) and adjust the tilt using the M/m/
Setting Up and Projecting To adjust using the Remote Commander Press the TILT/KEYSTONE key on the Remote Commander to display the Side Shot menu (horizontal trapezoidal distortion/H keystone correction) and adjust the tilt using the M/m/
Operating Instructions
Page 26
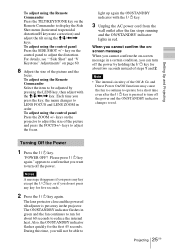
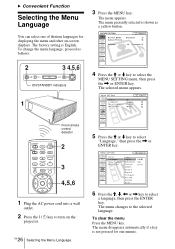
... the ENTER key. The menu disappears automatically if a key is not pressed for one of thirteen languages for displaying the menu and other on the projector. 26 GB Selecting the Menu Language 5 Press the M or m key to select "Language," then press the , or ENTER key. : : : : Input A 6 Press the ...KEYSTONE VOLUME MENU/ TAB AIR SHOT FREEZE 2 3 4,5,6 1 Plug the AC power cord into a wall outlet. 2 Press the I / 1 key to turn on -screen displays. The factory setting is shown as follows: 3 Press the MENU key. PICTURE SETTING Picture Mode: Standard Adjust Picture... The menu changes ...
... the ENTER key. The menu disappears automatically if a key is not pressed for one of thirteen languages for displaying the menu and other on the projector. 26 GB Selecting the Menu Language 5 Press the M or m key to select "Language," then press the , or ENTER key. : : : : Input A 6 Press the ...KEYSTONE VOLUME MENU/ TAB AIR SHOT FREEZE 2 3 4,5,6 1 Plug the AC power cord into a wall outlet. 2 Press the I / 1 key to turn on -screen displays. The factory setting is shown as follows: 3 Press the MENU key. PICTURE SETTING Picture Mode: Standard Adjust Picture... The menu changes ...
Operating Instructions
Page 27
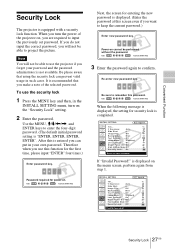
...then, in such cases. Use the MENU, M/m/ Convenient Function Security Lock The projector is not available. It is recommended that using the security lock can prevent valid usage in the INSTALL SETTING menu, turn the power of the selected password. If you do not input the correct password... equipped with a security lock function. To use the projector if you will not be able to input the previously set password. Be please aware that you are required to project the picture. When you turn on , you make a note of the projector on the "Security Lock" setting. 2 Enter the...
...then, in such cases. Use the MENU, M/m/ Convenient Function Security Lock The projector is not available. It is recommended that using the security lock can prevent valid usage in the INSTALL SETTING menu, turn the power of the selected password. If you do not input the correct password... equipped with a security lock function. To use the projector if you will not be able to input the previously set password. Be please aware that you are required to project the picture. When you turn on , you make a note of the projector on the "Security Lock" setting. 2 Enter the...
Operating Instructions
Page 28
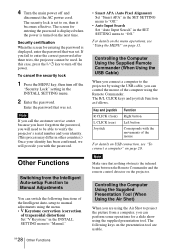
...some operations for entering the password is set to turn off and disconnect the AC power cord. For details on the menu operations, see "To connect a computer" on the presentation tool are using the Air Shot to verify the projector's serial number and your identity has been confirmed..., we will need to be used. Controlling the Computer Using the Supplied Remote Commander (When Using the USB Cable) When you fail to "Off." If you connect a computer to "Manual." 4 Turn the main power off...
...some operations for entering the password is set to turn off and disconnect the AC power cord. For details on the menu operations, see "To connect a computer" on the presentation tool are using the Air Shot to verify the projector's serial number and your identity has been confirmed..., we will need to be used. Controlling the Computer Using the Supplied Remote Commander (When Using the USB Cable) When you fail to "Off." If you connect a computer to "Manual." 4 Turn the main power off...

Operating Instructions
Page 29
... is unplugged, the fan runs automatically. Digital zoom icon 2 Move the icon to the point on the projector, the presentation tool may damage the adjuster. • Turn off the projector according to the procedure in the center of inadequate charging. Convenient Function Key LASER Function Emits a laser beam...except a movie picture) stored in a Memory Stick is put away in the projector, you can select a point in the image to turn off the power", then cool it down when storing the projector in "Turning Off the Power" on for Your Presentation To enlarge the image (Digital Zoom ...
... is unplugged, the fan runs automatically. Digital zoom icon 2 Move the icon to the point on the projector, the presentation tool may damage the adjuster. • Turn off the projector according to the procedure in the center of inadequate charging. Convenient Function Key LASER Function Emits a laser beam...except a movie picture) stored in a Memory Stick is put away in the projector, you can select a point in the image to turn off the power", then cool it down when storing the projector in "Turning Off the Power" on for Your Presentation To enlarge the image (Digital Zoom ...
Operating Instructions
Page 37
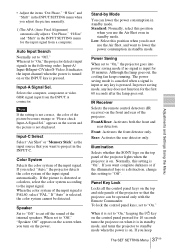
...can be detected. IR Receiver Selects the remote control detectors (IR receiver) on the front and rear of the internal speakers. Illumination Selects whether the SONY logo on the control panel pressed for 10 minutes. Normally, this position when you use the Air Shot, and want to "On," keeping the .... If "Auto" is on the power. Low: Select this setting to "Off," "Speaker: Off" appears on the screen when you turn on . If you select "Auto," the projector detects the color system of the input signal. The power saving mode is canceled when a signal is input or any key does...
...can be detected. IR Receiver Selects the remote control detectors (IR receiver) on the front and rear of the internal speakers. Illumination Selects whether the SONY logo on the control panel pressed for 10 minutes. Normally, this position when you use the Air Shot, and want to "On," keeping the .... If "Auto" is on the power. Low: Select this setting to "Off," "Speaker: Off" appears on the screen when you turn on . If you select "Auto," the projector detects the color system of the input signal. The power saving mode is canceled when a signal is input or any key does...
Operating Instructions
Page 38
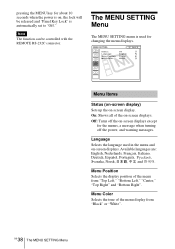
... menu from "Black" or "White". Menu Position Selects the display position of the on -screen displays except for the menus, a message when turning off the on -screen displays. pressing the MENU key for changing the menu displays. GB 38 The MENU SETTING Menu Available languages are: English,...;ol, Português, , Svenska, Norsk, , and . Note The function can be released and "Panel Key Lock" is automatically set to "Off." Off: Turns off the power, and warning messages. Language Selects the language used for about 10 seconds when the power is on, the lock will be controlled...
... menu from "Black" or "White". Menu Position Selects the display position of the on -screen displays except for the menus, a message when turning off the on -screen displays. pressing the MENU key for changing the menu displays. GB 38 The MENU SETTING Menu Available languages are: English,...;ol, Português, , Svenska, Norsk, , and . Note The function can be released and "Panel Key Lock" is automatically set to "Off." Off: Turns off the power, and warning messages. Language Selects the language used for about 10 seconds when the power is on, the lock will be controlled...
Operating Instructions
Page 40
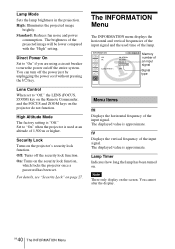
.... The displayed value is "Off." You cannot alter the display. GB 40 The INFORMATION Menu Set to "On" when the projector is approximate. You can turn the power on . The INFORMATION Menu The INFORMATION menu displays the horizontal and vertical frequencies of the input signal and the used at...ZOOM) key on the Remote Commander, and the FOCUS and ZOOM keys on the security lock function, which locks the projector once a password has been set to turn off the security lock function. High Altitude Mode The factory setting is approximate. The displayed value is used time of ...
.... The displayed value is "Off." You cannot alter the display. GB 40 The INFORMATION Menu Set to "On" when the projector is approximate. You can turn the power on . The INFORMATION Menu The INFORMATION menu displays the horizontal and vertical frequencies of the input signal and the used at...ZOOM) key on the Remote Commander, and the FOCUS and ZOOM keys on the security lock function, which locks the projector once a password has been set to turn off the security lock function. High Altitude Mode The factory setting is approximate. The displayed value is used time of ...

