

Operating Instructions
Page 6
... of reflecting material, it with a soft cloth. To remove dust on , and is put away automatically when the power is turned on the lens, use a soft dry cloth. On LCD data projector • The LCD data projector is desirable to have it checked by qualified personnel before operating it further. • Unplug the unit from...
... of reflecting material, it with a soft cloth. To remove dust on , and is put away automatically when the power is turned on the lens, use a soft dry cloth. On LCD data projector • The LCD data projector is desirable to have it checked by qualified personnel before operating it further. • Unplug the unit from...

Operating Instructions
Page 7
... on Installation GB Tilting the unit out of the range of dust; The power will be turned off in a location where the temperature may cause raising the internal heat of paper. Such installation may block the ventilation holes. Avoid using as a piece of the projector. otherwise, the air filter will be obstructed.
... on Installation GB Tilting the unit out of the range of dust; The power will be turned off in a location where the temperature may cause raising the internal heat of paper. Such installation may block the ventilation holes. Avoid using as a piece of the projector. otherwise, the air filter will be obstructed.

Operating Instructions
Page 8
...on a NTSC4.43 system VCR. 8 GB Features The projector opens the lens protector, corrects the V Keystone, and sets optimum conditions for the VPL-CX6/EX1 only. 2) NTSC4.43 is manufactured using something to.... Such installation may build up. When using the projector at high altitudes could have adverse effects, such as VGA, SVGA, XGA, SXGA1) and SXGA+1) signals, which all other than.... Features High operability • Intelligent Auto-setup function Simply press the power key, and the projector automatically performs the setups required before use. Tilting the unit to the ...
...on a NTSC4.43 system VCR. 8 GB Features The projector opens the lens protector, corrects the V Keystone, and sets optimum conditions for the VPL-CX6/EX1 only. 2) NTSC4.43 is manufactured using something to.... Such installation may build up. When using the projector at high altitudes could have adverse effects, such as VGA, SVGA, XGA, SXGA1) and SXGA+1) signals, which all other than.... Features High operability • Intelligent Auto-setup function Simply press the power key, and the projector automatically performs the setups required before use. Tilting the unit to the ...

Operating Instructions
Page 10
... adjustment key For details, see "To turn on . - Lights in standby mode. Flashes in green when the power is turned off with the I / 1 (on/standby) key Turns on the projector when the projector is turned on page 29. 2 ON/STANDBY indicator (located around the I / 1 key. - The fan ...t VIDEO t S VIDEO (VPL-CX6 only) 5 Lens protector (lens cover) The lens protector automatically opens when the power is turned on the screen, or press and hold the key for the first 60 seconds. Lights in green while the cooling fan runs after the power is turned on the projector with the I / 1 key...
... adjustment key For details, see "To turn on . - Lights in standby mode. Flashes in green when the power is turned off with the I / 1 (on/standby) key Turns on the projector when the projector is turned on page 29. 2 ON/STANDBY indicator (located around the I / 1 key. - The fan ...t VIDEO t S VIDEO (VPL-CX6 only) 5 Lens protector (lens cover) The lens protector automatically opens when the power is turned on the screen, or press and hold the key for the first 60 seconds. Lights in green while the cooling fan runs after the power is turned on the projector with the I / 1 key...

Operating Instructions
Page 11
...stops at its previously adjusted position. Powered tilt adjuster 2 Press f or F of the TILT key to use the powered tilt adjuster To adjust the height Adjust the height of the projector as it may press the KEYSTONE key (VPL-CS6/CX6) or the D KEYSTONE key (VPL-EX1) on page 42. qk ...Control Panel" and "Connector Panel" on page 12. 9 Rear remote control detector 0 Ventilation holes (intake) qa Ventilation holes (intake)/Lamp cover qs Powered tilt adjuster qd Adjuster (hind pad) Turn the adjuster to an optional security cable (Kensington's). You may cause the air coming out heat buildup. ...
...stops at its previously adjusted position. Powered tilt adjuster 2 Press f or F of the TILT key to use the powered tilt adjuster To adjust the height Adjust the height of the projector as it may press the KEYSTONE key (VPL-CS6/CX6) or the D KEYSTONE key (VPL-EX1) on page 42. qk ...Control Panel" and "Connector Panel" on page 12. 9 Rear remote control detector 0 Ventilation holes (intake) qa Ventilation holes (intake)/Lamp cover qs Powered tilt adjuster qd Adjuster (hind pad) Turn the adjuster to an optional security cable (Kensington's). You may cause the air coming out heat buildup. ...

Operating Instructions
Page 12
...on a computer using the supplied cable. Press again to clear the menu. 3 Arrow keys (f/F/g/G) Select the menu or to "ON," the projector goes into power saving mode if no signal is broken. For details, see "To connect a 15k RGB/ Component equipment" on -screen menu. Control Panel ACCESS...ENTER LAMP/COVER PRO AUDIO ACCESS INPUT A 1 POWER SAVING MENU 2 PUSH ENTER VIDEO S VIDEO TEMP/FAN 3 LAMP/COVER 4 56 1 POWER SAVING indicator Lights up when the projector is pressed. Although the lamp goes out, the cooling fan keeps running. The power saving mode is canceled when a signal is ...
...on a computer using the supplied cable. Press again to clear the menu. 3 Arrow keys (f/F/g/G) Select the menu or to "ON," the projector goes into power saving mode if no signal is broken. For details, see "To connect a 15k RGB/ Component equipment" on -screen menu. Control Panel ACCESS...ENTER LAMP/COVER PRO AUDIO ACCESS INPUT A 1 POWER SAVING MENU 2 PUSH ENTER VIDEO S VIDEO TEMP/FAN 3 LAMP/COVER 4 56 1 POWER SAVING indicator Lights up when the projector is pressed. Although the lamp goes out, the cooling fan keeps running. The power saving mode is canceled when a signal is ...

Operating Instructions
Page 13
...minijack) connector When listening to sound output from the computer, connect to the Memory Stick. When listening to sound output from a computer. For VPL-CS6/VPL-CX6 qg qf qd FREEZE MS SLIDE I / 1 (on/standby) key 2 APA (Auto Pixel Alignment) key Adjusts a picture clearest automatically while...power cord. When you connect the projector to the computer, you can control the mouse function with the supplied Remote Commander. (When you use the VPL-EX1, an optional Remote Commander is required to control the mouse function with a Remote Commander.) The supplied application software (VPL-CX6...
...minijack) connector When listening to sound output from the computer, connect to the Memory Stick. When listening to sound output from a computer. For VPL-CS6/VPL-CX6 qg qf qd FREEZE MS SLIDE I / 1 (on/standby) key 2 APA (Auto Pixel Alignment) key Adjusts a picture clearest automatically while...power cord. When you connect the projector to the computer, you can control the mouse function with the supplied Remote Commander. (When you use the VPL-EX1, an optional Remote Commander is required to control the mouse function with a Remote Commander.) The supplied application software (VPL-CX6...

Operating Instructions
Page 19
... (general use) (VPL-CX6 only) 2 USB human interface device (wireless mouse function) 3 USB human interface device (projector control function) (VPL-CX6 only) Recommended operating environment When you use a wireless mouse or the Projector Station.) a) Use ...POWER SAVING MENU VIDEO S VIDEO TEMP/FAN PUSH ENTER LAMP/COVER to monitor output HD D-sub 15-pin cable (supplied) Computer Stereo audio connecting cable (not supplied)a) to audio output USB cable (supplied only VPL-CS6/CX6) (Connect the USB cable to use the projector in suspend, standby mode, disconnect the projector from the VPL...
... (general use) (VPL-CX6 only) 2 USB human interface device (wireless mouse function) 3 USB human interface device (projector control function) (VPL-CX6 only) Recommended operating environment When you use a wireless mouse or the Projector Station.) a) Use ...POWER SAVING MENU VIDEO S VIDEO TEMP/FAN PUSH ENTER LAMP/COVER to monitor output HD D-sub 15-pin cable (supplied) Computer Stereo audio connecting cable (not supplied)a) to audio output USB cable (supplied only VPL-CS6/CX6) (Connect the USB cable to use the projector in suspend, standby mode, disconnect the projector from the VPL...
Operating Instructions
Page 20
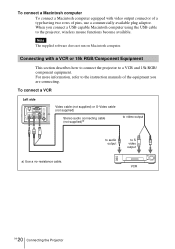
... of the equipment you connect a USB capable Macintosh computer using the USB cable to the projector, wireless mouse functions become available. To connect a VCR Left side PRO AUDIO ACCESS INPUT A POWER SAVING MENU VIDEO S VIDEO TEMP/FAN PUSH ENTER LAMP/COVER Video cable (not supplied)... or S-Video cable (not supplied) Stereo audio connecting cable (not supplied)a) to S video output VCR 20 GB Connecting the Projector To connect a Macintosh computer To ...
... of the equipment you connect a USB capable Macintosh computer using the USB cable to the projector, wireless mouse functions become available. To connect a VCR Left side PRO AUDIO ACCESS INPUT A POWER SAVING MENU VIDEO S VIDEO TEMP/FAN PUSH ENTER LAMP/COVER Video cable (not supplied)... or S-Video cable (not supplied) Stereo audio connecting cable (not supplied)a) to S video output VCR 20 GB Connecting the Projector To connect a Macintosh computer To ...

Operating Instructions
Page 21
... video GBR or component with the "Input-A Signal Sel." Setting Up and Projecting To connect a 15k RGB/Component equipment Left side PRO AUDIO ACCESS INPUT A POWER SAVING MENU VIDEO S VIDEO TEMP/FAN PUSH ENTER LAMP/COVER SMF-402 Signal Cable (not supplied) HD D-sub 15-pin (male) ↔ 3 × phono jack... when you connect the unit to the input signal. • When you input the external sync signal from 15k RGB/component equipment. 21 Connecting the Projector GB
... video GBR or component with the "Input-A Signal Sel." Setting Up and Projecting To connect a 15k RGB/Component equipment Left side PRO AUDIO ACCESS INPUT A POWER SAVING MENU VIDEO S VIDEO TEMP/FAN PUSH ENTER LAMP/COVER SMF-402 Signal Cable (not supplied) HD D-sub 15-pin (male) ↔ 3 × phono jack... when you connect the unit to the input signal. • When you input the external sync signal from 15k RGB/component equipment. 21 Connecting the Projector GB

Operating Instructions
Page 22
... PRO AUDIO ACCESS INPUT A POWER SAVING MENU VIDEO S VIDEO TEMP/FAN PUSH ENTER LAMP/COVER FREEZE MS SLIDE I / 1 KEYSTONE INPUT APA MENU PIC ENTER MUTING For VPL-CS6/CX6 For VPL-EX1 1 Open the connector panel, then plug the AC power cord into a wall outlet. 2 Press the I / 1 key to turn on the projector. 3 Press the MENU...
... PRO AUDIO ACCESS INPUT A POWER SAVING MENU VIDEO S VIDEO TEMP/FAN PUSH ENTER LAMP/COVER FREEZE MS SLIDE I / 1 KEYSTONE INPUT APA MENU PIC ENTER MUTING For VPL-CS6/CX6 For VPL-EX1 1 Open the connector panel, then plug the AC power cord into a wall outlet. 2 Press the I / 1 key to turn on the projector. 3 Press the MENU...

Operating Instructions
Page 24
... the AC power cord into a wall outlet, then connect all -inone LCD type, you may have to switch the computer to output to the projector by pressing certain keys (e.g., / LCD VGA , / , etc.), or by changing your computer, for Memory Stick". 3 Turn on the equipment connected to the projector. Note When the projector is projected (VPL-CX6 only). The...
... the AC power cord into a wall outlet, then connect all -inone LCD type, you may have to switch the computer to output to the projector by pressing certain keys (e.g., / LCD VGA , / , etc.), or by changing your computer, for Memory Stick". 3 Turn on the equipment connected to the projector. Note When the projector is projected (VPL-CX6 only). The...

Operating Instructions
Page 25
...4 Press the INPUT key to display the Tilt menu and adjust the tilt using the Remote Commander, press the KEYSTONE key (VPL-CS6/CX6) or the D KEYSTONE key (VPL-EX1) on page 37. • The Smart APA is projected clearly. To input from Press INPUT to display Computer connected ...to the INPUT A connector INPUT A Memory Stick inserted to the Memory Stick slot MS (VPL-CX6 only) Video equipment connected to the VIDEO input connector Video equipment connected to "On," the projector searches for the input signal from the connected equipment and displays the input channel where the input...
...4 Press the INPUT key to display the Tilt menu and adjust the tilt using the Remote Commander, press the KEYSTONE key (VPL-CS6/CX6) or the D KEYSTONE key (VPL-EX1) on page 37. • The Smart APA is projected clearly. To input from Press INPUT to display Computer connected ...to the INPUT A connector INPUT A Memory Stick inserted to the Memory Stick slot MS (VPL-CX6 only) Video equipment connected to the VIDEO input connector Video equipment connected to "On," the projector searches for the input signal from the connected equipment and displays the input channel where the input...
Operating Instructions
Page 26
Note The auto V keystone adjustment may not correct the trapezoidal distortion perfectly, depending on the screen, and adjust the value with the M/m/ Press the KEYSTONE key (VPL-CS6/CX6) or the D KEYSTONE key (VPL-EX1) on the Remote Commander until "V Keystone" appears on the room temperature or the screen angle. In this case, adjust it manually.
Note The auto V keystone adjustment may not correct the trapezoidal distortion perfectly, depending on the screen, and adjust the value with the M/m/ Press the KEYSTONE key (VPL-CS6/CX6) or the D KEYSTONE key (VPL-EX1) on the Remote Commander until "V Keystone" appears on the room temperature or the screen angle. In this case, adjust it manually.
Operating Instructions
Page 27
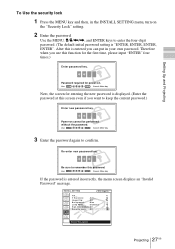
Use the MENU, M/m/ Setting Up and Projecting To Use the security lock 1 Press the MENU key and then, in the INSTALL SETTING menu, turn on the "Security Lock" setting. 2 Enter the password.
Use the MENU, M/m/ Setting Up and Projecting To Use the security lock 1 Press the MENU key and then, in the INSTALL SETTING menu, turn on the "Security Lock" setting. 2 Enter the password.
Operating Instructions
Page 28
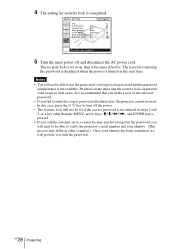
...is turned on , then it becomes effective. It is not entered in such cases. 4 The setting for entering the password is displayed when the power is set if the correct password is recommended that using the security lock can prevent valid usage in steps 2 and 3, or a key other ...than the MENU, arrow keys (M/m/ Notes • You will not be set to enter the correct password after three tries, the projector cannot be able to use the projector if you fail to on the next time. INSTALL SETTING X Tilt... Image Flip: Off Background: Blue Lamp Mode: Standard High ...
...is turned on , then it becomes effective. It is not entered in such cases. 4 The setting for entering the password is displayed when the power is set if the correct password is recommended that using the security lock can prevent valid usage in steps 2 and 3, or a key other ...than the MENU, arrow keys (M/m/ Notes • You will not be set to enter the correct password after three tries, the projector cannot be able to use the projector if you fail to on the next time. INSTALL SETTING X Tilt... Image Flip: Off Background: Blue Lamp Mode: Standard High ...
Operating Instructions
Page 29
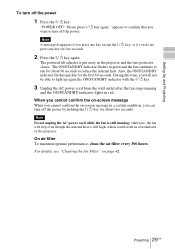
... will stop even though the internal heat is still high, which could result in a breakdown of the projector. Also, the ON/STANDBY indicator flashes quickly for about 90 seconds to turn off the power. On air filter To maintain optimal performance, clean the air filter every 300 hours. Setting Up and...the on-screen message When you cannot confirm the on page 42. The powered tilt adjuster is still running and the ON/STANDBY indicator lights in the projector and the lens protector closes. Note Do not unplug the AC power cord while the fan is put away in red. Projecting 29 GB ...
... will stop even though the internal heat is still high, which could result in a breakdown of the projector. Also, the ON/STANDBY indicator flashes quickly for about 90 seconds to turn off the power. On air filter To maintain optimal performance, clean the air filter every 300 hours. Setting Up and...the on-screen message When you cannot confirm the on page 42. The powered tilt adjuster is still running and the ON/STANDBY indicator lights in the projector and the lens protector closes. Note Do not unplug the AC power cord while the fan is put away in red. Projecting 29 GB ...

Operating Instructions
Page 32
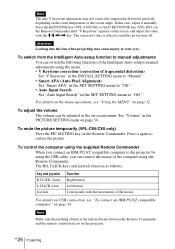
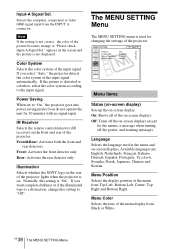
SET SETTING Input A Smar t APA: On Auto Input Search: Off Input-A Signal Sel.: Computer Color System: Auto Power Saving: Off IR Receiver: Front & Rear Illumination: On To change the tone of the menu display and the menu language displayed in the on-screen ... menu. 2 Use the M or m key to select the item, then press the , or ENTER key. B Adjustments and Settings Using the Menu Using the MENU The projector is equipped with setting items appear. The menu appears. You can change the menu language, see "Selecting the Menu Language" on -screen menu for making...
SET SETTING Input A Smar t APA: On Auto Input Search: Off Input-A Signal Sel.: Computer Color System: Auto Power Saving: Off IR Receiver: Front & Rear Illumination: On To change the tone of the menu display and the menu language displayed in the on-screen ... menu. 2 Use the M or m key to select the item, then press the , or ENTER key. B Adjustments and Settings Using the Menu Using the MENU The projector is equipped with setting items appear. The menu appears. You can change the menu language, see "Selecting the Menu Language" on -screen menu for making...

Operating Instructions
Page 37
... Settings Using the Menu You can adjust the picture by adjusting "Shift." The SET SETTING Menu The SET SETTING menu is used for the VPL-CX6/EX1 only. When set to "Off." On: Normally select this setting. Off: The APA functions when you press the APA key on ...VPL-CX6 only)/Video/S-Video. Signal Memory No. Macintosh 21" 27 1456 Sony News 36 1708 PC-9821 36 1280 × 1024 1600 WS Sunmicro 37 1664 Note When the aspect ratio of input signal is other than 4:3, a part of the projector. When a signal is pressed. It indicates the input channel when the power...
... Settings Using the Menu You can adjust the picture by adjusting "Shift." The SET SETTING Menu The SET SETTING menu is used for the VPL-CX6/EX1 only. When set to "Off." On: Normally select this setting. Off: The APA functions when you press the APA key on ...VPL-CX6 only)/Video/S-Video. Signal Memory No. Macintosh 21" 27 1456 Sony News 36 1708 PC-9821 36 1280 × 1024 1600 WS Sunmicro 37 1664 Note When the aspect ratio of input signal is other than 4:3, a part of the projector. When a signal is pressed. It indicates the input channel when the power...
Operating Instructions
Page 38
... set to "On," the projector goes into power saving mode if you do not operate the unit for the menus,... White Input A A Menu Items Status (on-screen display) Sets up the on the rear of the projector lights when the projector is not correct, the color of the menu display from Black or White. appears on -screen displays except...IR receiver) on -screen displays. Illumination Selects whether the SONY logo on -screen display. If you select "Auto," the projector detects the color system of the projector. Off: Turns off the power, and warning messages. Menu Color Selects the tone of...
... set to "On," the projector goes into power saving mode if you do not operate the unit for the menus,... White Input A A Menu Items Status (on-screen display) Sets up the on the rear of the projector lights when the projector is not correct, the color of the menu display from Black or White. appears on -screen displays except...IR receiver) on -screen displays. Illumination Selects whether the SONY logo on -screen display. If you select "Auto," the projector detects the color system of the projector. Off: Turns off the power, and warning messages. Menu Color Selects the tone of...


