Operating Instructions
Page 2
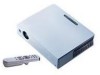
.... Myers, Florida 33913 Telephone No.: 800-686-7669 The number below is encouraged to try to correct the interference by turning the equipment off and on a circuit different from that to provide reasonable protection against harmful interference in the literature accompanying the... instructions in a residential installation. This equipment has been tested and found to Part 15 of Conformity Trade Name: SONY Model No.: VPL-CS5/VPL-CX5 Responsible Party: Sony Electronics Inc. This equipment generates, uses, and can be of sufficient magnitude to persons. Reorient or relocate the receiving...
.... Myers, Florida 33913 Telephone No.: 800-686-7669 The number below is encouraged to try to correct the interference by turning the equipment off and on a circuit different from that to provide reasonable protection against harmful interference in the literature accompanying the... instructions in a residential installation. This equipment has been tested and found to Part 15 of Conformity Trade Name: SONY Model No.: VPL-CS5/VPL-CX5 Responsible Party: Sony Electronics Inc. This equipment generates, uses, and can be of sufficient magnitude to persons. Reorient or relocate the receiving...
Operating Instructions
Page 6
... paper be removed with a cloth lightly dampened with a mild detergent solution. On LCD data projector • The LCD data projector is hot. • Be careful not to the projector. Never use strong solvents, such as it with a soft cloth. On illumination ...• To obtain the best picture, the front of the manufacturing process and does not indicate a malfunction. Never pull the cord itself has been turned...
... paper be removed with a cloth lightly dampened with a mild detergent solution. On LCD data projector • The LCD data projector is hot. • Be careful not to the projector. Never use strong solvents, such as it with a soft cloth. On illumination ...• To obtain the best picture, the front of the manufacturing process and does not indicate a malfunction. Never pull the cord itself has been turned...
Operating Instructions
Page 7
...cover over on surfaces (rugs, blankets, etc.) or near materials (curtains, draperies) that may cause raising the Avoid using something to the projector. Lamp off automatically after one minute. • Leave space of dust; Highly heated and humid Unsuitable Conditions Do not use the...of the adjuster setting. Overview internal heat of Controls" on page 10. 7 Notes on Installation periodically. Clean it up , the temperature sensor will be turned off in a location where the temperature or humidity is very high, or temperature is a lot of more than 30 cm (11 7/8 inches) around ...
...cover over on surfaces (rugs, blankets, etc.) or near materials (curtains, draperies) that may cause raising the Avoid using something to the projector. Lamp off automatically after one minute. • Leave space of dust; Highly heated and humid Unsuitable Conditions Do not use the...of the adjuster setting. Overview internal heat of Controls" on page 10. 7 Notes on Installation periodically. Clean it up , the temperature sensor will be turned off in a location where the temperature or humidity is very high, or temperature is a lot of more than 30 cm (11 7/8 inches) around ...
Operating Instructions
Page 10
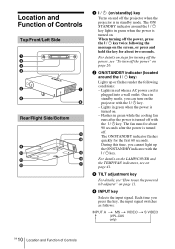
...: INPUT A t MS t VIDEO t S VIDEO (VPL-CX5 only) 10 GB Location and Function of Controls Top/Front/Left Side 1 TILT 2 3 4 5 7 6 8 Rear/Right Side/Bottom qd qf 9 0 qg qa qh qs qj t 1 I / 1 (on/standby) key Turns on the screen, or press and hold the key for turning off the projector when the projector is in red when a AC...
...: INPUT A t MS t VIDEO t S VIDEO (VPL-CX5 only) 10 GB Location and Function of Controls Top/Front/Left Side 1 TILT 2 3 4 5 7 6 8 Rear/Right Side/Bottom qd qf 9 0 qg qa qh qs qj t 1 I / 1 (on/standby) key Turns on the screen, or press and hold the key for turning off the projector when the projector is in red when a AC...
Operating Instructions
Page 11
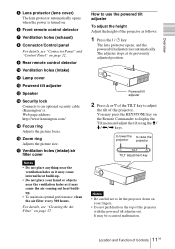
...To maintain optimal performance, clean the air filter every 300 hours. Overview 5 Lens protector (lens cover) The lens protector automatically opens when the power is turned on. 6 Front remote control detector 7 Ventilation holes (exhaust) 8 Connector/Control panel For details, see "Cleaning the Air Filter" on page 37....Connector Panel" and "Control Panel" on the Remote Commander to use the powered tilt adjuster To adjust the height Adjust the height of the projector. How to display the Tilt menu and adjust the tilt using the M/ m/ Web page address: http://www.kensington.com/ qg Focus ...
...To maintain optimal performance, clean the air filter every 300 hours. Overview 5 Lens protector (lens cover) The lens protector automatically opens when the power is turned on. 6 Front remote control detector 7 Ventilation holes (exhaust) 8 Connector/Control panel For details, see "Cleaning the Air Filter" on page 37....Connector Panel" and "Control Panel" on the Remote Commander to use the powered tilt adjuster To adjust the height Adjust the height of the projector. How to display the Tilt menu and adjust the tilt using the M/ m/ Web page address: http://www.kensington.com/ qg Focus ...
Operating Instructions
Page 17
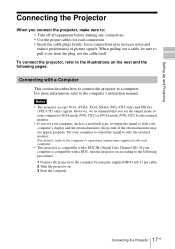
... Projecting Connecting the Projector When you connect the projector, make sure to: • Turn off all equipment before making any connections. • Use the proper cables for the external monitor. • If you set the output mode of picture signals. Notes • The projector accepts VGA, SVGA, XGA, SXGA (VPL-CX5 only) and SXGA+ (VPL-CX5 only) signals. Set...
... Projecting Connecting the Projector When you connect the projector, make sure to: • Turn off all equipment before making any connections. • Use the proper cables for the external monitor. • If you set the output mode of picture signals. Notes • The projector accepts VGA, SVGA, XGA, SXGA (VPL-CX5 only) and SXGA+ (VPL-CX5 only) signals. Set...
Operating Instructions
Page 21
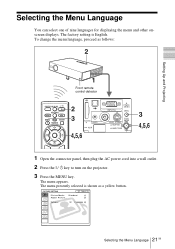
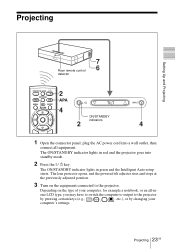
... S VIDEO TEMP/FAN PUSH ENTER LAMP/COVER 1 Open the connector panel, then plug the AC power cord into a wall outlet. 2 Press the I / 1 key to turn on the projector. 3 Press the MENU key. The menu presently selected is English. Input A Vo l u m e : 30 21 Selecting the Menu Language GB To change the menu language...
... S VIDEO TEMP/FAN PUSH ENTER LAMP/COVER 1 Open the connector panel, then plug the AC power cord into a wall outlet. 2 Press the I / 1 key to turn on the projector. 3 Press the MENU key. The menu presently selected is English. Input A Vo l u m e : 30 21 Selecting the Menu Language GB To change the menu language...
Operating Instructions
Page 23
... 1 Open the connector panel, plug the AC power cord into a wall outlet, then connect all -inone LCD type, you may have to switch the computer to output to the projector. Projecting 23 GB The lens protector opens, and the powered tilt adjuster rises and stops at the previously adjusted... position. 3 Turn on the type of your computer's settings. Projecting Setting Up and Projecting 7 Rear remote ...
... 1 Open the connector panel, plug the AC power cord into a wall outlet, then connect all -inone LCD type, you may have to switch the computer to output to the projector. Projecting 23 GB The lens protector opens, and the powered tilt adjuster rises and stops at the previously adjusted... position. 3 Turn on the type of your computer's settings. Projecting Setting Up and Projecting 7 Rear remote ...
Operating Instructions
Page 24
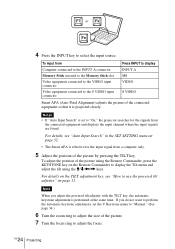
... (Auto Pixel Alignment) adjusts the picture of the picture by pressing the TILT key. F7 or Fx Fn 4 Press the INPUT key to "On," the projector searches for the input signal from a computer only. 5 Adjust the position of the connected equipment so that it is set to select the input source...
... (Auto Pixel Alignment) adjusts the picture of the picture by pressing the TILT key. F7 or Fx Fn 4 Press the INPUT key to "On," the projector searches for the input signal from a computer only. 5 Adjust the position of the connected equipment so that it is set to select the input source...
Operating Instructions
Page 25
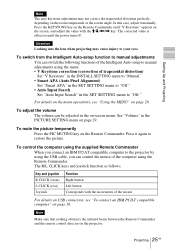
Press the KEYSTONE key on the Remote Commander until "V Keystone" appears on the room temperature or the screen angle. Setting Up and Projecting Note The auto keystone adjustment may not correct the trapezoidal distortion perfectly, depending on the screen, and adjust the value with the M/m/ In this case, adjust it manually.
Press the KEYSTONE key on the Remote Commander until "V Keystone" appears on the room temperature or the screen angle. Setting Up and Projecting Note The auto keystone adjustment may not correct the trapezoidal distortion perfectly, depending on the screen, and adjust the value with the M/m/ In this case, adjust it manually.
Operating Instructions
Page 26
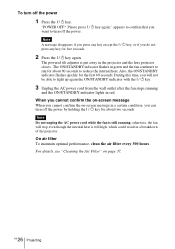
... the power. The powered tilt adjuster is still running and the ON/STANDBY indicator lights in the projector and the lens protector closes. During this time, you can turn off the power by holding the I / 1 key. 3 Unplug the AC power cord from the wall outlet after the fan stops running ;... cannot confirm the on-screen message When you want to run for the first 60 seconds. The ON/STANDBY indicator flashes in a breakdown of the projector. Please press I / 1 key again." appears to confirm that you cannot confirm the on page 37. Also, the ON/STANDBY indicator flashes quickly for...
... the power. The powered tilt adjuster is still running and the ON/STANDBY indicator lights in the projector and the lens protector closes. During this time, you can turn off the power by holding the I / 1 key. 3 Unplug the AC power cord from the wall outlet after the fan stops running ;... cannot confirm the on-screen message When you want to run for the first 60 seconds. The ON/STANDBY indicator flashes in a breakdown of the projector. Please press I / 1 key again." appears to confirm that you cannot confirm the on page 37. Also, the ON/STANDBY indicator flashes quickly for...
Operating Instructions
Page 33
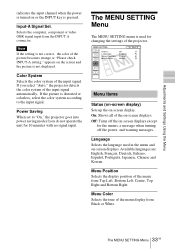
...Top Left, Bottom Left, Center, Top Right and Bottom Right. Off: Turns off the on-screen displays except for changing the settings of the projector. Language Selects the language used for the menus, a message when turning off the power, and warning messages. Adjustments and Settings Using the Menu... indicates the input channel when the power is turned on or the INPUT key is distorted or colorless, select the color system according to "On," the projector goes into power saving mode if you select "Auto," the projector detects the color system of the input signal automatically....
...Top Left, Bottom Left, Center, Top Right and Bottom Right. Off: Turns off the on-screen displays except for changing the settings of the projector. Language Selects the language used for the menus, a message when turning off the power, and warning messages. Adjustments and Settings Using the Menu... indicates the input channel when the power is turned on or the INPUT key is distorted or colorless, select the color system according to "On," the projector goes into power saving mode if you select "Auto," the projector detects the color system of the input signal automatically....
Operating Instructions
Page 35
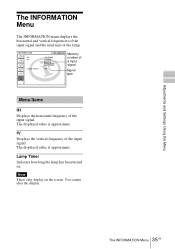
... number of a input signal Signal type Menu Items fH Displays the horizontal frequency of the lamp. Lamp Timer Indicates how long the lamp has been turned on the screen. The displayed value is approximate. You cannot alter the display. The displayed value is approximate. The INFORMATION Menu 35 GB Adjustments and...
... number of a input signal Signal type Menu Items fH Displays the horizontal frequency of the lamp. Lamp Timer Indicates how long the lamp has been turned on the screen. The displayed value is approximate. You cannot alter the display. The displayed value is approximate. The INFORMATION Menu 35 GB Adjustments and...
Operating Instructions
Page 36
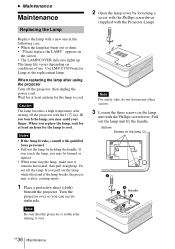
...screen • The LAMP/COVER indicator lights up . Do not tilt the lamp. Note Be sure that the projector is stable after using the projector Turn off the projector with the Projector Lamp). If you touch the lamp, you replace the lamp, wait for at least an hour for the ...may scald your finger. When replacing the lamp after turning it remains horizontal, then pull straight up The lamp life varies depending on the lamp (3) Handle GB 36 Maintenance B Maintenance Maintenance Replacing the Lamp Replace the lamp with qualified Sony personnel. • Pull out the lamp by holding...
...screen • The LAMP/COVER indicator lights up . Do not tilt the lamp. Note Be sure that the projector is stable after using the projector Turn off the projector with the Projector Lamp). If you touch the lamp, you replace the lamp, wait for at least an hour for the ...may scald your finger. When replacing the lamp after turning it remains horizontal, then pull straight up The lamp life varies depending on the lamp (3) Handle GB 36 Maintenance B Maintenance Maintenance Replacing the Lamp Replace the lamp with qualified Sony personnel. • Pull out the lamp by holding...
Operating Instructions
Page 37
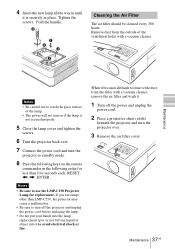
...new lamp all the way in until it is not secured properly. 5 Close the lamp cover and tighten the screws. 6 Turn the projector back over. 7 Connect the power cord and turn the projector to standby mode. 8 Press the following keys on if the lamp is securely in the following order for less than five... seconds each: RESET, Remove dust from the outside of the lamp. • The power will not turn on the remote commander in place...
...new lamp all the way in until it is not secured properly. 5 Close the lamp cover and tighten the screws. 6 Turn the projector back over. 7 Connect the power cord and turn the projector to standby mode. 8 Press the following keys on if the lamp is securely in the following order for less than five... seconds each: RESET, Remove dust from the outside of the lamp. • The power will not turn on the remote commander in place...

Operating Instructions
Page 38
... air filter. 5 Wash the air filter with the supplied new one. • Be sure to a possible malfunction or fire. • If the dust cannot be turned on the air filter cover.
... air filter. 5 Wash the air filter with the supplied new one. • Be sure to a possible malfunction or fire. • If the dust cannot be turned on the air filter cover.
Operating Instructions
Page 39
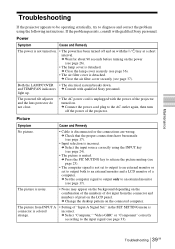
...from INPUT A connector is disconnected or the connections are wrong. and TEMP/FAN indicators c Consult with qualified Sony personnel. c Connect the power cord plug to the AC outlet again, then turn off and on with the I / 1 key at a short interval. light up. Picture Symptom Cause and...power (see page 26). • The lamp cover is not turned on the connected computer. c Close the air filter cover securely (see page 17). c Press the PIC MUTING key to an external monitor and a LCD monitor of the projector. c Select "Computer," "Video GBR" or "Component" correctly according...
...from INPUT A connector is disconnected or the connections are wrong. and TEMP/FAN indicators c Consult with qualified Sony personnel. c Connect the power cord plug to the AC outlet again, then turn off and on with the I / 1 key at a short interval. light up. Picture Symptom Cause and...power (see page 26). • The lamp cover is not turned on the connected computer. c Close the air filter cover securely (see page 17). c Press the PIC MUTING key to an external monitor and a LCD monitor of the projector. c Select "Computer," "Video GBR" or "Component" correctly according...
Operating Instructions
Page 41
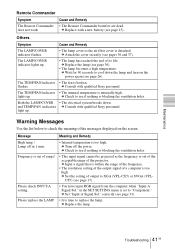
... system breaks down the lamp and turn on the screen. Message Meaning and Remedy High temp.! c Check to XGA (VPL-CX5) or SVGA (VPLCS5) (see page 15). c Set "Input-A Signal Sel." c Replace the lamp. does not work. c Replace with qualified Sony personnel. Others Symptom Cause and Remedy... The LAMP/COVER indicator flashes. • The lamp cover or the air filter cover is broken. c Replace the lamp (see pages 36 and 37). light up . c Set the setting of the projector. correctly (see page...
... system breaks down the lamp and turn on the screen. Message Meaning and Remedy High temp.! c Check to XGA (VPL-CX5) or SVGA (VPLCS5) (see page 15). c Set "Input-A Signal Sel." c Replace the lamp. does not work. c Replace with qualified Sony personnel. Others Symptom Cause and Remedy... The LAMP/COVER indicator flashes. • The lamp cover or the air filter cover is broken. c Replace the lamp (see pages 36 and 37). light up . c Set the setting of the projector. correctly (see page...
Operating Instructions
Page 48
... using the menu 28 Menu Color 33 Menu Position 33 Message caution 42 warning 41 O Optional accessories ...... 44 P Picture Mode 29 Pin assignment 44 Power turn on 23 Power Saving 12, 33 Powered tilt adjuster ...... 11 Precautions 6 R Remote Commander ...... 13 location and function of controls 13 Remote control detector front 11...
... using the menu 28 Menu Color 33 Menu Position 33 Message caution 42 warning 41 O Optional accessories ...... 44 P Picture Mode 29 Pin assignment 44 Power turn on 23 Power Saving 12, 33 Powered tilt adjuster ...... 11 Precautions 6 R Remote Commander ...... 13 location and function of controls 13 Remote control detector front 11...

