Operating Instructions
Page 5
...Rear/Right Side/Bottom 10 Control Panel 12 Connector Panel 12 Remote Commander 13 Setting Up and Projecting Installing the Projector 16 Connecting the Projector 17 Connecting with a Computer ......17 Connecting with a VCR or 15k RGB/Component Equipment 19 Selecting the Menu ...Language ..........21 Projecting 23 Effective Tools for Your Presentation 27 The INSTALL SETTING Menu ..... 34 The INFORMATION Menu 35 Maintenance Maintenance 36 Replacing the Lamp...
...Rear/Right Side/Bottom 10 Control Panel 12 Connector Panel 12 Remote Commander 13 Setting Up and Projecting Installing the Projector 16 Connecting the Projector 17 Connecting with a Computer ......17 Connecting with a VCR or 15k RGB/Component Equipment 19 Selecting the Menu ...Language ..........21 Projecting 23 Effective Tools for Your Presentation 27 The INSTALL SETTING Menu ..... 34 The INFORMATION Menu 35 Maintenance Maintenance 36 Replacing the Lamp...
Operating Instructions
Page 6
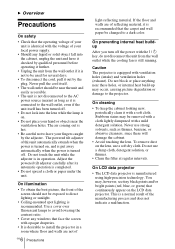
... avoid lowering the contrast ratio. • Cover any liquid or solid object fall into the lens while the lamp is hot. • Be careful not to the projector. If the floor and walls are not of your local power supply. • Should any windows that continuously appear on , ... • To disconnect the cord, pull it out by the adjuster. The powered tilt adjuster of reflecting material, it is recommended. On LCD data projector • The LCD data projector is in a room where floor and walls are of this unit automatically extends when the power is turned on the...
... avoid lowering the contrast ratio. • Cover any liquid or solid object fall into the lens while the lamp is hot. • Be careful not to the projector. If the floor and walls are not of your local power supply. • Should any windows that continuously appear on , ... • To disconnect the cord, pull it out by the adjuster. The powered tilt adjuster of reflecting material, it is recommended. On LCD data projector • The LCD data projector is in a room where floor and walls are of this unit automatically extends when the power is turned on the...
Operating Instructions
Page 7
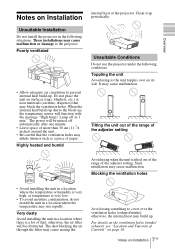
...turned off in a location where there is tilted out of the range of the adjuster setting. otherwise, the internal heat may cause malfunction. Lamp off automatically after one minute. • Leave space of Controls" on page 10. 7 Notes on its side. Highly heated and humid ...the unit topples over the ventilation holes (exhaust/intake); These installations may cause malfunction. When the internal heat builds up due to the projector. Such installation may cause malfunction or damage to the block-up . Toppling the unit Avoid using as a piece of the adjuster setting...
...turned off in a location where there is tilted out of the range of the adjuster setting. otherwise, the internal heat may cause malfunction. Lamp off automatically after one minute. • Leave space of Controls" on page 10. 7 Notes on its side. Highly heated and humid ...the unit topples over the ventilation holes (exhaust/intake); These installations may cause malfunction. When the internal heat builds up due to the projector. Such installation may cause malfunction or damage to the block-up . Toppling the unit Avoid using as a piece of the adjuster setting...
Operating Instructions
Page 8
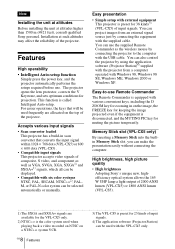
...by using the application software (Projector Station)4) supplied with the projector from a computer operated with external equipment This projector is disconnected, and the MUTING PIC key for projection. You can use the supplied Remote Commander as VGA, SVGA, XGA, SXGA1) and SXGA+1) signals...brightness Adopting Sony's unique new, highefficiency optical system allows the 165 W UHP lamp a light output of 2000 ANSI lumen (VPL-CX5) or 1800 ANSI lumen (VPL-CS5). ... 1) The SXGA and SXGA+ signals are allocated on the top of the projector. Easy-to the computer with the VPL-CX5 only....
...by using the application software (Projector Station)4) supplied with the projector from a computer operated with external equipment This projector is disconnected, and the MUTING PIC key for projection. You can use the supplied Remote Commander as VGA, SVGA, XGA, SXGA1) and SXGA+1) signals...brightness Adopting Sony's unique new, highefficiency optical system allows the 165 W UHP lamp a light output of 2000 ANSI lumen (VPL-CX5) or 1800 ANSI lumen (VPL-CS5). ... 1) The SXGA and SXGA+ signals are allocated on the top of the projector. Easy-to the computer with the VPL-CX5 only....
Operating Instructions
Page 10
...- Once in green when the power is turned on the screen, or press and hold the key for about two seconds. For details on the LAMP/COVER and the TEMP/FAN indicators, see on page 41. 3 TILT adjustment key For details, see "To turn on steps for the first 60... up the ON/STANDBY indicator with the I / 1 key. For details on the projector with the I / 1 key twice following conditions: - Lights in standby mode, you press the key, the input signal switches as follows: INPUT A t MS t VIDEO t S VIDEO (VPL-CX5 only) 10 GB Location and Function of Controls Top/Front/Left Side 1 TILT...
...- Once in green when the power is turned on the screen, or press and hold the key for about two seconds. For details on the LAMP/COVER and the TEMP/FAN indicators, see on page 41. 3 TILT adjustment key For details, see "To turn on steps for the first 60... up the ON/STANDBY indicator with the I / 1 key. For details on the projector with the I / 1 key twice following conditions: - Lights in standby mode, you press the key, the input signal switches as follows: INPUT A t MS t VIDEO t S VIDEO (VPL-CX5 only) 10 GB Location and Function of Controls Top/Front/Left Side 1 TILT...
Operating Instructions
Page 11
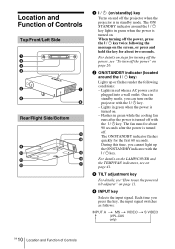
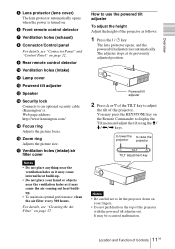
...For details, see "Connector Panel" and "Control Panel" on page 12. 9 Rear remote control detector 0 Ventilation holes (intake) qa Lamp cover qs Powered tilt adjuster qd Speaker qf Security lock Connects to adjust the tilt of the TILT key to an optional security cable (....kensington.com/ qg Focus ring Adjusts the picture focus. qh Zoom ring Adjusts the picture size. Powered tilt adjuster 2 Press f or F of the projector. Overview 5 Lens protector (lens cover) The lens protector automatically opens when the power is turned on. 6 Front remote control detector 7 Ventilation holes ...
...For details, see "Connector Panel" and "Control Panel" on page 12. 9 Rear remote control detector 0 Ventilation holes (intake) qa Lamp cover qs Powered tilt adjuster qd Speaker qf Security lock Connects to adjust the tilt of the TILT key to an optional security cable (....kensington.com/ qg Focus ring Adjusts the picture focus. qh Zoom ring Adjusts the picture size. Powered tilt adjuster 2 Press f or F of the projector. Overview 5 Lens protector (lens cover) The lens protector automatically opens when the power is turned on. 6 Front remote control detector 7 Ventilation holes ...
Operating Instructions
Page 12
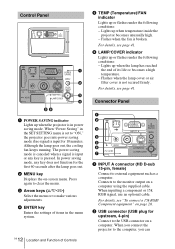
... VIDEO S VIDEO TEMP/FAN PUSH ENTER LAMP/COVER ACCESS AUDIO INPUT A 1 POWER SAVING MENU 2 PUSH ENTER VIDEO S VIDEO TEMP/FAN 3 LAMP/COVER 4 56 1 POWER SAVING indicator Lights up when the projector is not secured firmly. Lights up when the lamp has reached the end of Controls 5 ...TEMP (Temperature)/FAN indicator Lights up when temperature inside the projector becomes unusually high. - When you connect the projector to external equipment such as a computer. Although the lamp goes out, the cooling fan keeps running. Fashes when the fan is input for ...
... VIDEO S VIDEO TEMP/FAN PUSH ENTER LAMP/COVER ACCESS AUDIO INPUT A 1 POWER SAVING MENU 2 PUSH ENTER VIDEO S VIDEO TEMP/FAN 3 LAMP/COVER 4 56 1 POWER SAVING indicator Lights up when the projector is not secured firmly. Lights up when the lamp has reached the end of Controls 5 ...TEMP (Temperature)/FAN indicator Lights up when temperature inside the projector becomes unusually high. - When you connect the projector to external equipment such as a computer. Although the lamp goes out, the cooling fan keeps running. Fashes when the fan is input for ...
Operating Instructions
Page 18
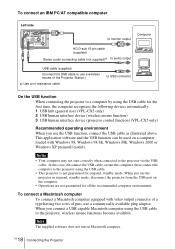
... devices automatically. 1 USB hub (general use) (VPL-CX5 only) 2 USB human interface device (wireless mouse function) 3 USB human interface device (projector control function) (VPL-CX5 only) Recommended operating environment When you connect a USB... capable Macintosh computer using the USB cable. • This projector is not guaranteed for all the recommended computer environments. To connect an IBM PC/AT compatible computer Left side ACCESS AUDIO INPUT A POWER SAVING MENU VIDEO S VIDEO TEMP/FAN PUSH ENTER LAMP...
... devices automatically. 1 USB hub (general use) (VPL-CX5 only) 2 USB human interface device (wireless mouse function) 3 USB human interface device (projector control function) (VPL-CX5 only) Recommended operating environment When you connect a USB... capable Macintosh computer using the USB cable. • This projector is not guaranteed for all the recommended computer environments. To connect an IBM PC/AT compatible computer Left side ACCESS AUDIO INPUT A POWER SAVING MENU VIDEO S VIDEO TEMP/FAN PUSH ENTER LAMP...
Operating Instructions
Page 19
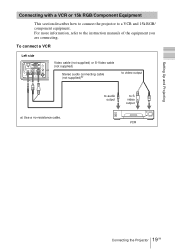
... INPUT A POWER SAVING MENU VIDEO S VIDEO TEMP/FAN PUSH ENTER LAMP/COVER Video cable (not supplied) or S-Video cable (not supplied) Stereo audio connecting cable (not supplied)a) to S video output VCR 19 Connecting the Projector GB to audio output to video output a) Use a no-resistance cable.... Setting Up and Projecting Connecting with a VCR or 15k RGB/Component Equipment This section describes how to connect the projector to the instruction manuals of the equipment you are connecting. For more information, refer to a VCR and 15k RGB/ component equipment.
... INPUT A POWER SAVING MENU VIDEO S VIDEO TEMP/FAN PUSH ENTER LAMP/COVER Video cable (not supplied) or S-Video cable (not supplied) Stereo audio connecting cable (not supplied)a) to S video output VCR 19 Connecting the Projector GB to audio output to video output a) Use a no-resistance cable.... Setting Up and Projecting Connecting with a VCR or 15k RGB/Component Equipment This section describes how to connect the projector to the instruction manuals of the equipment you are connecting. For more information, refer to a VCR and 15k RGB/ component equipment.

Operating Instructions
Page 20
To connect a 15k RGB/Component equipment Left side ACCESS AUDIO INPUT A POWER SAVING MENU VIDEO S VIDEO TEMP/FAN PUSH ENTER LAMP/COVER SMF-402 Signal Cable (not supplied) HD D-sub 15-pin (male) ↔ 3 × phono jack Stereo audio connecting cable (not supplied)a) to audio output ... INPUT SETTING menu according to the input signal. • When you input the external sync signal from 15k RGB/component equipment. 20 GB Connecting the Projector
To connect a 15k RGB/Component equipment Left side ACCESS AUDIO INPUT A POWER SAVING MENU VIDEO S VIDEO TEMP/FAN PUSH ENTER LAMP/COVER SMF-402 Signal Cable (not supplied) HD D-sub 15-pin (male) ↔ 3 × phono jack Stereo audio connecting cable (not supplied)a) to audio output ... INPUT SETTING menu according to the input signal. • When you input the external sync signal from 15k RGB/component equipment. 20 GB Connecting the Projector
Operating Instructions
Page 21
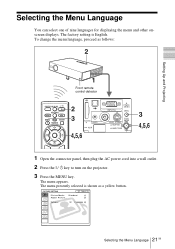
... PIC ENTER MUTING ACCESS AUDIO INPUT A POWER SAVING MENU VIDEO S VIDEO TEMP/FAN PUSH ENTER LAMP/COVER 1 Open the connector panel, then plug the AC power cord into a wall outlet. 2 Press the I / 1 key to turn on the projector. 3 Press the MENU key. Selecting the Menu Language You can select one of nine...
... PIC ENTER MUTING ACCESS AUDIO INPUT A POWER SAVING MENU VIDEO S VIDEO TEMP/FAN PUSH ENTER LAMP/COVER 1 Open the connector panel, then plug the AC power cord into a wall outlet. 2 Press the I / 1 key to turn on the projector. 3 Press the MENU key. Selecting the Menu Language You can select one of nine...
Operating Instructions
Page 34
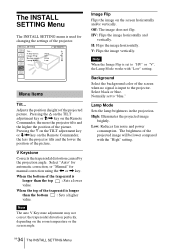
V Keystone: Image Flip: Background: Lamp Mode: Auto Off Blue Low Input A Menu Items Tilt... V Keystone Corrects the trapezoidal distortion caused by the projection angle. Image Flip Flips the image on the Remote Commander, the more the projector tilts and the higher the position of the screen when no signal ...is input to "blue." Off: The image does not flip. H: Flips the image horizontally. Normally set to "HV" or "V", the Lamp Mode works with the "High" setting. ...
V Keystone: Image Flip: Background: Lamp Mode: Auto Off Blue Low Input A Menu Items Tilt... V Keystone Corrects the trapezoidal distortion caused by the projection angle. Image Flip Flips the image on the Remote Commander, the more the projector tilts and the higher the position of the screen when no signal ...is input to "blue." Off: The image does not flip. H: Flips the image horizontally. Normally set to "HV" or "V", the Lamp Mode works with the "High" setting. ...
Operating Instructions
Page 36
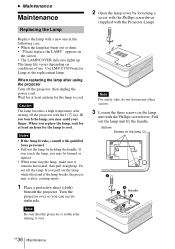
.... 1 Place a protective sheet (cloth) beneath the projector. Notes • If the lamp breaks, consult with qualified Sony personnel. • Pull out the lamp by the handle. B Maintenance Maintenance Replacing the Lamp Replace the lamp with the Projector Lamp). appears on the screen • The LAMP/COVER indicator lights up . If you touch the lamp, you can see its underside. Note...
.... 1 Place a protective sheet (cloth) beneath the projector. Notes • If the lamp breaks, consult with qualified Sony personnel. • Pull out the lamp by the handle. B Maintenance Maintenance Replacing the Lamp Replace the lamp with the Projector Lamp). appears on the screen • The LAMP/COVER indicator lights up . If you touch the lamp, you can see its underside. Note...
Operating Instructions
Page 37
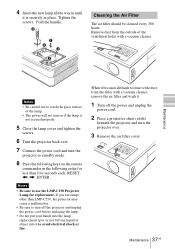
...the ventilation holes with a vacuum cleaner. 4 Insert the new lamp all the way in until it is not secured properly. 5 Close the lamp cover and tighten the screws. 6 Turn the projector back over. 7 Connect the power cord and turn on if the lamp is securely in the following keys on the remote commander... in place. Fold the handle. Remove dust from the outside of the lamp. • The power will not turn the projector to standby mode. 8 Press the following order for less than...
...the ventilation holes with a vacuum cleaner. 4 Insert the new lamp all the way in until it is not secured properly. 5 Close the lamp cover and tighten the screws. 6 Turn the projector back over. 7 Connect the power cord and turn on if the lamp is securely in the following keys on the remote commander... in place. Fold the handle. Remove dust from the outside of the lamp. • The power will not turn the projector to standby mode. 8 Press the following order for less than...
Operating Instructions
Page 39
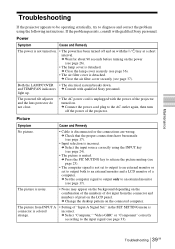
... The power is incorrect. If the problem persists, consult with qualified Sony personnel. c Connect the power cord plug to an external monitor and a LCD monitor of the projector. The picture from the connector and numbers of pixel on the LCD panel. c Close the lamp cover securely (see page 17). The picture is muted. Troubleshooting 39...
... The power is incorrect. If the problem persists, consult with qualified Sony personnel. c Connect the power cord plug to an external monitor and a LCD monitor of the projector. The picture from the connector and numbers of pixel on the LCD panel. c Close the lamp cover securely (see page 17). The picture is muted. Troubleshooting 39...
Operating Instructions
Page 40
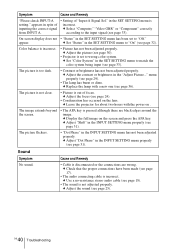
... out of "Input-A Signal Sel." The picture is not clear. • Picture is incorrect. • Picture has not been adjusted properly. c Leave the projector for about two hours with a new one (see page 31). c Adjust "Shift" in spite of inputting the correct signal from INPUT A. • Setting...properly. menu properly (see page 24). • Condensation has occurred on the lens. c Adjust the focus (see page 29). • The lamp has burnt or dims. c Replace the lamp with the power on the screen and press the APA key. Symptom Cause and Remedy "Please check INPUT-A setting."
... out of "Input-A Signal Sel." The picture is not clear. • Picture is incorrect. • Picture has not been adjusted properly. c Leave the projector for about two hours with a new one (see page 31). c Adjust "Shift" in spite of inputting the correct signal from INPUT A. • Setting...properly. menu properly (see page 24). • Condensation has occurred on the lens. c Adjust the focus (see page 29). • The lamp has burnt or dims. c Replace the lamp with the power on the screen and press the APA key. Symptom Cause and Remedy "Please check INPUT-A setting."
Operating Instructions
Page 41
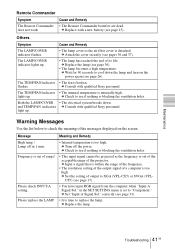
...c Wait for 90 seconds to XGA (VPL-CX5) or SVGA (VPLCS5) (see if nothing is time to "Component." The TEMP/FAN indicator • The internal temperature is blocking the ventilation holes. Message Meaning and Remedy High temp.! c Check to check the meaning of the projector. c Input a signal that... list below to see page 17). c Attach the cover securely (see page 33). and TEMP/FAN indicators c Consult with qualified Sony personnel. Lamp off the power. Please check INPUT-A setting. • You have input RGB signal from the computer when "Input-A Signal Sel." Please...
...c Wait for 90 seconds to XGA (VPL-CX5) or SVGA (VPLCS5) (see if nothing is time to "Component." The TEMP/FAN indicator • The internal temperature is blocking the ventilation holes. Message Meaning and Remedy High temp.! c Check to check the meaning of the projector. c Input a signal that... list below to see page 17). c Attach the cover securely (see page 33). and TEMP/FAN indicators c Consult with qualified Sony personnel. Lamp off the power. Please check INPUT-A setting. • You have input RGB signal from the computer when "Input-A Signal Sel." Please...
Operating Instructions
Page 43
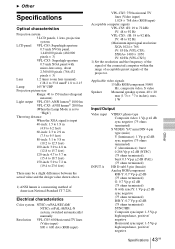
... LCD panels, 1 lens, projection system LCD panel VPL-CS5: Superhigh-aperture 0.7-inch SVGA panel, 1,440,000 pixels (480,000 pixels × 3) VPL-CX5: Superhigh-aperture 0.7-inch XGA ...measure) Light output VPL-CS5: ANSI lumen1) 1800 lm VPL-CX5: ANSI lumen1) 2000 lm (When the Lamp Mode is set to "High") Throwing distance When the XGA signal is input 40...VPL-CS5: fH: 19 to 72 kHz fV: 48 to 92 Hz VPL-CX5: fH: 19 to 92 kHz fV: 48 to 23.6 feet) There may be a slight difference between the actual value and the design value shown above. 1) ANSI lumen is a measuring method of the projector...
... LCD panels, 1 lens, projection system LCD panel VPL-CS5: Superhigh-aperture 0.7-inch SVGA panel, 1,440,000 pixels (480,000 pixels × 3) VPL-CX5: Superhigh-aperture 0.7-inch XGA ...measure) Light output VPL-CS5: ANSI lumen1) 1800 lm VPL-CX5: ANSI lumen1) 2000 lm (When the Lamp Mode is set to "High") Throwing distance When the XGA signal is input 40...VPL-CS5: fH: 19 to 72 kHz fV: 48 to 92 Hz VPL-CX5: fH: 19 to 92 kHz fV: 48 to 23.6 feet) There may be a slight difference between the actual value and the design value shown above. 1) ANSI lumen is a measuring method of the projector...
Operating Instructions
Page 44
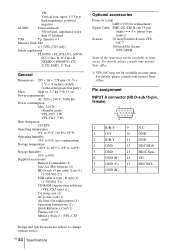
... Storage humidity 10% to change without notice. GB 44 Specifications Optional accessories Projector Lamp LMP-C150 (for replacement) (1) Operating Instructions (1) Quick Reference Card (1) Ferrite core (1) Memory Stick (1) (VPL-CX5 only) Design and specifications are subject to 90% Supplied accessories Remote Commander...15 DDC/SCL 8 GND (B) For details, please consult your nearest Sony office. 1) VPS-50C may not be available in some areas. B type (1) (1-790-081-31) CD-ROM (Application software) (VPL-CX5 only) (1) Carrying case (1) AC power cord (1) Air filter (...
... Storage humidity 10% to change without notice. GB 44 Specifications Optional accessories Projector Lamp LMP-C150 (for replacement) (1) Operating Instructions (1) Quick Reference Card (1) Ferrite core (1) Memory Stick (1) (VPL-CX5 only) Design and specifications are subject to 90% Supplied accessories Remote Commander...15 DDC/SCL 8 GND (B) For details, please consult your nearest Sony office. 1) VPS-50C may not be available in some areas. B type (1) (1-790-081-31) CD-ROM (Application software) (VPL-CX5 only) (1) Carrying case (1) AC power cord (1) Air filter (...

