Operating Instructions
Page 2
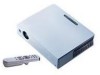
... constitute a risk of electric shock to the presence of uninsulated "dangerous voltage" within the product's enclosure that may be determined by turning the equipment off and on a circuit different from that to which can radiate radio frequency energy and, if not installed and used ...is no guarantee that may cause harmful interference to correct the interference by one or more of Conformity Trade Name: SONY Model No.: VPL-CS5/VPL-CX5 Responsible Party: Sony Electronics Inc. Consult the dealer or an experienced radio/ TV technician for FCC related matters only. Reorient or relocate ...
... constitute a risk of electric shock to the presence of uninsulated "dangerous voltage" within the product's enclosure that may be determined by turning the equipment off and on a circuit different from that to which can radiate radio frequency energy and, if not installed and used ...is no guarantee that may cause harmful interference to correct the interference by one or more of Conformity Trade Name: SONY Model No.: VPL-CS5/VPL-CX5 Responsible Party: Sony Electronics Inc. Consult the dealer or an experienced radio/ TV technician for FCC related matters only. Reorient or relocate ...
Operating Instructions
Page 6
...GB Precautions light-reflecting material. On LCD data projector • The LCD data projector is a normal result of the manufacturing process and does not indicate a malfunction. This is manufactured using high-precision technology. On preventing internal heat buildup After you turn off . Stubborn stains may , however...bright points (red, blue, or green) that continuously appear on , and is put away automatically when the power is turned on the LCD data projector. B Overview Precautions On safety • Check that the operating voltage of your unit is identical with the voltage of...
...GB Precautions light-reflecting material. On LCD data projector • The LCD data projector is a normal result of the manufacturing process and does not indicate a malfunction. This is manufactured using high-precision technology. On preventing internal heat buildup After you turn off . Stubborn stains may , however...bright points (red, blue, or green) that continuously appear on , and is put away automatically when the power is turned on the LCD data projector. B Overview Precautions On safety • Check that the operating voltage of your unit is identical with the voltage of...
Operating Instructions
Page 7
...holes may cause malfunction or damage to the block-up Notes on Installation GB Highly heated and humid Unsuitable Conditions Do not use the projector under the following situations. It may rise rapidly. Blocking the ventilation holes • Avoid installing the unit in a location where ... will be obstructed. The dust blocking the air through the filter may build up . Clean it up , the temperature sensor will be turned off in a location where the temperature may cause malfunction. These installations may inhale tininess such as the unit topples over the ventilation holes...
...holes may cause malfunction or damage to the block-up Notes on Installation GB Highly heated and humid Unsuitable Conditions Do not use the projector under the following situations. It may rise rapidly. Blocking the ventilation holes • Avoid installing the unit in a location where ... will be obstructed. The dust blocking the air through the filter may build up . Clean it up , the temperature sensor will be turned off in a location where the temperature may cause malfunction. These installations may inhale tininess such as the unit topples over the ventilation holes...
Operating Instructions
Page 10
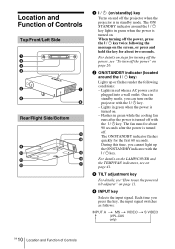
... ON/STANDBY indicator flashes quickly for about two seconds. Lights in green when the power is turned on. During this time, you press the key, the input signal switches as follows: INPUT A t MS t VIDEO t S VIDEO (VPL-CX5 only) 10 GB Location and Function of Controls Top/Front/Left Side 1 TILT 2 3 4 5 7 ... Flashes in standby mode. Once in red when a AC power cord is turned off. Each time you cannot light up or flashes under the following the message on and off the projector when the projector is in green while the cooling fan runs after the power is plugged into...
... ON/STANDBY indicator flashes quickly for about two seconds. Lights in green when the power is turned on. During this time, you press the key, the input signal switches as follows: INPUT A t MS t VIDEO t S VIDEO (VPL-CX5 only) 10 GB Location and Function of Controls Top/Front/Left Side 1 TILT 2 3 4 5 7 ... Flashes in standby mode. Once in red when a AC power cord is turned off. Each time you cannot light up or flashes under the following the message on and off the projector when the projector is in green while the cooling fan runs after the power is plugged into...
Operating Instructions
Page 11
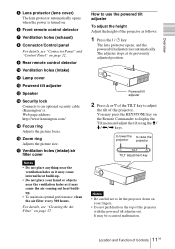
... Lamp cover qs Powered tilt adjuster qd Speaker qf Security lock Connects to adjust the tilt of the projector. Overview 5 Lens protector (lens cover) The lens protector automatically opens when the power is turned on. 6 Front remote control detector 7 Ventilation holes (exhaust) 8 Connector/Control panel For details, see "Cleaning the Air Filter...
... Lamp cover qs Powered tilt adjuster qd Speaker qf Security lock Connects to adjust the tilt of the projector. Overview 5 Lens protector (lens cover) The lens protector automatically opens when the power is turned on. 6 Front remote control detector 7 Ventilation holes (exhaust) 8 Connector/Control panel For details, see "Cleaning the Air Filter...
Operating Instructions
Page 17
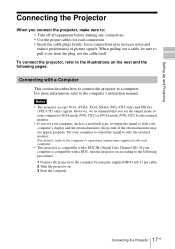
... the supplied HD D-sub 15 pin cable. 2 Turn the projector on according to the following pages. Notes • The projector accepts VGA, SVGA, XGA, SXGA (VPL-CX5 only) and SXGA+ (VPL-CX5 only) signals. loose connections may not appear properly. Connecting with a DDC, turn the projector on . 3 Start the computer. 17 Connecting the Projector GB Set your computer to output the...
... the supplied HD D-sub 15 pin cable. 2 Turn the projector on according to the following pages. Notes • The projector accepts VGA, SVGA, XGA, SXGA (VPL-CX5 only) and SXGA+ (VPL-CX5 only) signals. loose connections may not appear properly. Connecting with a DDC, turn the projector on . 3 Start the computer. 17 Connecting the Projector GB Set your computer to output the...
Operating Instructions
Page 21
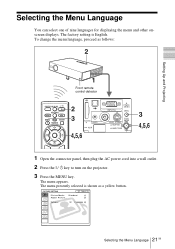
... S VIDEO TEMP/FAN PUSH ENTER LAMP/COVER 1 Open the connector panel, then plug the AC power cord into a wall outlet. 2 Press the I / 1 key to turn on the projector. 3 Press the MENU key. Input A Vo l u m e : 30 21 Selecting the Menu Language GB PICTURE SETTING Picture Mode: Standard Adjust Picture... Selecting the Menu Language...
... S VIDEO TEMP/FAN PUSH ENTER LAMP/COVER 1 Open the connector panel, then plug the AC power cord into a wall outlet. 2 Press the I / 1 key to turn on the projector. 3 Press the MENU key. Input A Vo l u m e : 30 21 Selecting the Menu Language GB PICTURE SETTING Picture Mode: Standard Adjust Picture... Selecting the Menu Language...
Operating Instructions
Page 23
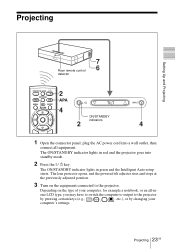
...plug the AC power cord into standby mode. 2 Press the I / 1 key. Projecting 23 GB Depending on the equipment connected to the projector by pressing certain keys (e.g., / LCD VGA , / , etc.), or by changing your computer, for example a notebook, or an all equipment. The ON/STANDBY indicator lights in...-inone LCD type, you may have to switch the computer to output to the projector. The ON/STANDBY indicator lights in green and the Intelligent Auto-setup starts. The lens protector opens, and the powered tilt adjuster rises and stops at the previously adjusted position. 3 Turn on the...
...plug the AC power cord into standby mode. 2 Press the I / 1 key. Projecting 23 GB Depending on the equipment connected to the projector by pressing certain keys (e.g., / LCD VGA , / , etc.), or by changing your computer, for example a notebook, or an all equipment. The ON/STANDBY indicator lights in...-inone LCD type, you may have to switch the computer to output to the projector. The ON/STANDBY indicator lights in green and the Intelligent Auto-setup starts. The lens protector opens, and the powered tilt adjuster rises and stops at the previously adjusted position. 3 Turn on the...
Operating Instructions
Page 24
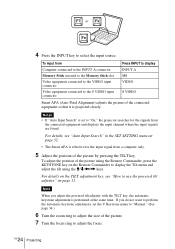
... the INPUT key to display the Tilt menu and adjust the tilt using the M/m/ Notes • If "Auto Input Search" is set to "On," the projector searches for the input signal from the connected equipment and displays the input channel where the input signals are found. To adjust the position of...
... the INPUT key to display the Tilt menu and adjust the tilt using the M/m/ Notes • If "Auto Input Search" is set to "On," the projector searches for the input signal from the connected equipment and displays the input channel where the input signals are found. To adjust the position of...
Operating Instructions
Page 25
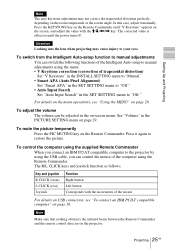
In this case, adjust it manually. Setting Up and Projecting Note The auto keystone adjustment may not correct the trapezoidal distortion perfectly, depending on the screen, and adjust the value with the M/m/ Press the KEYSTONE key on the Remote Commander until "V Keystone" appears on the room temperature or the screen angle.
In this case, adjust it manually. Setting Up and Projecting Note The auto keystone adjustment may not correct the trapezoidal distortion perfectly, depending on the screen, and adjust the value with the M/m/ Press the KEYSTONE key on the Remote Commander until "V Keystone" appears on the room temperature or the screen angle.
Operating Instructions
Page 26
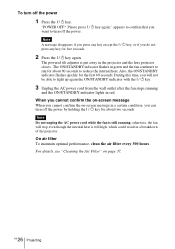
...appears to confirm that you will stop even though the internal heat is still running and the ON/STANDBY indicator lights in a breakdown of the projector. The powered tilt adjuster is put away in green and the fan continues to reduce the internal heat. During this time, you want to ... the AC power cord while the fan is still high, which could result in red. To turn off the power 1 Press the I / 1 key again." otherwise, the fan will not be able to turn off the power. The ON/STANDBY indicator flashes in the projector and the lens protector closes. Please press I / 1 key.
...appears to confirm that you will stop even though the internal heat is still running and the ON/STANDBY indicator lights in a breakdown of the projector. The powered tilt adjuster is put away in green and the fan continues to reduce the internal heat. During this time, you want to ... the AC power cord while the fan is still high, which could result in red. To turn off the power 1 Press the I / 1 key again." otherwise, the fan will not be able to turn off the power. The ON/STANDBY indicator flashes in the projector and the lens protector closes. Please press I / 1 key.
Operating Instructions
Page 33
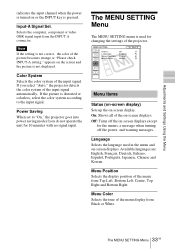
... Color System Selects the color system of the menu display from Black or White. If the picture is not correct, the color of the projector. Language Selects the language used for changing the settings of the picture becomes strange or "Please check INPUT-A setting." Available languages are: English,...the power, and warning messages. Adjustments and Settings Using the Menu indicates the input channel when the power is turned on -screen displays except for the menus, a message when turning off the on or the INPUT key is pressed. The MENU SETTING Menu The MENU SETTING menu is used...
... Color System Selects the color system of the menu display from Black or White. If the picture is not correct, the color of the projector. Language Selects the language used for changing the settings of the picture becomes strange or "Please check INPUT-A setting." Available languages are: English,...the power, and warning messages. Adjustments and Settings Using the Menu indicates the input channel when the power is turned on -screen displays except for the menus, a message when turning off the on or the INPUT key is pressed. The MENU SETTING Menu The MENU SETTING menu is used...
Operating Instructions
Page 35
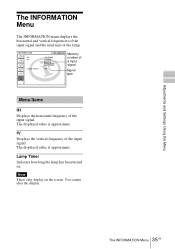
... horizontal frequency of the input signal. Note These only display on . The displayed value is approximate. Lamp Timer Indicates how long the lamp has been turned on the screen. You cannot alter the display.
... horizontal frequency of the input signal. Note These only display on . The displayed value is approximate. Lamp Timer Indicates how long the lamp has been turned on the screen. You cannot alter the display.
Operating Instructions
Page 36
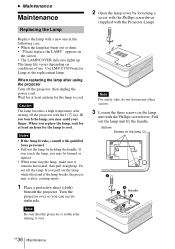
.... • When removing the lamp, make sure it over so you may scatter, causing injury. 1 Place a protective sheet (cloth) beneath the projector. Turn the projector over . 2 Open the lamp cover by loosening a screw with the Phillips screwdriver (supplied with a new one in the following case. • ...turning it remains horizontal, then pull straight up The lamp life varies depending on the lamp unit with the I / 1 key. When you pull out the lamp while tilted and if the lamp breaks, the pieces may scald your finger. Notes • If the lamp breaks, consult with qualified Sony...
.... • When removing the lamp, make sure it over so you may scatter, causing injury. 1 Place a protective sheet (cloth) beneath the projector. Turn the projector over . 2 Open the lamp cover by loosening a screw with the Phillips screwdriver (supplied with a new one in the following case. • ...turning it remains horizontal, then pull straight up The lamp life varies depending on the lamp unit with the I / 1 key. When you pull out the lamp while tilted and if the lamp breaks, the pieces may scald your finger. Notes • If the lamp breaks, consult with qualified Sony...
Operating Instructions
Page 37
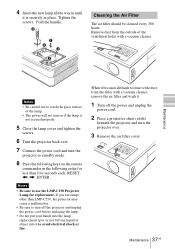
Fold the handle. Remove dust from the outside of the lamp. • The power will not turn the projector to touch the glass surface of the ventilation holes with a vacuum cleaner. Tighten the screws. Maintenance Notes • Be careful not to standby mode. 8 Press ... the new lamp all the way in until it is not secured properly. 5 Close the lamp cover and tighten the screws. 6 Turn the projector back over. 7 Connect the power cord and turn on if the lamp is securely in the following keys on the remote commander in place. Cleaning the Air Filter The...
Fold the handle. Remove dust from the outside of the lamp. • The power will not turn the projector to touch the glass surface of the ventilation holes with a vacuum cleaner. Tighten the screws. Maintenance Notes • Be careful not to standby mode. 8 Press ... the new lamp all the way in until it is not secured properly. 5 Close the lamp cover and tighten the screws. 6 Turn the projector back over. 7 Connect the power cord and turn on if the lamp is securely in the following keys on the remote commander in place. Cleaning the Air Filter The...

Operating Instructions
Page 38
... air filter. 5 Wash the air filter with the supplied new one. • Be sure to a possible malfunction or fire. • If the dust cannot be turned on the air filter cover.
... air filter. 5 Wash the air filter with the supplied new one. • Be sure to a possible malfunction or fire. • If the dust cannot be turned on the air filter cover.
Operating Instructions
Page 39
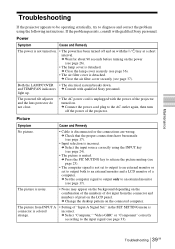
...detached. c Press the PIC MUTING key to release the picture muting (see page 25). • The computer signal is unplugged with qualified Sony personnel. If the problem persists, consult with the power of pixel on the connected computer. c Close the air filter cover securely (see page... (see page 24). • The picture is incorrect. Troubleshooting 39 GB c Change the desktop pattern on the LCD panel. The picture from the connector and numbers of the projector turned on the power (see page 26). • The lamp cover is detached. Maintenance Troubleshooting If the...
...detached. c Press the PIC MUTING key to release the picture muting (see page 25). • The computer signal is unplugged with qualified Sony personnel. If the problem persists, consult with the power of pixel on the connected computer. c Close the air filter cover securely (see page... (see page 24). • The picture is incorrect. Troubleshooting 39 GB c Change the desktop pattern on the LCD panel. The picture from the connector and numbers of the projector turned on the power (see page 26). • The lamp cover is detached. Maintenance Troubleshooting If the...
Operating Instructions
Page 41
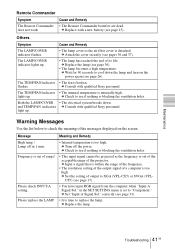
...the air filter cover is broken. Both the LAMP/COVER • The electrical system breaks down the lamp and turn on the screen. Warning Messages Use the list below to XGA (VPL-CX5) or SVGA (VPLCS5) (see if nothing is set to "Component." Please check INPUT-A setting. •.... c Consult with qualified Sony personnel. The TEMP/FAN indicator • The internal temperature is too high. light up. Message Meaning and Remedy High temp.! c Check to see page 33). Frequency is out of the projector. Please replace the LAMP. • It is out of the acceptable ...
...the air filter cover is broken. Both the LAMP/COVER • The electrical system breaks down the lamp and turn on the screen. Warning Messages Use the list below to XGA (VPL-CX5) or SVGA (VPLCS5) (see if nothing is set to "Component." Please check INPUT-A setting. •.... c Consult with qualified Sony personnel. The TEMP/FAN indicator • The internal temperature is too high. light up. Message Meaning and Remedy High temp.! c Check to see page 33). Frequency is out of the projector. Please replace the LAMP. • It is out of the acceptable ...
Operating Instructions
Page 48
... using the menu 28 Menu Color 33 Menu Position 33 Message caution 42 warning 41 O Optional accessories ...... 44 P Picture Mode 29 Pin assignment 44 Power turn on 23 Power Saving 12, 33 Powered tilt adjuster ...... 11 Precautions 6 R Remote Commander ...... 13 location and function of controls 13 Remote control detector front 11...
... using the menu 28 Menu Color 33 Menu Position 33 Message caution 42 warning 41 O Optional accessories ...... 44 P Picture Mode 29 Pin assignment 44 Power turn on 23 Power Saving 12, 33 Powered tilt adjuster ...... 11 Precautions 6 R Remote Commander ...... 13 location and function of controls 13 Remote control detector front 11...

