Operating Instructions
Page 1
3-211-166-13 (1) Data Projector Operating Instructions VPL-CX100 VPL-CX120/CX125 VPL-CX150/CX155 VPL-CW125 © 2007 Sony Corporation
3-211-166-13 (1) Data Projector Operating Instructions VPL-CX100 VPL-CX120/CX125 VPL-CX150/CX155 VPL-CW125 © 2007 Sony Corporation

Operating Instructions
Page 4
... (Main Unit 13 Top/Front/Side 13 Rear/Side/Bottom 13 Control Panel 15 Connector Panel 16 Remote Commander 17 VPL-CX125/CX155/CW125 ..... 17 VPL-CX100/CX120/CX150 ...... 19 Effective Tools for Your Presentation 32 Controlling the Computer Using a Presentation Tool, RM-PJPK1 (not supplied...38 The Function Menu 39 The Installation Menu 41 The Setup Menu 43 The Information Menu 44 Projecting the Picture Installing the Projector 21 Connecting the Projector 23 Connecting a Computer 23 Connecting a VCR 24 Projecting 26 Turning Off the Power 28 Convenient Functions Selecting the Menu ...
... (Main Unit 13 Top/Front/Side 13 Rear/Side/Bottom 13 Control Panel 15 Connector Panel 16 Remote Commander 17 VPL-CX125/CX155/CW125 ..... 17 VPL-CX100/CX120/CX150 ...... 19 Effective Tools for Your Presentation 32 Controlling the Computer Using a Presentation Tool, RM-PJPK1 (not supplied...38 The Function Menu 39 The Installation Menu 41 The Setup Menu 43 The Information Menu 44 Projecting the Picture Installing the Projector 21 Connecting the Projector 23 Connecting a Computer 23 Connecting a VCR 24 Projecting 26 Turning Off the Power 28 Convenient Functions Selecting the Menu ...
Operating Instructions
Page 6
... chemical cleaning cloth, as it is connected to the following: • Avoid touching the lens. If voltage adaptation is required, consult with qualified Sony personnel. • Should any windows that the operating voltage of your unit is equipped with ventilation holes (intake) at the bottom and ventilation holes...Be sure to install the unit in a room where floor and walls are of the unit. Stubborn stains may damage the finish of the projector, take care with the voltage of lightreflecting material. Never pull the cord itself has been turned off. • Do not look into the ...
... chemical cleaning cloth, as it is connected to the following: • Avoid touching the lens. If voltage adaptation is required, consult with qualified Sony personnel. • Should any windows that the operating voltage of your unit is equipped with ventilation holes (intake) at the bottom and ventilation holes...Be sure to install the unit in a room where floor and walls are of the unit. Stubborn stains may damage the finish of the projector, take care with the voltage of lightreflecting material. Never pull the cord itself has been turned off. • Do not look into the ...
Operating Instructions
Page 7
... the unit. These installations may , however, see tiny black points and/or bright points (red, blue, or green) that continuously appear on the LCD projector. On LCD projector • The LCD projector is a normal result of the manufacturing process and does not indicate a malfunction. Notes on Installation and Usage Unsuitable Installation Do not install the unit...
... the unit. These installations may , however, see tiny black points and/or bright points (red, blue, or green) that continuously appear on the LCD projector. On LCD projector • The LCD projector is a normal result of the manufacturing process and does not indicate a malfunction. Notes on Installation and Usage Unsuitable Installation Do not install the unit...
Operating Instructions
Page 9
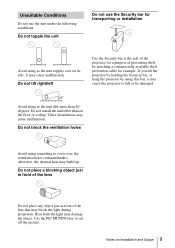
...theft, by using something to cover over on its side. Notes on the floor or ceiling. If you lift the projector by holding the Security bar, or hang the projector by attaching a commercially available theft prevention cable for example. Avoid using as the unit topples over the ventilation holes (... on Installation and Usage 9 These installations may damage the object. Do not install the unit other than 20 degrees. It may cause the projector to cut off the picture. Do not topple the unit Do not use the unit under the following conditions. Use the PIC MUTING key...
...theft, by using something to cover over on its side. Notes on the floor or ceiling. If you lift the projector by holding the Security bar, or hang the projector by attaching a commercially available theft prevention cable for example. Avoid using as the unit topples over the ventilation holes (... on Installation and Usage 9 These installations may damage the object. Do not install the unit other than 20 degrees. It may cause the projector to cut off the picture. Do not topple the unit Do not use the unit under the following conditions. Use the PIC MUTING key...
Operating Instructions
Page 10
... how to pay attention when handling and using this projector. Manuals Safety Regulations (separately printed manual) This manual describes important notes and cautions to which you have to set up and operate the network presentation. Operating Instructions for the VPL-CX100, VPL-CX120, VPL-CX125, VPL-CX150, VPL-CX155 and VPLCW125 all together. Note You must have...
... how to pay attention when handling and using this projector. Manuals Safety Regulations (separately printed manual) This manual describes important notes and cautions to which you have to set up and operate the network presentation. Operating Instructions for the VPL-CX100, VPL-CX120, VPL-CX125, VPL-CX150, VPL-CX155 and VPLCW125 all together. Note You must have...
Operating Instructions
Page 11
... lumen for the VPL-CX150/CX155, 3000 lumen for the VPL-CX120/CX125/CW125 and 2700 lumen for the VPL-CX100. It allows light output of Sony's unique optical system provides a high-efficiency optical system. Versatile installation capability Capable of a picture on the screen unless the required password is entered when the projector is mounted on...
... lumen for the VPL-CX150/CX155, 3000 lumen for the VPL-CX120/CX125/CW125 and 2700 lumen for the VPL-CX100. It allows light output of Sony's unique optical system provides a high-efficiency optical system. Versatile installation capability Capable of a picture on the screen unless the required password is entered when the projector is mounted on...
Operating Instructions
Page 15
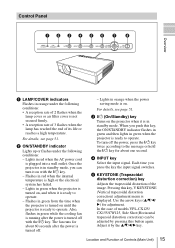
...is running after the power is turned off with the ?/1 key. - When you press the key the input signal switches. In the case of models VPL-CX125/ CX155/CW125, Side Shot (Horizontal trapezoid distortion correction) can turn off the power, press the ?/1 key twice according to operate. Control Panel ...the ON/STANDBY indicator flashes in green and then lights in orange when the power saving mode is on until the projector is turned off . - Lights in green when the projector is ready to the message or hold the ?/1 key for about 60 seconds after the power is ready to ...
...is running after the power is turned off with the ?/1 key. - When you press the key the input signal switches. In the case of models VPL-CX125/ CX155/CW125, Side Shot (Horizontal trapezoid distortion correction) can turn off the power, press the ?/1 key twice according to operate. Control Panel ...the ON/STANDBY indicator flashes in green and then lights in orange when the power saving mode is on until the projector is turned off . - Lights in green when the projector is ready to the message or hold the ?/1 key for about 60 seconds after the power is ready to ...
Operating Instructions
Page 17
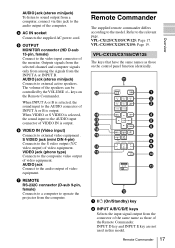
... is output. AUDIO jack Connect to the audio output of VIDEO IN is selected, the sound input to the AUDIO input connector of video equipment. VPL-CX100/CX120/CX150: Page 19. S VIDEO jack (mini DIN 4-pin) Connects to the S video output (Y/C video output) of the monitor. g REMOTE RS-232C... connector (D-sub 9-pin, female) Connects to a computer to operate the projector from the connector of the same name as those of INPUT A or B is selected, ...
... is output. AUDIO jack Connect to the audio output of VIDEO IN is selected, the sound input to the AUDIO input connector of video equipment. VPL-CX100/CX120/CX150: Page 19. S VIDEO jack (mini DIN 4-pin) Connects to the S video output (Y/C video output) of the monitor. g REMOTE RS-232C... connector (D-sub 9-pin, female) Connects to a computer to operate the projector from the connector of the same name as those of INPUT A or B is selected, ...
Operating Instructions
Page 18
... again, or press the VOLUME+ key to its factory preset value or returns the enlarged image with a Remote Commander whenever you press this projector. o ZOOM +/- d APA (Auto Pixel Alignment) key Automatically adjusts a picture to restore the sound. g KEYSTONE (Trapezoidal distortion correction) ...key h ASPECT key Select the aspect ratio of an item to its clearest while a signal is not provided in this projector. q SHIFT +/- For details, see Operating Instructions for Network (stored on the screen. l CONTROL S OUT jack (stereo mini-jack)...
... again, or press the VOLUME+ key to its factory preset value or returns the enlarged image with a Remote Commander whenever you press this projector. o ZOOM +/- d APA (Auto Pixel Alignment) key Automatically adjusts a picture to restore the sound. g KEYSTONE (Trapezoidal distortion correction) ...key h ASPECT key Select the aspect ratio of an item to its clearest while a signal is not provided in this projector. q SHIFT +/- For details, see Operating Instructions for Network (stored on the screen. l CONTROL S OUT jack (stereo mini-jack)...
Operating Instructions
Page 19
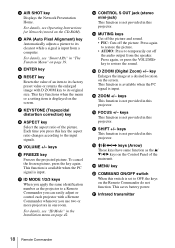
...key Automatically adjusts a picture to its original size. c KEYSTONE (Trapezoidal distortion correction) key d LENS key This function is not provided in this projector. This key functions when the menu or a setting item is displayed on page 39. Notes on Remote Commander operation • Make sure that... have the same names as those on the projector. Remote Commander 19 VPL-CX100/CX120/CX150 The keys that nothing obstructs the infrared beam between the Remote Commander and the projector is input. For details, see "Smart APA" in "The Function Menu" on...
...key Automatically adjusts a picture to its original size. c KEYSTONE (Trapezoidal distortion correction) key d LENS key This function is not provided in this projector. This key functions when the menu or a setting item is displayed on page 39. Notes on Remote Commander operation • Make sure that... have the same names as those on the projector. Remote Commander 19 VPL-CX100/CX120/CX150 The keys that nothing obstructs the infrared beam between the Remote Commander and the projector is input. For details, see "Smart APA" in "The Function Menu" on...
Operating Instructions
Page 20
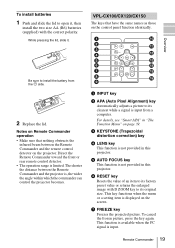
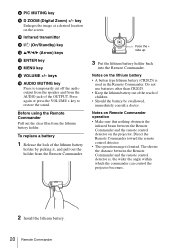
... obstructs the infrared beam between the Remote Commander and the remote control detector is, the wider the angle within which the commander can control the projector becomes. 2 Install the lithium battery. 20 Remote Commander Notes on the lithium battery • A button type lithium battery (CR2025) is limited. j Infrared transmitter k ?/1 (On/Standby... Commander toward the remote control detector. • The operation range is used in the Remote Commander. key Enlarges the image at a desired location on the projector. h PIC MUTING key i D ZOOM (Digital Zoom) +/-
... obstructs the infrared beam between the Remote Commander and the remote control detector is, the wider the angle within which the commander can control the projector becomes. 2 Install the lithium battery. 20 Remote Commander Notes on the lithium battery • A button type lithium battery (CR2025) is limited. j Infrared transmitter k ?/1 (On/Standby... Commander toward the remote control detector. • The operation range is used in the Remote Commander. key Enlarges the image at a desired location on the projector. h PIC MUTING key i D ZOOM (Digital Zoom) +/-
Operating Instructions
Page 21
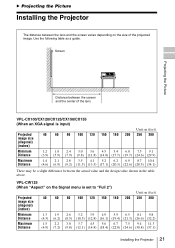
...center of the projected image. VPL-CW125 (When "Aspect" on the size of the lens VPL-CX100/CX120/CX125/CX150/CX155 (When an XGA signal is set to "...Full 2") Unit: m (feet) Projected image size (diagonal) (inches) 40 60 80 100 120 150 180 200 250 300 Minimum Distance 1.3 1.9 2.6 3.2 3.9 4.9 5.9 6.5 8.1 9.8 (4.3) (6.2) (8.5) (10.5) (12.8) (16.1) (19.4) (21.3) (26.6) (32.2) Maximum Distance 1.5 2.2 3.0 3.7 4.5 5.6 6.7 7.5 9.4 11.3 (4.9) (7.2) (9.8) (12.1) (14.8) (18.4) (22.0) (24.6) (30.8) (37.1) Installing the Projector...
...center of the projected image. VPL-CW125 (When "Aspect" on the size of the lens VPL-CX100/CX120/CX125/CX150/CX155 (When an XGA signal is set to "...Full 2") Unit: m (feet) Projected image size (diagonal) (inches) 40 60 80 100 120 150 180 200 250 300 Minimum Distance 1.3 1.9 2.6 3.2 3.9 4.9 5.9 6.5 8.1 9.8 (4.3) (6.2) (8.5) (10.5) (12.8) (16.1) (19.4) (21.3) (26.6) (32.2) Maximum Distance 1.5 2.2 3.0 3.7 4.5 5.6 6.7 7.5 9.4 11.3 (4.9) (7.2) (9.8) (12.1) (14.8) (18.4) (22.0) (24.6) (30.8) (37.1) Installing the Projector...
Operating Instructions
Page 22
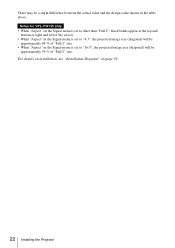
Notes for VPL-CW125 only • When "Aspect" on page 59. 22 Installing the Projector For details on installation, see "Installation Diagram" on the Signal menu is set to other than "Full 2", black bands appear at the top and bottom ...
Notes for VPL-CW125 only • When "Aspect" on page 59. 22 Installing the Projector For details on installation, see "Installation Diagram" on the Signal menu is set to other than "Full 2", black bands appear at the top and bottom ...
Operating Instructions
Page 23
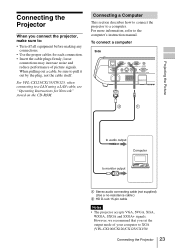
...audio output Computer to the computer's instruction manual. loose connections may increase noise and reduce performance of your computer to XGA (VPL-CX100/CX120/CX125/CX150/ Connecting the Projector 23 For more information, refer to monitor output A Stereo audio connecting cable (not supplied) (Use a no-... D-sub 15-pin cable Notes • The projector accepts VGA, SVGA, XGA, WXGA, SXGA and SXGA+ signals. When pulling out a cable, be sure to a computer. Connecting the Projector When you set the output mode of picture signals. For VPL-CX125/CX155/CW125, when connecting to : •...
...audio output Computer to the computer's instruction manual. loose connections may increase noise and reduce performance of your computer to XGA (VPL-CX100/CX120/CX125/CX150/ Connecting the Projector 23 For more information, refer to monitor output A Stereo audio connecting cable (not supplied) (Use a no-... D-sub 15-pin cable Notes • The projector accepts VGA, SVGA, XGA, WXGA, SXGA and SXGA+ signals. When pulling out a cable, be sure to a computer. Connecting the Projector When you set the output mode of picture signals. For VPL-CX125/CX155/CW125, when connecting to : •...
Operating Instructions
Page 24
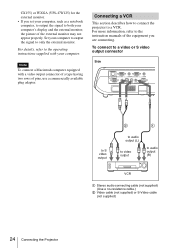
... supplied) (Use a no-resistance cable.) B Video cable (not supplied) or S-Video cable (not supplied) 24 Connecting the Projector For more information, refer to a VCR. Connecting a VCR This section describes how to connect the projector to the instruction manuals of the equipment you set your computer's display and the external monitor, the picture... computer to output the signal to both your computer, such as a notebook computer, to output the signal to only the external monitor. CX155) or WXGA (VPL-CW125) for the external monitor. • If you are connecting.
... supplied) (Use a no-resistance cable.) B Video cable (not supplied) or S-Video cable (not supplied) 24 Connecting the Projector For more information, refer to a VCR. Connecting a VCR This section describes how to connect the projector to the instruction manuals of the equipment you set your computer's display and the external monitor, the picture... computer to output the signal to both your computer, such as a notebook computer, to output the signal to only the external monitor. CX155) or WXGA (VPL-CW125) for the external monitor. • If you are connecting.

Operating Instructions
Page 25
... Signal menu according to the input signal. • When you connect the projector to a video GBR output connector, select "Video GBR" or when you connect the projector to a component output connector, select "Component" with the "Input-A Signal Sel." Connecting the Projector 25 To connect to a video GBR/ Component output connector Side NETWORK INPUT...
... Signal menu according to the input signal. • When you connect the projector to a video GBR output connector, select "Video GBR" or when you connect the projector to a component output connector, select "Component" with the "Input-A Signal Sel." Connecting the Projector 25 To connect to a video GBR/ Component output connector Side NETWORK INPUT...

Operating Instructions
Page 26
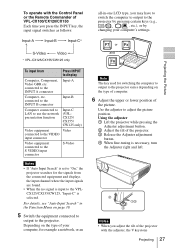
To operate with the Remote Commander of VPL-CX125/ CX155/CW125 You can select directly the input signal you want to the projector. 4 Select the input source. The ON/STANDBY indicator flashes in green, and then lights in red and the projector goes into a wall outlet, then connect all equipment. Projecting .../CX155/CW125 APA INPUT KEY STONE /TILT LENS ENTER AUTO FOCUS RESET MENU FREEZE PIC MUTING D ZOOM AUDIO MUTING VOLUME 2 4 VPL-CX100/CX120/CX150 1 Plug the AC power cord into standby mode. 2 Press the ?/1 key. The ON/STANDBY indicator lights in green. 3 Turn on the ...
To operate with the Remote Commander of VPL-CX125/ CX155/CW125 You can select directly the input signal you want to the projector. 4 Select the input source. The ON/STANDBY indicator flashes in green, and then lights in red and the projector goes into a wall outlet, then connect all equipment. Projecting .../CX155/CW125 APA INPUT KEY STONE /TILT LENS ENTER AUTO FOCUS RESET MENU FREEZE PIC MUTING D ZOOM AUDIO MUTING VOLUME 2 4 VPL-CX100/CX120/CX150 1 Plug the AC power cord into standby mode. 2 Press the ?/1 key. The ON/STANDBY indicator lights in green. 3 Turn on the ...
Operating Instructions
Page 27
..., "Input-C" is necessary, turn the Adjuster right and left. 2 13 4 Notes • When you adjust the tilt of the projector with the Control Panel or the Remote Commander of VPL-CX100/CX120/CX150 Each time you press the INPUT key, the input signal switches as follows: all-in the Function Menu on... page 39. 5 Switch the equipment connected to output to the projector. For details, see "Auto Input Search" in -one LCD type, you may have to...
..., "Input-C" is necessary, turn the Adjuster right and left. 2 13 4 Notes • When you adjust the tilt of the projector with the Control Panel or the Remote Commander of VPL-CX100/CX120/CX150 Each time you press the INPUT key, the input signal switches as follows: all-in the Function Menu on... page 39. 5 Switch the equipment connected to output to the projector. For details, see "Auto Input Search" in -one LCD type, you may have to...
Operating Instructions
Page 28
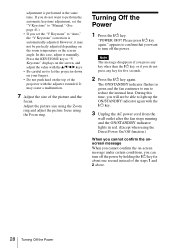
..." displays on the screen, and adjust the value with the v/V/b/B keys. • Be careful not to let the projector down on your fingers. • Do not push hard on the top of the projector with the ?/1 key. 3 Unplug the AC power cord from the wall outlet after the fan stops running and...
..." displays on the screen, and adjust the value with the v/V/b/B keys. • Be careful not to let the projector down on your fingers. • Do not push hard on the top of the projector with the ?/1 key. 3 Unplug the AC power cord from the wall outlet after the fan stops running and...


