
Operating Instructions
Page 2
... magnitude to Part 15 of Conformity Trade Name: SONY Model No.: VPL-AW15, VPL-AW10 Responsible Party: Sony Electronics Inc. This symbol is intended to alert the user to the presence of uninsulated "dangerous voltage" within the product's enclosure that any questions about this apparatus to the following measures: - This symbol is connected. - However, there is for help. To avoid...
... magnitude to Part 15 of Conformity Trade Name: SONY Model No.: VPL-AW15, VPL-AW10 Responsible Party: Sony Electronics Inc. This symbol is intended to alert the user to the presence of uninsulated "dangerous voltage" within the product's enclosure that any questions about this apparatus to the following measures: - This symbol is connected. - However, there is for help. To avoid...
Operating Instructions
Page 5
... the projector 7 Location of Controls Front/Side 8 Rear/Bottom 9 Remote Control 10 Connections and Preparations Unpacking 11 Step 1: Installing the Projector .........12 Before Setting Up the Projector 12 Positioning the Projector and a screen 14 Step 2: Connecting the Projector .....17 Connecting to a VCR 17 Connecting to a Computer ..........20 Step 3: Adjusting the Picture Position 21 Step 4: Selecting the Menu Language 25 Projecting Projecting the Picture on the Screen 27 Turning Off the Power 28 Selecting the Wide Screen Mode...
... the projector 7 Location of Controls Front/Side 8 Rear/Bottom 9 Remote Control 10 Connections and Preparations Unpacking 11 Step 1: Installing the Projector .........12 Before Setting Up the Projector 12 Positioning the Projector and a screen 14 Step 2: Connecting the Projector .....17 Connecting to a VCR 17 Connecting to a Computer ..........20 Step 3: Adjusting the Picture Position 21 Step 4: Selecting the Menu Language 25 Projecting Projecting the Picture on the Screen 27 Turning Off the Power 28 Selecting the Wide Screen Mode...
Operating Instructions
Page 6
Others Troubleshooting 51 Warning Indicators 53 Message Lists 54 Replacing the Lamp and the Air Filter and cleaning the Ventilation holes (intake 55 Replacing the Air Filter 58 Fitting the lens cap 58 Specifications 59 Preset Signals 61 Input Signals and Adjustable/ Setting Items 64 Ceiling Installation 66 When Using the PSS-H10 Projector Suspension Support ......... 66 When Using the PSS-610 Projector Suspension Support ......... 70 Index 73 6
Others Troubleshooting 51 Warning Indicators 53 Message Lists 54 Replacing the Lamp and the Air Filter and cleaning the Ventilation holes (intake 55 Replacing the Air Filter 58 Fitting the lens cap 58 Specifications 59 Preset Signals 61 Input Signals and Adjustable/ Setting Items 64 Ceiling Installation 66 When Using the PSS-H10 Projector Suspension Support ......... 66 When Using the PSS-610 Projector Suspension Support ......... 70 Index 73 6
Operating Instructions
Page 8
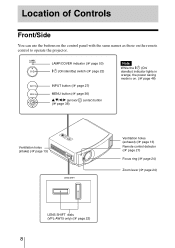
LAMP/COVER indicator (1 page 53) ?/1 (On/standby) switch (1 page 22) INPUT button (1 page 27) MENU button (1 page 36) v/V/b/B (arrow)/ (enter) button (1 page 36) Note While the ?/1 (On/ standby) indicator lights in orange, the power saving mode is on the remote control to operate the projector. Location of Controls Front/Side You can use the buttons on the control panel with the same names as those on . (1 page 46) Ventilation holes (intake) (1 page 13) Ventilation holes (exhaust) (1 page...
LAMP/COVER indicator (1 page 53) ?/1 (On/standby) switch (1 page 22) INPUT button (1 page 27) MENU button (1 page 36) v/V/b/B (arrow)/ (enter) button (1 page 36) Note While the ?/1 (On/ standby) indicator lights in orange, the power saving mode is on the remote control to operate the projector. Location of Controls Front/Side You can use the buttons on the control panel with the same names as those on . (1 page 46) Ventilation holes (intake) (1 page 13) Ventilation holes (exhaust) (1 page...

Operating Instructions
Page 11
... in the illustration. Remove this lens cap when you use the projector. • Operating Instructions (this manual) • AC power cord (1) • Air filter (for replacement) (1) Inserting the batteries into the remote control Push and slide to project the picture, etc. Connections and Preparations Connections and Preparations This section describes how to install the projector and screen, how to connect the equipment from which you want to open. Unpacking Check the carton to make...
... in the illustration. Remove this lens cap when you use the projector. • Operating Instructions (this manual) • AC power cord (1) • Air filter (for replacement) (1) Inserting the batteries into the remote control Push and slide to project the picture, etc. Connections and Preparations Connections and Preparations This section describes how to install the projector and screen, how to connect the equipment from which you want to open. Unpacking Check the carton to make...
Operating Instructions
Page 22
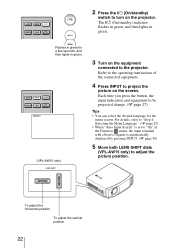
... Menu Language". (1 page 25) • When "Auto Input Search" is set to "On" in the Function menu, the input terminal with effective signals is automatically displayed by pressing INPUT. (1 page 48) 5 Move both LENS SHIFT dials (VPL-AW15 only) to turn on the projector. The ?/1 (On/standby) indicator flashes in green, and then lights in green. (VPL-AW15 only) 3 Turn on the screen. Refer to the operating instructions of the connected equipment. 4 Press INPUT to be projected change...
... Menu Language". (1 page 25) • When "Auto Input Search" is set to "On" in the Function menu, the input terminal with effective signals is automatically displayed by pressing INPUT. (1 page 48) 5 Move both LENS SHIFT dials (VPL-AW15 only) to turn on the projector. The ?/1 (On/standby) indicator flashes in green, and then lights in green. (VPL-AW15 only) 3 Turn on the screen. Refer to the operating instructions of the connected equipment. 4 Press INPUT to be projected change...
Operating Instructions
Page 41
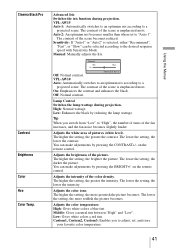
VPL-AW10 Auto: Automatically switches to an optimum iris according to "Auto 1". Low: Enhances the black by pressing the CONTRAST+/- Adjusts the intensity of pictures (white level). The higher the setting, the greater the intensity. Adjusts the color tone. Middle: Gives a neutral tint between "High" and "Low". Auto 2: An optimum iris becomes smaller than when set , and store your favorite color temperature. 41 Manual: Manually adjusts the Iris. Using the Menus...
VPL-AW10 Auto: Automatically switches to an optimum iris according to "Auto 1". Low: Enhances the black by pressing the CONTRAST+/- Adjusts the intensity of pictures (white level). The higher the setting, the greater the intensity. Adjusts the color tone. Middle: Gives a neutral tint between "High" and "Low". Auto 2: An optimum iris becomes smaller than when set , and store your favorite color temperature. 41 Manual: Manually adjusts the Iris. Using the Menus...
Operating Instructions
Page 46
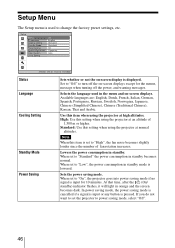
... Setting Standby Mode Power Saving Sets whether or not the on-screen display is pressed. High: Use this setting when using the projector at high altitudes. In power saving mode, the power saving mode is cancelled if a signal is input or any button is displayed. Set to "Off" to turn off the power, and warning messages. At that time, after the ?/1 (On/ standby) indicator flashes, it will light in the menu and on -screen displays except for 10 minutes. Selects the language used to change the factory...
... Setting Standby Mode Power Saving Sets whether or not the on-screen display is pressed. High: Use this setting when using the projector at high altitudes. In power saving mode, the power saving mode is cancelled if a signal is input or any button is displayed. Set to "Off" to turn off the power, and warning messages. At that time, after the ?/1 (On/ standby) indicator flashes, it will light in the menu and on -screen displays except for 10 minutes. Selects the language used to change the factory...
Operating Instructions
Page 50
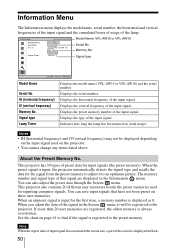
... projector. • You cannot change any items listed above. Model Name: VPL-AW15 or VPL-AW10 Serial No. Memory No. Notes • fH (horizontal frequency) and fV(vertical frequency) may not be registered to adjust it will be displayed depending on the input signal used for inputting computer signals. When you adjust the data of the screen is registered to an optimum picture. Displays the horizontal frequency of the lamp...
... projector. • You cannot change any items listed above. Model Name: VPL-AW15 or VPL-AW10 Serial No. Memory No. Notes • fH (horizontal frequency) and fV(vertical frequency) may not be registered to adjust it will be displayed depending on the input signal used for inputting computer signals. When you adjust the data of the screen is registered to an optimum picture. Displays the horizontal frequency of the lamp...
Operating Instructions
Page 51
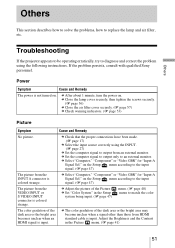
... 17) c Select the input source correctly using the following instructions. Troubleshooting If the projector appears to be operating erratically, try to diagnose and correct the problem using the INPUT. (1 page 27) c Set the computer signal to the input signal. (1 page 47) The picture from an external monitor. c Set the computer signal to output only to replace the lamp and air filter, etc. c Adjust the picture of the Picture c Set "Color System" in the Picture menu. (1 page 41) 51...
... 17) c Select the input source correctly using the following instructions. Troubleshooting If the projector appears to be operating erratically, try to diagnose and correct the problem using the INPUT. (1 page 27) c Set the computer signal to the input signal. (1 page 47) The picture from an external monitor. c Set the computer signal to output only to replace the lamp and air filter, etc. c Adjust the picture of the Picture c Set "Color System" in the Picture menu. (1 page 41) 51...
Operating Instructions
Page 52
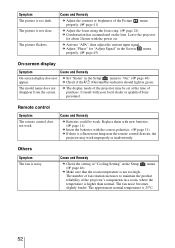
... qualified Sony personnel. Remote control Symptom The remote control does not work improperly or inadvertently. Leave the projector for "Adjust Signal" in the Screen menu properly. (1 page 45) On-screen display Symptom Cause and Remedy On-screen display does not c Set "Status" in a room, where the temperature is not too high. c Check if the ?/1 (On/standby) indicator should light in the Setup menu. (1 page 46) c Make sure that the room temperature is higher than normal. The fan...
... qualified Sony personnel. Remote control Symptom The remote control does not work improperly or inadvertently. Leave the projector for "Adjust Signal" in the Screen menu properly. (1 page 45) On-screen display Symptom Cause and Remedy On-screen display does not c Set "Status" in a room, where the temperature is not too high. c Check if the ?/1 (On/standby) indicator should light in the Setup menu. (1 page 46) c Make sure that the room temperature is higher than normal. The fan...
Operating Instructions
Page 53
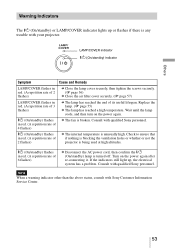
... of 4 flashes) c The fan is any trouble with qualified Sony personnel. ?/1 (On/standby) flashes in red. (A repetition rate of its useful lifespan. Note When a warning indicator other than the above status, consult with qualified Sony personnel. Others Warning Indicators The ?/1 (On/standby) or LAMP/COVER indicator lights up , the electrical system has a problem. If the indicators still light up or flashes if there is broken. Consult with Sony Customer Information Service Center. 53 Replace the lamp. (1 page...
... of 4 flashes) c The fan is any trouble with qualified Sony personnel. ?/1 (On/standby) flashes in red. (A repetition rate of its useful lifespan. Note When a warning indicator other than the above status, consult with qualified Sony personnel. Others Warning Indicators The ?/1 (On/standby) or LAMP/COVER indicator lights up , the electrical system has a problem. If the indicators still light up or flashes if there is broken. Consult with Sony Customer Information Service Center. 53 Replace the lamp. (1 page...
Operating Instructions
Page 54
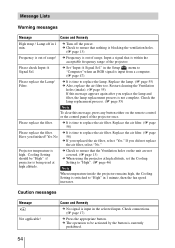
... covered. (1 page 13) c When using the projector at high altitude. If you finished? Cooling Setting should be activated by the button is input in 1 min. Check connections. (1 page 17) c Press the appropriate button. c Frequency is being used at high altitude, set the Cooling Setting to "High". (1 page 46) Note When temperature inside the projector remains high, the Cooling Setting is switched to "High" in the Setup menu to replace the air filter. c Set "Input-A Signal Sel." Caution messages Message x Not applicable! Input a signal...
... covered. (1 page 13) c When using the projector at high altitude. If you finished? Cooling Setting should be activated by the button is input in 1 min. Check connections. (1 page 17) c Press the appropriate button. c Frequency is being used at high altitude, set the Cooling Setting to "High". (1 page 46) Note When temperature inside the projector remains high, the Cooling Setting is switched to "High" in the Setup menu to replace the air filter. c Set "Input-A Signal Sel." Caution messages Message x Not applicable! Input a signal...
Operating Instructions
Page 55
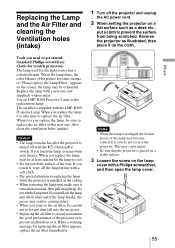
... you may be exhausted. When a warning message for the light source has a certain lifespan. Replacing the Lamp and the Air Filter and cleaning the Ventilation holes (intake) 1 Turn off the projector and unplug the AC power cord. 2 When setting the projector on a flat surface such as the replacement lamp. Use an LMP-H160 Projector Lamp as a desk etc., put a cloth to replacing the lamp when the projector is supplied with a soft cloth. • Pay...
... you may be exhausted. When a warning message for the light source has a certain lifespan. Replacing the Lamp and the Air Filter and cleaning the Ventilation holes (intake) 1 Turn off the projector and unplug the AC power cord. 2 When setting the projector on a flat surface such as the replacement lamp. Use an LMP-H160 Projector Lamp as a desk etc., put a cloth to replacing the lamp when the projector is supplied with a soft cloth. • Pay...
Operating Instructions
Page 57
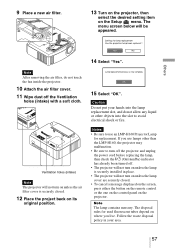
... the air filter cover is securely closed . • To cancel a message displayed on the screen, press either the button on the remote control or the one on the control panel on its original position. 14 Select "Yes". 15 Select "OK". 9 Place a new air filter. 13 Turn on the projector, then select the desired setting item on where you use an LMP-H160 Projector Lamp for used fluorescent tubes depend on the Setup menu...
... the air filter cover is securely closed . • To cancel a message displayed on the screen, press either the button on the remote control or the one on the control panel on its original position. 14 Select "Yes". 15 Select "OK". 9 Place a new air filter. 13 Turn on the projector, then select the desired setting item on where you use an LMP-H160 Projector Lamp for used fluorescent tubes depend on the Setup menu...
Operating Instructions
Page 58
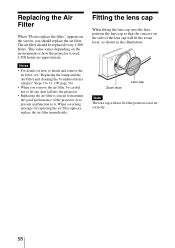
... is used. 1,500 hours are approximate. Replacing the Air Filter When "Please replace the filter." Fitting the lens cap When fitting the lens cap onto the lens, position the lens cap so that the concave on how to attach and remove the air filter, see "Replacing the Lamp and the Air Filter and cleaning the Ventilation holes (intake)" Steps 7 to it. The air filter should replace the air filter. When a warning message for replacing the air filter appears, replace the air filter...
... is used. 1,500 hours are approximate. Replacing the Air Filter When "Please replace the filter." Fitting the lens cap When fitting the lens cap onto the lens, position the lens cap so that the concave on how to attach and remove the air filter, see "Replacing the Lamp and the Air Filter and cleaning the Ventilation holes (intake)" Steps 7 to it. The air filter should replace the air filter. When a warning message for replacing the air filter appears, replace the air filter...
Operating Instructions
Page 60
Supplied accessories Remote control RM-PJAW15 (1) (VPL-AW15 only) RM-PJAW10 (1) (VPL-AW10 only) Size AA (R6) batteries (2) AC power cord (1) Air filter (for replacement) Projector Suspension Support PSS-H10, PSS-610 60 Optional accessories Projector Lamp LMP-H160 (for replacement) (1) Lens Cap (1) Operating Instructions (1) Design and specifications are subject to change without notice.
Supplied accessories Remote control RM-PJAW15 (1) (VPL-AW15 only) RM-PJAW10 (1) (VPL-AW10 only) Size AA (R6) batteries (2) AC power cord (1) Air filter (for replacement) Projector Suspension Support PSS-H10, PSS-610 60 Optional accessories Projector Lamp LMP-H160 (for replacement) (1) Lens Cap (1) Operating Instructions (1) Design and specifications are subject to change without notice.
Marketing Specifications (VPL-AW10)
Page 1
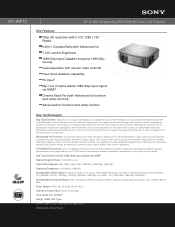
... source. And each mode has three sensitivity settings- Two "Auto" nodes offer the user some flexibility depending on television. Horizontal 19-92KHz, Vertical 48-92Hz, Maximum Input Signal Resolution: up to 6,000:1 can 't be faithfully reproduced. Because of the limitations of any input source, the 12- VPL-AW10 40" to 200" (Diagonally) BRAVIA® AW Series LCD Projector Key Features 720p HD resolution with 3 LCD 1280 x 720 Panels...
... source. And each mode has three sensitivity settings- Two "Auto" nodes offer the user some flexibility depending on television. Horizontal 19-92KHz, Vertical 48-92Hz, Maximum Input Signal Resolution: up to 6,000:1 can 't be faithfully reproduced. Because of the limitations of any input source, the 12- VPL-AW10 40" to 200" (Diagonally) BRAVIA® AW Series LCD Projector Key Features 720p HD resolution with 3 LCD 1280 x 720 Panels...
Marketing Specifications (VPL-AW10)
Page 2
... are subject to reslutions supported by both the PC and the Sony TV. Please visit the Dealer Network for supported resolutions. Conditions: Lamp Control Low and Advanced Iris ON. 3. Sony and BRAVIA are approximate. Dimensions Weight: 12lbs 12oz (5.8kg) Supplied Accessories Instruction Manual Remote Control (RM-PJAW10) Air Filter AA Battery x2 Lens Cap Optional Accessories DynaClear Screen™ (VPS-80DS) Replacement Lamp (LMP-H160) Replacement Air Filter Suspension Support (PSS-H10) - Nonmetric weights...
... are subject to reslutions supported by both the PC and the Sony TV. Please visit the Dealer Network for supported resolutions. Conditions: Lamp Control Low and Advanced Iris ON. 3. Sony and BRAVIA are approximate. Dimensions Weight: 12lbs 12oz (5.8kg) Supplied Accessories Instruction Manual Remote Control (RM-PJAW10) Air Filter AA Battery x2 Lens Cap Optional Accessories DynaClear Screen™ (VPS-80DS) Replacement Lamp (LMP-H160) Replacement Air Filter Suspension Support (PSS-H10) - Nonmetric weights...

Limited Warranty (US Only)
Page 1
... purchase receipt is longer. Printed in material or workmanship for the LCD Projector Lamp the period will , at its option, (i) repair the product using new or refurbished parts or (ii) replace the product with a refurbished product. Pursuant to this Limited Warranty, Sony will, at its option, repair or replace with refurbished product, product determined to be defective, except that has been...
... purchase receipt is longer. Printed in material or workmanship for the LCD Projector Lamp the period will , at its option, (i) repair the product using new or refurbished parts or (ii) replace the product with a refurbished product. Pursuant to this Limited Warranty, Sony will, at its option, repair or replace with refurbished product, product determined to be defective, except that has been...


