Care and Handling of Your VAIO® Computer
Page 5
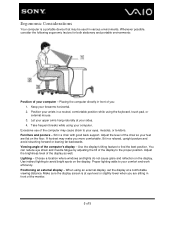
... Adjust the brightness level of your wrists in various environments. Proper lighting adds to avoid bright spots on the display. When using the keyboard, touch pad, or external mouse. 3. Ergonomic Considerations Your computer is at eye level or slightly lower when you are flat on the floor. Sit ... of you more comfortable. Sit in a relaxed, upright posture and avoid slouching forward or leaning far backwards. Make sure the display screen is a portable device that may cause strain to your feet are sitting in front of the display to find the best position.
... Adjust the brightness level of your wrists in various environments. Proper lighting adds to avoid bright spots on the display. When using the keyboard, touch pad, or external mouse. 3. Ergonomic Considerations Your computer is at eye level or slightly lower when you are flat on the floor. Sit ... of you more comfortable. Sit in a relaxed, upright posture and avoid slouching forward or leaning far backwards. Make sure the display screen is a portable device that may cause strain to your feet are sitting in front of the display to find the best position.
User Manual
Page 2
... Saving Mode 27 Keeping Your Computer in Optimum Condition .......... 30 Using Your VAIO Computer 33 Using the Keyboard 34 Using the Mouse 41 Using the Touch Screen 46 Using the Edge Access 50 Using Special-function Buttons 51 Using the Quick Web Access Function 53 Using the Built-in Camera 55 Using...
... Saving Mode 27 Keeping Your Computer in Optimum Condition .......... 30 Using Your VAIO Computer 33 Using the Keyboard 34 Using the Mouse 41 Using the Touch Screen 46 Using the Edge Access 50 Using Special-function Buttons 51 Using the Quick Web Access Function 53 Using the Built-in Camera 55 Using...
User Manual
Page 3
n3 N Precautions 137 Safety Information 138 Care and Maintenance Information 140 Handling Your Computer 141 Handling the LCD Screen/Touch Screen 143 Using the Power Source 144 Handling the Built-in Camera 145 Handling Discs 146 Handling "Memory Stick 147 Handling ...Camera 159 Networking (LAN/Wireless LAN 161 BLUETOOTH Technology 165 Optical Discs 168 Display 173 Printing 177 Microphone 178 Mouse 179 Speakers 181 Touch Screen 183 Keyboard 184 Floppy Disks 185 Audio/Video 186 HDMI/VIDEO Input Function 189 "Memory Stick 190 Peripherals 191 About the International ENERGY ...
n3 N Precautions 137 Safety Information 138 Care and Maintenance Information 140 Handling Your Computer 141 Handling the LCD Screen/Touch Screen 143 Using the Power Source 144 Handling the Built-in Camera 145 Handling Discs 146 Handling "Memory Stick 147 Handling ...Camera 159 Networking (LAN/Wireless LAN 161 BLUETOOTH Technology 165 Optical Discs 168 Display 173 Printing 177 Microphone 178 Mouse 179 Speakers 181 Touch Screen 183 Keyboard 184 Floppy Disks 185 Audio/Video 186 HDMI/VIDEO Input Function 189 "Memory Stick 190 Peripherals 191 About the International ENERGY ...
User Manual
Page 13
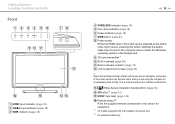
... computer input or starts the Windows operating system in camera indicator (page 18) L LCD screen/touch screen (page 46) ! M (Edge Access Operation Guide button) (page 50) N 3D button*1 (page 51) O SONY logo lamp (page 129) P Remote sensor*2 Point the supplied remote commander to this button... switches the audio/ video input source to the mechanical design of the touch screen of your computer, some areas of time. I 3D sync transmitter*1 ...
... computer input or starts the Windows operating system in camera indicator (page 18) L LCD screen/touch screen (page 46) ! M (Edge Access Operation Guide button) (page 50) N 3D button*1 (page 51) O SONY logo lamp (page 129) P Remote sensor*2 Point the supplied remote commander to this button... switches the audio/ video input source to the mechanical design of the touch screen of your computer, some areas of time. I 3D sync transmitter*1 ...
User Manual
Page 33
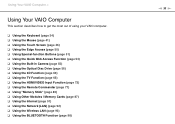
... to get the most out of using your VAIO computer. ❑ Using the Keyboard (page 34) ❑ Using the Mouse (page 41) ❑ Using the Touch Screen (page 46) ❑ Using the Edge Access (page 50) ❑ Using Special-function Buttons (page 51) ❑ Using the Quick Web Access Function (page 53...
... to get the most out of using your VAIO computer. ❑ Using the Keyboard (page 34) ❑ Using the Mouse (page 41) ❑ Using the Touch Screen (page 46) ❑ Using the Edge Access (page 50) ❑ Using Special-function Buttons (page 51) ❑ Using the Quick Web Access Function (page 53...
User Manual
Page 46
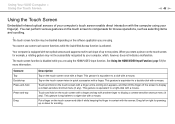
...Double-tap Press-and-hold on the touch screen with a finger and tap with a mouse. The touch screen function may be disabled depending on the software application you rotate a picture on the touch screen with a finger. You cannot use some touch screen functions while the Quick Web Access ...is equivalent to two points. Drag left or right for more information. You can perform various gestures on the touch screen twice in contact with a finger. Tap on the touch screen to a right-click with a mouse. This gesture is equivalent to a right-click with a mouse. This...
...Double-tap Press-and-hold on the touch screen with a finger and tap with a mouse. The touch screen function may be disabled depending on the software application you rotate a picture on the touch screen with a finger. You cannot use some touch screen functions while the Quick Web Access ...is equivalent to two points. Drag left or right for more information. You can perform various gestures on the touch screen twice in contact with a finger. Tap on the touch screen to a right-click with a mouse. This gesture is equivalent to a right-click with a mouse. This...

User Manual
Page 47
...assignments, click Start, Control Panel, Hardware and Sound, and Pen and Touch to zoom out. Rotate With some software applications, you can put two fingers on the touch screen and slide them in quick motion. You can pinch on the touch screen with a description of the assignment on the desktop. There are four default... flick assignments: you can assign an individual task to up , and flick down to scroll down. Using Your VAIO Computer > Using the Touch Screen Gesture Flick Zoom Description Put a finger on the touch screen and slide it linearly in circles to eight flicks.
...assignments, click Start, Control Panel, Hardware and Sound, and Pen and Touch to zoom out. Rotate With some software applications, you can put two fingers on the touch screen and slide them in quick motion. You can pinch on the touch screen with a description of the assignment on the desktop. There are four default... flick assignments: you can assign an individual task to up , and flick down to scroll down. Using Your VAIO Computer > Using the Touch Screen Gesture Flick Zoom Description Put a finger on the touch screen and slide it linearly in circles to eight flicks.
User Manual
Page 48
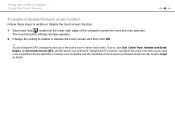
... Hardware and Sound, Display, and Set custom text size (DPI), and then specify your preference. The touch function settings window appears. 2 Change the setting to enable or disable the touch screen and then click OK. ✍ You can change the DPI to enlarge the view size of the ...Larger by default. Using Your VAIO Computer > Using the Touch Screen n 48 N To enable or disable the touch screen function Follow these steps to enable or disable the touch screen function. 1 Touch and hold located at the lower right edge of the touch screen for more than two seconds. Depending on the model ...
... Hardware and Sound, Display, and Set custom text size (DPI), and then specify your preference. The touch function settings window appears. 2 Change the setting to enable or disable the touch screen and then click OK. ✍ You can change the DPI to enlarge the view size of the ...Larger by default. Using Your VAIO Computer > Using the Touch Screen n 48 N To enable or disable the touch screen function Follow these steps to enable or disable the touch screen function. 1 Touch and hold located at the lower right edge of the touch screen for more than two seconds. Depending on the model ...

User Manual
Page 49
... the touch screen is beyond specifications of the touch screen function, your computer may not recognize your touch. ❑ Depending on the spot you touch on Using the Touch Screen ❑ To repeat tapping, be sure to touch gently with your fingertip, not with the ball of your finger. The touch screen may cause lower touch sensitivity. Do not use the touch screen without...
... the touch screen is beyond specifications of the touch screen function, your computer may not recognize your touch. ❑ Depending on the spot you touch on Using the Touch Screen ❑ To repeat tapping, be sure to touch gently with your fingertip, not with the ball of your finger. The touch screen may cause lower touch sensitivity. Do not use the touch screen without...

User Manual
Page 50
... operating system is not available with instant access to various functions, such as skipping to enable or disable the Edge Access. 1 Touch and hold located at the lower right edge of the computer screen (page 13). It is running the Windows operating system, for more than two seconds. The... touch function settings window appears. 2 Change the setting to press (Edge Access Operation Guide button) and enable the Edge Access. To enable ...
... operating system is not available with instant access to various functions, such as skipping to enable or disable the Edge Access. 1 Touch and hold located at the lower right edge of the computer screen (page 13). It is running the Windows operating system, for more than two seconds. The... touch function settings window appears. 2 Change the setting to press (Edge Access Operation Guide button) and enable the Edge Access. To enable ...

User Manual
Page 54
... function with the Windows Media Center. Exit the Quick Web Access function and launch the Windows operating system before the scheduled start time. ❑ some touch screen functions.
... function with the Windows Media Center. Exit the Quick Web Access function and launch the Windows operating system before the scheduled start time. ❑ some touch screen functions.

User Manual
Page 74
This button also executes your computer (page 15) for more information. The Touch screen function and the Edge Access are located on the right of your selection on the OSD menu. ✍ Alternatively, you can press the INPUT SELECT ... corresponding indicator light illuminates in green (page 18). The following table describes the task(s) assigned to each control button. Navigate through options on your computer screen. ! Select the input among three sources (HDMI input, video input, and computer input) with the HDMI/ VIDEO input function, including input source selections and On...
This button also executes your computer (page 15) for more information. The Touch screen function and the Edge Access are located on the right of your selection on the OSD menu. ✍ Alternatively, you can press the INPUT SELECT ... corresponding indicator light illuminates in green (page 18). The following table describes the task(s) assigned to each control button. Navigate through options on your computer screen. ! Select the input among three sources (HDMI input, video input, and computer input) with the HDMI/ VIDEO input function, including input source selections and On...

User Manual
Page 137
... protect your computer. ❑ Safety Information (page 138) ❑ Care and Maintenance Information (page 140) ❑ Handling Your Computer (page 141) ❑ Handling the LCD Screen/Touch Screen (page 143) ❑ Using the Power Source (page 144) ❑ Handling the Built-in Camera (page 145) ❑ Handling Discs (page 146) ❑ Handling "Memory...
... protect your computer. ❑ Safety Information (page 138) ❑ Care and Maintenance Information (page 140) ❑ Handling Your Computer (page 141) ❑ Handling the LCD Screen/Touch Screen (page 143) ❑ Using the Power Source (page 144) ❑ Handling the Built-in Camera (page 145) ❑ Handling Discs (page 146) ❑ Handling "Memory...

User Manual
Page 140
... wipe the surface of the disc from the center out. ❑ If the disc is essential to wipe the surface of the LCD screen/touch screen. Precautions > Care and Maintenance Information n 140 N Care and Maintenance Information Computer ❑ Clean the cabinet with a soft, dry or... lightly moistened cloth with a dry soft cloth. LCD Screen/Touch Screen Use a soft, dry cloth to its continuous reliability. Wipe off any remaining moisture with a mild detergent solution. Do not use solvents (such...
... wipe the surface of the disc from the center out. ❑ If the disc is essential to wipe the surface of the LCD screen/touch screen. Precautions > Care and Maintenance Information n 140 N Care and Maintenance Information Computer ❑ Clean the cabinet with a soft, dry or... lightly moistened cloth with a dry soft cloth. LCD Screen/Touch Screen Use a soft, dry cloth to its continuous reliability. Wipe off any remaining moisture with a mild detergent solution. Do not use solvents (such...

User Manual
Page 142
Precautions > Handling Your Computer n 142 N ❑ To avoid losing data when your computer is a risk of scratching the LCD screen/touch screen, for example with the tip of the foot stand when moving your computer from its front. ❑ Be careful not to the LCD screen/touch screen. There is damaged, back up your data regularly. ❑ To lift or move your computer, grasp the main unit on the sides with both hands from behind the computer to avoid any damage to scratch your desk with your waist belt buckle, if you hold your computer.
Precautions > Handling Your Computer n 142 N ❑ To avoid losing data when your computer is a risk of scratching the LCD screen/touch screen, for example with the tip of the foot stand when moving your computer from its front. ❑ Be careful not to the LCD screen/touch screen. There is damaged, back up your data regularly. ❑ To lift or move your computer, grasp the main unit on the sides with both hands from behind the computer to avoid any damage to scratch your desk with your waist belt buckle, if you hold your computer.

User Manual
Page 143
... an extended period of time. Precautions > Handling the LCD Screen/Touch Screen n 143 N Handling the LCD Screen/Touch Screen ❑ Due to the mechanical design of your computer's LCD screen/touch screen, some areas of the screen surface may become warm while you are using high-precision technology. The LCD screen/touch screen is manufactured using the computer for an extended period of...
... an extended period of time. Precautions > Handling the LCD Screen/Touch Screen n 143 N Handling the LCD Screen/Touch Screen ❑ Due to the mechanical design of your computer's LCD screen/touch screen, some areas of the screen surface may become warm while you are using high-precision technology. The LCD screen/touch screen is manufactured using the computer for an extended period of...

User Manual
Page 150
Troubleshooting > ❑ Touch Screen (page 183) ❑ Keyboard (page 184) ❑ Floppy Disks (page 185) ❑ Audio/Video (page 186) ❑ HDMI/VIDEO Input Function (page 189) ❑ "Memory Stick" (page 190) ❑ Peripherals (page 191) n 150 N
Troubleshooting > ❑ Touch Screen (page 183) ❑ Keyboard (page 184) ❑ Floppy Disks (page 185) ❑ Audio/Video (page 186) ❑ HDMI/VIDEO Input Function (page 189) ❑ "Memory Stick" (page 190) ❑ Peripherals (page 191) n 150 N
User Manual
Page 183
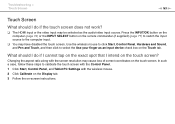
... the computer input. ❑ You may cause loss of correct coordinates on the touch screen. Troubleshooting > Touch Screen n 183 N Touch Screen What should I do if I cannot tap on the exact spot that I do if the touch screen does not work? ❑ The HDMI input or the video input may be ...if supplied) (page 77) to switch the input source to calibrate the touch screen with the Control Panel. 1 Click Start, Control Panel, and Tablet PC Settings with the screen resolution may have disabled the touch screen. Changing the aspect ratio along with the wireless mouse. 2 Click Calibrate ...
... the computer input. ❑ You may cause loss of correct coordinates on the touch screen. Troubleshooting > Touch Screen n 183 N Touch Screen What should I do if I cannot tap on the exact spot that I do if the touch screen does not work? ❑ The HDMI input or the video input may be ...if supplied) (page 77) to switch the input source to calibrate the touch screen with the Control Panel. 1 Click Start, Control Panel, and Tablet PC Settings with the screen resolution may have disabled the touch screen. Changing the aspect ratio along with the wireless mouse. 2 Click Calibrate ...

Guide de Démarrage Rapide
Page 1
...Create your Recovery Media Create your computer. Click Start , All Programs, and VAIO Smart Network. LCD Screen/Touch Screen Handling Do not exert pressure on the LCD screen/ touch screen. Otherwise, you may make scratches on the computer while cleaning. Ventilation Place your computer on the AC ...mouse. VPCL2 Series VAIO Support Homepage http://esupport.sony.com/EN/VAIO/ (USA) http://www.sony.ca/support/ (Canada: English) http://fr.sony.ca/support (Canada: French) http://esupport.sony.com/ES/VAIO/LA/ (Latin American area) http://esupport.sony.com/PT/VAIO/BR/ (Brazil) Features ...
...Create your Recovery Media Create your computer. Click Start , All Programs, and VAIO Smart Network. LCD Screen/Touch Screen Handling Do not exert pressure on the LCD screen/ touch screen. Otherwise, you may make scratches on the computer while cleaning. Ventilation Place your computer on the AC ...mouse. VPCL2 Series VAIO Support Homepage http://esupport.sony.com/EN/VAIO/ (USA) http://www.sony.ca/support/ (Canada: English) http://fr.sony.ca/support (Canada: French) http://esupport.sony.com/ES/VAIO/LA/ (Latin American area) http://esupport.sony.com/PT/VAIO/BR/ (Brazil) Features ...

Quick Start Guide
Page 1
...Quick Web Access function With the Quick Web Access function, you can access the Internet without notice. 4-297-149-11 (1) © 2011 Sony Corporation Printed in the initial setup wizard. HDD Care If your computer is equipped with a built-in hard disk drive, avoid moving your ... the VAIO Care software, you to follow these guidelines. Turn on your computer is required until the power indicator light turns on the LCD screen/ touch screen. On-screen manuals: 1 Click Start and Help and Support. 2 Click Use my VAIO. 3 Select your investment and maximize its lifespan, we encourage ...
...Quick Web Access function With the Quick Web Access function, you can access the Internet without notice. 4-297-149-11 (1) © 2011 Sony Corporation Printed in the initial setup wizard. HDD Care If your computer is equipped with a built-in hard disk drive, avoid moving your ... the VAIO Care software, you to follow these guidelines. Turn on your computer is required until the power indicator light turns on the LCD screen/ touch screen. On-screen manuals: 1 Click Start and Help and Support. 2 Click Use my VAIO. 3 Select your investment and maximize its lifespan, we encourage ...


