
User Guide
Page 3
n3 N Precautions 97 Safety Information 98 Care and Maintenance Information 102 Handling Your Computer 103 Handling the LCD Screen 105 Using the Power Source 106 Handling the Built-in Camera 107 Handling Discs 108 Using the Battery Pack 109 Handling "Memory Stick 110 Handling ...
n3 N Precautions 97 Safety Information 98 Care and Maintenance Information 102 Handling Your Computer 103 Handling the LCD Screen 105 Using the Power Source 106 Handling the Built-in Camera 107 Handling Discs 108 Using the Battery Pack 109 Handling "Memory Stick 110 Handling ...
User Guide
Page 4
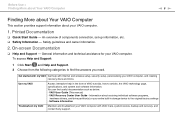
... manual may not be available on your computer, visit the Sony online support web site at the following URLs: ❑ For customers in USA http://esupport.sony.com/EN/VAIO/ ❑ For customers in Canada http://sony.ca/support/ ❑ For customers in Spanish-speaking Latin ...American countries or areas http://esupport.sony.com/ES/VAIO/LA ❑ For customers in Brazil http://esupport.sony.com/BR/ Sony has combined leading-edge technology in this Sony VAIO® computer, and welcome to provide a state-of-the-art personal computing ...
... manual may not be available on your computer, visit the Sony online support web site at the following URLs: ❑ For customers in USA http://esupport.sony.com/EN/VAIO/ ❑ For customers in Canada http://sony.ca/support/ ❑ For customers in Spanish-speaking Latin ...American countries or areas http://esupport.sony.com/ES/VAIO/LA ❑ For customers in Brazil http://esupport.sony.com/BR/ Sony has combined leading-edge technology in this Sony VAIO® computer, and welcome to provide a state-of-the-art personal computing ...
User Guide
Page 5
... to the original factory settings - Information about your VAIO computer. 1. VAIO Recovery Center User Guide - On-screen Documentation ❑ Help and Support - Use my VAIO Access interactive help with VAIO Care, system restore, backup and recovery, and contact Sony support. Software Information Troubleshoot my VAIO Maintain and troubleshoot your VAIO computer with Internet and wireless setup, security setup...
... to the original factory settings - Information about your VAIO computer. 1. VAIO Recovery Center User Guide - On-screen Documentation ❑ Help and Support - Use my VAIO Access interactive help with VAIO Care, system restore, backup and recovery, and contact Sony support. Software Information Troubleshoot my VAIO Maintain and troubleshoot your VAIO computer with Internet and wireless setup, security setup...
User Guide
Page 6
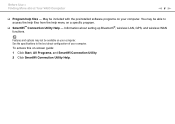
Before Use > Finding More about Your VAIO Computer n6 N ❑ Program help menu on your computer. You may not be included with the preinstalled software programs on -screen guide: 1 Click Start, All Programs, and SmartWi Connection Utility. 2 Click SmartWi Connection Utility Help. Features and options may be able to find out about setting...
Before Use > Finding More about Your VAIO Computer n6 N ❑ Program help menu on your computer. You may not be included with the preinstalled software programs on -screen guide: 1 Click Start, All Programs, and SmartWi Connection Utility. 2 Click SmartWi Connection Utility Help. Features and options may be able to find out about setting...
User Guide
Page 10
.... Before Use > Ergonomic Considerations n 10 N ❑ Viewing angle of the monitor. Proper lighting adds to avoid bright spots on the display. Make sure the display screen is at a comfortable viewing distance. Use the display's tilting feature to the proper position.
.... Before Use > Ergonomic Considerations n 10 N ❑ Viewing angle of the monitor. Proper lighting adds to avoid bright spots on the display. Make sure the display screen is at a comfortable viewing distance. Use the display's tilting feature to the proper position.
User Guide
Page 14
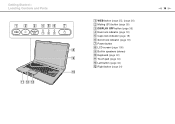
Getting Started > Locating Controls and Ports A WEB button (page 35), (page 36) B Muting (S1) button (page 35) C DISPLAY OFF button (page 35) D Num lock indicator (page 18) E Caps lock indicator (page 18) F Scroll lock indicator (page 18) G Power button H LCD screen (page 105) I Built-in speakers (stereo) J Keyboard (page 32) K Touch pad (page 34) L Left button (page 34) M Right button (page 34) n 14 N
Getting Started > Locating Controls and Ports A WEB button (page 35), (page 36) B Muting (S1) button (page 35) C DISPLAY OFF button (page 35) D Num lock indicator (page 18) E Caps lock indicator (page 18) F Scroll lock indicator (page 18) G Power button H LCD screen (page 105) I Built-in speakers (stereo) J Keyboard (page 32) K Touch pad (page 34) L Left button (page 34) M Right button (page 34) n 14 N
User Guide
Page 21
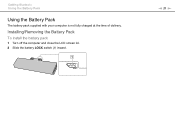
Getting Started > Using the Battery Pack Using the Battery Pack The battery pack supplied with your computer is not fully charged at the time of delivery. Installing/Removing the Battery Pack To install the battery pack 1 Turn off the computer and close the LCD screen lid. 2 Slide the battery LOCK switch (1) inward. n 21 N
Getting Started > Using the Battery Pack Using the Battery Pack The battery pack supplied with your computer is not fully charged at the time of delivery. Installing/Removing the Battery Pack To install the battery pack 1 Turn off the computer and close the LCD screen lid. 2 Slide the battery LOCK switch (1) inward. n 21 N
User Guide
Page 23
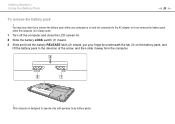
... designed to the AC adapter or if you remove the battery pack while the computer is on and not connected to operate only with genuine Sony battery packs. Getting Started > Using the Battery Pack n 23 N To remove the battery pack ! You may lose data if you remove the battery pack while... your computer is in Sleep mode. 1 Turn off the computer and close the LCD screen lid. 2 Slide the battery LOCK switch (1) inward. 3 Slide and hold the battery RELEASE latch (2) inward, put your fingertip underneath the tab (3) on the battery pack...
... designed to the AC adapter or if you remove the battery pack while the computer is on and not connected to operate only with genuine Sony battery packs. Getting Started > Using the Battery Pack n 23 N To remove the battery pack ! You may lose data if you remove the battery pack while... your computer is in Sleep mode. 1 Turn off the computer and close the LCD screen lid. 2 Slide the battery LOCK switch (1) inward. 3 Slide and hold the battery RELEASE latch (2) inward, put your fingertip underneath the tab (3) on the battery pack...
User Guide
Page 26
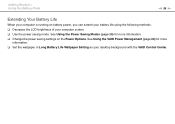
... settings on battery power, you can extend your battery life using the following methods. ❑ Decrease the LCD brightness of your desktop background with the VAIO Control Center. See Using the VAIO Power Management (page 88) for more information. ❑ Set the wallpaper in Long Battery Life Wallpaper Setting as your computer...
... settings on battery power, you can extend your battery life using the following methods. ❑ Decrease the LCD brightness of your desktop background with the VAIO Control Center. See Using the VAIO Power Management (page 88) for more information. ❑ Set the wallpaper in Long Battery Life Wallpaper Setting as your computer...
User Guide
Page 28
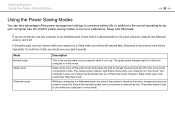
... extended period of time while it is disconnected from AC power, place the computer into Hibernate mode or turn it is turned off the LCD screen and places the built-in this mode. The orange power indicator light blinks slowly while your computer is impossible. If you should save your data...
... extended period of time while it is disconnected from AC power, place the computer into Hibernate mode or turn it is turned off the LCD screen and places the built-in this mode. The orange power indicator light blinks slowly while your computer is impossible. If you should save your data...
User Guide
Page 30
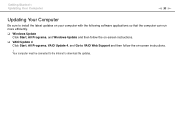
Getting Started > Updating Your Computer n 30 N Updating Your Computer Be sure to install the latest updates on your computer with the following software applications so that the computer can run more efficiently. ❑ Windows Update Click Start, All Programs, and Windows Update and then follow the on-screen instructions. ❑ VAIO Update 4 Click Start, All Programs, VAIO Update 4, and Go to download the updates. Your computer must be connected to the Internet to VAIO Web Support and then follow the on-screen instructions. !
Getting Started > Updating Your Computer n 30 N Updating Your Computer Be sure to install the latest updates on your computer with the following software applications so that the computer can run more efficiently. ❑ Windows Update Click Start, All Programs, and Windows Update and then follow the on-screen instructions. ❑ VAIO Update 4 Click Start, All Programs, VAIO Update 4, and Go to download the updates. Your computer must be connected to the Internet to VAIO Web Support and then follow the on-screen instructions. !
User Guide
Page 32
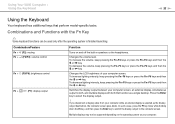
... pressing the Fn+F4 keys or press the Fn+F4 keys and then the M or , key. If you disconnect a display cable from your computer screen, an external display, simultaneous output to both that perform model-specific tasks. Changes the volume level. Changes the LCD brightness of your computer. In such.... To decrease the volume, keep pressing the Fn+F6 keys or press the Fn+F6 keys and then the M or , key. Using Your VAIO Computer > Using the Keyboard n 32 N Using the Keyboard Your keyboard has additional keys that function as the display output destination, the computer...
... pressing the Fn+F4 keys or press the Fn+F4 keys and then the M or , key. If you disconnect a display cable from your computer screen, an external display, simultaneous output to both that perform model-specific tasks. Changes the volume level. Changes the LCD brightness of your computer. In such.... To decrease the volume, keep pressing the Fn+F6 keys or press the Fn+F6 keys and then the M or , key. Using Your VAIO Computer > Using the Keyboard n 32 N Using the Keyboard Your keyboard has additional keys that function as the display output destination, the computer...
User Guide
Page 34
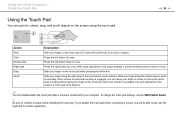
... pad (1) to place the pointer (2) on the touch pad while pressing the left button. Press the left button twice in circles on the screen using the touch pad. Press the right button (4) once. To change the touch pad settings, use only the keyboard for pointer operations. Slide.... Once vertical or horizontal scrolling is engaged, you will be able to connect a mouse before disabling the touch pad. Be sure to use the VAIO Control Center. ! With many applications, this action displays a context-sensitive shortcut menu (if any). If you disable the touch pad before connecting a...
... pad (1) to place the pointer (2) on the touch pad while pressing the left button. Press the left button twice in circles on the screen using the touch pad. Press the right button (4) once. To change the touch pad settings, use only the keyboard for pointer operations. Slide.... Once vertical or horizontal scrolling is engaged, you will be able to connect a mouse before disabling the touch pad. Be sure to use the VAIO Control Center. ! With many applications, this action displays a context-sensitive shortcut menu (if any). If you disable the touch pad before connecting a...

User Guide
Page 36
...; Press the WEB button. ❑ Press the power button on the computer. 2 Follow the instructions in the initial setup wizard. Using Your VAIO Computer > Using the Quick Web Access Function n 36 N Using the Quick Web Access Function The Quick Web Access function enables you immediately to ...exit the Quick Web Access function. Exiting the Quick Web Access Function ! icon located at the lower left corner of the screen. Activating the Quick Web Access Function To activate the Quick Web Access function, your computer must be off. To activate the Quick Web Access ...
...; Press the WEB button. ❑ Press the power button on the computer. 2 Follow the instructions in the initial setup wizard. Using Your VAIO Computer > Using the Quick Web Access Function n 36 N Using the Quick Web Access Function The Quick Web Access function enables you immediately to ...exit the Quick Web Access function. Exiting the Quick Web Access Function ! icon located at the lower left corner of the screen. Activating the Quick Web Access Function To activate the Quick Web Access function, your computer must be off. To activate the Quick Web Access ...
User Guide
Page 50
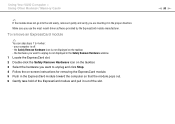
It may take time to format "Memory Stick" depending on -screen instructions. ! Using Your VAIO Computer > Using "Memory Stick" 6 Click Start. 7 Follow the on the media type. n 50 N
It may take time to format "Memory Stick" depending on -screen instructions. ! Using Your VAIO Computer > Using "Memory Stick" 6 Click Start. 7 Follow the on the media type. n 50 N
User Guide
Page 53
the Safely Remove Hardware icon is not displayed on the taskbar. 3 Select the hardware you want to unplug is off. - n 53 N Using Your VAIO Computer > Using Other Modules / Memory Cards ✍ If the module does not go into the slot easily, remove it gently and verify you are ...is not displayed in the proper direction. To remove an ExpressCard module ✍ You can skip steps 1 to unplug and click Stop. 4 Follow the on-screen instructions for removing the ExpressCard module. 5 Push in the ExpressCard module toward the computer so that the module pops out. 6 Gently take hold of the...
the Safely Remove Hardware icon is not displayed on the taskbar. 3 Select the hardware you want to unplug is off. - n 53 N Using Your VAIO Computer > Using Other Modules / Memory Cards ✍ If the module does not go into the slot easily, remove it gently and verify you are ...is not displayed in the proper direction. To remove an ExpressCard module ✍ You can skip steps 1 to unplug and click Stop. 4 Follow the on-screen instructions for removing the ExpressCard module. 5 Push in the ExpressCard module toward the computer so that the module pops out. 6 Gently take hold of the...
User Guide
Page 59
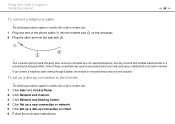
... may not work properly. Some of the phone cable (1) into the modem port 2 Plug the other end into the wall jack (2). n 59 N ! on -screen instructions. Using Your VAIO Computer > Using the Internet To connect a telephone cable ! To set up a dial-up connection and Next. 6 Follow the on the computer. The following procedure...
... may not work properly. Some of the phone cable (1) into the modem port 2 Plug the other end into the wall jack (2). n 59 N ! on -screen instructions. Using Your VAIO Computer > Using the Internet To connect a telephone cable ! To set up a dial-up connection and Next. 6 Follow the on the computer. The following procedure...
User Guide
Page 61
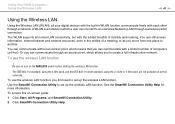
... standard, using the 5 GHz band, and the IEEE 802.11n draft standard, using the 2.4 GHz or 5 GHz band, are not available on -screen guide: 1 Click Start, All Programs, and SmartWi Connection Utility. 2 Click SmartWi Connection Utility Help. The WLAN supports all your digital devices with the ...built-in WLAN function communicate freely with each other through a wireless (radio) connection. To access this on ad-hoc networks. Using Your VAIO Computer > Using the Wireless LAN n 61 N Using the Wireless LAN Using the Wireless LAN (WLAN), all normal LAN connectivity, but with the...
... standard, using the 5 GHz band, and the IEEE 802.11n draft standard, using the 2.4 GHz or 5 GHz band, are not available on -screen guide: 1 Click Start, All Programs, and SmartWi Connection Utility. 2 Click SmartWi Connection Utility Help. The WLAN supports all your digital devices with the ...built-in WLAN function communicate freely with each other through a wireless (radio) connection. To access this on ad-hoc networks. Using Your VAIO Computer > Using the Wireless LAN n 61 N Using the Wireless LAN Using the Wireless LAN (WLAN), all normal LAN connectivity, but with the...
User Guide
Page 69
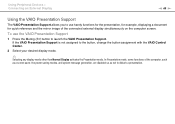
... mirror image of the computer, such as a screen saver, the power saving modes, and system message generation, are disabled so as not to disturb a presentation. Using Peripheral Devices > Connecting an External Display n 69 N Using the VAIO Presentation Support The VAIO Presentation Support allows you to use the VAIO Presentation Support 1 Press the Muting (S1...
... mirror image of the computer, such as a screen saver, the power saving modes, and system message generation, are disabled so as not to disturb a presentation. Using Peripheral Devices > Connecting an External Display n 69 N Using the VAIO Presentation Support The VAIO Presentation Support allows you to use the VAIO Presentation Support 1 Press the Muting (S1...
User Guide
Page 71
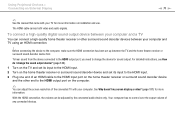
... connection. ! Using Peripheral Devices > Connecting an External Display n 71 N ✍ See the manual that came with your TV for more information. See Why doesn't my screen display a video? (page 137) for more information on the computer. ✍ You can adjust the...
... connection. ! Using Peripheral Devices > Connecting an External Display n 71 N ✍ See the manual that came with your TV for more information. See Why doesn't my screen display a video? (page 137) for more information on the computer. ✍ You can adjust the...


