
User Guide
Page 3
n3 N Precautions 103 Handling the LCD Screen 104 Using the Power Source 105 Handling Your Computer 106 Handling the Built-in Camera 109 Handling Discs 110 Using the Battery Pack 111 Using Headphones 113 Handling the Memory Stick 114 Handling the Built-in Storage Device 115 Troubleshooting 116 Computer 118 System Security 125 Battery 126 Built-in Camera 128 Networking 130 Optical Discs 133 Display 137 Printing 143 Microphone 144 Speakers 145 Touch Pad 146 Keyboard 147 Floppy Disks 148 Audio/Video 149 Memory Stick 152 Peripherals 153 Trademarks 154 Notice 156
n3 N Precautions 103 Handling the LCD Screen 104 Using the Power Source 105 Handling Your Computer 106 Handling the Built-in Camera 109 Handling Discs 110 Using the Battery Pack 111 Using Headphones 113 Handling the Memory Stick 114 Handling the Built-in Storage Device 115 Troubleshooting 116 Computer 118 System Security 125 Battery 126 Built-in Camera 128 Networking 130 Optical Discs 133 Display 137 Printing 143 Microphone 144 Speakers 145 Touch Pad 146 Keyboard 147 Floppy Disks 148 Audio/Video 149 Memory Stick 152 Peripherals 153 Trademarks 154 Notice 156
User Guide
Page 4
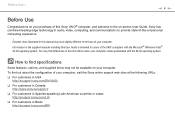
...users of your computer, visit the Sony online support web sites at the following URLs: ❑ For customers in USA http://esupport.sony.com/EN/VAIO/ ❑ For customers in Canada http://www.sony.ca/support/ ❑ For ...customers in Spanish-speaking Latin American countries or areas http://esupport.sony.com/LA/ ❑ For customers in the supplied manuals including this Sony VAIO® computer, and welcome to find out about the configuration of -the-art personal computing experience. ! Before Use > n4 N Before Use Congratulations on -screen...
...users of your computer, visit the Sony online support web sites at the following URLs: ❑ For customers in USA http://esupport.sony.com/EN/VAIO/ ❑ For customers in Canada http://www.sony.ca/support/ ❑ For ...customers in Spanish-speaking Latin American countries or areas http://esupport.sony.com/LA/ ❑ For customers in the supplied manuals including this Sony VAIO® computer, and welcome to find out about the configuration of -the-art personal computing experience. ! Before Use > n4 N Before Use Congratulations on -screen...
User Guide
Page 5
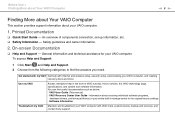
... with my VAIO Get help in storage device to find useful documentation such as below: - On-screen Documentation ❑ Help and Support - Safety guidelines and owner information. 2. VAIO User Guide (This manual) - An overview of VAIO tutorials, how-to articles, the VAIO technology page,..., set-up information, etc. ❑ Safety Information - General information and technical assistance for your VAIO computer with Internet and wireless setup, security setup, personalizing your VAIO computer, and creating recovery discs and more. To access Help and Support: 1 Click Start and ...
... with my VAIO Get help in storage device to find useful documentation such as below: - On-screen Documentation ❑ Help and Support - Safety guidelines and owner information. 2. VAIO User Guide (This manual) - An overview of VAIO tutorials, how-to articles, the VAIO technology page,..., set-up information, etc. ❑ Safety Information - General information and technical assistance for your VAIO computer with Internet and wireless setup, security setup, personalizing your VAIO computer, and creating recovery discs and more. To access Help and Support: 1 Click Start and ...
User Guide
Page 6
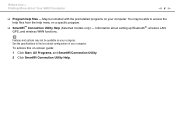
Before Use > Finding More about setting up Bluetooth®, wireless LAN, GPS, and wireless WAN functions. Information about Your VAIO Computer n6 N ❑ Program help menu on your computer. Features and options may be able to find out about ...be included with the preinstalled programs on a specific program. ❑ SmartWi™ Connection Utility Help (Selected models only) - May be available on -screen guide: 1 Click Start, All Programs, and SmartWi Connection Utility. 2 Click SmartWi Connection Utility Help. See the specifications to access the help files from...
Before Use > Finding More about setting up Bluetooth®, wireless LAN, GPS, and wireless WAN functions. Information about Your VAIO Computer n6 N ❑ Program help menu on your computer. Features and options may be able to find out about ...be included with the preinstalled programs on a specific program. ❑ SmartWi™ Connection Utility Help (Selected models only) - May be available on -screen guide: 1 Click Start, All Programs, and SmartWi Connection Utility. 2 Click SmartWi Connection Utility Help. See the specifications to access the help files from...

User Guide
Page 10
Adjust the brightness level of the computer's display - Make sure the display screen is at a comfortable viewing distance. Use indirect lighting to the proper position. Before Use > Ergonomic Considerations n 10 N ❑ Viewing angle of the display as well. &#...
Adjust the brightness level of the computer's display - Make sure the display screen is at a comfortable viewing distance. Use indirect lighting to the proper position. Before Use > Ergonomic Considerations n 10 N ❑ Viewing angle of the display as well. &#...
User Guide
Page 14
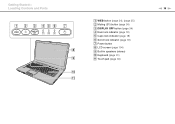
Getting Started > Locating Controls and Ports A WEB button (page 34), (page 35) B Muting (S1) button (page 34) C DISPLAY OFF button (page 34) D Num lock indicator (page 18) E Caps lock indicator (page 18) F Scroll lock indicator (page 18) G Power button H LCD screen (page 104) I Built-in speakers (stereo) J Keyboard (page 31) K Touch pad (page 33) n 14 N
Getting Started > Locating Controls and Ports A WEB button (page 34), (page 35) B Muting (S1) button (page 34) C DISPLAY OFF button (page 34) D Num lock indicator (page 18) E Caps lock indicator (page 18) F Scroll lock indicator (page 18) G Power button H LCD screen (page 104) I Built-in speakers (stereo) J Keyboard (page 31) K Touch pad (page 33) n 14 N

User Guide
Page 20
Getting Started > Using the Battery Pack Using the Battery Pack The battery pack supplied with your computer is not fully charged at the time of delivery. Installing the Battery Pack To install the battery pack 1 Turn off the computer and close the LCD screen lid. 2 Slide the battery LOCK switch (1) inward. n 20 N
Getting Started > Using the Battery Pack Using the Battery Pack The battery pack supplied with your computer is not fully charged at the time of delivery. Installing the Battery Pack To install the battery pack 1 Turn off the computer and close the LCD screen lid. 2 Slide the battery LOCK switch (1) inward. n 20 N

User Guide
Page 27
... direction of the arrow, and then slide it away from the computer. To remove the battery pack 1 Turn off the computer and close the LCD screen lid. 2 Slide the battery LOCK switch (1) inward. 3 Slide and hold the battery RELEASE latch (2) inward, put your computer is on the battery pack, and lift...
... direction of the arrow, and then slide it away from the computer. To remove the battery pack 1 Turn off the computer and close the LCD screen lid. 2 Slide the battery LOCK switch (1) inward. 3 Slide and hold the battery RELEASE latch (2) inward, put your computer is on the battery pack, and lift...

User Guide
Page 29
Getting Started > Updating Your Computer n 29 N Updating Your Computer Be sure to install the latest updates on your computer with the following software applications so that the computer can run more efficiently. ❑ Windows Update Click Start, All Programs, and Windows Update and then follow the on-screen instructions. ❑ VAIO Update 4 Click Start, All Programs, VAIO Update 4, and Go to download the updates. Your computer must be connected to the Internet to VAIO Web Support and then follow the on-screen instructions. !
Getting Started > Updating Your Computer n 29 N Updating Your Computer Be sure to install the latest updates on your computer with the following software applications so that the computer can run more efficiently. ❑ Windows Update Click Start, All Programs, and Windows Update and then follow the on-screen instructions. ❑ VAIO Update 4 Click Start, All Programs, VAIO Update 4, and Go to download the updates. Your computer must be connected to the Internet to VAIO Web Support and then follow the on-screen instructions. !
User Guide
Page 31
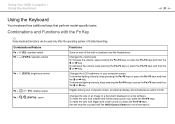
... 8 (F5/F6): brightness control Fn + /T (F7): display output Fn + / (F9/F10): zoom Functions Turns on some software. Toggles among your computer screen. See the help file included with the Fn Key ✍ Some keyboard functions can be used only after the operating system is finished launching. Using... Your VAIO Computer > Using the Keyboard n 31 N Using the Keyboard Your keyboard has additional keys that perform model-specific tasks. Changes the volume ...
... 8 (F5/F6): brightness control Fn + /T (F7): display output Fn + / (F9/F10): zoom Functions Turns on some software. Toggles among your computer screen. See the help file included with the Fn Key ✍ Some keyboard functions can be used only after the operating system is finished launching. Using... Your VAIO Computer > Using the Keyboard n 31 N Using the Keyboard Your keyboard has additional keys that perform model-specific tasks. Changes the volume ...

User Guide
Page 33
...left button twice in circles on the touch pad while pressing the left button. In many applications, this action displays a shortcut menu. Using Your VAIO Computer > Using the Touch Pad Using the Touch Pad You can disable/enable the touch pad while a mouse is connected to your finger along ...the right edge of the touch pad to scroll vertically. Slide your finger along the bottom edge to place the pointer (2) on the screen using the touch pad. Press the left button (3) once. n 33 N Action Point Click Double-click Right-click Drag Scroll Description Slide your finger ...
...left button twice in circles on the touch pad while pressing the left button. In many applications, this action displays a shortcut menu. Using Your VAIO Computer > Using the Touch Pad Using the Touch Pad You can disable/enable the touch pad while a mouse is connected to your finger along ...the right edge of the touch pad to scroll vertically. Slide your finger along the bottom edge to place the pointer (2) on the screen using the touch pad. Press the left button (3) once. n 33 N Action Point Click Double-click Right-click Drag Scroll Description Slide your finger ...
User Guide
Page 35
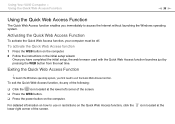
... on the computer. To launch the Windows operating system, you immediately to access the Internet without launching the Windows operating system. Using Your VAIO Computer > Using the Quick Web Access Function n 35 N Using the Quick Web Access Function The Quick Web Access function enables you first...located at the For detailed information on how to use or restrictions on the Quick Web Access function, click the lower right corner of the screen. ❑ Press the WEB button. ❑ Press the power button on the computer. 2 Follow the instructions in the initial setup wizard....
... on the computer. To launch the Windows operating system, you immediately to access the Internet without launching the Windows operating system. Using Your VAIO Computer > Using the Quick Web Access Function n 35 N Using the Quick Web Access Function The Quick Web Access function enables you first...located at the For detailed information on how to use or restrictions on the Quick Web Access function, click the lower right corner of the screen. ❑ Press the WEB button. ❑ Press the power button on the computer. 2 Follow the instructions in the initial setup wizard....

User Guide
Page 47
... may cause a malfunction. ✍ The formatting process will be completed more quickly if you want to reformat the media with your valuable data. Using Your VAIO Computer > Using the Memory Stick n 47 N Formatting a Memory Stick To format a Memory Stick The Memory Stick has been formatted in Format options. 5 Click Start. 6 Follow...
... may cause a malfunction. ✍ The formatting process will be completed more quickly if you want to reformat the media with your valuable data. Using Your VAIO Computer > Using the Memory Stick n 47 N Formatting a Memory Stick To format a Memory Stick The Memory Stick has been formatted in Format options. 5 Click Start. 6 Follow...
User Guide
Page 51
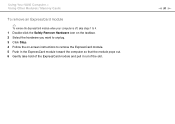
Using Your VAIO Computer > Using Other Modules / Memory Cards To remove an ExpressCard module ✍ To remove the ExpressCard module when your computer is off, skip steps 1 to 4. 1 Double-click the Safely Remove Hardware icon on the taskbar. 2 Select the hardware you want to unplug. 3 Click Stop. 4 Follow the on-screen instructions to remove the ExpressCard module. 5 Push in the ExpressCard module toward the computer so that the module pops out. 6 Gently take hold of the ExpressCard module and pull it out of the slot. n 51 N
Using Your VAIO Computer > Using Other Modules / Memory Cards To remove an ExpressCard module ✍ To remove the ExpressCard module when your computer is off, skip steps 1 to 4. 1 Double-click the Safely Remove Hardware icon on the taskbar. 2 Select the hardware you want to unplug. 3 Click Stop. 4 Follow the on-screen instructions to remove the ExpressCard module. 5 Push in the ExpressCard module toward the computer so that the module pops out. 6 Gently take hold of the ExpressCard module and pull it out of the slot. n 51 N
User Guide
Page 57
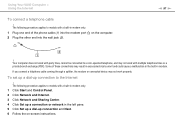
on -screen instructions. n 57 N ! Your computer does not work with party lines, cannot be connected to a coin-operated telephone, and may not work properly. If you connect a ... (2). The following procedure applies to models with a built-in modem. To set up a dial-up connection and Next. 6 Follow the on the computer. Using Your VAIO Computer > Using the Internet To connect a telephone cable !
on -screen instructions. n 57 N ! Your computer does not work with party lines, cannot be connected to a coin-operated telephone, and may not work properly. If you connect a ... (2). The following procedure applies to models with a built-in modem. To set up a dial-up connection and Next. 6 Follow the on the computer. Using Your VAIO Computer > Using the Internet To connect a telephone cable !

User Guide
Page 60
....11a standard, using the 5 GHz band, and the IEEE 802.11n draft standard, using the 2.4 GHz or 5 GHz band, are not available on -screen guide: 1 Click Start, All Programs, and SmartWi Connection Utility. 2 Click SmartWi Connection Utility Help. ❑ On models without the SmartWi Connection Utility Search ... See the SmartWi Connection Utility Help for wireless LAN information using Windows Help and Support to set up the wireless LAN function. ! Using Your VAIO Computer > Using the Wireless LAN n 60 N To use the wireless LAN function To use the wireless LAN function, you first need to set...
....11a standard, using the 5 GHz band, and the IEEE 802.11n draft standard, using the 2.4 GHz or 5 GHz band, are not available on -screen guide: 1 Click Start, All Programs, and SmartWi Connection Utility. 2 Click SmartWi Connection Utility Help. ❑ On models without the SmartWi Connection Utility Search ... See the SmartWi Connection Utility Help for wireless LAN information using Windows Help and Support to set up the wireless LAN function. ! Using Your VAIO Computer > Using the Wireless LAN n 60 N To use the wireless LAN function To use the wireless LAN function, you first need to set...

User Guide
Page 70
See Why doesn't my screen display a video? (page 139) for more information on the home theater receiver or surround sound decoder device and the other surround sound decoder devices between ... home theater receiver or surround sound decoder device and set up between your computer and a TV ! With the HDMI connection, the volume can adjust the screen resolution of any connected devices. To hear sound from the device connected to the connected TV. ✍ You can be adjusted by the connected audio...
See Why doesn't my screen display a video? (page 139) for more information on the home theater receiver or surround sound decoder device and the other surround sound decoder devices between ... home theater receiver or surround sound decoder device and set up between your computer and a TV ! With the HDMI connection, the volume can adjust the screen resolution of any connected devices. To hear sound from the device connected to the connected TV. ✍ You can be adjusted by the connected audio...

User Guide
Page 72
Using Peripheral Devices > Selecting Display Modes n 72 N Selecting Display Modes When an external display is connected, you want to work on the video controller used in the computer. If you can select either your computer screen or the connected display to find out about the configuration of your computer screen and the external display at the same time, see Using the Multiple Monitors Function (page 74) for selecting a display depends on your computer. See the specifications to use as the primary monitor. The procedure for more information.
Using Peripheral Devices > Selecting Display Modes n 72 N Selecting Display Modes When an external display is connected, you want to work on the video controller used in the computer. If you can select either your computer screen or the connected display to find out about the configuration of your computer screen and the external display at the same time, see Using the Multiple Monitors Function (page 74) for selecting a display depends on your computer. See the specifications to use as the primary monitor. The procedure for more information.

User Guide
Page 73
...; On models with the Intel Graphics Media Accelerator 1 Right-click on the desktop and select Personalize. 2 Click Display Settings. 3 Follow the on-screen instructions to change the settings. ❑ On models with the NVIDIA video controller 1 Click Start and Control Panel. 2 Click Additional Options. 3... Click NVIDIA Control Panel. 4 Select the display setup option under Display. 5 Follow the on-screen instructions to change the settings. ❑ On models with the ATI video controller When the computer has an external display connected, you can ...
...; On models with the Intel Graphics Media Accelerator 1 Right-click on the desktop and select Personalize. 2 Click Display Settings. 3 Follow the on-screen instructions to change the settings. ❑ On models with the NVIDIA video controller 1 Click Start and Control Panel. 2 Click Additional Options. 3... Click NVIDIA Control Panel. 4 Select the display setup option under Display. 5 Follow the on-screen instructions to change the settings. ❑ On models with the ATI video controller When the computer has an external display connected, you can ...

User Guide
Page 74
... drag objects, such as a single desktop. For example, if you to the other . See the specifications to find out about the configuration of your computer screen and the external display can move the cursor from one display to the monitor port, your desktop across separate displays.
... drag objects, such as a single desktop. For example, if you to the other . See the specifications to find out about the configuration of your computer screen and the external display can move the cursor from one display to the monitor port, your desktop across separate displays.


