User Guide
Page 2
...the Indicator Lights 18 Connecting a Power Source 19 Using the Battery Pack 20 Shutting Down Your Computer Safely 27 Updating Your Computer 28 Using Your VAIO Computer 29 Using the Keyboard 30 Using the Touch Pad 32 Using the Special-function Button 33 Using the Touch Sensor Buttons 34 Using the...Display Modes 82 Using the Multiple Monitors Function 84 Connecting an External Microphone 86 Connecting a USB Device 87 Connecting an i.LINK Device 89 Customizing Your VAIO Computer 91 Setting the Password 92 Using the VAIO Control Center 99 Using the Power Saving Modes 100 Using the...
...the Indicator Lights 18 Connecting a Power Source 19 Using the Battery Pack 20 Shutting Down Your Computer Safely 27 Updating Your Computer 28 Using Your VAIO Computer 29 Using the Keyboard 30 Using the Touch Pad 32 Using the Special-function Button 33 Using the Touch Sensor Buttons 34 Using the...Display Modes 82 Using the Multiple Monitors Function 84 Connecting an External Microphone 86 Connecting a USB Device 87 Connecting an i.LINK Device 89 Customizing Your VAIO Computer 91 Setting the Password 92 Using the VAIO Control Center 99 Using the Power Saving Modes 100 Using the...

User Guide
Page 4
... on your purchase of this manual may not be available on -screen User Guide. External views illustrated in this Sony VAIO® computer, and welcome to the on your computer, visit the Sony online support web sites at the following URLs: ❑ For customers in USA http://esupport...❑ For customers in Spanish-speaking Latin American countries or areas http://esupport.sony.com/LA/ ❑ For customers in Brazil http://esupport.sony.com/BR/ How to provide state-of the VAIO computers with the 64-bit operating system. Information in the information when your computer...
... on your purchase of this manual may not be available on -screen User Guide. External views illustrated in this Sony VAIO® computer, and welcome to the on your computer, visit the Sony online support web sites at the following URLs: ❑ For customers in USA http://esupport...❑ For customers in Spanish-speaking Latin American countries or areas http://esupport.sony.com/LA/ ❑ For customers in Brazil http://esupport.sony.com/BR/ How to provide state-of the VAIO computers with the 64-bit operating system. Information in the information when your computer...
User Guide
Page 5
... access Help and Support: 1 Click Start and Help and Support. 2 Choose from the following categories to find useful documentation such as below: - Get started with VAIO Care, system restore, backup and recovery, and contact Sony support. VAIO User Guide (This manual) - Safety guidelines and owner information. 2. General information and technical assistance for your...
... access Help and Support: 1 Click Start and Help and Support. 2 Choose from the following categories to find useful documentation such as below: - Get started with VAIO Care, system restore, backup and recovery, and contact Sony support. VAIO User Guide (This manual) - Safety guidelines and owner information. 2. General information and technical assistance for your...
User Guide
Page 6
... the preinstalled programs on -screen guide: 1 Click Start, All Programs, and SmartWi Connection Utility. 2 Click SmartWi Connection Utility Help. Before Use > Finding More about Your VAIO Computer n6 N ❑ Program help menu on a specific program. ❑ SmartWi™ Connection Utility Help (Selected models only) - To access this on your computer. May...
... the preinstalled programs on -screen guide: 1 Click Start, All Programs, and SmartWi Connection Utility. 2 Click SmartWi Connection Utility Help. Before Use > Finding More about Your VAIO Computer n6 N ❑ Program help menu on a specific program. ❑ SmartWi™ Connection Utility Help (Selected models only) - To access this on your computer. May...
User Guide
Page 7
... commonly encountered problems. Type a description of the problem and the Knowledge Database searches for the corresponding solutions online. ❑ For customers in USA http://esupport.sony.com/EN/VAIO/ ❑ For customers in Canada http://www.sony.ca/support/ ❑ For customers in Spanish-speaking Latin American countries or areas http://esupport...
... commonly encountered problems. Type a description of the problem and the Knowledge Database searches for the corresponding solutions online. ❑ For customers in USA http://esupport.sony.com/EN/VAIO/ ❑ For customers in Canada http://www.sony.ca/support/ ❑ For customers in Spanish-speaking Latin American countries or areas http://esupport...
User Guide
Page 8
... support web site. Sony Style Backstage Technicians can assist with a Sony certified technician at www.sonystyle.com/backstage to receive the fastest and most efficient services, have the following information readily available: 1 Your VAIO computer model You can find the nearest location. You can find it on your VAIO PC. The serial number is...
... support web site. Sony Style Backstage Technicians can assist with a Sony certified technician at www.sonystyle.com/backstage to receive the fastest and most efficient services, have the following information readily available: 1 Your VAIO computer model You can find the nearest location. You can find it on your VAIO PC. The serial number is...
User Guide
Page 11
... any other hardware that did not originally come with only the supplied accessories connected and set up your computer with your system. Before starting your VAIO computer. !
... any other hardware that did not originally come with only the supplied accessories connected and set up your computer with your system. Before starting your VAIO computer. !

User Guide
Page 25
...Long Battery Life Wallpaper Setting. 3 Click Set Long Battery Life Wallpaper. To enable the battery care function 1 Click Start, All Programs, and VAIO Control Center. 2 Click Power Management and then Battery Charge Functions. 3 Click Advanced. 4 Click to 3 in To enable the battery care function... above and check detailed information. If the battery charge capacity is low, replace the battery pack with a new genuine Sony battery pack. Using the Battery Life Conserving Wallpaper You can customize the current battery charging method using the Battery Charge Functions. Getting ...
...Long Battery Life Wallpaper Setting. 3 Click Set Long Battery Life Wallpaper. To enable the battery care function 1 Click Start, All Programs, and VAIO Control Center. 2 Click Power Management and then Battery Charge Functions. 3 Click Advanced. 4 Click to 3 in To enable the battery care function... above and check detailed information. If the battery charge capacity is low, replace the battery pack with a new genuine Sony battery pack. Using the Battery Life Conserving Wallpaper You can customize the current battery charging method using the Battery Charge Functions. Getting ...

User Guide
Page 28
Getting Started > Updating Your Computer n 28 N Updating Your Computer Be sure to download the updates. Your computer must be connected to the Internet to install the latest updates on your computer with the following software applications so that the computer can run more efficiently. ❑ Windows Update Click Start, All Programs, and Windows Update and then follow the on-screen instructions. ❑ VAIO Update 4 Click Start, All Programs, VAIO Update 4, and VAIO Update Options and then follow the on-screen instructions. !
Getting Started > Updating Your Computer n 28 N Updating Your Computer Be sure to download the updates. Your computer must be connected to the Internet to install the latest updates on your computer with the following software applications so that the computer can run more efficiently. ❑ Windows Update Click Start, All Programs, and Windows Update and then follow the on-screen instructions. ❑ VAIO Update 4 Click Start, All Programs, VAIO Update 4, and VAIO Update Options and then follow the on-screen instructions. !
User Guide
Page 29
... This section describes how to get the most out of using your VAIO computer. ❑ Using the Keyboard (page 30) ❑ Using the Touch Pad (page 32) ❑ Using the Special-function Button (page 33) ❑ Using the ...
... This section describes how to get the most out of using your VAIO computer. ❑ Using the Keyboard (page 30) ❑ Using the Touch Pad (page 32) ❑ Using the Special-function Button (page 33) ❑ Using the ...

User Guide
Page 30
...keys and then the M or , key. To make the view look bigger and closer (zoom in speakers and the headphones. Using Your VAIO Computer > Using the Keyboard n 30 N Using the Keyboard Your keyboard has additional keys that perform model-specific tasks. To increase the volume,... included with the Fn Key ✍ Some keyboard functions can be used only after the operating system is finished launching. Combinations and Functions with the VAIO Control Center for more information. Combinations/Feature Fn + % (F2): speaker switch Fn + 2 (F3/F4): speaker volume Fn + 8 (F5/F6): brightness control ...
...keys and then the M or , key. To make the view look bigger and closer (zoom in speakers and the headphones. Using Your VAIO Computer > Using the Keyboard n 30 N Using the Keyboard Your keyboard has additional keys that perform model-specific tasks. To increase the volume,... included with the Fn Key ✍ Some keyboard functions can be used only after the operating system is finished launching. Combinations and Functions with the VAIO Control Center for more information. Combinations/Feature Fn + % (F2): speaker switch Fn + 2 (F3/F4): speaker volume Fn + 8 (F5/F6): brightness control ...

User Guide
Page 31
When you execute this command, the states of power consumption. To return the system to its original state, use the power button to the built-in storage device and the system power is turned off. For details on the power. Using Your VAIO Computer > Using the Keyboard Combinations/Feature Fn + (F12): hibernate n 31 N Functions Provides the lowest level of the system and the connected peripheral devices are saved to turn on power management, see Using the Power Saving Modes (page 100).
When you execute this command, the states of power consumption. To return the system to its original state, use the power button to the built-in storage device and the system power is turned off. For details on the power. Using Your VAIO Computer > Using the Keyboard Combinations/Feature Fn + (F12): hibernate n 31 N Functions Provides the lowest level of the system and the connected peripheral devices are saved to turn on power management, see Using the Power Saving Modes (page 100).
User Guide
Page 32
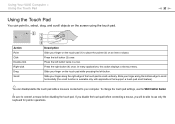
...using the touch pad. Be sure to scroll vertically. Press the left button. In many applications, this action displays a shortcut menu. Using Your VAIO Computer > Using the Touch Pad Using the Touch Pad You can disable/enable the touch pad while a mouse is available only with applications that support.... Slide your finger on an item or object. If you will be able to place the pointer (2) on the touch pad (1) to use the VAIO Control Center. ! n 32 N Action Point Click Double-click Right-click Drag Scroll Description Slide your finger along the right edge of the touch pad...
...using the touch pad. Be sure to scroll vertically. Press the left button. In many applications, this action displays a shortcut menu. Using Your VAIO Computer > Using the Touch Pad Using the Touch Pad You can disable/enable the touch pad while a mouse is available only with applications that support.... Slide your finger on an item or object. If you will be able to place the pointer (2) on the touch pad (1) to use the VAIO Control Center. ! n 32 N Action Point Click Double-click Right-click Drag Scroll Description Slide your finger along the right edge of the touch pad...

User Guide
Page 33
... and movies with the software. See the specifications to help file included with the built-in camera. For more information on your computer. Using Your VAIO Computer > Using the Special-function Button n 33 N Using the Special-function Button Your computer may not be equipped with a special button to find out about...
... and movies with the software. See the specifications to help file included with the built-in camera. For more information on your computer. Using Your VAIO Computer > Using the Special-function Button n 33 N Using the Special-function Button Your computer may not be equipped with a special button to find out about...
User Guide
Page 34
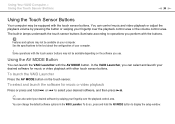
...and launch the software for music or video playback with the touch sensor buttons may not be available depending on the touch sensor. Using Your VAIO Computer > Using the Touch Sensor Buttons n 34 N Using the Touch Sensor Buttons Your computer may be equipped with the buttons. The built-...in the VAIO Launcher. Using the AV MODE Button You can change the default software options in lamps underneath the touch sensor buttons illuminate according to select your...
...and launch the software for music or video playback with the touch sensor buttons may not be available depending on the touch sensor. Using Your VAIO Computer > Using the Touch Sensor Buttons n 34 N Using the Touch Sensor Buttons Your computer may be equipped with the buttons. The built-...in the VAIO Launcher. Using the AV MODE Button You can change the default software options in lamps underneath the touch sensor buttons illuminate according to select your...
User Guide
Page 35
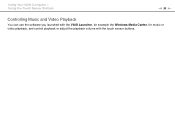
Using Your VAIO Computer > Using the Touch Sensor Buttons n 35 N Controlling Music and Video Playback You can use the software you launched with the VAIO Launcher, for example the Windows Media Center, for music or video playback, and control playback or adjust the playback volume with the touch sensor buttons.
Using Your VAIO Computer > Using the Touch Sensor Buttons n 35 N Controlling Music and Video Playback You can use the software you launched with the VAIO Launcher, for example the Windows Media Center, for music or video playback, and control playback or adjust the playback volume with the touch sensor buttons.
User Guide
Page 36
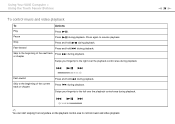
... can start swiping from anywhere on the playback control area to the left over the playback control area during playback. Press during playback. Using Your VAIO Computer > Using the Touch Sensor Buttons To control music and video playback To Actions Play Press . Fast-rewind Skip to resume playback.
... can start swiping from anywhere on the playback control area to the left over the playback control area during playback. Press during playback. Using Your VAIO Computer > Using the Touch Sensor Buttons To control music and video playback To Actions Play Press . Fast-rewind Skip to resume playback.
User Guide
Page 37
Using Your VAIO Computer > Using the Touch Sensor Buttons To adjust the playback volume To Increase the volume Keep increasing the volume Actions Press . Press and hold . Swipe ...
Using Your VAIO Computer > Using the Touch Sensor Buttons To adjust the playback volume To Increase the volume Keep increasing the volume Actions Press . Press and hold . Swipe ...

User Guide
Page 38
... ❑ Sensing and capturing object movements for monitoring purposes ❑ Editing captured data ✍ Turning on the computer activates the built-in camera. Using Your VAIO Computer > Using the Built-in Camera n 38 N Using the Built-in Camera Your computer is possible with the software. ✍ When capturing an image or...
... ❑ Sensing and capturing object movements for monitoring purposes ❑ Editing captured data ✍ Turning on the computer activates the built-in camera. Using Your VAIO Computer > Using the Built-in Camera n 38 N Using the Built-in Camera Your computer is possible with the software. ✍ When capturing an image or...
User Guide
Page 39
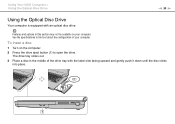
Features and options in the middle of your computer. To insert a disc 1 Turn on your computer. Using Your VAIO Computer > Using the Optical Disc Drive n 39 N Using the Optical Disc Drive Your computer is equipped with the label side facing upward and gently push it down until the disc clicks into place. The drive tray slides out. 3 Place a disc in this section may not be available on the computer. 2 Press the drive eject button (1) to find out about the configuration of the drive tray with an optical disc drive. See the specifications to open the drive.
Features and options in the middle of your computer. To insert a disc 1 Turn on your computer. Using Your VAIO Computer > Using the Optical Disc Drive n 39 N Using the Optical Disc Drive Your computer is equipped with the label side facing upward and gently push it down until the disc clicks into place. The drive tray slides out. 3 Place a disc in this section may not be available on the computer. 2 Press the drive eject button (1) to find out about the configuration of the drive tray with an optical disc drive. See the specifications to open the drive.


