
User Guide
Page 4
n4 N Precautions ...121 Handling the LCD Screen ...122 Using the Power Source ...123 Handling Your Computer ...124 Handling the Built-in MOTION EYE Camera...126 Handling Floppy Disks ...127 Handling Discs ...128 Using the Battery Pack ...129 Using Headphones ...131 Handling the Memory Stick ...132 Handling the Hard Disk ...133 Updating Your Computer ...134 Troubleshooting ...135 Computer ...137 System Security ...143 Battery...144 Built-in MOTION EYE Camera...146 Internet ...148 Networking ...150 Bluetooth Technology ...153 Optical Discs ...157 Display ...162 Printing ...166 Microphone ...167
n4 N Precautions ...121 Handling the LCD Screen ...122 Using the Power Source ...123 Handling Your Computer ...124 Handling the Built-in MOTION EYE Camera...126 Handling Floppy Disks ...127 Handling Discs ...128 Using the Battery Pack ...129 Using Headphones ...131 Handling the Memory Stick ...132 Handling the Hard Disk ...133 Updating Your Computer ...134 Troubleshooting ...135 Computer ...137 System Security ...143 Battery...144 Built-in MOTION EYE Camera...146 Internet ...148 Networking ...150 Bluetooth Technology ...153 Optical Discs ...157 Display ...162 Printing ...166 Microphone ...167
User Guide
Page 14
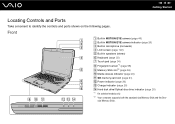
Front A Built-in MOTION EYE camera (page 40) B Built-in MOTION EYE camera indicator (page 20) C Built-in microphone (monaural) D LCD screen (page 122) E Built-in speakers (stereo) F Keyboard (page 32) G Touch pad (page 34) H Fingerprint sensor*1 (page 98) I Memory Stick slot*2 (page 56) J Media Access ...
Front A Built-in MOTION EYE camera (page 40) B Built-in MOTION EYE camera indicator (page 20) C Built-in microphone (monaural) D LCD screen (page 122) E Built-in speakers (stereo) F Keyboard (page 32) G Touch pad (page 34) H Fingerprint sensor*1 (page 98) I Memory Stick slot*2 (page 56) J Media Access ...
User Guide
Page 22
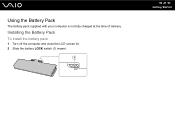
Using the Battery Pack The battery pack supplied with your computer is not fully charged at the time of delivery. Installing the Battery Pack To install the battery pack 1 Turn off the computer and close the LCD screen lid. 2 Slide the battery LOCK switch (1) inward. n 22 N Getting Started
Using the Battery Pack The battery pack supplied with your computer is not fully charged at the time of delivery. Installing the Battery Pack To install the battery pack 1 Turn off the computer and close the LCD screen lid. 2 Slide the battery LOCK switch (1) inward. n 22 N Getting Started

User Guide
Page 29
You may lose data if you remove the battery pack while the computer is in the direction of the arrow, and then slide it away from the computer. n 29 N Getting Started Removing the Battery Pack ! To remove the battery pack 1 Turn off the computer and close the LCD screen lid. 2 Slide the battery LOCK switch (1) inward. 3 Slide and hold the battery RELEASE latch (2) inward, put your computer is on and not connected to the AC adapter or if you remove the battery pack while your fingertip underneath the tab (3) on the battery pack, and lift the battery pack in Sleep mode.
You may lose data if you remove the battery pack while the computer is in the direction of the arrow, and then slide it away from the computer. n 29 N Getting Started Removing the Battery Pack ! To remove the battery pack 1 Turn off the computer and close the LCD screen lid. 2 Slide the battery LOCK switch (1) inward. 3 Slide and hold the battery RELEASE latch (2) inward, put your computer is on and not connected to the AC adapter or if you remove the battery pack while your fingertip underneath the tab (3) on the battery pack, and lift the battery pack in Sleep mode.
User Guide
Page 32
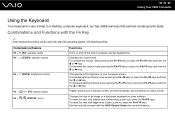
... Fn + 8 (F5/F6): brightness control Fn + /T (F7): display output Fn + / (F9/F10): zoom Functions Turns on some software. Combinations and Functions with the VAIO Control Center for more information. To decrease the volume, keep pressing the Fn+F6 keys or press the Fn+F6 keys and then the M or... make the view look smaller and further away (zoom out), press the Fn+F9 keys. n 32 N Using Your VAIO Computer Using the Keyboard Your keyboard is finished launching. Changes the LCD brightness of an image or a document displayed on and off the built-in ), press the Fn+F10 keys. Changes ...
... Fn + 8 (F5/F6): brightness control Fn + /T (F7): display output Fn + / (F9/F10): zoom Functions Turns on some software. Combinations and Functions with the VAIO Control Center for more information. To decrease the volume, keep pressing the Fn+F6 keys or press the Fn+F6 keys and then the M or... make the view look smaller and further away (zoom out), press the Fn+F9 keys. n 32 N Using Your VAIO Computer Using the Keyboard Your keyboard is finished launching. Changes the LCD brightness of an image or a document displayed on and off the built-in ), press the Fn+F10 keys. Changes ...
User Guide
Page 79
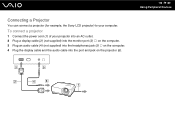
n 79 N Using Peripheral Devices Connecting a Projector You can connect a projector (for example, the Sony LCD projector) to your projector into an AC outlet. 2 Plug a display cable (2) (not supplied) into the monitor port (3) a on the computer. 3 Plug an audio cable (4) (not supplied) into the headphones jack (5) i on the computer. 4 Plug the display cable and the audio cable into the port and jack on the projector (6). To connect a projector 1 Connect the power cord (1) of your computer.
n 79 N Using Peripheral Devices Connecting a Projector You can connect a projector (for example, the Sony LCD projector) to your projector into an AC outlet. 2 Plug a display cable (2) (not supplied) into the monitor port (3) a on the computer. 3 Plug an audio cable (4) (not supplied) into the headphones jack (5) i on the computer. 4 Plug the display cable and the audio cable into the port and jack on the projector (6). To connect a projector 1 Connect the power cord (1) of your computer.
User Guide
Page 108
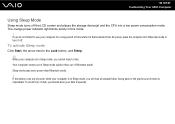
... this mode. ! Your computer comes out of data, you cannot insert a disc. Sleep mode uses more power than out of time while it off the LCD screen and places the storage device(s) and the CPU into a low power consumption mode. To activate Sleep mode Click Start, the arrow next to use... the Lock button, and Sleep. ✍ When your computer for a long period of Hibernate mode. If you will lose all unsaved data. n 108 N Customizing Your VAIO Computer Using Sleep Mode Sleep mode turns off .
... this mode. ! Your computer comes out of data, you cannot insert a disc. Sleep mode uses more power than out of time while it off the LCD screen and places the storage device(s) and the CPU into a low power consumption mode. To activate Sleep mode Click Start, the arrow next to use... the Lock button, and Sleep. ✍ When your computer for a long period of Hibernate mode. If you will lose all unsaved data. n 108 N Customizing Your VAIO Computer Using Sleep Mode Sleep mode turns off .
User Guide
Page 109
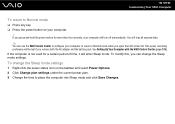
... turn off automatically. To modify this, you open the LCD screen lid. To change the Sleep mode settings 1 Right-click the power status icon on your computer will lose all unsaved data. ✍ You can use the VAIO Control Center to configure your computer to return to place the...you remove both the AC adapter and the battery pack. See Setting Up Your Computer with the VAIO Control Center (page 106). This power resuming preference will enter Sleep mode. n 109 N Customizing Your VAIO Computer To return to Normal mode ❑ Press any key. ❑ Press the power button ...
... turn off automatically. To modify this, you open the LCD screen lid. To change the Sleep mode settings 1 Right-click the power status icon on your computer will lose all unsaved data. ✍ You can use the VAIO Control Center to configure your computer to return to place the...you remove both the AC adapter and the battery pack. See Setting Up Your Computer with the VAIO Control Center (page 106). This power resuming preference will enter Sleep mode. n 109 N Customizing Your VAIO Computer To return to Normal mode ❑ Press any key. ❑ Press the power button ...
User Guide
Page 111
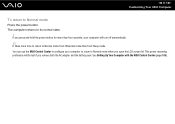
... Center (page 106). The computer returns to Normal mode when you open the LCD screen lid. You can use the VAIO Control Center to configure your computer will be lost if you press and hold the power button for more time to return to Normal mode ...Press the power button. n 111 N Customizing Your VAIO Computer To return to Normal mode from Hibernate mode than four seconds, your computer to return to its normal state. ! This power resuming preference will...
... Center (page 106). The computer returns to Normal mode when you open the LCD screen lid. You can use the VAIO Control Center to configure your computer will be lost if you press and hold the power button for more time to return to Normal mode ...Press the power button. n 111 N Customizing Your VAIO Computer To return to Normal mode from Hibernate mode than four seconds, your computer to return to its normal state. ! This power resuming preference will...
User Guide
Page 121
n 121 N Precautions Precautions This section describes safety guidelines and precautions to help you protect your VAIO computer from potential damage. ❑ Handling the LCD Screen (page 122) ❑ Using the Power Source (page 123) ❑ Handling Your Computer (page 124) ❑ Handling the Built-in MOTION EYE Camera (page ...
n 121 N Precautions Precautions This section describes safety guidelines and precautions to help you protect your VAIO computer from potential damage. ❑ Handling the LCD Screen (page 122) ❑ Using the Power Source (page 123) ❑ Handling Your Computer (page 124) ❑ Handling the Built-in MOTION EYE Camera (page ...

User Guide
Page 122
You can use a screen saver to the settings. Sony assumes no liability for any malfunctions arising from changes to prevent residual images. ❑ The LCD screen becomes warm during operation. Be careful when using high-precision technology. This is not a malfunction. This could... damage the screen. This is a normal result of the manufacturing process and does not indicate a malfunction. ❑ Avoid rubbing the LCD screen. Use a soft, dry cloth to normal. ❑ A residual image may make your computer near a window. ❑ Do not scratch...
You can use a screen saver to the settings. Sony assumes no liability for any malfunctions arising from changes to prevent residual images. ❑ The LCD screen becomes warm during operation. Be careful when using high-precision technology. This is not a malfunction. This could... damage the screen. This is a normal result of the manufacturing process and does not indicate a malfunction. ❑ Avoid rubbing the LCD screen. Use a soft, dry cloth to normal. ❑ A residual image may make your computer near a window. ❑ Do not scratch...

User Guide
Page 125
...radio signals and may damage the screen or cause it to malfunction. If any problems occur, unplug the computer and contact an authorized Sony Service Center. The LCD screen may be sure to carry your computer. If this case, allow at least one hour before cleaning your computer. ❑... and interface cables. In this occurs, relocate the computer a suitable distance away from a cold location to a warm one hand and gently lift the LCD screen lid with both hands. ❑ Use a carrying case specially designed to hold the base with one , moisture may condense inside the computer....
...radio signals and may damage the screen or cause it to malfunction. If any problems occur, unplug the computer and contact an authorized Sony Service Center. The LCD screen may be sure to carry your computer. If this case, allow at least one hour before cleaning your computer. ❑... and interface cables. In this occurs, relocate the computer a suitable distance away from a cold location to a warm one hand and gently lift the LCD screen lid with both hands. ❑ Use a carrying case specially designed to hold the base with one , moisture may condense inside the computer....

User Guide
Page 162
... (page 22) for more information. ❑ Make sure your computer is using battery power, make sure the battery pack is installed properly and is in LCD (Video) Sleep mode, press any key to the external display, press the Fn+F7 keys. If the computer is charged. n 162 N Troubleshooting Display Why did...
... (page 22) for more information. ❑ Make sure your computer is using battery power, make sure the battery pack is installed properly and is in LCD (Video) Sleep mode, press any key to the external display, press the Fn+F7 keys. If the computer is charged. n 162 N Troubleshooting Display Why did...

User Guide
Page 163
... Fn+F7 keys to change the display output to the computer screen, and then restart video playback. In this case, lower the resolution of the LCD screen. Press the Fn+F6 keys to brighten your computer. See Selecting Display Modes (page 80) for more information. ❑ The video memory of your...
... Fn+F7 keys to change the display output to the computer screen, and then restart video playback. In this case, lower the resolution of the LCD screen. Press the Fn+F6 keys to brighten your computer. See Selecting Display Modes (page 80) for more information. ❑ The video memory of your...
User Guide
Page 164
...Troubleshooting What should I do if the external display remains blank? What should I do if the LCD brightness of my screen changes? Then, use the Fn+F7 keys to change the settings, launch the VAIO Control Center, select the control item for the external display, and then click to select the check... box for brightness adjustment. The LCD brightness setting, adjusted with the VAIO Control Center. If you cannot change the display output with the Fn+F7 keys, you need to change the settings for...
...Troubleshooting What should I do if the external display remains blank? What should I do if the LCD brightness of my screen changes? Then, use the Fn+F7 keys to change the settings, launch the VAIO Control Center, select the control item for the external display, and then click to select the check... box for brightness adjustment. The LCD brightness setting, adjusted with the VAIO Control Center. If you cannot change the display output with the Fn+F7 keys, you need to change the settings for...


