
User Guide
Page 2
... ...8 Ergonomic Considerations ...11 Getting Started ...13 Locating Controls and Ports...14 About the Indicator Lights ...20 Connecting a Power Source ...21 Using the Battery Pack ...22 Shutting Down Your Computer Safely ...29 Using Your VAIO Computer ...30 Using the Keyboard ...31 Using the Touch Pad ...32 Using the Special-function Button ...33 Using...
... ...8 Ergonomic Considerations ...11 Getting Started ...13 Locating Controls and Ports...14 About the Indicator Lights ...20 Connecting a Power Source ...21 Using the Battery Pack ...22 Shutting Down Your Computer Safely ...29 Using Your VAIO Computer ...30 Using the Keyboard ...31 Using the Touch Pad ...32 Using the Special-function Button ...33 Using...

User Guide
Page 3
... a Printer ...84 Connecting an i.LINK Device ...85 Connecting to a Network (LAN) ...87 Customizing Your VAIO Computer ...88 Setting the Password ...89 Using Fingerprint Authentication ...96 Setting Up Your Computer with VAIO Control Center 104 Using the Power Saving Modes ...105 Managing Power with VAIO Power Management ...110 Upgrading Your VAIO Computer...112 Adding and Removing Memory...113
... a Printer ...84 Connecting an i.LINK Device ...85 Connecting to a Network (LAN) ...87 Customizing Your VAIO Computer ...88 Setting the Password ...89 Using Fingerprint Authentication ...96 Setting Up Your Computer with VAIO Control Center 104 Using the Power Saving Modes ...105 Managing Power with VAIO Power Management ...110 Upgrading Your VAIO Computer...112 Adding and Removing Memory...113
User Guide
Page 4
n4 N Precautions ...119 Handling the LCD Screen ...120 Using the Power Source ...121 Handling Your Computer ...122 Handling the Built-in MOTION EYE Camera...124 Handling Floppy Disks ...125 Handling Discs ...126 Using the Battery Pack ...127 Using Headphones ...129 Handling the Memory Stick ...130 Handling the Hard Disk ...131 Updating Your Computer ...132 Troubleshooting ...133 Computer ...135 System Security ...141 Battery...142 Built-in MOTION EYE Camera...144 Internet ...147 Networking ...149 Bluetooth Technology ...152 Optical Discs ...157 Display ...161 Printing ...165 Microphone ...166
n4 N Precautions ...119 Handling the LCD Screen ...120 Using the Power Source ...121 Handling Your Computer ...122 Handling the Built-in MOTION EYE Camera...124 Handling Floppy Disks ...125 Handling Discs ...126 Using the Battery Pack ...127 Using Headphones ...129 Handling the Memory Stick ...130 Handling the Hard Disk ...131 Updating Your Computer ...132 Troubleshooting ...133 Computer ...135 System Security ...141 Battery...142 Built-in MOTION EYE Camera...144 Internet ...147 Networking ...149 Bluetooth Technology ...152 Optical Discs ...157 Display ...161 Printing ...165 Microphone ...166

User Guide
Page 7
...Use As an ENERGY STAR Partner, Sony has determined that promotes energy saving through the use of computers and office equipment. The program backs the development and dissemination of inactivity. For detailed information on power saving modes, see Using the Power Saving Modes (page 105). The ...about 15 minutes of inactivity. ❑ The computer enters Sleep mode automatically after about 30 minutes of products with the following power saving settings: ❑ The LCD backlight is an international program that this product meets the ENERGY STAR guidelines for energy efficiency...
...Use As an ENERGY STAR Partner, Sony has determined that promotes energy saving through the use of computers and office equipment. The program backs the development and dissemination of inactivity. For detailed information on power saving modes, see Using the Power Saving Modes (page 105). The ...about 15 minutes of inactivity. ❑ The computer enters Sleep mode automatically after about 30 minutes of products with the following power saving settings: ❑ The LCD backlight is an international program that this product meets the ENERGY STAR guidelines for energy efficiency...
User Guide
Page 13
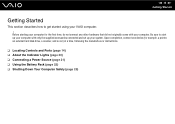
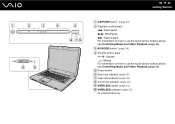
... (for the first time, do not connect any other hardware that did not originally come with only the supplied accessories connected and set up your VAIO computer. ! n 13 N Getting Started Getting Started This section describes how to start up your computer with your computer for example, a printer, ...) at a time, following the manufacturers' instructions. ❑ Locating Controls and Ports (page 14) ❑ About the Indicator Lights (page 20) ❑ Connecting a Power Source (page 21) ❑ Using the Battery Pack (page 22) ❑ Shutting Down Your Computer Safely (page 29)
... (for the first time, do not connect any other hardware that did not originally come with only the supplied accessories connected and set up your VAIO computer. ! n 13 N Getting Started Getting Started This section describes how to start up your computer with your computer for example, a printer, ...) at a time, following the manufacturers' instructions. ❑ Locating Controls and Ports (page 14) ❑ About the Indicator Lights (page 20) ❑ Connecting a Power Source (page 21) ❑ Using the Battery Pack (page 22) ❑ Shutting Down Your Computer Safely (page 29)
User Guide
Page 14
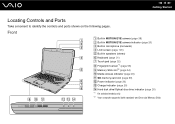
... 31) G Touch pad (page 32) H Fingerprint sensor*1 (page 96) I Memory Stick slot*2 (page 54) J Media Access indicator (page 20) K SD memory card slot (page 59) L Power indicator (page 20) M Charge indicator (page 20) N Hard disk drive/Optical disc drive indicator (page 20) *1 On selected models only. *2 Your computer supports both standard-
... 31) G Touch pad (page 32) H Fingerprint sensor*1 (page 96) I Memory Stick slot*2 (page 54) J Media Access indicator (page 20) K SD memory card slot (page 59) L Power indicator (page 20) M Charge indicator (page 20) N Hard disk drive/Optical disc drive indicator (page 20) *1 On selected models only. *2 Your computer supports both standard-
User Guide
Page 15
E Power button F Num lock indicator (page 20) G Caps lock indicator (page 20) H Scroll lock indicator (page 20) I WIRELESS switch (page 63) J WIRELESS indicator (page 20) * On ...
E Power button F Num lock indicator (page 20) G Caps lock indicator (page 20) H Scroll lock indicator (page 20) I WIRELESS switch (page 63) J WIRELESS indicator (page 20) * On ...
User Guide
Page 20
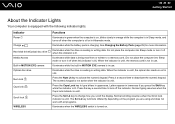
... is on . The Scr Lk key functions differently depending on the program you are using and does not work with the following indicator lights: Indicator Power 1 Charge Hard disk drive/Optical disc drive Media Access Built-in MOTION EYE camera Optical disc drive Num lock Caps lock Scroll lock WIRELESS Functions...
... is on . The Scr Lk key functions differently depending on the program you are using and does not work with the following indicator lights: Indicator Power 1 Charge Hard disk drive/Optical disc drive Media Access Built-in MOTION EYE camera Optical disc drive Num lock Caps lock Scroll lock WIRELESS Functions...

User Guide
Page 21
...for a long period of time, place the computer into the DC IN port (4) on the AC adapter. ✍ To disconnect your computer completely from AC power, unplug the AC adapter. See Using Hibernate Mode (page 108). Make sure that the AC outlet is easily accessible. To use either an AC adapter...mode saves the time of shutting down and resuming. n 21 N Getting Started Connecting a Power Source You can use the AC adapter 1 Plug one end of the power cord (1) into the AC adapter (3). 2 Plug the other end of the power cord into an AC outlet (2). 3 Plug the cable connected to the AC adapter (3) ...
...for a long period of time, place the computer into the DC IN port (4) on the AC adapter. ✍ To disconnect your computer completely from AC power, unplug the AC adapter. See Using Hibernate Mode (page 108). Make sure that the AC outlet is easily accessible. To use either an AC adapter...mode saves the time of shutting down and resuming. n 21 N Getting Started Connecting a Power Source You can use the AC adapter 1 Plug one end of the power cord (1) into the AC adapter (3). 2 Plug the other end of the power cord into an AC outlet (2). 3 Plug the cable connected to the AC adapter (3) ...
User Guide
Page 24
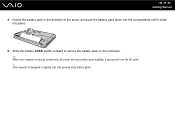
This computer is directly connected to operate only with genuine Sony battery packs. n 24 N Getting Started 4 Rotate the battery pack in the direction of the arrow, and push the battery pack down into the compartment until it clicks into place. 5 Slide the battery LOCK switch outward to secure the battery pack on the computer. ✍ When your computer is designed to AC power and has a battery pack installed, it uses power from the AC outlet. !
This computer is directly connected to operate only with genuine Sony battery packs. n 24 N Getting Started 4 Rotate the battery pack in the direction of the arrow, and push the battery pack down into the compartment until it clicks into place. 5 Slide the battery LOCK switch outward to secure the battery pack on the computer. ✍ When your computer is designed to AC power and has a battery pack installed, it uses power from the AC outlet. !
User Guide
Page 25
... adapter to the maximum charge level you selected with the battery charge functions, the charge indicator turns off. The battery pack is running out of power. (Sleep mode) A battery error has occurred due to a failed battery pack or an unlocked battery pack. ! To select your first battery charge. ...Charge the battery pack as described in orange Meaning The battery pack is not fully charged at the time of power. (Normal mode) The battery pack is charging. The charge indicator light turns on while the battery pack is running out of delivery. n 25 ...
... adapter to the maximum charge level you selected with the battery charge functions, the charge indicator turns off. The battery pack is running out of power. (Sleep mode) A battery error has occurred due to a failed battery pack or an unlocked battery pack. ! To select your first battery charge. ...Charge the battery pack as described in orange Meaning The battery pack is not fully charged at the time of power. (Normal mode) The battery pack is charging. The charge indicator light turns on while the battery pack is running out of delivery. n 25 ...
User Guide
Page 26
...connect the AC adapter to recharge the battery pack or shut down your computer and install a fully charged battery pack. Going back to AC power and has a battery pack installed, it is supplied with a lithium ion battery pack and can be recharged any time. When your computer...connected to the previous work state is impossible. Your computer is directly connected to charge while you should save your data frequently and manually activate a power management mode, such as Sleep or Hibernate. n 26 N Getting Started ✍ Keep the battery pack in use, your computer may not ...
...connect the AC adapter to recharge the battery pack or shut down your computer and install a fully charged battery pack. Going back to AC power and has a battery pack installed, it is supplied with a lithium ion battery pack and can be recharged any time. When your computer...connected to the previous work state is impossible. Your computer is directly connected to charge while you should save your data frequently and manually activate a power management mode, such as Sleep or Hibernate. n 26 N Getting Started ✍ Keep the battery pack in use, your computer may not ...
User Guide
Page 27
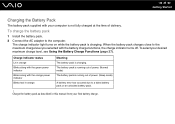
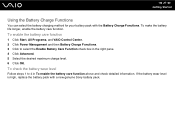
...N Getting Started Using the Battery Charge Functions You can select the battery charging method for your battery pack with a new genuine Sony battery pack. If the battery wear level is high, replace the battery pack with the Battery Charge Functions. To make the battery...in To enable the battery care function above and check detailed information. To enable the battery care function 1 Click Start, All Programs, and VAIO Control Center. 2 Click Power Management and then Battery Charge Functions. 3 Click to 4 in the right pane. 4 Click Advanced. 5 Select the desired maximum charge level....
...N Getting Started Using the Battery Charge Functions You can select the battery charging method for your battery pack with a new genuine Sony battery pack. If the battery wear level is high, replace the battery pack with the Battery Charge Functions. To make the battery...in To enable the battery care function above and check detailed information. To enable the battery care function 1 Click Start, All Programs, and VAIO Control Center. 2 Click Power Management and then Battery Charge Functions. 3 Click to 4 in the right pane. 4 Click Advanced. 5 Select the desired maximum charge level....

User Guide
Page 29
n 29 N Getting Started Shutting Down Your Computer Safely To avoid losing unsaved data, be sure to turn off automatically. The power indicator light turns off any peripherals connected to the computer. 2 Click Start, the arrow next to the Lock button, and then Shut Down. 3 Respond to any prompts warning you to save documents or to consider other users and wait for the computer to shut down your computer 1 Turn off . To shut down your computer properly, as described below.
n 29 N Getting Started Shutting Down Your Computer Safely To avoid losing unsaved data, be sure to turn off automatically. The power indicator light turns off any peripherals connected to the computer. 2 Click Start, the arrow next to the Lock button, and then Shut Down. 3 Respond to any prompts warning you to save documents or to consider other users and wait for the computer to shut down your computer 1 Turn off . To shut down your computer properly, as described below.
User Guide
Page 31
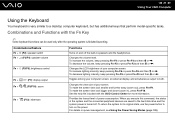
n 31 N Using Your VAIO Computer Using the Keyboard Your keyboard is finished launching. Combinations/Feature Fn + % (F2): speaker switch Fn + 2 (F3/F4): speaker volume Fn + 8 (F5/F6): brightness control ...
n 31 N Using Your VAIO Computer Using the Keyboard Your keyboard is finished launching. Combinations/Feature Fn + % (F2): speaker switch Fn + 2 (F3/F4): speaker volume Fn + 8 (F5/F6): brightness control ...
User Guide
Page 42
n 42 N Using Your VAIO Computer 4 Close the tray by pushing it in a power saving mode (Sleep or Hibernate). Do not remove the optical disc when your computer is in gently. ! Doing so may cause the computer to malfunction. ✍ If you plan to use an external optical disc drive, connect the drive before you launch any preinstalled disc operation program.
n 42 N Using Your VAIO Computer 4 Close the tray by pushing it in a power saving mode (Sleep or Hibernate). Do not remove the optical disc when your computer is in gently. ! Doing so may cause the computer to malfunction. ✍ If you plan to use an external optical disc drive, connect the drive before you launch any preinstalled disc operation program.
User Guide
Page 46
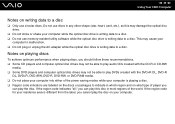
... optimum performance when playing discs, you can play the disc. If the region code for your computer is writing data to a disc. n 46 N Using Your VAIO Computer Notes on writing data to a disc. ❑ Do not use circular discs. Do not use discs in most regions of the...
... optimum performance when playing discs, you can play the disc. If the region code for your computer is writing data to a disc. n 46 N Using Your VAIO Computer Notes on writing data to a disc. ❑ Do not use circular discs. Do not use discs in most regions of the...
User Guide
Page 73
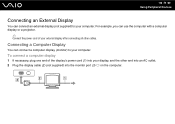
... connect a computer display (monitor) to your computer. Connecting a Computer Display You can use the computer with a computer display or a projector. ✍ Connect the power cord of the display's power cord (1) into your external display after connecting all other end into an AC outlet. 2 Plug the display cable (2) (not supplied) into the monitor...
... connect a computer display (monitor) to your computer. Connecting a Computer Display You can use the computer with a computer display or a projector. ✍ Connect the power cord of the display's power cord (1) into your external display after connecting all other end into an AC outlet. 2 Plug the display cable (2) (not supplied) into the monitor...

User Guide
Page 74
n 74 N Using Peripheral Devices Connecting a Multimedia Computer Display You can connect a multimedia computer display that includes built-in speakers and a microphone to your multimedia computer display (1) into an AC outlet. 2 Plug the display cable (2) (not supplied) into the monitor port (3) a on the computer. 3 Plug the speaker cable (4) (not supplied) into the headphones jack (5) i on the computer. 4 Plug the microphone cable (6) (not supplied) into the microphone jack (7) m on the computer. To connect a multimedia computer display 1 Plug the power cord of your computer.
n 74 N Using Peripheral Devices Connecting a Multimedia Computer Display You can connect a multimedia computer display that includes built-in speakers and a microphone to your multimedia computer display (1) into an AC outlet. 2 Plug the display cable (2) (not supplied) into the monitor port (3) a on the computer. 3 Plug the speaker cable (4) (not supplied) into the headphones jack (5) i on the computer. 4 Plug the microphone cable (6) (not supplied) into the microphone jack (7) m on the computer. To connect a multimedia computer display 1 Plug the power cord of your computer.

User Guide
Page 75
n 75 N Using Peripheral Devices To connect a projector 1 Connect the power cord (1) of your computer. Connecting a Projector You can connect a projector (for example, the Sony LCD projector) to your projector into an AC outlet. 2 Plug a display cable (2) (not supplied) into the monitor port (3) a on the computer. 3 Plug an audio cable (4) (not supplied) into the headphones jack (5) i on the computer. 4 Plug the display cable and the audio cable into the jack and port on the projector (6).
n 75 N Using Peripheral Devices To connect a projector 1 Connect the power cord (1) of your computer. Connecting a Projector You can connect a projector (for example, the Sony LCD projector) to your projector into an AC outlet. 2 Plug a display cable (2) (not supplied) into the monitor port (3) a on the computer. 3 Plug an audio cable (4) (not supplied) into the headphones jack (5) i on the computer. 4 Plug the display cable and the audio cable into the jack and port on the projector (6).


