User Guide
Page 2
... or Headphones ..........53 Connecting a USB Device 54 Connecting an i.LINK Device 56 Customizing Your VAIO Computer 58 Setting the Password 59 Using the VAIO Control Center 64 Using the Power Saving Mode 65 Upgrading Your VAIO Computer 67 Adding and Removing Memory 68 Precautions 74 Handling the LCD Screen 75 Using the Power Source 76 Handling...
... or Headphones ..........53 Connecting a USB Device 54 Connecting an i.LINK Device 56 Customizing Your VAIO Computer 58 Setting the Password 59 Using the VAIO Control Center 64 Using the Power Saving Mode 65 Upgrading Your VAIO Computer 67 Adding and Removing Memory 68 Precautions 74 Handling the LCD Screen 75 Using the Power Source 76 Handling...
User Guide
Page 3
Troubleshooting 84 Computer 86 System Security 91 Built-in MOTION EYE Camera 92 Networking 94 Bluetooth Technology 97 Optical Discs 100 Display 104 Printing 106 Microphone 107 Mouse 108 Speakers 109 Keyboard 110 Floppy Disks 111 Audio/Video 112 Memory Stick 115 Peripherals 116 Trademarks 117 Notice 119 n3 N
Troubleshooting 84 Computer 86 System Security 91 Built-in MOTION EYE Camera 92 Networking 94 Bluetooth Technology 97 Optical Discs 100 Display 104 Printing 106 Microphone 107 Mouse 108 Speakers 109 Keyboard 110 Floppy Disks 111 Audio/Video 112 Memory Stick 115 Peripherals 116 Trademarks 117 Notice 119 n3 N
User Guide
Page 13
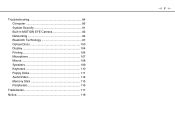
Getting Started > Locating Controls and Ports Back n 13 N A Air vent B Cable clamps (page 17), (page 18) C Prop-up stand (page 78) D DC IN port (page 18) E Network (Ethernet) port (page 42) F Hi-Speed USB (USB 2.0) ports* (page 54) G OPTICAL OUT port (page 53) (Output Sampling Rate: 44.1 KHz/48.0 KHz/96.0 KHz) H i.LINK 4-pin (S400) port (page 56) I Memory module compartment cover (page 68) * Support high-/full-/low- Be sure to wait until the computer cools down before you touch it. The area around the air vent (1) becomes hot while your computer is on. speeds. !
Getting Started > Locating Controls and Ports Back n 13 N A Air vent B Cable clamps (page 17), (page 18) C Prop-up stand (page 78) D DC IN port (page 18) E Network (Ethernet) port (page 42) F Hi-Speed USB (USB 2.0) ports* (page 54) G OPTICAL OUT port (page 53) (Output Sampling Rate: 44.1 KHz/48.0 KHz/96.0 KHz) H i.LINK 4-pin (S400) port (page 56) I Memory module compartment cover (page 68) * Support high-/full-/low- Be sure to wait until the computer cools down before you touch it. The area around the air vent (1) becomes hot while your computer is on. speeds. !

User Guide
Page 15
speeds. Getting Started > Locating Controls and Ports Left n 15 N A Memory Stick slot*1 (page 33) B Media Access indicator (page 16) C SD memory card slot (page 38) D Hi-Speed USB (USB 2.0) ports*2 (page 54) E Headphones jack (page 53) F Microphone jack Connect an external microphone. G Line In jack Connect an external audio device for audio input. H WIRELESS switch (page 43) *1 Your computer supports both the standard-size Memory Stick and the Duo- size Memory Stick. *2 Support high-/full-/low-
speeds. Getting Started > Locating Controls and Ports Left n 15 N A Memory Stick slot*1 (page 33) B Media Access indicator (page 16) C SD memory card slot (page 38) D Hi-Speed USB (USB 2.0) ports*2 (page 54) E Headphones jack (page 53) F Microphone jack Connect an external microphone. G Line In jack Connect an external audio device for audio input. H WIRELESS switch (page 43) *1 Your computer supports both the standard-size Memory Stick and the Duo- size Memory Stick. *2 Support high-/full-/low-
User Guide
Page 16
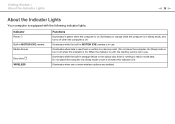
Illuminates when one or more wireless options are enabled. Do not place the computer into Sleep mode or turn it off . Illuminates while the built-in MOTION EYE camera is in use . Illuminates when data is read from or ...written to read or write data. Illuminates while the built-in storage device or the optical disc drive is running to a memory card. (Do not place the computer into Sleep mode or turn it off when this indicator is lit.) When the indicator is unlit, the...
Illuminates when one or more wireless options are enabled. Do not place the computer into Sleep mode or turn it off . Illuminates while the built-in MOTION EYE camera is in use . Illuminates when data is read from or ...written to read or write data. Illuminates while the built-in storage device or the optical disc drive is running to a memory card. (Do not place the computer into Sleep mode or turn it off when this indicator is lit.) When the indicator is unlit, the...
User Guide
Page 22
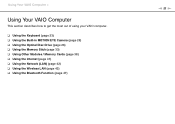
Using Your VAIO Computer > Using Your VAIO Computer This section describes how to get the most out of using your VAIO computer. ❑ Using the Keyboard (page 23) ❑ Using the Built-in MOTION EYE Camera (page 25) ❑ Using the Optical Disc Drive (page 26) ❑ Using the Memory Stick (page 33) ❑ Using Other Modules / Memory Cards (page 38) ❑ Using the Internet (page 41) ❑ Using the Network (LAN) (page 42) ❑ Using the Wireless LAN (page 43) ❑ Using the Bluetooth Function (page 47) n 22 N
Using Your VAIO Computer > Using Your VAIO Computer This section describes how to get the most out of using your VAIO computer. ❑ Using the Keyboard (page 23) ❑ Using the Built-in MOTION EYE Camera (page 25) ❑ Using the Optical Disc Drive (page 26) ❑ Using the Memory Stick (page 33) ❑ Using Other Modules / Memory Cards (page 38) ❑ Using the Internet (page 41) ❑ Using the Network (LAN) (page 42) ❑ Using the Wireless LAN (page 43) ❑ Using the Bluetooth Function (page 47) n 22 N
User Guide
Page 29
When you buy pre-recorded or blank discs for use memory-resident utility software when playing or writing a disc. For ... rates. It is a two sided disc product which mates DVD recorded material on one side with your VAIO computer, be implemented for some contents on the disc package carefully to check both playback and recording... compatibility with other side. Sony does NOT guarantee the compatibility of a DualDisc may not support movie playback on the disc, playback is not supported. ! VAIO computers may not play copyright protected Blu-ray Disc ...
When you buy pre-recorded or blank discs for use memory-resident utility software when playing or writing a disc. For ... rates. It is a two sided disc product which mates DVD recorded material on one side with your VAIO computer, be implemented for some contents on the disc package carefully to check both playback and recording... compatibility with other side. Sony does NOT guarantee the compatibility of a DualDisc may not support movie playback on the disc, playback is not supported. ! VAIO computers may not play copyright protected Blu-ray Disc ...
User Guide
Page 33
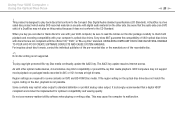
... PRO-HG Duo with compatible products, such as digital cameras, mobile phones, and other devices. Using Your VAIO Computer > Using the Memory Stick n 33 N Using the Memory Stick The Memory Stick is removable, it is a compact, portable, and versatile IC recording media especially designed for external data ...can accommodate both standard- For the latest information about the Memory Stick, visit the Memory Stick web site at http://www.memorystick.com/en/. Before You Use the Memory Stick The Memory Stick slot on your computer can be used for exchanging and sharing digital data with...
... PRO-HG Duo with compatible products, such as digital cameras, mobile phones, and other devices. Using Your VAIO Computer > Using the Memory Stick n 33 N Using the Memory Stick The Memory Stick is removable, it is a compact, portable, and versatile IC recording media especially designed for external data ...can accommodate both standard- For the latest information about the Memory Stick, visit the Memory Stick web site at http://www.memorystick.com/en/. Before You Use the Memory Stick The Memory Stick slot on your computer can be used for exchanging and sharing digital data with...
User Guide
Page 34
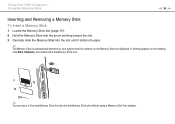
...VAIO Computer > Using the Memory Stick n 34 N Inserting and Removing a Memory Stick To insert a Memory Stick 1 Locate the Memory Stick slot (page 15). 2 Hold the Memory Stick with the arrow pointing toward the slot. 3 Carefully slide the Memory Stick into the slot until it clicks into the Memory Stick slot without using a Memory... Stick Duo adaptor. If nothing appears on the desktop, click Start, Computer, and double-click the Memory Stick icon. ✍ You can insert a Duo-size Memory Stick directly into place. ✍ The Memory Stick is...
...VAIO Computer > Using the Memory Stick n 34 N Inserting and Removing a Memory Stick To insert a Memory Stick 1 Locate the Memory Stick slot (page 15). 2 Hold the Memory Stick with the arrow pointing toward the slot. 3 Carefully slide the Memory Stick into the slot until it clicks into the Memory Stick slot without using a Memory... Stick Duo adaptor. If nothing appears on the desktop, click Start, Computer, and double-click the Memory Stick icon. ✍ You can insert a Duo-size Memory Stick directly into place. ✍ The Memory Stick is...
User Guide
Page 35
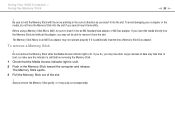
... slot without the adaptor, you insert it into the slot. The Memory Stick ejects. 3 Pull the Memory Stick out of data may pop out unexpectedly. Using Your VAIO Computer > Using the Memory Stick n 35 N ! Do not remove the Memory Stick while the Media Access indicator light is additionally inserted into the slot if you may not...
... slot without the adaptor, you insert it into the slot. The Memory Stick ejects. 3 Pull the Memory Stick out of data may pop out unexpectedly. Using Your VAIO Computer > Using the Memory Stick n 35 N ! Do not remove the Memory Stick while the Media Access indicator light is additionally inserted into the slot if you may not...
User Guide
Page 36
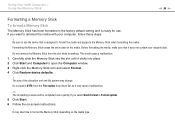
... when formatting the media. Before formatting the media, make sure that is ready for use. Using Your VAIO Computer > Using the Memory Stick n 36 N Formatting a Memory Stick To format a Memory Stick The Memory Stick has been formatted in Format options. 5 Click Start. 6 Follow the on the media. Do ...Format in the factory default setting and is designed to format the Memory Stick depending on the media type. This could cause a malfunction. 1 Carefully slide the Memory Stick into place. 2 Click Start and Computer to reformat the media with your valuable data. Do not remove the...
... when formatting the media. Before formatting the media, make sure that is ready for use. Using Your VAIO Computer > Using the Memory Stick n 36 N Formatting a Memory Stick To format a Memory Stick The Memory Stick has been formatted in Format options. 5 Click Start. 6 Follow the on the media. Do ...Format in the factory default setting and is designed to format the Memory Stick depending on the media type. This could cause a malfunction. 1 Carefully slide the Memory Stick into place. 2 Click Start and Computer to reformat the media with your valuable data. Do not remove the...
User Guide
Page 37
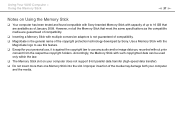
...VAIO Computer > Using the Memory Stick n 37 N Notes on your computer does not support 8-bit parallel data transfer (high-speed data transfer). ❑ Do not insert more than one Memory Stick into the slot. Accordingly, the Memory Stick with such copyrighted data can be used only within the law. ❑ The Memory... Stick slot on Using the Memory Stick ❑ Your computer has been tested and found compatible with Sony branded Memory Stick ...
...VAIO Computer > Using the Memory Stick n 37 N Notes on your computer does not support 8-bit parallel data transfer (high-speed data transfer). ❑ Do not insert more than one Memory Stick into the slot. Accordingly, the Memory Stick with such copyrighted data can be used only within the law. ❑ The Memory... Stick slot on Using the Memory Stick ❑ Your computer has been tested and found compatible with Sony branded Memory Stick ...
User Guide
Page 38
... latest information on compatible memory cards, see Finding More about Your VAIO Computer (page 5) to transfer data among digital cameras, camcorders, music players, and other audio/video devices. Using Your VAIO Computer > Using Other Modules / Memory Cards n 38 N Using Other Modules / Memory Cards Using the SD Memory Card Your computer is equipped with an SD memory card slot. Before you...
... latest information on compatible memory cards, see Finding More about Your VAIO Computer (page 5) to transfer data among digital cameras, camcorders, music players, and other audio/video devices. Using Your VAIO Computer > Using Other Modules / Memory Cards n 38 N Using Other Modules / Memory Cards Using the SD Memory Card Your computer is equipped with an SD memory card slot. Before you...
User Guide
Page 39
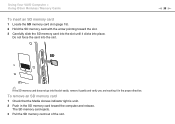
.... 3 Carefully slide the SD memory card into the slot until it clicks into place. n 39 N ✍ If the SD memory card does not go into the slot. Using Your VAIO Computer > Using Other Modules / Memory Cards To insert an SD memory card 1 Locate the SD memory card slot (page 15). 2 Hold the SD memory card with the arrow...
.... 3 Carefully slide the SD memory card into the slot until it clicks into place. n 39 N ✍ If the SD memory card does not go into the slot. Using Your VAIO Computer > Using Other Modules / Memory Cards To insert an SD memory card 1 Locate the SD memory card slot (page 15). 2 Hold the SD memory card with the arrow...
User Guide
Page 40
... Your VAIO Computer > Using Other Modules / Memory Cards n 40 N Notes on Using Memory Cards General notes on using the memory card ❑ Be sure to insert an memory card or memory card adaptor of January 2009. Do not force it smoothly. ❑ Use care when inserting or removing the memory card from... the slot and can cause damage to your computer. ❑ Be sure to hold the memory card with your computer. ❑ The SD memory card slot on your computer does not support the high-speed data transfer feature of...
... Your VAIO Computer > Using Other Modules / Memory Cards n 40 N Notes on Using Memory Cards General notes on using the memory card ❑ Be sure to insert an memory card or memory card adaptor of January 2009. Do not force it smoothly. ❑ Use care when inserting or removing the memory card from... the slot and can cause damage to your computer. ❑ Be sure to hold the memory card with your computer. ❑ The SD memory card slot on your computer does not support the high-speed data transfer feature of...
User Guide
Page 57
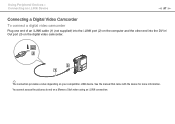
You cannot access the pictures stored on your compatible i.LINK device. Using Peripheral Devices > Connecting an i.LINK Device n 57 N Connecting a Digital Video Camcorder To connect a digital video camcorder Plug one end of an i.LINK cable (1) (not supplied) into the i.LINK port (2) on the computer and the other end into the DV In/ Out port (3) on the digital video camcorder. ✍ The connection procedure varies depending on a Memory Stick when using an i.LINK connection. See the manual that came with the device for more information.
You cannot access the pictures stored on your compatible i.LINK device. Using Peripheral Devices > Connecting an i.LINK Device n 57 N Connecting a Digital Video Camcorder To connect a digital video camcorder Plug one end of an i.LINK cable (1) (not supplied) into the i.LINK port (2) on the computer and the other end into the DV In/ Out port (3) on the digital video camcorder. ✍ The connection procedure varies depending on a Memory Stick when using an i.LINK connection. See the manual that came with the device for more information.
User Guide
Page 67
... Finding More about the configuration of memory installed on your computer. For assistance, contact an authorized Sony Service Center. The type of module and the amount of your computer may differ depending on a computer. ❑ You should not install...memory on the model you purchased. See the specifications to install a new memory module. ❑ You should not touch the connectors or open the memory module compartment cover. To find out about Your VAIO Computer (page 5). Upgrading Your VAIO Computer > n 67 N Upgrading Your VAIO Computer Your VAIO computer and memory...
... Finding More about the configuration of memory installed on your computer. For assistance, contact an authorized Sony Service Center. The type of module and the amount of your computer may differ depending on a computer. ❑ You should not install...memory on the model you purchased. See the specifications to install a new memory module. ❑ You should not touch the connectors or open the memory module compartment cover. To find out about Your VAIO Computer (page 5). Upgrading Your VAIO Computer > n 67 N Upgrading Your VAIO Computer Your VAIO computer and memory...

User Guide
Page 68
... chassis while performing the procedure. ❑ Do not open the memory module package before you upgrade your computer. Upgrading Your VAIO Computer > Adding and Removing Memory n 68 N Adding and Removing Memory If you want to expand the functionality of your computer, you can increase the amount of memory modules may cause damage to your system. Notes on adding...
... chassis while performing the procedure. ❑ Do not open the memory module package before you upgrade your computer. Upgrading Your VAIO Computer > Adding and Removing Memory n 68 N Adding and Removing Memory If you want to expand the functionality of your computer, you can increase the amount of memory modules may cause damage to your system. Notes on adding...

User Guide
Page 69
... or speakers that are not magnetically shielded ❑ Ambient temperature of the components and circuit boards inside your computer. Upgrading Your VAIO Computer > Adding and Removing Memory n 69 N ❑ Use the special bag supplied with the memory module or wrap the module in aluminum foil to protect it from ESD. ❑ Introducing any liquids, foreign...
... or speakers that are not magnetically shielded ❑ Ambient temperature of the components and circuit boards inside your computer. Upgrading Your VAIO Computer > Adding and Removing Memory n 69 N ❑ Use the special bag supplied with the memory module or wrap the module in aluminum foil to protect it from ESD. ❑ Introducing any liquids, foreign...
User Guide
Page 70
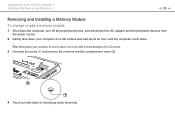
Upgrading Your VAIO Computer > Adding and Removing Memory n 70 N Removing and Installing a Memory Module To change or add a memory module 1 Shut down the computer, turn off all peripheral devices, and disconnect the AC adapter and the peripheral devices from the power source. 2 Gently face down . ! When facing down your computer, be sure to place it on a flat surface...
Upgrading Your VAIO Computer > Adding and Removing Memory n 70 N Removing and Installing a Memory Module To change or add a memory module 1 Shut down the computer, turn off all peripheral devices, and disconnect the AC adapter and the peripheral devices from the power source. 2 Gently face down . ! When facing down your computer, be sure to place it on a flat surface...


