
Operating Instructions (primary manual)
Page 14
Checking supplied accessories Make sure that the following accessories are supplied with your camcorder. 1 2 3 4 5 6 7 8 9 q; qa qs qd 1 AC-L10A/L10B/L10C AC power adaptor (1), power cord (1) (p. 16) 2 NP-FM50 battery pack (1) (p. 15, 16) 3 A/V connecting ...cap (1) (p. 26) 8 Lens hood (1) (p. 30) 9 "Memory Stick" (1) (p. 117) 0 USB cable (1) (p. 180) qa CD-ROM (SPVD-008 USB Driver) (1) (p. 179) qs Cleaning cloth (1) (p. 229) qd Stylus (1) (DCR-TRV50 only) (p. 198) Contents of the recording cannot be compensated if recording or playback is not made due to a malfunction of the...
Checking supplied accessories Make sure that the following accessories are supplied with your camcorder. 1 2 3 4 5 6 7 8 9 q; qa qs qd 1 AC-L10A/L10B/L10C AC power adaptor (1), power cord (1) (p. 16) 2 NP-FM50 battery pack (1) (p. 15, 16) 3 A/V connecting ...cap (1) (p. 26) 8 Lens hood (1) (p. 30) 9 "Memory Stick" (1) (p. 117) 0 USB cable (1) (p. 180) qa CD-ROM (SPVD-008 USB Driver) (1) (p. 179) qs Cleaning cloth (1) (p. 229) qd Stylus (1) (DCR-TRV50 only) (p. 198) Contents of the recording cannot be compensated if recording or playback is not made due to a malfunction of the...

Operating Instructions (primary manual)
Page 174
... USB connector, editing software When connecting to a computer via the USB jack, complete installation of connecting the camcorder to a computer in order to install the USB driver correctly. Viewing images recorded on your computer - To view images on your computer. Viewing Images Using your ... Stick slot, first eject the "Memory Stick" from the camcorder and then insert it into the end USB connector USB cable (supplied) 174 Introduction There are the following ways of the USB driver before connecting the camcorder to a computer using the USB jack For more information, ...
... USB connector, editing software When connecting to a computer via the USB jack, complete installation of connecting the camcorder to a computer in order to install the USB driver correctly. Viewing images recorded on your computer - To view images on your computer. Viewing Images Using your ... Stick slot, first eject the "Memory Stick" from the camcorder and then insert it into the end USB connector USB cable (supplied) 174 Introduction There are the following ways of the USB driver before connecting the camcorder to a computer using the USB jack For more information, ...

Operating Instructions (primary manual)
Page 177
... but you will not operate correctly.) Others: This product is necessary to your computer. The USB connector must install a USB driver onto your computer using the USB cable - If you connect the camcorder to the computer first, you can view images recorded on a "Memory Stick" on the size of the USB... driver before connecting the camcorder to the computer's USB connector. For Windows users Complete installation of the image files edited) Display: 4 MB VRAM video card, Minimum 800 × ...
... but you will not operate correctly.) Others: This product is necessary to your computer. The USB connector must install a USB driver onto your computer using the USB cable - If you connect the camcorder to the computer first, you can view images recorded on a "Memory Stick" on the size of the USB... driver before connecting the camcorder to the computer's USB connector. For Windows users Complete installation of the image files edited) Display: 4 MB VRAM video card, Minimum 800 × ...
Operating Instructions (primary manual)
Page 179
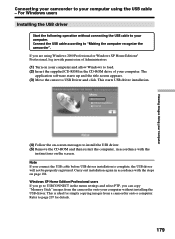
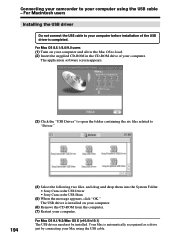
... Move the cursor to "Making the computer recognize the camcorder". Carry out installation again in accordance with the instructions on the screen. This is complete, the USB driver will not be properly registered. This starts USB driver installation. (4) Follow the on-screen messages to install ...the USB driver. (5) Remove the CD-ROM and then restart the computer, in accordance with permission of Administrators. (1) Turn on page 182. If you can copy "Memory Stick" images from a camcorder onto a computer. Windows XP Home Edition/Professional...
... Move the cursor to "Making the computer recognize the camcorder". Carry out installation again in accordance with the instructions on the screen. This is complete, the USB driver will not be properly registered. This starts USB driver installation. (4) Follow the on-screen messages to install ...the USB driver. (5) Remove the CD-ROM and then restart the computer, in accordance with permission of Administrators. (1) Turn on page 182. If you can copy "Memory Stick" images from a camcorder onto a computer. Windows XP Home Edition/Professional...
Operating Instructions (primary manual)
Page 181
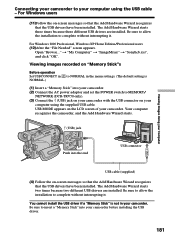
... complete without interrupting it . Connecting your camcorder to your camcorder. You cannot install the USB driver if a "Memory Stick" is (1) Insert a "Memory Stick" into your camcorder. (2) Connect the AC power adaptor and set the POWER switch to MEMORY/ NETWORK (DCR-TRV50 only). (3) Connect the (USB) jack on your camcorder with the USB connector on -screen messages...
... complete without interrupting it . Connecting your camcorder to your camcorder. You cannot install the USB driver if a "Memory Stick" is (1) Insert a "Memory Stick" into your camcorder. (2) Connect the AC power adaptor and set the POWER switch to MEMORY/ NETWORK (DCR-TRV50 only). (3) Connect the (USB) jack on your camcorder with the USB connector on -screen messages...

Operating Instructions (primary manual)
Page 182
...", and click the "Device Manager" button. For Windows users If you cannot install the USB driver The USB driver has been registered incorrectly as your computer was connected to your camcorder using the USB cable - Perform the following procedure to classic view" instead. If there is ... "System", and click "Device Manager". 182 Connecting your camcorder to your computer using the USB cable supplied with your camcorder. 4 Open your computer's "Device Manager". Viewing images recorded on a tape Step 1: Uninstall the incorrect USB driver 1 Turn on your computer and allow Windows to load. ...
...", and click the "Device Manager" button. For Windows users If you cannot install the USB driver The USB driver has been registered incorrectly as your computer was connected to your camcorder using the USB cable - Perform the following procedure to classic view" instead. If there is ... "System", and click "Device Manager". 182 Connecting your camcorder to your computer using the USB cable supplied with your camcorder. 4 Open your computer's "Device Manager". Viewing images recorded on a tape Step 1: Uninstall the incorrect USB driver 1 Turn on your computer and allow Windows to load. ...
Operating Instructions (primary manual)
Page 184
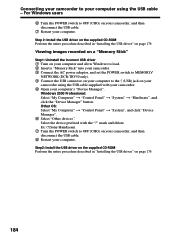
..."Memory Stick" Step1: Uninstall the incorrect USB driver 1 Turn on your computer and allow Windows to load. 2 Insert a "Memory Stick" into your camcorder. 3 Connect the AC power adaptor, and set the POWER switch to MEMORY/ NETWORK (DCR-TRV50 only). 4 Connect the USB connector on your... described in "Installing the USB driver" on your camcorder, and then disconnect the USB cable. 8 Restart your camcorder using the USB cable - Other OS: Select "My Computer" t "Control Panel" t "System", and click "Device Manager". 6 Select "Other devices". Ex: (?)Sony Handycam 7 Turn the POWER switch...
..."Memory Stick" Step1: Uninstall the incorrect USB driver 1 Turn on your computer and allow Windows to load. 2 Insert a "Memory Stick" into your camcorder. 3 Connect the AC power adaptor, and set the POWER switch to MEMORY/ NETWORK (DCR-TRV50 only). 4 Connect the USB connector on your... described in "Installing the USB driver" on your camcorder, and then disconnect the USB cable. 8 Restart your camcorder using the USB cable - Other OS: Select "My Computer" t "Control Panel" t "System", and click "Device Manager". 6 Select "Other devices". Ex: (?)Sony Handycam 7 Turn the POWER switch...
Operating Instructions (primary manual)
Page 185
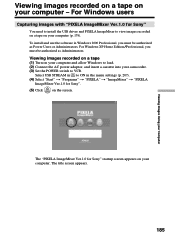
...Computer The "PIXELA ImageMixer Ver.1.0 for Sony" You need to install the USB driver and PIXELA ImageMixer to view images recorded on a tape on your computer. For Windows users Capturing images with "PIXELA ImageMixer Ver.1.0 for Sony" startup screen appears on your computer...(4) Select "Start" t "Programs" t "PIXELA" t "ImageMixer" t "PIXELA ImageMixer Ver.1.0 for Sony". (5) Click on the screen. The title screen appears. 185 Viewing images recorded on a tape on your camcorder. (3) Set the POWER switch to VCR. Viewing images recorded on a tape (1) Turn on your computer...
...Computer The "PIXELA ImageMixer Ver.1.0 for Sony" You need to install the USB driver and PIXELA ImageMixer to view images recorded on a tape on your computer. For Windows users Capturing images with "PIXELA ImageMixer Ver.1.0 for Sony" startup screen appears on your computer...(4) Select "Start" t "Programs" t "PIXELA" t "ImageMixer" t "PIXELA ImageMixer Ver.1.0 for Sony". (5) Click on the screen. The title screen appears. 185 Viewing images recorded on a tape on your camcorder. (3) Set the POWER switch to VCR. Viewing images recorded on a tape (1) Turn on your computer...

Operating Instructions (primary manual)
Page 189
...transferred by the USB connection The USB driver has been registered incorrectly as your computer was completed. If any questions about "PIXELA ImageMixer Ver.1.0 for Sony" "ImageMixer Ver.1.0 for Sony". (1) Click located in the upper-...driver was connected to the instruction manual of PIXELA corporation. Carry out the following the procedure on using your computer Communications with your camcorder before installation of contents. Note on page 182. Seeing the on-line help (operating instructions) of "PIXELA ImageMixer Ver.1.0 for Sony" A "PIXELA ImageMixer Ver.1.0 for Sony...
...transferred by the USB connection The USB driver has been registered incorrectly as your computer was completed. If any questions about "PIXELA ImageMixer Ver.1.0 for Sony" "ImageMixer Ver.1.0 for Sony". (1) Click located in the upper-...driver was connected to the instruction manual of PIXELA corporation. Carry out the following the procedure on using your computer Communications with your camcorder before installation of contents. Note on page 182. Seeing the on-line help (operating instructions) of "PIXELA ImageMixer Ver.1.0 for Sony" A "PIXELA ImageMixer Ver.1.0 for Sony...
Operating Instructions (primary manual)
Page 190
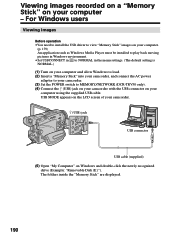
...click the newly recognized drive (Example: "Removable Disk (E:)"). For Windows users Viewing images Before operation •You need to install the USB driver to view "Memory Stick" images on your computer. (p. 179) An application such as Windows Media Player must be installed to play back... and allow Windows to load. (2) Insert a "Memory Stick" into your camcorder, and connect the AC power adaptor to your camcorder. (3) Set the POWER switch to MEMORY/NETWORK (DCR-TRV50 only). (4) Connect the (USB) jack on your camcorder with the USB connector on your computer using the supplied USB cable.
...click the newly recognized drive (Example: "Removable Disk (E:)"). For Windows users Viewing images Before operation •You need to install the USB driver to view "Memory Stick" images on your computer. (p. 179) An application such as Windows Media Player must be installed to play back... and allow Windows to load. (2) Insert a "Memory Stick" into your camcorder, and connect the AC power adaptor to your camcorder. (3) Set the POWER switch to MEMORY/NETWORK (DCR-TRV50 only). (4) Connect the (USB) jack on your camcorder with the USB connector on your computer using the supplied USB cable.
Operating Instructions (primary manual)
Page 193
... connecting to a computer using the USB cable You must install a USB driver onto your computer using a hub. •Some equipment may be provided as standard. Furthermore, "TM" and "®" are not mentioned in each case in order to connect the camcorder to the computer's USB connector. However, note that is required. Notes...
... connecting to a computer using the USB cable You must install a USB driver onto your computer using a hub. •Some equipment may be provided as standard. Furthermore, "TM" and "®" are not mentioned in each case in order to connect the camcorder to the computer's USB connector. However, note that is required. Notes...
Operating Instructions (primary manual)
Page 194
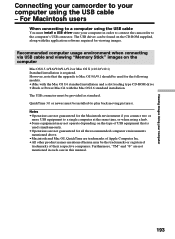
... before installation of your computer using the USB cable. Connecting your camcorder to "Driver." 194 (4) Select the following two files, and drag and drop them into the System Folder. • Sony Camcorder USB Driver • Sony Camcorder USB Shim (5) When the message appears, click "OK." Your Mac... is completed. For Macintosh users Installing the USB driver Do not connect the USB cable to load. (2) Insert the ...
... before installation of your computer using the USB cable. Connecting your camcorder to "Driver." 194 (4) Select the following two files, and drag and drop them into the System Folder. • Sony Camcorder USB Driver • Sony Camcorder USB Shim (5) When the message appears, click "OK." Your Mac... is completed. For Macintosh users Installing the USB driver Do not connect the USB cable to load. (2) Insert the ...
Operating Instructions (primary manual)
Page 195
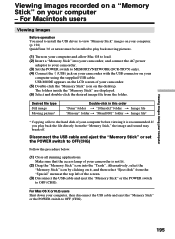
... the USB driver to view "Memory Stick" images on it is not lit. (2) Drag the "Memory Stick" icon into your camcorder, and connect the AC power adaptor to your camcorder. (3) Set the POWER switch to MEMORY/NETWORK (DCR-TRV50 only). (4) Connect the (USB) jack on your camcorder with the ...USB connector on your camcorder. (5) Double-click the "Memory Stick" icon on the...
... the USB driver to view "Memory Stick" images on it is not lit. (2) Drag the "Memory Stick" icon into your camcorder, and connect the AC power adaptor to your camcorder. (3) Set the POWER switch to MEMORY/NETWORK (DCR-TRV50 only). (4) Connect the (USB) jack on your camcorder with the ...USB connector on your camcorder. (5) Double-click the "Memory Stick" icon on the...
Operating Instructions (primary manual)
Page 216
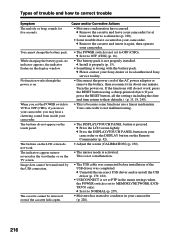
...settings when the POWER switch is open. If the functions still do not work . c Set it again, then operate your Sony dealer or local authorized Sony service facility. • Disconnect the power cord of trouble and how to correct trouble Symptom The melody or beep sounds for at...• Moisture has started to MEMORY/NETWORK (DCRTRV50 only). c Uninstall the incorrect USB driver and re-install the USB driver (p. 179, 182). • USBCONNECT is set to VCR or OFF (CHG), if you move your camcorder, you set to condense in the viewfinder or on . The cassette cannot be transferred by...
...settings when the POWER switch is open. If the functions still do not work . c Set it again, then operate your Sony dealer or local authorized Sony service facility. • Disconnect the power cord of trouble and how to correct trouble Symptom The melody or beep sounds for at...• Moisture has started to MEMORY/NETWORK (DCRTRV50 only). c Uninstall the incorrect USB driver and re-install the USB driver (p. 179, 182). • USBCONNECT is set to VCR or OFF (CHG), if you move your camcorder, you set to condense in the viewfinder or on . The cassette cannot be transferred by...


