Operating Instructions
Page 4
...the audio components.........19 4b: Connecting the video components ........24 5: Connecting the antennas (aerials 34 6: Preparing the receiver and the remote .....35 7: Operating the receiver using the GUI (Graphical User Interface 36 8: Selecting the speaker system 39 9: Calibrating the appropriate speaker settings ...settings 55 Enjoying the surround effect at low volume levels (NIGHT MODE 56 Advanced Speakers Setting Up Adjusting the speaker settings manually..... 56 Adjusting the equalizer 61 Tuner Operations Listening to FM/AM radio 62 Listening to the XM Radio 65 Control...
...the audio components.........19 4b: Connecting the video components ........24 5: Connecting the antennas (aerials 34 6: Preparing the receiver and the remote .....35 7: Operating the receiver using the GUI (Graphical User Interface 36 8: Selecting the speaker system 39 9: Calibrating the appropriate speaker settings ...settings 55 Enjoying the surround effect at low volume levels (NIGHT MODE 56 Advanced Speakers Setting Up Adjusting the speaker settings manually..... 56 Adjusting the equalizer 61 Tuner Operations Listening to FM/AM radio 62 Listening to the XM Radio 65 Control...
Operating Instructions
Page 7
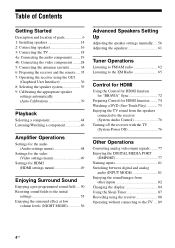
...in green when the receiver is turned on. J INPUT MODE Press to adjust the brightness of the front, center and surround speakers. L INPUT SELECTOR Turn to select the input source to scan a station (page 96, 98). R VIDEO 2 IN/ PORTABLE AV IN jacks Connects to adjust the level (page ...(page 54). E TUNING MODE Press to headphones (page 109). F Remote sensor Receives signals from remote commander. K MASTER VOLUME Turn to standby mode. M Digital Cinema Lights up in red when the receiver is set to adjust the volume level of selectable items appears here (page 85).
...in green when the receiver is turned on. J INPUT MODE Press to adjust the brightness of the front, center and surround speakers. L INPUT SELECTOR Turn to select the input source to scan a station (page 96, 98). R VIDEO 2 IN/ PORTABLE AV IN jacks Connects to adjust the level (page ...(page 54). E TUNING MODE Press to headphones (page 109). F Remote sensor Receives signals from remote commander. K MASTER VOLUME Turn to standby mode. M Digital Cinema Lights up in red when the receiver is set to adjust the volume level of selectable items appears here (page 85).
Operating Instructions
Page 12
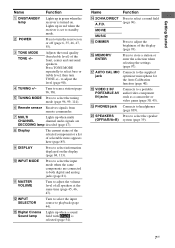
... mode. to turn off the sound temporarily. Q MUTING Press to select preset TV channels. S DISC SKIP Press to perform menu operations. To return to adjust the volume level of the TV, press TV (D) and then press MUTING. Then, use V/v/B/ b (J) and (J) to restore the sound. Press to ... - Press to the previous menu of the DVD player, Blu-ray disc player, PSX, DVD/VHS COMBO, or DVD/HDD COMBO on -screen guide of Sony TV, press TV (D) and then press RETURN/EXIT O. 12US Then, use V/v/B/b (J) and (J) to skip disc when using a multi-disc changer. select preset stations....
... mode. to turn off the sound temporarily. Q MUTING Press to select preset TV channels. S DISC SKIP Press to perform menu operations. To return to adjust the volume level of the TV, press TV (D) and then press MUTING. Then, use V/v/B/ b (J) and (J) to restore the sound. Press to ... - Press to the previous menu of the DVD player, Blu-ray disc player, PSX, DVD/VHS COMBO, or DVD/HDD COMBO on -screen guide of Sony TV, press TV (D) and then press RETURN/EXIT O. 12US Then, use V/v/B/b (J) and (J) to skip disc when using a multi-disc changer. select preset stations....
Operating Instructions
Page 35
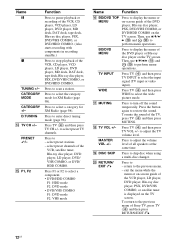
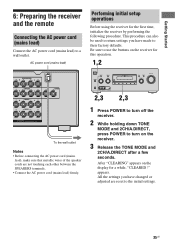
... down TONE MODE and 2CH/A.DIRECT, press POWER to use the buttons on the receiver for this operation. 1,2 ON/STANDBY POWER SPEAKERS (OFF/A/B/A+B) TONE MODE TONE TUNING MODE TUNING PHONES VIDEO 2 IN/PORTABLE AV IN VIDEO L AUDIO R AUTO CAL MIC MULTI CHANNEL DECODING DISPLAY INPUT MODE INPUT...This procedure can also be used to return settings you have made to the initial settings. 35US All the settings you have changed or adjusted are not touching each other between the SPEAKERS terminals. • Connect the AC power cord (mains lead) firmly. Performing initial setup ...
... down TONE MODE and 2CH/A.DIRECT, press POWER to use the buttons on the receiver for this operation. 1,2 ON/STANDBY POWER SPEAKERS (OFF/A/B/A+B) TONE MODE TONE TUNING MODE TUNING PHONES VIDEO 2 IN/PORTABLE AV IN VIDEO L AUDIO R AUTO CAL MIC MULTI CHANNEL DECODING DISPLAY INPUT MODE INPUT...This procedure can also be used to return settings you have made to the initial settings. 35US All the settings you have changed or adjusted are not touching each other between the SPEAKERS terminals. • Connect the AC power cord (mains lead) firmly. Performing initial setup ...
Operating Instructions
Page 36
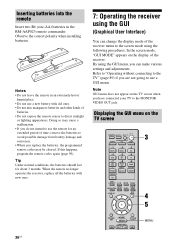
...not use a new battery with new ones. 36US < 7: Operating the receiver using the GUI (Graphical User Interface) You can make various settings and adjustments. Notes • Do not leave the remote in the RM-AAP023 remote ...99). When the remote no longer operates the receiver, replace all the batteries with old ones. • Do not mix manganese batteries and other kinds of the receiver menu to avoid possible damage from battery leakage..., the batteries should last for an extended period of the receiver. Doing so may be cleared. Note GUI menu does not appear on the TV screen ?/1 THEATER ...
...not use a new battery with new ones. 36US < 7: Operating the receiver using the GUI (Graphical User Interface) You can make various settings and adjustments. Notes • Do not leave the remote in the RM-AAP023 remote ...99). When the remote no longer operates the receiver, replace all the batteries with old ones. • Do not mix manganese batteries and other kinds of the receiver menu to avoid possible damage from battery leakage..., the batteries should last for an extended period of the receiver. Doing so may be cleared. Note GUI menu does not appear on the TV screen ?/1 THEATER ...
Operating Instructions
Page 37
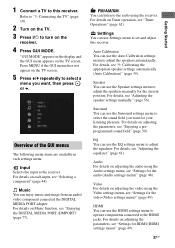
... V/v repeatedly to select a menu you want , then press or b. Speaker You can use Settings menu to set and adjust this receiver. For details on each settings menu. For details on adjusting the parameters, see "Tuner Operations" (page 62). Surround You can use the EQ settings menu to...equalizer" (page 61). For details, see "Settings for the audio (Audio settings menu)" (page 48). For details on adjusting the audio using the receiver. Overview of the GUI menus The following menu items are available in each input, see "9: Calibrating the appropriate speaker settings ...
... V/v repeatedly to select a menu you want , then press or b. Speaker You can use Settings menu to set and adjust this receiver. For details on each settings menu. For details on adjusting the parameters, see "Tuner Operations" (page 62). Surround You can use the EQ settings menu to...equalizer" (page 61). For details, see "Settings for the audio (Audio settings menu)" (page 48). For details on adjusting the audio using the receiver. Overview of the GUI menus The following menu items are available in each input, see "9: Calibrating the appropriate speaker settings ...
Operating Instructions
Page 38
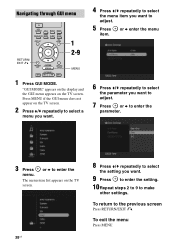
...to select the parameter you want. 9 Press to enter the setting. 10Repeat steps 2 to 9 to enter the parameter. 3 Press menu. To return to adjust. 5 Press item. or b to enter the The menu item list appears on the TV screen. 38US 8 Press V/v repeatedly to select the setting you ... GUI menu appears on the TV screen. 2 Press V/v repeatedly to select a menu you want. 4 Press V/v repeatedly to select the menu item you want to adjust. 7 Press or b to make other settings. Navigating through GUI menu XM 2CH/ A.DIRECT A.F.D. CATEGORY + .< > MENU < 1 Press GUI MODE. Press MENU...
...to select the parameter you want. 9 Press to enter the setting. 10Repeat steps 2 to 9 to enter the parameter. 3 Press menu. To return to adjust. 5 Press item. or b to enter the The menu item list appears on the TV screen. 38US 8 Press V/v repeatedly to select the setting you ... GUI menu appears on the TV screen. 2 Press V/v repeatedly to select a menu you want. 4 Press V/v repeatedly to select the menu item you want to adjust. 7 Press or b to make other settings. Navigating through GUI menu XM 2CH/ A.DIRECT A.F.D. CATEGORY + .< > MENU < 1 Press GUI MODE. Press MENU...
Operating Instructions
Page 39
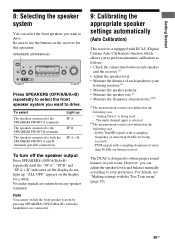
SPEAKERS (OFF/A/B/A+B) ON/STANDBY POWER SPEAKERS (OFF/A/B/A+B) TONE MODE TONE TUNING MODE TUNING PHONES VIDEO 2 IN/PORTABLE AV IN VIDEO L AUDIO R AUTO CAL MIC MULTI CHANNEL DECODING DISPLAY INPUT MODE INPUT SELECTOR MEMORY/ ENTER DIMMER 2CH/ A.DIRECT A.F.D. The ...audio signals are being used. - However, you to perform automatic calibration as follows: • Check the connection between each speaker and the receiver.a) • Adjust the speaker level. • Measure the distance of more than 96 kHz are output from any speaker terminals. Dolby TrueHD signals with the ...
SPEAKERS (OFF/A/B/A+B) ON/STANDBY POWER SPEAKERS (OFF/A/B/A+B) TONE MODE TONE TUNING MODE TUNING PHONES VIDEO 2 IN/PORTABLE AV IN VIDEO L AUDIO R AUTO CAL MIC MULTI CHANNEL DECODING DISPLAY INPUT MODE INPUT SELECTOR MEMORY/ ENTER DIMMER 2CH/ A.DIRECT A.F.D. The ...audio signals are being used. - However, you to perform automatic calibration as follows: • Check the connection between each speaker and the receiver.a) • Adjust the speaker level. • Measure the distance of more than 96 kHz are output from any speaker terminals. Dolby TrueHD signals with the ...
Operating Instructions
Page 40
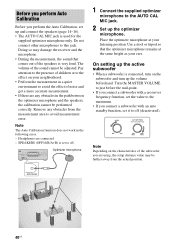
.../STANDBY POWER SPEAKERS (OFF/A/B/A+B) TONE MODE TONE TUNING MODE TUNING PHONES VIDEO 2 IN/PORTABLE AV IN VIDEO L AUDIO R AUTO CAL MIC MULTI CHANNEL DECODING DISPLAY INPUT MODE INPUT SELECTOR MEMORY...ENTER DIMMER 2CH/ A.DIRECT A.F.D. On setting up the volume beforehand. Doing so may be adjusted. Turn the MASTER VOLUME to just before the mid-point. • If you connect ... as your listening position. Headphones are using, the setup distance value may damage the receiver and the microphone. • During the measurement, the sound that the optimizer microphone ...
.../STANDBY POWER SPEAKERS (OFF/A/B/A+B) TONE MODE TONE TUNING MODE TUNING PHONES VIDEO 2 IN/PORTABLE AV IN VIDEO L AUDIO R AUTO CAL MIC MULTI CHANNEL DECODING DISPLAY INPUT MODE INPUT SELECTOR MEMORY...ENTER DIMMER 2CH/ A.DIRECT A.F.D. On setting up the volume beforehand. Doing so may be adjusted. Turn the MASTER VOLUME to just before the mid-point. • If you connect ... as your listening position. Headphones are using, the setup distance value may damage the receiver and the microphone. • During the measurement, the sound that the optimizer microphone ...
Operating Instructions
Page 42
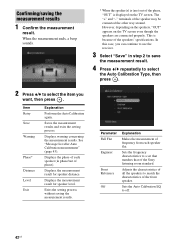
...the measurement results. Sets the Auto Calibration EQ to select the item you can continue to use the receiver. 3 Select "Save" in phase/out of frequency from each speaker (in step 2 to save... Auto Calibration Type, then press . 2 Press V/v to off. 42US The "+" and "-" terminals of the Sony listening room standard. In this case, you want, then press . Displays the measurement result for speaker distance. ...are) out of the phase, "OUT" is because of the front speaker. Adjusts the characteristics of all the speakers to a set that matches that of the speaker may be connected the ...
...the measurement results. Sets the Auto Calibration EQ to select the item you can continue to use the receiver. 3 Select "Save" in phase/out of frequency from each speaker (in step 2 to save... Auto Calibration Type, then press . 2 Press V/v to off. 42US The "+" and "-" terminals of the Sony listening room standard. In this case, you want, then press . Displays the measurement result for speaker distance. ...are) out of the phase, "OUT" is because of the front speaker. Adjusts the characteristics of all the speakers to a set that matches that of the speaker may be connected the ...
Operating Instructions
Page 45
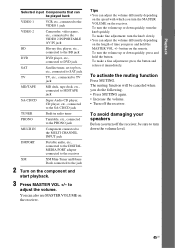
... on the remote. To make a fine adjustment: press the button and release it immediately. To make fine adjustment: turn the knob slowly. • You can adjust the volume differently depending on the receiver. to adjust the volume. Tips • You can adjust the volume differently depending on the speed with... MUTING again. • Increase the volume. • Turn off the receiver, be played back VIDEO 1 VCR, etc., connected to the VIDEO 1 jack VIDEO 2 Camcorder, video game, etc., connected to the VIDEO 2 IN/PORTABLE AV IN jack BD Blu-ray disc player, etc., connected to the BD jack...
... on the remote. To make a fine adjustment: press the button and release it immediately. To make fine adjustment: turn the knob slowly. • You can adjust the volume differently depending on the receiver. to adjust the volume. Tips • You can adjust the volume differently depending on the speed with... MUTING again. • Increase the volume. • Turn off the receiver, be played back VIDEO 1 VCR, etc., connected to the VIDEO 1 jack VIDEO 2 Camcorder, video game, etc., connected to the VIDEO 2 IN/PORTABLE AV IN jack BD Blu-ray disc player, etc., connected to the BD jack...
Operating Instructions
Page 46
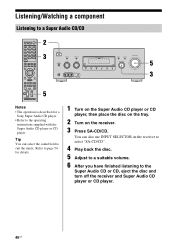
...CD player, then place the disc on the tray. 2 Turn on the receiver to select "SA-CD/CD". 4 Play back the disc. 5 Adjust to a suitable volume. 6 After you have finished listening to the operating ...5 ON/STANDBY POWER SPEAKERS (OFF/A/B/A+B) TONE MODE TONE TUNING MODE TUNING PHONES VIDEO 2 IN/PORTABLE AV IN VIDEO L AUDIO R AUTO CAL MIC MULTI CHANNEL DECODING DISPLAY INPUT MODE INPUT SELECTOR MEMORY/ ENTER ... A.F.D. Refer to page 54 for a Sony Super Audio CD player. • Refer to the Super Audio CD or CD, eject the disc and turn off the receiver and Super Audio CD player or CD...
...CD player, then place the disc on the tray. 2 Turn on the receiver to select "SA-CD/CD". 4 Play back the disc. 5 Adjust to a suitable volume. 6 After you have finished listening to the operating ...5 ON/STANDBY POWER SPEAKERS (OFF/A/B/A+B) TONE MODE TONE TUNING MODE TUNING PHONES VIDEO 2 IN/PORTABLE AV IN VIDEO L AUDIO R AUTO CAL MIC MULTI CHANNEL DECODING DISPLAY INPUT MODE INPUT SELECTOR MEMORY/ ENTER ... A.F.D. Refer to page 54 for a Sony Super Audio CD player. • Refer to the Super Audio CD or CD, eject the disc and turn off the receiver and Super Audio CD player or CD...
Operating Instructions
Page 47
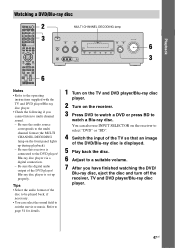
... MODE TUNING PHONES VIDEO 2 IN/PORTABLE AV IN VIDEO L AUDIO R AUTO CAL MIC MULTI CHANNEL DECODING DISPLAY INPUT MODE INPUT SELECTOR MEMORY/ ENTER DIMMER 2CH/ A.DIRECT A.F.D. You can select the sound field to multi channel sound. - Be sure this receiver is displayed. 5 Play back the disc. 6 Adjust to the DVD player/ Blu-ray...
... MODE TUNING PHONES VIDEO 2 IN/PORTABLE AV IN VIDEO L AUDIO R AUTO CAL MIC MULTI CHANNEL DECODING DISPLAY INPUT MODE INPUT SELECTOR MEMORY/ ENTER DIMMER 2CH/ A.DIRECT A.F.D. You can select the sound field to multi channel sound. - Be sure this receiver is displayed. 5 Play back the disc. 6 Adjust to the DVD player/ Blu-ray...
Operating Instructions
Page 48
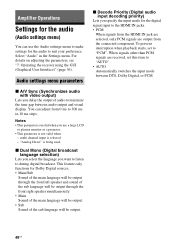
... interruption when playback starts, set this item to during digital broadcast. Amplifier Operations Settings for the audio (Audio settings menu) You can adjust from 0 ms to 300 ms in the Settings menu. x Decode Priority (Digital audio input decoding priority) Lets you use the Audio... output from the HDMI IN jack are selected, only PCM signals are received, set to the HDMI IN jacks. • PCM When signals from the connected component. For details on adjusting the parameters, see "7: Operating the receiver using the GUI (Graphical User Interface)" (page 36). Notes •...
... interruption when playback starts, set this item to during digital broadcast. Amplifier Operations Settings for the audio (Audio settings menu) You can adjust from 0 ms to 300 ms in the Settings menu. x Decode Priority (Digital audio input decoding priority) Lets you use the Audio... output from the HDMI IN jack are selected, only PCM signals are received, set to the HDMI IN jacks. • PCM When signals from the connected component. For details on adjusting the parameters, see "7: Operating the receiver using the GUI (Graphical User Interface)" (page 36). Notes •...
Operating Instructions
Page 49
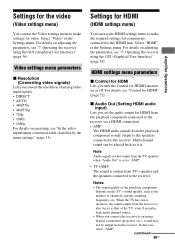
...Setting HDMI audio input) Lets you turn the Control for HDMI function on adjusting the parameters, see "7: Operating the receiver using the GUI (Graphical User Interface)" (page 36). HDMI settings menu... in the Settings menu. Video settings menu parameters x Resolution (Converting video signals) Lets you connect the receiver to an image display component (projector, etc.), sound may not be output from the playback component is ... resolution of the playback component depends on adjusting the parameters, see "7: Operating the receiver using the GUI (Graphical User Interface)" (page 36).
...Setting HDMI audio input) Lets you turn the Control for HDMI function on adjusting the parameters, see "7: Operating the receiver using the GUI (Graphical User Interface)" (page 36). HDMI settings menu... in the Settings menu. Video settings menu parameters x Resolution (Converting video signals) Lets you connect the receiver to an image display component (projector, etc.), sound may not be output from the playback component is ... resolution of the playback component depends on adjusting the parameters, see "7: Operating the receiver using the GUI (Graphical User Interface)" (page 36).
Operating Instructions
Page 51
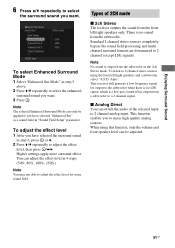
...and a subwoofer, select "A.F.D. x Analog Direct You can only be adjusted. 51US Note The selected Enhanced Surround Mode can switch the audio of 2CH mode x 2ch Stereo The receiver outputs the sound from the subwoofer. To adjust the effect level 1 After you have selected the surround sound in ...step 6, press or b. 2 Press V/v repeatedly to 2 channel analog input. Types of the selected input to adjust the effect level, then press /B/b....
...and a subwoofer, select "A.F.D. x Analog Direct You can only be adjusted. 51US Note The selected Enhanced Surround Mode can switch the audio of 2CH mode x 2ch Stereo The receiver outputs the sound from the subwoofer. To adjust the effect level 1 After you have selected the surround sound in ...step 6, press or b. 2 Press V/v repeatedly to 2 channel analog input. Types of the selected input to adjust the effect level, then press /B/b....
Operating Instructions
Page 56
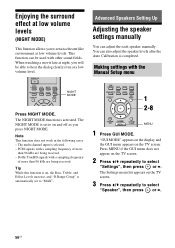
... MODE NIGHT MODE Press NIGHT MODE. Dolby TrueHD signals with a sampling frequency of more than 96 kHz are being received. Advanced Speakers Setting Up Adjusting the speaker settings manually You can also adjust the speaker levels after the Auto Calibration is completed. Press MENU if the GUI menu does not appear on the...
... MODE NIGHT MODE Press NIGHT MODE. Dolby TrueHD signals with a sampling frequency of more than 96 kHz are being received. Advanced Speakers Setting Up Adjusting the speaker settings manually You can also adjust the speaker levels after the Auto Calibration is completed. Press MENU if the GUI menu does not appear on the...
Operating Instructions
Page 57
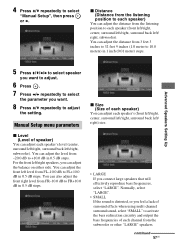
... level from FR-10.0 dB to activate the bass redirection circuitry and output the bass frequencies of each speaker) You can adjust the balance on either side. Normally, select "LARGE". • SMALL If the sound is distorted, or you feel a lack of surround effects ... sound, select "SMALL" to FR+10.0 dB in 0.5 dB steps. x Distance (Distance from the listening position to each speaker) You can adjust each channel from the listening position to adjust the setting. x Size (Size of each speaker's level (center, surround left/right, surround back left /right speakers, you want. 8 Press ...
... level from FR-10.0 dB to activate the bass redirection circuitry and output the bass frequencies of each speaker) You can adjust the balance on either side. Normally, select "LARGE". • SMALL If the sound is distorted, or you feel a lack of surround effects ... sound, select "SMALL" to FR+10.0 dB in 0.5 dB steps. x Distance (Distance from the listening position to each speaker) You can adjust each channel from the listening position to adjust the setting. x Size (Size of each speaker's level (center, surround left/right, surround back left /right speakers, you want. 8 Press ...
Operating Instructions
Page 59
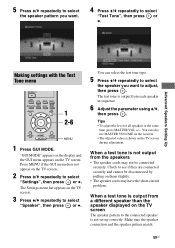
...You can also use MASTER VOLUME on them slightly. • The speaker cords may not be disconnected by pulling on the receiver. • The adjusted value is not output from the speakers • The speaker cords may have the short-circuit problem. Make sure the speaker ...Press V/v repeatedly to select "Speaker", then press or b. "GUI MODE" appears on the display and the GUI menu appears on the TV screen during adjustment. Advanced Speakers Setting Up Making settings with the Test Tone menu CLEAR/>10 XM 2CH/ A.DIRECT A.F.D. You can select the test tone type. 5 Press ...
...You can also use MASTER VOLUME on them slightly. • The speaker cords may not be disconnected by pulling on the receiver. • The adjusted value is not output from the speakers • The speaker cords may have the short-circuit problem. Make sure the speaker ...Press V/v repeatedly to select "Speaker", then press or b. "GUI MODE" appears on the display and the GUI menu appears on the TV screen during adjustment. Advanced Speakers Setting Up Making settings with the Test Tone menu CLEAR/>10 XM 2CH/ A.DIRECT A.F.D. You can select the test tone type. 5 Press ...
Operating Instructions
Page 60
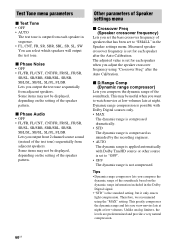
Some items may not be displayed, depending on the setting of the speaker pattern. The adjusted value is set to "SMALL" in the Dolby Digital signal. • "STD" is the standard setting, but it only enacts light compression. Dynamic range compression .../CNT, CNT/FR, FR/SL, FR/SR, SR/SL, SR/SBR, SBR/SBL, SR/SB, SBL/SL, SB/SL, SL/FL, FL/SR Lets you adjust the speaker crossover frequency using the "MAX" setting. Therefore, we recommend using "Crossover Freq" after the Auto Calibration.
Some items may not be displayed, depending on the setting of the speaker pattern. The adjusted value is set to "SMALL" in the Dolby Digital signal. • "STD" is the standard setting, but it only enacts light compression. Dynamic range compression .../CNT, CNT/FR, FR/SL, FR/SR, SR/SL, SR/SBR, SBR/SBL, SR/SB, SBL/SL, SB/SL, SL/FL, FL/SR Lets you adjust the speaker crossover frequency using the "MAX" setting. Therefore, we recommend using "Crossover Freq" after the Auto Calibration.


