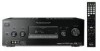
Operating Instructions
Page 4
... the surround effect at low volume levels (NIGHT MODE 56 Advanced Speakers Setting Up Adjusting the speaker settings manually..... 56 Adjusting the equalizer 61 Tuner Operations Listening to FM/AM radio 62 Listening to the XM Radio 65 Control for HDMI Using the Control for HDMI function for "BRAVIA" Sync 72 Preparing Control for HDMI function ........ 74 Watching a DVD (One-Touch Play 75 Enjoying the TV sound from the speakers connected to the receiver (System Audio Control 76 Turning off the receiver with the TV (System Power...
... the surround effect at low volume levels (NIGHT MODE 56 Advanced Speakers Setting Up Adjusting the speaker settings manually..... 56 Adjusting the equalizer 61 Tuner Operations Listening to FM/AM radio 62 Listening to the XM Radio 65 Control for HDMI Using the Control for HDMI function for "BRAVIA" Sync 72 Preparing Control for HDMI function ........ 74 Watching a DVD (One-Touch Play 75 Enjoying the TV sound from the speakers connected to the receiver (System Audio Control 76 Turning off the receiver with the TV (System Power...
Operating Instructions
Page 7
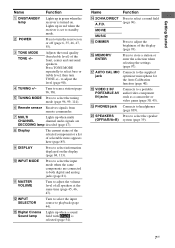
... optimizer microphone for the Auto Calibration function (page 40). M Digital Cinema Lights up when multi CHANNEL channel audio signals are connected to headphones (page 109). Q AUTO CAL MIC jack Connects to select information displayed on or off (page 6, 35, 46, 47, 55). Getting Started Name Function A ON/STANDBY lamp Lights up in red when the receiver is set to standby mode. Adjusts the tonal quality (bass/treble level) of selectable items appears here (page 85). Turn to adjust the volume level of the display (page 93). K MASTER VOLUME Turn...
... optimizer microphone for the Auto Calibration function (page 40). M Digital Cinema Lights up when multi CHANNEL channel audio signals are connected to headphones (page 109). Q AUTO CAL MIC jack Connects to select information displayed on or off (page 6, 35, 46, 47, 55). Getting Started Name Function A ON/STANDBY lamp Lights up in red when the receiver is set to standby mode. Adjusts the tonal quality (bass/treble level) of selectable items appears here (page 85). Turn to adjust the volume level of the display (page 93). K MASTER VOLUME Turn...
Operating Instructions
Page 9
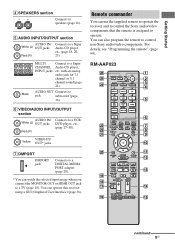
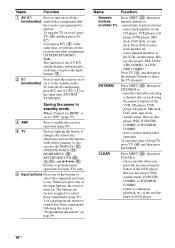
... channel sound (page 22). L L CENTER R R FRONT SURROUND SUR BACK SUBWOOFER MULTI CHANNEL INPUT MULTI CHANNEL INPUT jacks Connect to a Super Audio CD player, etc. (page 18, 20, 23). VIDEO IN/ Yellow OUT* jacks G DMPORT DMPORT jack Connects to a DIGITAL MEDIA PORT adapter (page 20). * You can use the supplied remote to operate the receiver and to control the Sony audio/video components that the remote is assigned to control non-Sony audio/video components. Getting Started D SPEAKERS section Connects to a TV (page 18). Remote commander You can watch the selected input...
... channel sound (page 22). L L CENTER R R FRONT SURROUND SUR BACK SUBWOOFER MULTI CHANNEL INPUT MULTI CHANNEL INPUT jacks Connect to a Super Audio CD player, etc. (page 18, 20, 23). VIDEO IN/ Yellow OUT* jacks G DMPORT DMPORT jack Connects to a DIGITAL MEDIA PORT adapter (page 20). * You can use the supplied remote to operate the receiver and to control the Sony audio/video components that the remote is assigned to control non-Sony audio/video components. Getting Started D SPEAKERS section Connects to a TV (page 18). Remote commander You can watch the selected input...
Operating Instructions
Page 10
... VCR, CD player, DVD player, LD player, MD deck, DAT deck, tape deck, satellite tuner, Blu-ray disc player, PSX, DVD/VHS COMBO, or DVD/HDD COMBO. - To turn off the receiver and other components (SYSTEM STANDBY). If you press the input buttons (E). It changes the remote key function to - It also activate the DISPLAY (U), OPTIONS TOOLS (K), HOME/MENU (L), RETURN/EXIT O (T), (J), and V/v/B/b (J) buttons to perform menu operations for HDMI" is programmed to operate. C AMP Press to control Sony components (page 45). E Input buttons Press one...
... VCR, CD player, DVD player, LD player, MD deck, DAT deck, tape deck, satellite tuner, Blu-ray disc player, PSX, DVD/VHS COMBO, or DVD/HDD COMBO. - To turn off the receiver and other components (SYSTEM STANDBY). If you press the input buttons (E). It changes the remote key function to - It also activate the DISPLAY (U), OPTIONS TOOLS (K), HOME/MENU (L), RETURN/EXIT O (T), (J), and V/v/B/b (J) buttons to perform menu operations for HDMI" is programmed to operate. C AMP Press to control Sony components (page 45). E Input buttons Press one...
Operating Instructions
Page 13
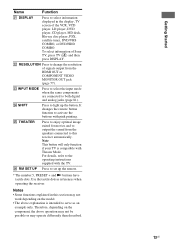
... player, LD player, DVD player, CD player, MD deck, Blu-ray disc player, PSX, satellite tuner, DVD/VHS COMBO, or DVD/HDD COMBO. V RESOLUTION Press to change the resolution of signals output from the speakers connected to this section may not work depending on the component, the above explanation is compatible with Theater Mode. Note This button will only function if your TV is intended to both digital and analog jacks (page 81). W INPUT MODE Press to select the input mode...
... player, LD player, DVD player, CD player, MD deck, Blu-ray disc player, PSX, satellite tuner, DVD/VHS COMBO, or DVD/HDD COMBO. V RESOLUTION Press to change the resolution of signals output from the speakers connected to this section may not work depending on the component, the above explanation is compatible with Theater Mode. Note This button will only function if your TV is intended to both digital and analog jacks (page 81). W INPUT MODE Press to select the input mode...
Operating Instructions
Page 20
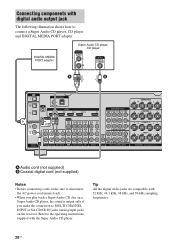
... AUDIO OUT CENTER R R R FRONT SURROUND SUR BACK SUBWOOFER VIDEO 1 SUBWOOFER MULTI CHANNEL INPUT SURROUND BACK R L SURROUND R L R FRONT B L FRONT A R L SPEAKERS A Audio cord (not supplied) B Coaxial digital cord (not supplied) Notes • Before connecting cords, make sure to disconnect the AC power cord (mains lead). • When you play back a Super Audio CD disc on a Super Audio CD player, the sound is output only if you make the connection to connect a Super Audio CD player, CD player and DIGITAL MEDIA PORT adapter. Tip All the digital audio jacks are compatible...
... AUDIO OUT CENTER R R R FRONT SURROUND SUR BACK SUBWOOFER VIDEO 1 SUBWOOFER MULTI CHANNEL INPUT SURROUND BACK R L SURROUND R L R FRONT B L FRONT A R L SPEAKERS A Audio cord (not supplied) B Coaxial digital cord (not supplied) Notes • Before connecting cords, make sure to disconnect the AC power cord (mains lead). • When you play back a Super Audio CD disc on a Super Audio CD player, the sound is output only if you make the connection to connect a Super Audio CD player, CD player and DIGITAL MEDIA PORT adapter. Tip All the digital audio jacks are compatible...
Operating Instructions
Page 25
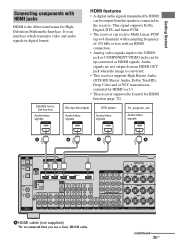
...CENTER R R R FRONT SURROUND SUR BACK SUBWOOFER VIDEO 1 SUBWOOFER MULTI CHANNEL INPUT SURROUND BACK R L SURROUND R L R FRONT B L FRONT A R L SPEAKERS A HDMI cable (not supplied) We recommend that you use a Sony HDMI cable. continued 25US It is the abbreviated name for HDMI function (page 72). Satellite tuner, Set-top box Audio/video signals Blu-ray disc player Audio/video signals DVD player Audio/video signals TV, projector, etc. This signal supports Dolby Digital, DTS, and linear PCM. • The receiver can receive Multi Linear PCM (up -converted as HDMI signals...
...CENTER R R R FRONT SURROUND SUR BACK SUBWOOFER VIDEO 1 SUBWOOFER MULTI CHANNEL INPUT SURROUND BACK R L SURROUND R L R FRONT B L FRONT A R L SPEAKERS A HDMI cable (not supplied) We recommend that you use a Sony HDMI cable. continued 25US It is the abbreviated name for HDMI function (page 72). Satellite tuner, Set-top box Audio/video signals Blu-ray disc player Audio/video signals DVD player Audio/video signals TV, projector, etc. This signal supports Dolby Digital, DTS, and linear PCM. • The receiver can receive Multi Linear PCM (up -converted as HDMI signals...
Operating Instructions
Page 26
... output from any other audio cords or digital connecting cords, then set "Audio Out" to the operating instructions of the playback component. • Not every HDMI component supports all functions that are not output from the HDMI OUT jack while the receiver menu is not output correctly. • Before connecting cables, make sure to disconnect the AC power cord (mains lead). In this case, check the specification of the connected component. • You can enjoy multi channel Linear PCM. The video input signals cannot be output...
... output from any other audio cords or digital connecting cords, then set "Audio Out" to the operating instructions of the playback component. • Not every HDMI component supports all functions that are not output from the HDMI OUT jack while the receiver menu is not output correctly. • Before connecting cables, make sure to disconnect the AC power cord (mains lead). In this case, check the specification of the connected component. • You can enjoy multi channel Linear PCM. The video input signals cannot be output...
Operating Instructions
Page 35
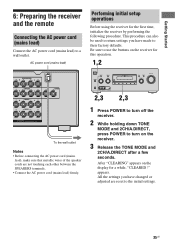
...L SURROUND R L R FRONT B L FRONT A R L SPEAKERS CENTER To the wall outlet Notes • Before connecting the AC power cord (mains lead), make sure that metallic wires of the speaker cords are reset to return settings you have made to use the buttons on the receiver. 3 Release the TONE MODE and 2CH/A.DIRECT after a few seconds. MOVIE MUSIC MASTER VOLUME 2,3 2,3 1 Press POWER to turn on the receiver for this operation. 1,2 ON/STANDBY POWER SPEAKERS (OFF/A/B/A+B) TONE MODE TONE TUNING MODE TUNING PHONES VIDEO 2 IN/PORTABLE AV IN VIDEO L AUDIO R AUTO CAL MIC MULTI...
...L SURROUND R L R FRONT B L FRONT A R L SPEAKERS CENTER To the wall outlet Notes • Before connecting the AC power cord (mains lead), make sure that metallic wires of the speaker cords are reset to return settings you have made to use the buttons on the receiver. 3 Release the TONE MODE and 2CH/A.DIRECT after a few seconds. MOVIE MUSIC MASTER VOLUME 2,3 2,3 1 Press POWER to turn on the receiver for this operation. 1,2 ON/STANDBY POWER SPEAKERS (OFF/A/B/A+B) TONE MODE TONE TUNING MODE TUNING PHONES VIDEO 2 IN/PORTABLE AV IN VIDEO L AUDIO R AUTO CAL MIC MULTI...
Operating Instructions
Page 39
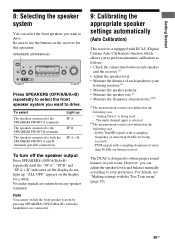
...Dolby TrueHD signals with DCAC (Digital Cinema Auto Calibration) function which allows you to perform automatic calibration as follows: • Check the connection between each speaker and the receiver.a) • Adjust the speaker level. • Measure the distance of more than 96 kHz are output from any speaker terminals. SPEAKERS (OFF/A/B/A+B) ON/STANDBY POWER SPEAKERS (OFF/A/B/A+B) TONE MODE TONE TUNING MODE TUNING PHONES VIDEO 2 IN/PORTABLE AV IN VIDEO L AUDIO R AUTO CAL MIC MULTI CHANNEL DECODING DISPLAY INPUT MODE INPUT SELECTOR MEMORY/ ENTER DIMMER 2CH/ A.DIRECT...
...Dolby TrueHD signals with DCAC (Digital Cinema Auto Calibration) function which allows you to perform automatic calibration as follows: • Check the connection between each speaker and the receiver.a) • Adjust the speaker level. • Measure the distance of more than 96 kHz are output from any speaker terminals. SPEAKERS (OFF/A/B/A+B) ON/STANDBY POWER SPEAKERS (OFF/A/B/A+B) TONE MODE TONE TUNING MODE TUNING PHONES VIDEO 2 IN/PORTABLE AV IN VIDEO L AUDIO R AUTO CAL MIC MULTI CHANNEL DECODING DISPLAY INPUT MODE INPUT SELECTOR MEMORY/ ENTER DIMMER 2CH/ A.DIRECT...
Operating Instructions
Page 45
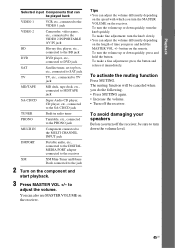
... MULTI CHANNEL INPUT jack DMPORT Portable audio, etc., connected to the DIGITAL MEDIA PORT adapter connected to the receiver XM XM Mini-Tuner and Home Dock connected to the jack 2 Turn on the component and start playback. 3 Press MASTER VOL +/- To activate the muting function Press MUTING. Playback Selected input Components that can also use MASTER VOLUME on the receiver. You can be sure to adjust the volume. To avoid damaging your speakers Before you turn the volume up or down the volume level...
... MULTI CHANNEL INPUT jack DMPORT Portable audio, etc., connected to the DIGITAL MEDIA PORT adapter connected to the receiver XM XM Mini-Tuner and Home Dock connected to the jack 2 Turn on the component and start playback. 3 Press MASTER VOL +/- To activate the muting function Press MUTING. Playback Selected input Components that can also use MASTER VOLUME on the receiver. You can be sure to adjust the volume. To avoid damaging your speakers Before you turn the volume up or down the volume level...
Operating Instructions
Page 47
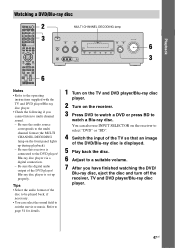
... MODE TONE TUNING MODE TUNING PHONES VIDEO 2 IN/PORTABLE AV IN VIDEO L AUDIO R AUTO CAL MIC MULTI CHANNEL DECODING DISPLAY INPUT MODE INPUT SELECTOR MEMORY/ ENTER DIMMER 2CH/ A.DIRECT A.F.D. MOVIE MUSIC MASTER VOLUME 6 3 Notes • Refer to the operating instructions supplied with the TV and DVD player/Blu-ray disc player. • Check the following if you have finished watching the DVD/ Blu-ray disc, eject the disc and turn off the receiver, TV and DVD player/Blu-ray disc player. 47US Tips • Select the audio format of the DVD/Blu-ray disc is displayed. 5 Play...
... MODE TONE TUNING MODE TUNING PHONES VIDEO 2 IN/PORTABLE AV IN VIDEO L AUDIO R AUTO CAL MIC MULTI CHANNEL DECODING DISPLAY INPUT MODE INPUT SELECTOR MEMORY/ ENTER DIMMER 2CH/ A.DIRECT A.F.D. MOVIE MUSIC MASTER VOLUME 6 3 Notes • Refer to the operating instructions supplied with the TV and DVD player/Blu-ray disc player. • Check the following if you have finished watching the DVD/ Blu-ray disc, eject the disc and turn off the receiver, TV and DVD player/Blu-ray disc player. 47US Tips • Select the audio format of the DVD/Blu-ray disc is displayed. 5 Play...
Operating Instructions
Page 55
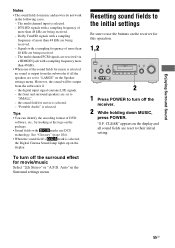
...; When the sound field's DCSmark is selected, the Digital Cinema Sound lamp lights up on the receiver for this operation. 1,2 ON/STANDBY POWER SPEAKERS (OFF/A/B/A+B) TONE MODE TONE TUNING MODE TUNING PHONES VIDEO 2 IN/PORTABLE AV IN VIDEO L AUDIO R AUTO CAL MIC MULTI CHANNEL DECODING DISPLAY INPUT MODE INPUT SELECTOR MEMORY/ ENTER DIMMER 2CH/ A.DIRECT A.F.D. To turn off the surround effect for movie/music Select "2ch Stereo" or "A.F.D. Resetting sound fields to the initial settings Be sure to use DCS technology. "S.F. Dolby TrueHD signals with a sampling frequency of more...
...; When the sound field's DCSmark is selected, the Digital Cinema Sound lamp lights up on the receiver for this operation. 1,2 ON/STANDBY POWER SPEAKERS (OFF/A/B/A+B) TONE MODE TONE TUNING MODE TUNING PHONES VIDEO 2 IN/PORTABLE AV IN VIDEO L AUDIO R AUTO CAL MIC MULTI CHANNEL DECODING DISPLAY INPUT MODE INPUT SELECTOR MEMORY/ ENTER DIMMER 2CH/ A.DIRECT A.F.D. To turn off the surround effect for movie/music Select "2ch Stereo" or "A.F.D. Resetting sound fields to the initial settings Be sure to use DCS technology. "S.F. Dolby TrueHD signals with a sampling frequency of more...
Operating Instructions
Page 76
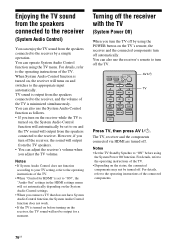
... speakers connected to the operating instructions of the connected components. 76US You can operate System Audio Control function using the POWER button on the TV's remote, the receiver and the connected components turn off automatically. The TV, receiver and the components connected via HDMI are turned off . You can also use the System Audio Control function as follows. • If you turn off the TV. ?/1 THEATER RM SET UP AV ?/1 SYSTEM STANDBY SHIFT TV AMP 1 VIDEO 1 2 VIDEO 2 4 5 DVD SAT 7 8 MD/ TAPE SA-CD/ CD -/-- 0/10 PHONO MULTI...
... speakers connected to the operating instructions of the connected components. 76US You can operate System Audio Control function using the POWER button on the TV's remote, the receiver and the connected components turn off automatically. The TV, receiver and the components connected via HDMI are turned off . You can also use the System Audio Control function as follows. • If you turn off the TV. ?/1 THEATER RM SET UP AV ?/1 SYSTEM STANDBY SHIFT TV AMP 1 VIDEO 1 2 VIDEO 2 4 5 DVD SAT 7 8 MD/ TAPE SA-CD/ CD -/-- 0/10 PHONO MULTI...
Operating Instructions
Page 86
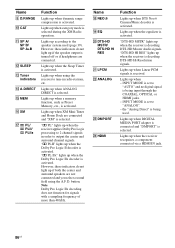
... being input through the COAXIAL, OPTICAL or HDMI jacks. - Lights up when the Dolby Pro Logic IIx decoder is activated. PL IIx" lights up when a memory function, such as Preset Memory, etc., is activated. Lights up when category mode is selected. Lights up when DIGITAL MEDIA PORT adapter is connected and "DMPORT" is selected during the XM Radio operation. Lights up if the speaker output is decoding DTS-HD Master Audio signals. Lights up when the receiver is turned...
... being input through the COAXIAL, OPTICAL or HDMI jacks. - Lights up when the Dolby Pro Logic IIx decoder is activated. PL IIx" lights up when a memory function, such as Preset Memory, etc., is activated. Lights up when category mode is selected. Lights up when DIGITAL MEDIA PORT adapter is connected and "DMPORT" is selected during the XM Radio operation. Lights up if the speaker output is decoding DTS-HD Master Audio signals. Lights up when the receiver is turned...
Operating Instructions
Page 96
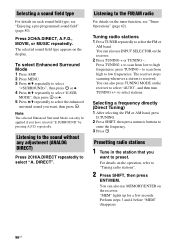
... ENT/MEM. to low frequencies. To select Enhanced Surround Mode 1 Press AMP. 2 Press MENU. 3 Press V/v repeatedly to select "", then press or b. 4 Press V/v repeatedly to select "E.SUR MODE", then press or b. 5 Press V/v repeatedly to select the enhanced surround sound you have selected "E.SURROUND" by pressing A.F.D. Listening to preset. "MEM" lights up for a few seconds. repeatedly. Tuning radio stations 1 Press TUNER repeatedly to select "AUTO", and then turn TUNING +/- The receiver stops scanning whenever a station is received. Selecting a sound field type For...
... ENT/MEM. to low frequencies. To select Enhanced Surround Mode 1 Press AMP. 2 Press MENU. 3 Press V/v repeatedly to select "", then press or b. 4 Press V/v repeatedly to select "E.SUR MODE", then press or b. 5 Press V/v repeatedly to select the enhanced surround sound you have selected "E.SURROUND" by pressing A.F.D. Listening to preset. "MEM" lights up for a few seconds. repeatedly. Tuning radio stations 1 Press TUNER repeatedly to select "AUTO", and then turn TUNING +/- The receiver stops scanning whenever a station is received. Selecting a sound field type For...
Operating Instructions
Page 100
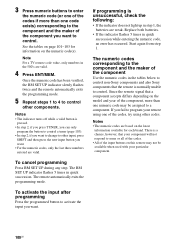
... remote code value, only numbers in quick succession while entering the numeric code, an error has occurred. The RM SET UP indicator flashes 5 times in step 1, the batteries are valid. The numeric codes corresponding to the component and the maker of the component Use the numeric codes in the tables below to control non-Sony components and also Sony components that your particular component. 100US The remote automatically exits the programming mode...
... remote code value, only numbers in quick succession while entering the numeric code, an error has occurred. The RM SET UP indicator flashes 5 times in step 1, the batteries are valid. The numeric codes corresponding to the component and the maker of the component Use the numeric codes in the tables below to control non-Sony components and also Sony components that your particular component. 100US The remote automatically exits the programming mode...
Operating Instructions
Page 110
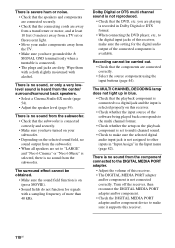
... the digital input jacks of the software being played back corresponds to make sure it supports this receiver, make sure the selected digital audio input jack is not reproduced. • Check that the subwoofer is connected correctly and securely. • Make sure you are set to multi channel sound. • Check to "LARGE" and "Neo:6 Cinema" or "Neo:6 Music" is selected, there is no sound output from the center/ surround/surround back speakers. • Select a Cinema Studio EX mode (page 54). • Adjust the speaker level...
... the digital input jacks of the software being played back corresponds to make sure it supports this receiver, make sure the selected digital audio input jack is not reproduced. • Check that the subwoofer is connected correctly and securely. • Make sure you are set to multi channel sound. • Check to "LARGE" and "Neo:6 Cinema" or "Neo:6 Music" is selected, there is no sound output from the center/ surround/surround back speakers. • Select a Cinema Studio EX mode (page 54). • Adjust the speaker level...
Operating Instructions
Page 112
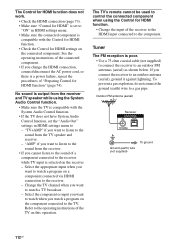
... operating instructions of a component connected to the receiver while TV input is selected on the component connected to the TV. "AMP" if you want to watch a program on this operation. The TV's remote cannot be used to control the connected component when using the System Audio Control function. • Make sure the TV is compatible with the Control for HDMI function. • Check the Control for HDMI settings on the connected component. If you change the HDMI connection, connect/disconnect the AC power cord, or there is a power...
... operating instructions of a component connected to the receiver while TV input is selected on the component connected to the TV. "AMP" if you want to watch a program on this operation. The TV's remote cannot be used to control the connected component when using the System Audio Control function. • Make sure the TV is compatible with the Control for HDMI function. • Check the Control for HDMI settings on the connected component. If you change the HDMI connection, connect/disconnect the AC power cord, or there is a power...
Operating Instructions
Page 113
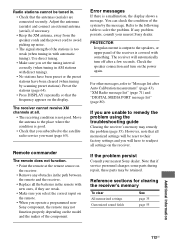
... the speaker cords and the power cord to remedy the problem using the troubleshooting guide Clearing the receiver's memory may remedy the problem (page 35). However, note that all settings on the display. Radio stations cannot be tuned in. • Check that the antennas (aerials) are weak. • Make sure you select the correct input on the remote. • When you operate a programmed nonSony component, the remote may not function properly depending on the power again...
... the speaker cords and the power cord to remedy the problem using the troubleshooting guide Clearing the receiver's memory may remedy the problem (page 35). However, note that all settings on the display. Radio stations cannot be tuned in. • Check that the antennas (aerials) are weak. • Make sure you select the correct input on the remote. • When you operate a programmed nonSony component, the remote may not function properly depending on the power again...


