Operating Instructions
Page 16
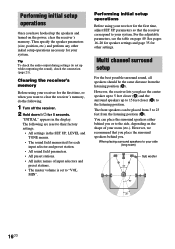
...position. Multi channel surround setup For the best possible surround sound, all speakers should be placed from 3 to clear the receiver's memory, do the following are reset to their factory settings. • All settings in the display. When placing surround speakers to your side (long room) ...B A A 45° Sub woofer C C 90° 20° 16US Clearing the receiver's memory Before using your receiver for the first time...
...position. Multi channel surround setup For the best possible surround sound, all speakers should be placed from 3 to clear the receiver's memory, do the following are reset to their factory settings. • All settings in the display. When placing surround speakers to your side (long room) ...B A A 45° Sub woofer C C 90° 20° 16US Clearing the receiver's memory Before using your receiver for the first time...

Operating Instructions
Page 17
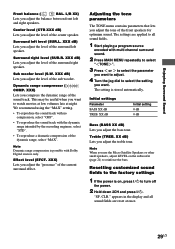
...4 Repeat steps 2 and 3 until you select "MICRO SP.". SP." (page 19). XX ft. SL SR PL. LOW continued 17US XX ft. Caution When you use Sony's Micro Satellite Speakers, select "MICRO SP.". C DIST. When you want to adjust. 3 Turn the jog dial to optimize the sound balance. You can adjust the...selection when you may also be damaged at high volume position. SP.", turn off the power, then turn on again while pressing MAIN MENU. (To reset to "MICRO SP.", do the same procedure.) Tip The setting for Micro Satellite Speaker (MICRO SP.) has been programmed to select the setting you ...
...4 Repeat steps 2 and 3 until you select "MICRO SP.". SP." (page 19). XX ft. SL SR PL. LOW continued 17US XX ft. Caution When you use Sony's Micro Satellite Speakers, select "MICRO SP.". C DIST. When you want to adjust. 3 Turn the jog dial to optimize the sound balance. You can adjust the...selection when you may also be damaged at high volume position. SP.", turn off the power, then turn on again while pressing MAIN MENU. (To reset to "MICRO SP.", do the same procedure.) Tip The setting for Micro Satellite Speaker (MICRO SP.) has been programmed to select the setting you ...
Operating Instructions
Page 29
.... XX dB Initial setting 0 dB 0 dB Bass (BASS XX dB) Lets you adjust the level of the center speaker. Resetting customized sound fields to reinforce the bass. RANGE COMP. The settings are reset at night. Enjoying Surround Sound Front balance ( L R BAL. Surround left and right speakers. Note Dynamic range compression is possible...
.... XX dB Initial setting 0 dB 0 dB Bass (BASS XX dB) Lets you adjust the level of the center speaker. Resetting customized sound fields to reinforce the bass. RANGE COMP. The settings are reset at night. Enjoying Surround Sound Front balance ( L R BAL. Surround left and right speakers. Note Dynamic range compression is possible...
Operating Instructions
Page 39
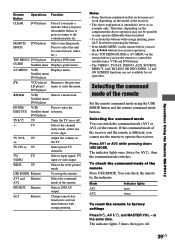
...once (twice for search (track, index, etc.) TOP MENU/ DVD player Displays DVD title. Mode AV1 AV2 Indicator lights once twice To reset the remote to operate the receiver. The indicator lights 3 times, then goes off . -/-- TV VOL TV +/- at the same time. TV CH +/- SOURCE Remote ...Selects 2ND AV output. If the command mode of the receiver and the remote is intended to control the satellite tuner, VCR and DVD player. • The VIDEO3, TV/SAT, PHONO, AUX, SOURCE, DIRECT, ...
...once (twice for search (track, index, etc.) TOP MENU/ DVD player Displays DVD title. Mode AV1 AV2 Indicator lights once twice To reset the remote to operate the receiver. The indicator lights 3 times, then goes off . -/-- TV VOL TV +/- at the same time. TV CH +/- SOURCE Remote ...Selects 2ND AV output. If the command mode of the receiver and the remote is intended to control the satellite tuner, VCR and DVD player. • The VIDEO3, TV/SAT, PHONO, AUX, SOURCE, DIRECT, ...
Operating Instructions
Page 40
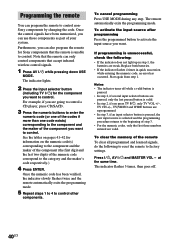
Furthermore, you are weak. For example, if you can also program the remote for Sony components that accept infrared wireless control signals. 1 Press AV ?/1 while pressing down USE MODE. See the tables on pages 41-42 for the component you ... beginning of your system. Once the control signals have been memorized, you can only control components that the remote is unsuccessful, check the following to reset the remote to activate the input source you press TV ?/1, only TV VOL +/-, TV CH +/-, TV/VIDEO and WIDE buttons are valid. The indicator flashes...
Furthermore, you are weak. For example, if you can also program the remote for Sony components that accept infrared wireless control signals. 1 Press AV ?/1 while pressing down USE MODE. See the tables on pages 41-42 for the component you ... beginning of your system. Once the control signals have been memorized, you can only control components that the remote is unsuccessful, check the following to reset the remote to activate the input source you press TV ?/1, only TV VOL +/-, TV CH +/-, TV/VIDEO and WIDE buttons are valid. The indicator flashes...
Operating Instructions
Page 45
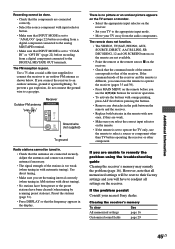
... mode of the receiver. Clearing the receiver's memory To clear See All memorized settings page 16 Customized sound fields page 29 45US If the problem persist Consult your TV away from the audio components. Use direct tuning. • Make sure you will be reset to their factory settings... on the TV screen or monitor. • Select the appropriate input selector on the receiver. • Set your TV to the appropriate input mode. • Move your nearest Sony dealer. The FM reception is poor. If you are unable to remedy the problem using the troubleshooting guide ...
... mode of the receiver. Clearing the receiver's memory To clear See All memorized settings page 16 Customized sound fields page 29 45US If the problem persist Consult your TV away from the audio components. Use direct tuning. • Make sure you will be reset to their factory settings... on the TV screen or monitor. • Select the appropriate input selector on the receiver. • Set your TV to the appropriate input mode. • Move your nearest Sony dealer. The FM reception is poor. If you are unable to remedy the problem using the troubleshooting guide ...
Operating Instructions
Page 47
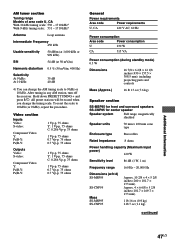
... 50 mV/m) Harmonic distortion 0.5 % (50 mV/m, 400 Hz) Selectivity At 9 kHz: At 10 kHz: 35 dB 40 dB 4) You can change the tuning scale. To reset the scale to 9 kHz or 10 kHz. Hold down PRESET TUNING + and press ?/1. Video section Inputs Video: S-video: Component Video: Y: PB/B-Y: PR/R-Y: Outputs Video: ...× 169.7 × 133 mm) 1 lb 16 oz (0.9 kg) 2 lb 7 oz (1.1 kg) continued Additional Information 47US After tuning in any AM station, turn off the receiver. All preset stations will be erased when you change the AM tuning scale to 10 kHz (or 9 kHz), repeat the procedure.
... 50 mV/m) Harmonic distortion 0.5 % (50 mV/m, 400 Hz) Selectivity At 9 kHz: At 10 kHz: 35 dB 40 dB 4) You can change the tuning scale. To reset the scale to 9 kHz or 10 kHz. Hold down PRESET TUNING + and press ?/1. Video section Inputs Video: S-video: Component Video: Y: PB/B-Y: PR/R-Y: Outputs Video: ...× 169.7 × 133 mm) 1 lb 16 oz (0.9 kg) 2 lb 7 oz (1.1 kg) continued Additional Information 47US After tuning in any AM station, turn off the receiver. All preset stations will be erased when you change the AM tuning scale to 10 kHz (or 9 kHz), repeat the procedure.


