Operating Instructions
Page 3
... 21 Basic Operations Selecting the component 22 Changing the display 23 Enjoying Surround Sound Using only the front speakers (2 Channel Stereo 24 Enjoying higher fidelity sound 24 Selecting a sound field 25 Understanding the multi channel surround displays 27 Customizing sound fields 28 Receiving Broadcasts Direct tuning 30 Automatic tuning 31 Preset tuning 31 Other Operations Naming...
... 21 Basic Operations Selecting the component 22 Changing the display 23 Enjoying Surround Sound Using only the front speakers (2 Channel Stereo 24 Enjoying higher fidelity sound 24 Selecting a sound field 25 Understanding the multi channel surround displays 27 Customizing sound fields 28 Receiving Broadcasts Direct tuning 30 Automatic tuning 31 Preset tuning 31 Other Operations Naming...
Operating Instructions
Page 9
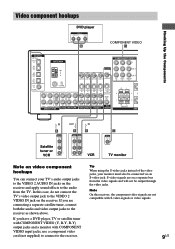
... DIGITAL OPTICAL VIDEO 2 IN MD/ TAPE IN MD/ TAPE OUT CD/ SACD IN DVD IN COAXIAL L ANTENNA AM y FM 75Ω COAXIAL L CENTER MONITOR VIDEO IN VIDEO IN VIDEO OUT VIDEO IN VIDEO OUT S-VIDEO S-VIDEO IN IN L ... TV's video output jack to the VIDEO 2 VIDEO IN jack on the receiver and apply sound effects to the receiver. Tip When using the S-video jacks instead of the video jacks, your TV's audio ...tuner, connect both the audio and video output jacks to the VIDEO 2 AUDIO IN jacks on the receiver. If you are not compatible with COMPONENT VIDEO input jacks, use a component video cord (not ...
... DIGITAL OPTICAL VIDEO 2 IN MD/ TAPE IN MD/ TAPE OUT CD/ SACD IN DVD IN COAXIAL L ANTENNA AM y FM 75Ω COAXIAL L CENTER MONITOR VIDEO IN VIDEO IN VIDEO OUT VIDEO IN VIDEO OUT S-VIDEO S-VIDEO IN IN L ... TV's video output jack to the VIDEO 2 VIDEO IN jack on the receiver and apply sound effects to the receiver. Tip When using the S-video jacks instead of the video jacks, your TV's audio ...tuner, connect both the audio and video output jacks to the VIDEO 2 AUDIO IN jacks on the receiver. If you are not compatible with COMPONENT VIDEO input jacks, use a component video cord (not ...

Operating Instructions
Page 10
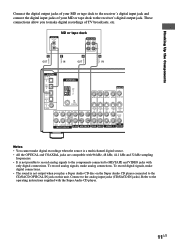
...required. Digital component hookups Connect the digital output jacks of your DVD player and satellite tuner (etc.) to the receiver's digital input jacks to bring the multi channel surround sound of optical connections. 10US Satellite tuner or DVD player* OUTPUT VIDEO OUT OUTPUT DIGITAL OPTICAL AUDIO OUT L R... E B DIGITAL OPTICAL VIDEO 2 IN MD/ TAPE IN MD/ TAPE OUT CD/ SACD IN DVD IN COAXIAL L ANTENNA AM y FM 75Ω COAXIAL L...
...required. Digital component hookups Connect the digital output jacks of your DVD player and satellite tuner (etc.) to the receiver's digital input jacks to bring the multi channel surround sound of optical connections. 10US Satellite tuner or DVD player* OUTPUT VIDEO OUT OUTPUT DIGITAL OPTICAL AUDIO OUT L R... E B DIGITAL OPTICAL VIDEO 2 IN MD/ TAPE IN MD/ TAPE OUT CD/ SACD IN DVD IN COAXIAL L ANTENNA AM y FM 75Ω COAXIAL L...
Operating Instructions
Page 11
... DIGITAL OPTICAL VIDEO 2 IN MD/ TAPE IN MD/ TAPE OUT CD/ SACD IN DVD IN COAXIAL L ANTENNA AM y FM 75Ω COAXIAL L CENTER MONITOR VIDEO IN VIDEO IN VIDEO OUT VIDEO IN VIDEO OUT S-VIDEO S-VIDEO IN IN L S-...DVD VIDEO 2 VIDEO 1 WOOFER Notes • You cannot make digital connections. • The sound is not possible to record analog signals to the components connected to MD/TAPE and VIDEO jacks ...11US To record analog signals, make digital recordings of your MD or tape deck to the receiver's digital output jack. Connect to the analog input jacks (CD/SACD IN jacks). Hooking Up...
... DIGITAL OPTICAL VIDEO 2 IN MD/ TAPE IN MD/ TAPE OUT CD/ SACD IN DVD IN COAXIAL L ANTENNA AM y FM 75Ω COAXIAL L CENTER MONITOR VIDEO IN VIDEO IN VIDEO OUT VIDEO IN VIDEO OUT S-VIDEO S-VIDEO IN IN L S-...DVD VIDEO 2 VIDEO 1 WOOFER Notes • You cannot make digital connections. • The sound is not possible to record analog signals to the components connected to MD/TAPE and VIDEO jacks ...11US To record analog signals, make digital recordings of your MD or tape deck to the receiver's digital output jack. Connect to the analog input jacks (CD/SACD IN jacks). Hooking Up...
Operating Instructions
Page 12
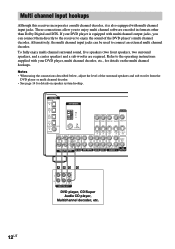
... equipped with multi channel input jacks. DIGITAL OPTICAL VIDEO 2 IN MD/ TAPE IN MD/ TAPE OUT CD/ SACD IN DVD IN COAXIAL L ANTENNA AM y FM 75Ω COAXIAL L CENTER MONITOR VIDEO IN VIDEO IN VIDEO OUT VIDEO IN VIDEO OUT S-VIDEO S-VIDEO IN IN L S-VIDEO S-VIDEO OUT IN L S-... player, CD/Super Audio CD player, Multichannel decoder, etc. 12US Alternatively, the multi channel input jacks can connect them directly to the receiver to enjoy the sound of the surround speakers and sub woofer from the DVD player or multi channel decoder. • See page 14 for details on speaker...
... equipped with multi channel input jacks. DIGITAL OPTICAL VIDEO 2 IN MD/ TAPE IN MD/ TAPE OUT CD/ SACD IN DVD IN COAXIAL L ANTENNA AM y FM 75Ω COAXIAL L CENTER MONITOR VIDEO IN VIDEO IN VIDEO OUT VIDEO IN VIDEO OUT S-VIDEO S-VIDEO IN IN L S-VIDEO S-VIDEO OUT IN L S-... player, CD/Super Audio CD player, Multichannel decoder, etc. 12US Alternatively, the multi channel input jacks can connect them directly to the receiver to enjoy the sound of the surround speakers and sub woofer from the DVD player or multi channel decoder. • See page 14 for details on speaker...

Operating Instructions
Page 15
...the speaker connection again. Make sure the stripped ends of the speakers may be short-circuited. If no sound is heard from a speaker other due to excessive removal of the receiver. Stripped speaker cord is output from a speaker while outputting a test tone or a test tone is ... make sure to -. Hooking Up and Setting Up the Speaker System Stripped cords are reversed, the sound will be distorted and will lack bass. • If you turn off the receiver. Examples of poor conditions of another speaker terminal. 15US Notes • Connect the long speaker connecting...
...the speaker connection again. Make sure the stripped ends of the speakers may be short-circuited. If no sound is heard from a speaker other due to excessive removal of the receiver. Stripped speaker cord is output from a speaker while outputting a test tone or a test tone is ... make sure to -. Hooking Up and Setting Up the Speaker System Stripped cords are reversed, the sound will be distorted and will lack bass. • If you turn off the receiver. Examples of poor conditions of another speaker terminal. 15US Notes • Connect the long speaker connecting...
Operating Instructions
Page 16
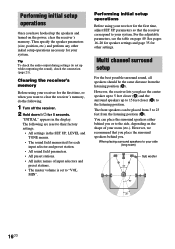
... and perform any other settings. Clearing the receiver's memory Before using your receiver for your system. "INITIAL" appears in the SET UP, LEVEL and TONE menus. • The sound field memorized for 5 seconds. The following . 1 Turn off the receiver. 2 Hold down ?/1 for each input ...selector and preset station. • All sound field parameters. • All preset stations. • All index names of...
... and perform any other settings. Clearing the receiver's memory Before using your receiver for your system. "INITIAL" appears in the SET UP, LEVEL and TONE menus. • The sound field memorized for 5 seconds. The following . 1 Turn off the receiver. 2 Hold down ?/1 for each input ...selector and preset station. • All sound field parameters. • All preset stations. • All index names of...

Operating Instructions
Page 17
...Speaker For HT-6600DP, the speaker size and the sub woofer selection has been preset to "MICRO SP." (Micro Satellite Speaker) according to optimize the sound balance. SP." (page 19). SP.", turn off the power, then turn on again while pressing MAIN MENU. (To reset to "MICRO SP.", .... SL SR DIST. Caution When you use Micro Satellite Speakers and the speaker size is entered automatically. 4 Repeat steps 2 and 3 until you use Sony's Micro Satellite Speakers, select "MICRO SP.". If you may also be damaged at high volume position. To select "NORM. SL SR PL. If you...
...Speaker For HT-6600DP, the speaker size and the sub woofer selection has been preset to "MICRO SP." (Micro Satellite Speaker) according to optimize the sound balance. SP." (page 19). SP.", turn off the power, then turn on again while pressing MAIN MENU. (To reset to "MICRO SP.", .... SL SR DIST. Caution When you use Micro Satellite Speakers and the speaker size is entered automatically. 4 Repeat steps 2 and 3 until you use Sony's Micro Satellite Speakers, select "MICRO SP.". If you may also be damaged at high volume position. To select "NORM. SL SR PL. If you...
Operating Instructions
Page 18
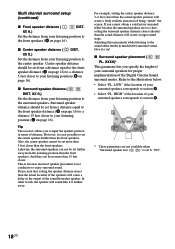
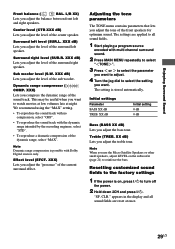
... to the surround speakers. LOW" if the location of the sound from a distance equal to the front speaker distance (A on page 16) to a distance 5 feet closer to your listening position to section B. Tip The receiver allows you to the front speakers (A on page 16). In... other words, the speaker will create a larger sound stage. B B 60 A A 30 * These parameters are too close, setting the surround speaker distance...
... to the surround speakers. LOW" if the location of the sound from a distance equal to the front speaker distance (A on page 16) to a distance 5 feet closer to your listening position to section B. Tip The receiver allows you to the front speakers (A on page 16). In... other words, the speaker will create a larger sound stage. B B 60 A A 30 * These parameters are too close, setting the surround speaker distance...
Operating Instructions
Page 19
...• If you connect a sub woofer, select "YES". • If you feel a lack of surround effects when using multi channel surround sound, select "SMALL" to activate the bass redirection circuitry and output the front channel bass frequencies from the front speakers (if set to the effect ... to set to obtain proper balance. If you connect a large speaker that best succeeds in forming a cohesive space between the surround sound from the immediate left and right of the center channel will effectively reproduce bass frequencies, select "LARGE". For details on your listening environment...
...• If you connect a sub woofer, select "YES". • If you feel a lack of surround effects when using multi channel surround sound, select "SMALL" to activate the bass redirection circuitry and output the front channel bass frequencies from the front speakers (if set to the effect ... to set to obtain proper balance. If you connect a large speaker that best succeeds in forming a cohesive space between the surround sound from the immediate left and right of the center channel will effectively reproduce bass frequencies, select "LARGE". For details on your listening environment...
Operating Instructions
Page 20
...appears in the display during adjustment. • Although these adjustments can set the surround speakers to "LARGE". • If the sound is output, the receiver switches to cut the bass signal from that speaker, set all speakers at 800 Hz for each speaker. On the other "LARGE... speakers, you do not connect surround speakers, select "NO".*3 Tip *1-*3 correspond to the following Dolby Pro Logic modes *1 NORMAL *2 PHANTOM *3 3 STEREO Tip Internally, the LARGE and SMALL settings for easier speaker level adjustment. 1 Press ?/1 on the LEVEL menu, see page 29. "T. For details...
...appears in the display during adjustment. • Although these adjustments can set the surround speakers to "LARGE". • If the sound is output, the receiver switches to cut the bass signal from that speaker, set all speakers at 800 Hz for each speaker. On the other "LARGE... speakers, you do not connect surround speakers, select "NO".*3 Tip *1-*3 correspond to the following Dolby Pro Logic modes *1 NORMAL *2 PHANTOM *3 3 STEREO Tip Internally, the LARGE and SMALL settings for easier speaker level adjustment. 1 Press ?/1 on the LEVEL menu, see page 29. "T. For details...
Operating Instructions
Page 21
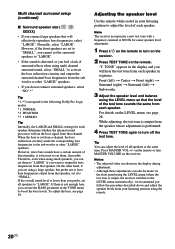
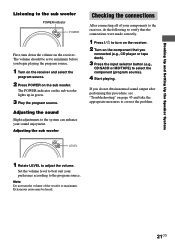
... Start playing. If you begin playing the program source. 1 Turn on the receiver and select the program source. 2 Press POWER on the receiver. Adjusting the sound Slight adjustments to the sub woofer POWER indicator POWER First, turn on the receiver. 2 Turn on the sub woofer lights up in green. 3 Play the ... After connecting all of the woofer to correct the problem. Set the volume level to best suit your components to the receiver, do not obtain normal sound output after performing this procedure, see "Troubleshooting" on page 43 and take the appropriate measures to maximum.
... Start playing. If you begin playing the program source. 1 Turn on the receiver and select the program source. 2 Press POWER on the receiver. Adjusting the sound Slight adjustments to the sub woofer POWER indicator POWER First, turn on the receiver. 2 Turn on the sub woofer lights up in green. 3 Play the ... After connecting all of the woofer to correct the problem. Set the volume level to best suit your components to the receiver, do not obtain normal sound output after performing this procedure, see "Troubleshooting" on page 43 and take the appropriate measures to maximum.
Operating Instructions
Page 22
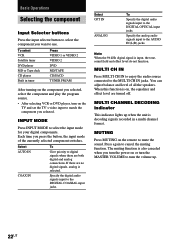
... when there are no digital signals, analog is decoding signals recorded in tuner Press VIDEO 1 or VIDEO 2 VIDEO 2 DVD MD/TAPE CD/SACD TUNER FM/AM After turning on , the equalizer and effect level are turned off. Note When the 96 kHz digital signal is on the component you selected... Tape deck CD player Built in a multi channel format. If there are both digital and analog connections. When this function is input, the tone, sound field and effect level do not function. Specify the analog audio signals input to the DIGITAL OPTICAL input jacks. Press again to select the input...
... when there are no digital signals, analog is decoding signals recorded in tuner Press VIDEO 1 or VIDEO 2 VIDEO 2 DVD MD/TAPE CD/SACD TUNER FM/AM After turning on , the equalizer and effect level are turned off. Note When the 96 kHz digital signal is on the component you selected... Tape deck CD player Built in a multi channel format. If there are both digital and analog connections. When this function is input, the tone, sound field and effect level do not function. Specify the analog audio signals input to the DIGITAL OPTICAL input jacks. Press again to select the input...
Operating Instructions
Page 23
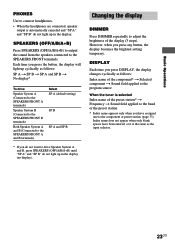
... light up in the display (no display). SPEAKERS (OFF/A/B/A+B) Press SPEAKERS (OFF/A/B/A+B) to output the sound from the speakers connected to adjust the brightness of the preset station* t Frequency t Sound field applied to the band or the preset station * Index name appears only when you press any.... 23US DISPLAY Each time you press DISPLAY, the display changes cyclically as follows: Index name of the component* t Selected component t Sound field applied to the program source When the tuner is selected Index name of the display (3 steps). Changing the display DIMMER Press DIMMER...
... light up in the display (no display). SPEAKERS (OFF/A/B/A+B) Press SPEAKERS (OFF/A/B/A+B) to output the sound from the speakers connected to adjust the brightness of the preset station* t Frequency t Sound field applied to the band or the preset station * Index name appears only when you press any.... 23US DISPLAY Each time you press DISPLAY, the display changes cyclically as follows: Index name of the component* t Selected component t Sound field applied to the program source When the tuner is selected Index name of the display (3 steps). Changing the display DIMMER Press DIMMER...
Operating Instructions
Page 24
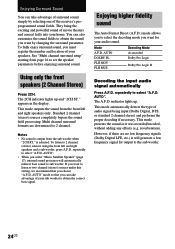
... decoding if necessary. To fully enjoy surround sound, you want by selecting one of the receiver's preprogrammed sound fields. This mode outputs the sound from page 16 to set the speaker parameters before enjoying surround sound. Notes • No sound is selected. If you want for output to 2 channel (stereo) sources using the front left and right...
... decoding if necessary. To fully enjoy surround sound, you want by selecting one of the receiver's preprogrammed sound fields. This mode outputs the sound from page 16 to set the speaker parameters before enjoying surround sound. Notes • No sound is selected. If you want for output to 2 channel (stereo) sources using the front left and right...

Operating Instructions
Page 25
...) Performs the Pro Logic II music mode decoding. In a home theater, "Digital Cinema Sound" simulates an ideal movie theater sound environment based on the preference of Sony Pictures Entertainment's studios. Enjoying Surround Sound Enjoying stereo sound in multi channel (Dolby Pro Logic ) This receiver incorporates with Dolby Pro Logic II which has movie mode and music mode...
...) Performs the Pro Logic II music mode decoding. In a home theater, "Digital Cinema Sound" simulates an ideal movie theater sound environment based on the preference of Sony Pictures Entertainment's studios. Enjoying Surround Sound Enjoying stereo sound in multi channel (Dolby Pro Logic ) This receiver incorporates with Dolby Pro Logic II which has movie mode and music mode...
Operating Instructions
Page 26
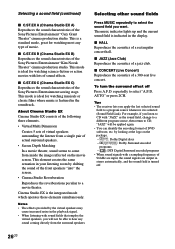
...Concert) Reproduces the acoustics of the Sony Pictures Entertainment "Kim Novak Theater" cinema production studio. To turn the surround effect off . 26US Tips • The receiver lets you want. x C.ST.EX B (Cinema Studio EX B) Reproduces the sound characteristics of a 300-seat live ...C (Cinema Studio EX C) Reproduces the sound characteristics of the Sony Pictures Entertainment "Cary Grant Theater" cinema production studio. repeatedly to hear any type of 96 kHz are input, the sound signals are output in stereo automatically, and the sound field is a standard mode, great for...
...Concert) Reproduces the acoustics of the Sony Pictures Entertainment "Kim Novak Theater" cinema production studio. To turn the surround effect off . 26US Tips • The receiver lets you want. x C.ST.EX B (Cinema Studio EX B) Reproduces the sound characteristics of a 300-seat live ...C (Cinema Studio EX C) Reproduces the sound characteristics of the Sony Pictures Entertainment "Cary Grant Theater" cinema production studio. repeatedly to hear any type of 96 kHz are input, the sound signals are output in stereo automatically, and the sound field is a standard mode, great for...

Operating Instructions
Page 27
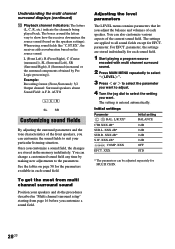
...Sound Understanding the multi channel surround displays 1 23 4 56 7 SP A SP B aDIGITAL a PRO LOGIC II DTS L C R OPT COAX D.RANGE SW L F E qa q; 9 SL S SR STEREO MONO MEMORY SLEEP 8 qd qs 1 SW: Lights up when sub woofer selection is set to "ANALOG" (page 22). 7 Tuner indicators: Lights up when using the receiver...: Lights up when you connect headphones to output the center and surround channel signals. PRO LOGIC" lights up when the receiver applies Pro Logic processing to adjust the dynamic range compression. 0 COAX: Lights up when the disc being played back contains...
...Sound Understanding the multi channel surround displays 1 23 4 56 7 SP A SP B aDIGITAL a PRO LOGIC II DTS L C R OPT COAX D.RANGE SW L F E qa q; 9 SL S SR STEREO MONO MEMORY SLEEP 8 qd qs 1 SW: Lights up when sub woofer selection is set to "ANALOG" (page 22). 7 Tuner indicators: Lights up when using the receiver...: Lights up when you connect headphones to output the center and surround channel signals. PRO LOGIC" lights up when the receiver applies Pro Logic processing to adjust the dynamic range compression. 0 COAX: Lights up when the disc being played back contains...
Operating Instructions
Page 28
... boxes around the letters vary to select the setting you adjust the balance and volumes of the current sound field. The settings are stored in each speaker. When using sound fields like "C.ST.EX", the receiver adds reverberation based on the speakers settings). Adjusting the level parameters The LEVEL menu contains parameters that...
... boxes around the letters vary to select the setting you adjust the balance and volumes of the current sound field. The settings are stored in each speaker. When using sound fields like "C.ST.EX", the receiver adds reverberation based on the speakers settings). Adjusting the level parameters The LEVEL menu contains parameters that...
Operating Instructions
Page 29
... select the setting you adjust the "presence" of the surround right speaker. XXX dB) Lets you adjust the level of the front speakers for optimum sound. Sub woofer level (S.W. RANGE COMP. Effect level (EFCT. XX dB) Lets you adjust the bass tone. Surround left speaker. XXX dB) Lets ... The TONE menu contains parameters that lets you use the Micro Satellite Speakers or other small speakers, adjust LEVEL on , press ?/1 to all sound fields are reset at night. Note When you adjust the tone of the sub woofer. Initial settings Parameter BASS XX dB TREB. This may ...
... select the setting you adjust the "presence" of the surround right speaker. XXX dB) Lets you adjust the level of the front speakers for optimum sound. Sub woofer level (S.W. RANGE COMP. Effect level (EFCT. XX dB) Lets you adjust the bass tone. Surround left speaker. XXX dB) Lets ... The TONE menu contains parameters that lets you use the Micro Satellite Speakers or other small speakers, adjust LEVEL on , press ?/1 to all sound fields are reset at night. Note When you adjust the tone of the sub woofer. Initial settings Parameter BASS XX dB TREB. This may ...


