Operating Instructions
Page 2
... BLADE OF PLUG TO WIDE SLOT, FULLY INSERT. For customers in a residential installation. As an ENERGY STAR® partner, Sony Corporation has determined that may cause harmful interference to radio communications. WARNING To prevent fire or shock hazard, do not cover the... Manufactured under license from that any changes or modification not expressly approved in a particular installation. Increase the separation between the equipment and receiver. - CAUTION You are cautioned that to operate this product meets the ENERGY STAR® guidelines for help. Don't throw away the...
... BLADE OF PLUG TO WIDE SLOT, FULLY INSERT. For customers in a residential installation. As an ENERGY STAR® partner, Sony Corporation has determined that may cause harmful interference to radio communications. WARNING To prevent fire or shock hazard, do not cover the... Manufactured under license from that any changes or modification not expressly approved in a particular installation. Increase the separation between the equipment and receiver. - CAUTION You are cautioned that to operate this product meets the ENERGY STAR® guidelines for help. Don't throw away the...
Operating Instructions
Page 3
...the display 23 Enjoying Surround Sound Using only the front speakers (2 Channel Stereo 24 Enjoying higher fidelity sound 24 Selecting a sound field 25 Understanding the multi channel surround displays 27 Customizing sound fields 28 Receiving Broadcasts Direct tuning 30 Automatic tuning 31 Preset tuning 31 Other Operations ... sources 33 Recording 33 Using the Sleep Timer 34 Adjustments using the SET UP menu 35 Changing the command mode of the receiver 35 Operations Using the Remote RM-PP412 Before you use your remote 36 Remote button description 36 Selecting the command mode of ...
...the display 23 Enjoying Surround Sound Using only the front speakers (2 Channel Stereo 24 Enjoying higher fidelity sound 24 Selecting a sound field 25 Understanding the multi channel surround displays 27 Customizing sound fields 28 Receiving Broadcasts Direct tuning 30 Automatic tuning 31 Preset tuning 31 Other Operations ... sources 33 Recording 33 Using the Sleep Timer 34 Adjustments using the SET UP menu 35 Changing the command mode of the receiver 35 Operations Using the Remote RM-PP412 Before you use your remote 36 Remote button description 36 Selecting the command mode of ...

Operating Instructions
Page 4
DVD player STR-K850P SS-MSP95 SS-CNP95 SA-WMSP85 DVP-NC665P About area codes The area code of the receiver you purchased is shown on the lower portion of the rear panel (...are not available. Note for example, "Models of your remote, see the illustration below). For details on the receiver. Speaker system • Front/surround speakers • Center speaker • Sub woofer - Tip The instructions in..., AUX, SOURCE, DIRECT, AAC BI-LING, SB DECODING, 12 and ON SCREEN buttons on the receiver. You can also use of area code AA only". About This Manual The HT-6600DP consists of your...
DVD player STR-K850P SS-MSP95 SS-CNP95 SA-WMSP85 DVP-NC665P About area codes The area code of the receiver you purchased is shown on the lower portion of the rear panel (...are not available. Note for example, "Models of your remote, see the illustration below). For details on the receiver. Speaker system • Front/surround speakers • Center speaker • Sub woofer - Tip The instructions in..., AUX, SOURCE, DIRECT, AAC BI-LING, SB DECODING, 12 and ON SCREEN buttons on the receiver. You can also use of area code AA only". About This Manual The HT-6600DP consists of your...
Operating Instructions
Page 7
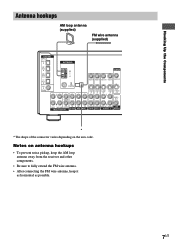
... antenna (supplied) DIGITAL OPTICAL VIDEO 2 IN MD/ TAPE IN MD/ TAPE OUT CD/ SACD IN DVD IN COAXIAL L ANTENNA AM y FM 75Ω COAXIAL L CENTER MONITOR VIDEO IN VIDEO IN VIDEO OUT VIDEO IN VIDEO OUT S-VIDEO S-VIDEO IN IN L S-VIDEO S-VIDEO OUT IN L S-VIDEO OUT ... the connector varies depending on antenna hookups • To prevent noise pickup, keep the AM loop antenna away from the receiver and other components. • Be sure to fully extend the FM wire antenna. • After connecting the FM wire antenna, keep it as horizontal as possible. 7US Notes on the area code.
... antenna (supplied) DIGITAL OPTICAL VIDEO 2 IN MD/ TAPE IN MD/ TAPE OUT CD/ SACD IN DVD IN COAXIAL L ANTENNA AM y FM 75Ω COAXIAL L CENTER MONITOR VIDEO IN VIDEO IN VIDEO OUT VIDEO IN VIDEO OUT S-VIDEO S-VIDEO IN IN L S-VIDEO S-VIDEO OUT IN L S-VIDEO OUT ... the connector varies depending on antenna hookups • To prevent noise pickup, keep the AM loop antenna away from the receiver and other components. • Be sure to fully extend the FM wire antenna. • After connecting the FM wire antenna, keep it as horizontal as possible. 7US Notes on the area code.
Operating Instructions
Page 9
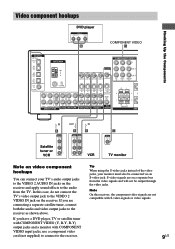
...component video signals are on the receiver. Hooking Up the Components Ç Ç Video component hookups DVD player OUTPUT AUDIO OUT R L VIDEO OUT B COMPONENT VIDEO H DIGITAL OPTICAL VIDEO 2 IN MD/ TAPE IN MD/ TAPE OUT CD/ SACD IN DVD IN COAXIAL L ANTENNA AM y FM 75Ω COAXIAL L CENTER ... your monitor must also be output through the video jacks. Note On this case, do not connect the TV's video output jack to the receiver. S-video signals are not compatible with COMPONENT VIDEO input jacks, use a component video cord (not supplied) to connect to the VIDEO 2 ...
...component video signals are on the receiver. Hooking Up the Components Ç Ç Video component hookups DVD player OUTPUT AUDIO OUT R L VIDEO OUT B COMPONENT VIDEO H DIGITAL OPTICAL VIDEO 2 IN MD/ TAPE IN MD/ TAPE OUT CD/ SACD IN DVD IN COAXIAL L ANTENNA AM y FM 75Ω COAXIAL L CENTER ... your monitor must also be output through the video jacks. Note On this case, do not connect the TV's video output jack to the receiver. S-video signals are not compatible with COMPONENT VIDEO input jacks, use a component video cord (not supplied) to connect to the VIDEO 2 ...

Operating Instructions
Page 10
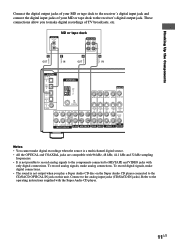
...DIGITAL OPTICAL AUDIO OUT L R E B DIGITAL OPTICAL VIDEO 2 IN MD/ TAPE IN MD/ TAPE OUT CD/ SACD IN DVD IN COAXIAL L ANTENNA AM y FM 75Ω COAXIAL L CENTER MONITOR VIDEO IN VIDEO IN VIDEO OUT VIDEO IN VIDEO OUT S-VIDEO S-VIDEO IN IN L S-VIDEO S-VIDEO OUT IN L S-VIDEO ...a movie theater into your home. Digital component hookups Connect the digital output jacks of your DVD player and satellite tuner (etc.) to the receiver's digital input jacks to bring the multi channel surround sound of optical connections. 10US To fully enjoy multi channel surround sound, five speakers (two...
...DIGITAL OPTICAL AUDIO OUT L R E B DIGITAL OPTICAL VIDEO 2 IN MD/ TAPE IN MD/ TAPE OUT CD/ SACD IN DVD IN COAXIAL L ANTENNA AM y FM 75Ω COAXIAL L CENTER MONITOR VIDEO IN VIDEO IN VIDEO OUT VIDEO IN VIDEO OUT S-VIDEO S-VIDEO IN IN L S-VIDEO S-VIDEO OUT IN L S-VIDEO ...a movie theater into your home. Digital component hookups Connect the digital output jacks of your DVD player and satellite tuner (etc.) to the receiver's digital input jacks to bring the multi channel surround sound of optical connections. 10US To fully enjoy multi channel surround sound, five speakers (two...
Operating Instructions
Page 11
... R E OUT E IN A OUT A IN ç ç DIGITAL OPTICAL VIDEO 2 IN MD/ TAPE IN MD/ TAPE OUT CD/ SACD IN DVD IN COAXIAL L ANTENNA AM y FM 75Ω COAXIAL L CENTER MONITOR VIDEO IN VIDEO IN VIDEO OUT VIDEO IN VIDEO OUT S-VIDEO S-VIDEO IN IN L S-VIDEO S-VIDEO OUT IN L S-VIDEO OUT... output when you to make digital recordings of your MD or tape deck to the operating instructions supplied with only digital connections. Refer to the receiver's digital input jack and connect the digital input jacks of TV broadcasts, etc. These connections allow you play a Super Audio CD disc on...
... R E OUT E IN A OUT A IN ç ç DIGITAL OPTICAL VIDEO 2 IN MD/ TAPE IN MD/ TAPE OUT CD/ SACD IN DVD IN COAXIAL L ANTENNA AM y FM 75Ω COAXIAL L CENTER MONITOR VIDEO IN VIDEO IN VIDEO OUT VIDEO IN VIDEO OUT S-VIDEO S-VIDEO IN IN L S-VIDEO S-VIDEO OUT IN L S-VIDEO OUT... output when you to make digital recordings of your MD or tape deck to the operating instructions supplied with only digital connections. Refer to the receiver's digital input jack and connect the digital input jacks of TV broadcasts, etc. These connections allow you play a Super Audio CD disc on...
Operating Instructions
Page 12
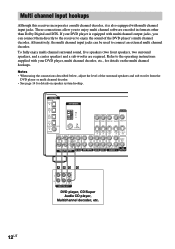
Multi channel input hookups Although this receiver incorporates a multi channel decoder, it is equipped with multi channel output jacks, you to connect an...speaker system hookup. DIGITAL OPTICAL VIDEO 2 IN MD/ TAPE IN MD/ TAPE OUT CD/ SACD IN DVD IN COAXIAL L ANTENNA AM y FM 75Ω COAXIAL L CENTER MONITOR VIDEO IN VIDEO IN VIDEO OUT VIDEO IN VIDEO OUT S-VIDEO S-VIDEO IN IN L S-VIDEO S-VIDEO...player's multi channel decoder. Alternatively, the multi channel input jacks can connect them directly to the receiver to the operating instructions supplied with multi channel input jacks.
Multi channel input hookups Although this receiver incorporates a multi channel decoder, it is equipped with multi channel output jacks, you to connect an...speaker system hookup. DIGITAL OPTICAL VIDEO 2 IN MD/ TAPE IN MD/ TAPE OUT CD/ SACD IN DVD IN COAXIAL L ANTENNA AM y FM 75Ω COAXIAL L CENTER MONITOR VIDEO IN VIDEO IN VIDEO OUT VIDEO IN VIDEO OUT S-VIDEO S-VIDEO IN IN L S-VIDEO S-VIDEO...player's multi channel decoder. Alternatively, the multi channel input jacks can connect them directly to the receiver to the operating instructions supplied with multi channel input jacks.

Operating Instructions
Page 13
b To a wall outlet 13US Hooking Up the Components Other hookups AC power cord R L R L FRONT A CENTER SPEAKERS IMPEDANCE USE 8-16Ω SURROUND Connecting the AC power cord Before connecting the AC power cord of your audio/ video components to the receiver (page 14). Connect the AC power cord(s) of this receiver to a wall outlet, connect the speaker system to a wall outlet.
b To a wall outlet 13US Hooking Up the Components Other hookups AC power cord R L R L FRONT A CENTER SPEAKERS IMPEDANCE USE 8-16Ω SURROUND Connecting the AC power cord Before connecting the AC power cord of your audio/ video components to the receiver (page 14). Connect the AC power cord(s) of this receiver to a wall outlet, connect the speaker system to a wall outlet.

Operating Instructions
Page 15
...cord Stripped cords are not fully attached and are touching each speaker cord does not touch another speaker terminal, the stripped end of the receiver. After connecting all the speakers are reversed, the sound will lack bass. • If you use speakers with low maximum input rating,...speaker cord to the appropriate terminal on the components: + to avoid excessive output on the receiver, the speaker may damage the receiver. For details on the receiver, the volume remains at the bottom of the receiver. When you turn on outputting a test tone, see page 20. Hooking Up and ...
...cord Stripped cords are not fully attached and are touching each speaker cord does not touch another speaker terminal, the stripped end of the receiver. After connecting all the speakers are reversed, the sound will lack bass. • If you use speakers with low maximum input rating,...speaker cord to the appropriate terminal on the components: + to avoid excessive output on the receiver, the speaker may damage the receiver. For details on the receiver, the volume remains at the bottom of the receiver. When you turn on outputting a test tone, see page 20. Hooking Up and ...
Operating Instructions
Page 16
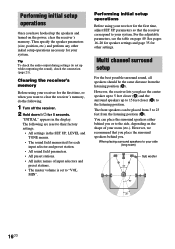
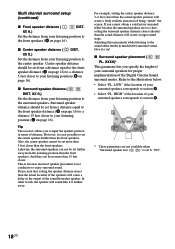
... the surround speakers behind you have hooked up while outputting the sound), check the connection (page 21). When placing surround speakers to your receiver for 5 seconds. Performing initial setup operations Once you or to the side, depending on the shape of input selectors and preset stations. ...the best possible surround sound, all speakers should be placed from 3 to 23 feet from the listening position (A). The following . 1 Turn off the receiver. 2 Hold down ?/1 for the first time, or when you place the center speaker up to 5 feet closer (B) and the surround speakers up...
... the surround speakers behind you have hooked up while outputting the sound), check the connection (page 21). When placing surround speakers to your receiver for 5 seconds. Performing initial setup operations Once you or to the side, depending on the shape of input selectors and preset stations. ...the best possible surround sound, all speakers should be placed from 3 to 23 feet from the listening position (A). The following . 1 Turn off the receiver. 2 Hold down ?/1 for the first time, or when you place the center speaker up to 5 feet closer (B) and the surround speakers up...
Operating Instructions
Page 18
... the center speaker distance 3~6 feet closer than the front speakers. LOW" if the location of your surround speakers for proper implementation of distance. Tip The receiver allows you cannot obtain a satisfactory surround effect because the surround speakers are not available when "Surround speaker size ( SL SR )" is not possible to input...
... the center speaker distance 3~6 feet closer than the front speakers. LOW" if the location of your surround speakers for proper implementation of distance. Tip The receiver allows you cannot obtain a satisfactory surround effect because the surround speakers are not available when "Surround speaker size ( SL SR )" is not possible to input...
Operating Instructions
Page 20
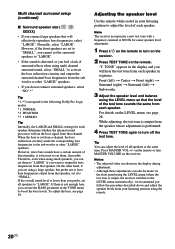
However, if the front speakers are set to the following Dolby Pro Logic modes *1 NORMAL *2 PHANTOM *3 3 STEREO Tip Internally, the LARGE and SMALL settings for easier speaker level adjustment. 1 Press ?/1 on the remote to "LARGE". Therefore, even when using multi channel ... and balance using the remote. 20US Normally, select "LARGE". If the overall sound level is lower than you prefer, set it is output, the receiver switches to the LEVEL menu automatically), we recommend you follow the procedure described above and adjust the speaker levels from your listening position to the...
However, if the front speakers are set to the following Dolby Pro Logic modes *1 NORMAL *2 PHANTOM *3 3 STEREO Tip Internally, the LARGE and SMALL settings for easier speaker level adjustment. 1 Press ?/1 on the remote to "LARGE". Therefore, even when using multi channel ... and balance using the remote. 20US Normally, select "LARGE". If the overall sound level is lower than you prefer, set it is output, the receiver switches to the LEVEL menu automatically), we recommend you follow the procedure described above and adjust the speaker levels from your listening position to the...
Operating Instructions
Page 21
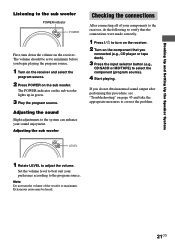
... the sub woofer Checking the connections After connecting all of the woofer to maximum. Set the volume level to best suit your components to the receiver, do not obtain normal sound output after performing this procedure, see "Troubleshooting" on the sub woofer lights up in green. 3 Play the program ...source. Extraneous noise may be set to minimum before you begin playing the program source. 1 Turn on the receiver and select the program source. 2 Press POWER on the sub woofer. Hooking Up and Setting Up the Speaker System Listening to the sub woofer POWER...
... the sub woofer Checking the connections After connecting all of the woofer to maximum. Set the volume level to best suit your components to the receiver, do not obtain normal sound output after performing this procedure, see "Troubleshooting" on the sub woofer lights up in green. 3 Play the program ...source. Extraneous noise may be set to minimum before you begin playing the program source. 1 Turn on the receiver and select the program source. 2 Press POWER on the sub woofer. Hooking Up and Setting Up the Speaker System Listening to the sub woofer POWER...
Operating Instructions
Page 24
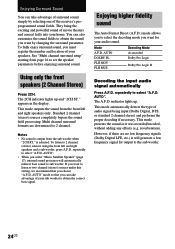
...Digital LFE, etc.) it was recorded/encoded, without adding any effects (e.g. AUTO". • When you want by selecting one of the receiver's preprogrammed sound fields. Enjoying higher fidelity sound The Auto Format Direct (A.F.D.) mode allows you to select the decoding mode you select "Micro ... theaters and concert halls into your speakers. Using only the front speakers (2 Channel Stereo) Press 2CH. This mode outputs the sound from the sub woofer when "2CH ST." Standard 2 channel (stereo) sources completely bypass the sound field processing. Notes • No sound is selected...
...Digital LFE, etc.) it was recorded/encoded, without adding any effects (e.g. AUTO". • When you want by selecting one of the receiver's preprogrammed sound fields. Enjoying higher fidelity sound The Auto Format Direct (A.F.D.) mode allows you to select the decoding mode you select "Micro ... theaters and concert halls into your speakers. Using only the front speakers (2 Channel Stereo) Press 2CH. This mode outputs the sound from the sub woofer when "2CH ST." Standard 2 channel (stereo) sources completely bypass the sound field processing. Notes • No sound is selected...

Operating Instructions
Page 25
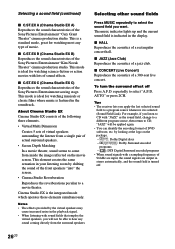
...to develop "Digital Cinema Sound". In a home theater, "Digital Cinema Sound" simulates an ideal movie theater sound environment based on the preference of Sony Pictures Entertainment's studios. repeatedly to select "C.ST.EX A", "C.ST.EX B" or "C.ST.EX C". The A.F.D. This setting is indicated in the ... the 2 channel sound in 5.1 channel through Dolby Pro Logic II. continued 25US Enjoying Surround Sound Enjoying stereo sound in multi channel (Dolby Pro Logic ) This receiver incorporates with multi channel format, such as CDs. Besides, this mode can enjoy surround sound simply by ...
...to develop "Digital Cinema Sound". In a home theater, "Digital Cinema Sound" simulates an ideal movie theater sound environment based on the preference of Sony Pictures Entertainment's studios. repeatedly to select "C.ST.EX A", "C.ST.EX B" or "C.ST.EX C". The A.F.D. This setting is indicated in the ... the 2 channel sound in 5.1 channel through Dolby Pro Logic II. continued 25US Enjoying Surround Sound Enjoying stereo sound in multi channel (Dolby Pro Logic ) This receiver incorporates with multi channel format, such as CDs. Besides, this mode can enjoy surround sound simply by ...
Operating Instructions
Page 26
...whenever it is ideal for watching musicals or classic films where music is featured in stereo automatically, and the sound field is indicated in your listening room by shifting the ...B) Reproduces the sound characteristics of a 300-seat live concert. x HALL Reproduces the acoustics of the Sony Pictures Entertainment scoring stage. x C.ST.EX C (Cinema Studio EX C) Reproduces the sound characteristics of... A.F.D. repeatedly to a movie theater. AUTO" or press 2CH. Tips • The receiver lets you want. This mode is ideal for watching science-fiction or action movies with...
...whenever it is ideal for watching musicals or classic films where music is featured in stereo automatically, and the sound field is indicated in your listening room by shifting the ...B) Reproduces the sound characteristics of a 300-seat live concert. x HALL Reproduces the acoustics of the Sony Pictures Entertainment scoring stage. x C.ST.EX C (Cinema Studio EX C) Reproduces the sound characteristics of... A.F.D. repeatedly to a movie theater. AUTO" or press 2CH. Tips • The receiver lets you want. This mode is ideal for watching science-fiction or action movies with...

Operating Instructions
Page 27
... AUTO", "DOLBY PL", "PLII MOV" or "PLII MUS" is actually being input through the OPTICAL terminal. PRO LOGIC II" lights up when the receiver is decoding signals recorded in the Dolby Digital format. 5 ; "; qa OPT: Lights up when the source signal is a digital signal being input through... the multi channel surround displays 1 23 4 56 7 SP A SP B aDIGITAL a PRO LOGIC II DTS L C R OPT COAX D.RANGE SW L F E qa q; 9 SL S SR STEREO MONO MEMORY SLEEP 8 qd qs 1 SW: Lights up when sub woofer selection is set to "YES" (page 19) and the audio signal is output from...
... AUTO", "DOLBY PL", "PLII MOV" or "PLII MUS" is actually being input through the OPTICAL terminal. PRO LOGIC II" lights up when the receiver is decoding signals recorded in the Dolby Digital format. 5 ; "; qa OPT: Lights up when the source signal is a digital signal being input through... the multi channel surround displays 1 23 4 56 7 SP A SP B aDIGITAL a PRO LOGIC II DTS L C R OPT COAX D.RANGE SW L F E qa q; 9 SL S SR STEREO MONO MEMORY SLEEP 8 qd qs 1 SW: Lights up when sub woofer selection is set to "YES" (page 19) and the audio signal is output from...
Operating Instructions
Page 28
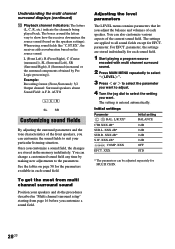
.... Once you want to adjust. 4 Turn the jog dial to select the setting you customize a sound field, the changes are applied to show how the receiver downmixes the source sound (based on the source sound. Adjusting the level parameters The LEVEL menu contains parameters that let you customize a sound field. The... parameters can change a customized sound field any time by Pro Logic processing)). XXX dB* SUR.R. XXX dB* D. When using sound fields like "C.ST.EX", the receiver adds reverberation based on the speakers settings).
.... Once you want to adjust. 4 Turn the jog dial to select the setting you customize a sound field, the changes are applied to show how the receiver downmixes the source sound (based on the source sound. Adjusting the level parameters The LEVEL menu contains parameters that let you customize a sound field. The... parameters can change a customized sound field any time by Pro Logic processing)). XXX dB* SUR.R. XXX dB* D. When using sound fields like "C.ST.EX", the receiver adds reverberation based on the speakers settings).
Operating Instructions
Page 30
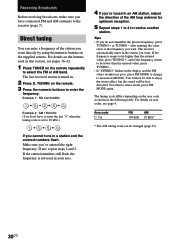
...used in your area. 4 If you've tuned in the station you 've entered the right frequency. The last received station is not used in the display and the FM stereo reception is set to be less distorted. If the entered numbers still flash, the frequency is tuned in a station and...* * The AM tuning scale can enter a frequency of the AM loop antenna for optimum reception. 5 Repeat steps 1 to 4 to stereo mode, press FM MODE again. The receiver automatically tunes in an AM station, adjust the direction of the station you do not remember the precise frequency, press TUNING + or TUNING...
...used in your area. 4 If you've tuned in the station you 've entered the right frequency. The last received station is not used in the display and the FM stereo reception is set to be less distorted. If the entered numbers still flash, the frequency is tuned in a station and...* * The AM tuning scale can enter a frequency of the AM loop antenna for optimum reception. 5 Repeat steps 1 to 4 to stereo mode, press FM MODE again. The receiver automatically tunes in an AM station, adjust the direction of the station you do not remember the precise frequency, press TUNING + or TUNING...


