GUI Menu List
Page 1
...AIR Mode RF Change S-AIR Stby Lvl Dist Size*1 Test Tone Phase Noise Phase Audio Sound Field Effect Level*1 Sony Corporation © 2010 Printed in Malaysia Start*2 Auto Cal. 4-174-070-12(1) STR-DN1010 GUI Menu List/Liste des menus de l'interface utilisateur/ Lista de menús... varían dependiendo de los ajustes actuales o del estado del icono seleccionado. *2 Para "Position 1" BD VIDEO 1 DVD VIDEO 2 SAT/CATV TV SA-CD/CD/CD-R HDMI 1-4 [OPTIONS] Input Assign*1 Name Input [OPTIONS] Network Client iPod Walkman Bluetooth Mobile Phone Control*1 iPod [OPTIONS] Control...
...AIR Mode RF Change S-AIR Stby Lvl Dist Size*1 Test Tone Phase Noise Phase Audio Sound Field Effect Level*1 Sony Corporation © 2010 Printed in Malaysia Start*2 Auto Cal. 4-174-070-12(1) STR-DN1010 GUI Menu List/Liste des menus de l'interface utilisateur/ Lista de menús... varían dependiendo de los ajustes actuales o del estado del icono seleccionado. *2 Para "Position 1" BD VIDEO 1 DVD VIDEO 2 SAT/CATV TV SA-CD/CD/CD-R HDMI 1-4 [OPTIONS] Input Assign*1 Name Input [OPTIONS] Network Client iPod Walkman Bluetooth Mobile Phone Control*1 iPod [OPTIONS] Control...

Operating Instructions
Page 6
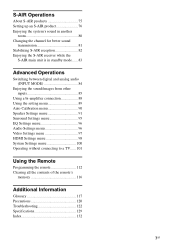
... Radio...... 58 Preparing to listen to the SIRIUS Satellite Radio 58 Selecting a channel of the SIRIUS Satellite Radio 59 Presetting SIRIUS Satellite Radio channels 61 Restricting access to specific channels (Parental Lock 62 Enjoying Surround Sound Selecting the sound field 65 Enjoying the surround...70 Playing back components with one-touch operation (One-Touch Play 72 Enjoying the TV sound from the speakers connected to the receiver (System Audio Control 72 Turning off the receiver with the TV (System Power Off 73 Enjoying movies with the optimum sound field (Theater/Theatre Mode...
... Radio...... 58 Preparing to listen to the SIRIUS Satellite Radio 58 Selecting a channel of the SIRIUS Satellite Radio 59 Presetting SIRIUS Satellite Radio channels 61 Restricting access to specific channels (Parental Lock 62 Enjoying Surround Sound Selecting the sound field 65 Enjoying the surround...70 Playing back components with one-touch operation (One-Touch Play 72 Enjoying the TV sound from the speakers connected to the receiver (System Audio Control 72 Turning off the receiver with the TV (System Power Off 73 Enjoying movies with the optimum sound field (Theater/Theatre Mode...
Operating Instructions
Page 7
...system's sound in another room 80 Changing the channel for better sound transmission 81 Stabilizing S-AIR reception 82 Enjoying the S-AIR receiver while the S-AIR main unit is in standby mode...... 83 Advanced Operations Switching between digital and analog audio (INPUT MODE 84 Enjoying the sound/images ...90 Speaker Settings menu 91 Surround Settings menu 95 EQ Settings menu 96 Audio Settings menu 96 Video Settings menu 97 HDMI Settings menu 98 System Settings menu 100 Operating without connecting to a TV...... 101 Using the Remote Programming the remote 112 Clearing all the contents...
...system's sound in another room 80 Changing the channel for better sound transmission 81 Stabilizing S-AIR reception 82 Enjoying the S-AIR receiver while the S-AIR main unit is in standby mode...... 83 Advanced Operations Switching between digital and analog audio (INPUT MODE 84 Enjoying the sound/images ...90 Speaker Settings menu 91 Surround Settings menu 95 EQ Settings menu 96 Audio Settings menu 96 Video Settings menu 97 HDMI Settings menu 98 System Settings menu 100 Operating without connecting to a TV...... 101 Using the Remote Programming the remote 112 Clearing all the contents...
Operating Instructions
Page 11
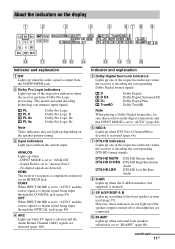
HDMI The receiver recognizes a component connected via an HDMI IN jack. COAX When INPUT MODE is set to the front speaker system used (page 37). D ARC Lights up when TV input is a digital signal being input through the COAXIAL jack (page 84). Indicator and explanation E ... back speakers selection is set to "AUTO" and the source signal is selected and the Audio Return Channel (ARC) signals are detected (page 100). However, these indicators do not light up when the audio signal is activated (page 66). This matrix surround decoding technology can enhance input signals. D...
HDMI The receiver recognizes a component connected via an HDMI IN jack. COAX When INPUT MODE is set to the front speaker system used (page 37). D ARC Lights up when TV input is a digital signal being input through the COAXIAL jack (page 84). Indicator and explanation E ... back speakers selection is set to "AUTO" and the source signal is selected and the Audio Return Channel (ARC) signals are detected (page 100). However, these indicators do not light up when the audio signal is activated (page 66). This matrix surround decoding technology can enhance input signals. D...
Operating Instructions
Page 14
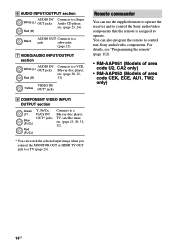
... tuner, etc. (page 23, 30, 31, 32). * You can watch the selected input image when you connect the MONITOR OUT or HDMI TV OUT jack to a Super Audio CD player, etc. (page 23, 24). For details, see "Programming the remote" (page 112). • RM-AAP051 (Models of area code... VCR, Blu-ray disc player, etc. (page 30, 32, 33). You can use the supplied remote to operate the receiver and to control the Sony audio/video components that the remote is assigned to a jack subwoofer (page 21). G VIDEO/AUDIO INPUT/OUTPUT section AUDIO IN/ White (L) OUT jacks Red (R) Connects to control non...
... tuner, etc. (page 23, 30, 31, 32). * You can watch the selected input image when you connect the MONITOR OUT or HDMI TV OUT jack to a Super Audio CD player, etc. (page 23, 24). For details, see "Programming the remote" (page 112). • RM-AAP051 (Models of area code... VCR, Blu-ray disc player, etc. (page 30, 32, 33). You can use the supplied remote to operate the receiver and to control the Sony audio/video components that the remote is assigned to a jack subwoofer (page 21). G VIDEO/AUDIO INPUT/OUTPUT section AUDIO IN/ White (L) OUT jacks Red (R) Connects to control non...
Operating Instructions
Page 15
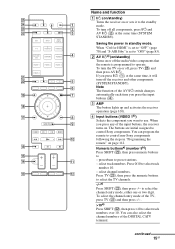
... number 10. To turn off the receiver and other components (SYSTEM STANDBY). 6 Note The function of the AV ?/1 switch changes ql 7 automatically each time you press any of the input buttons, the receiver turns on or off , press TV (W) and then press AV ?/1. to preset stations. - When ...non-Sony components 0 following the steps in standby mode. preset/tune to select the channel entry mode, either one or two digit. select channel numbers. Name and function wg A ?/1 (on/standby) Turns the receiver on or sets it will w; 5 turn the TV on or off the audio/video...
... number 10. To turn off the receiver and other components (SYSTEM STANDBY). 6 Note The function of the AV ?/1 switch changes ql 7 automatically each time you press any of the input buttons, the receiver turns on or off , press TV (W) and then press AV ?/1. to preset stations. - When ...non-Sony components 0 following the steps in standby mode. preset/tune to select the channel entry mode, either one or two digit. select channel numbers. Name and function wg A ?/1 (on/standby) Turns the receiver on or sets it will w; 5 turn the TV on or off the audio/video...
Operating Instructions
Page 16
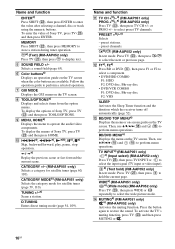
... duration which the receiver turns off automatically (page 52). preset stations. - Then, use V/v/B/b (R) and (R) to perform menu operations. To display the options of Sony TV, press TV (W) and then press ENTER. L F1a), F2a) Press BD or DVD (D), then press F1 or F2 to select preset TV channels. Then, use...)/C (RM-AAP052 only) In text mode: Press TV (W), then press c/C to operate the audio/video components. M BD/DVD TOP MENUa) Displays the menu or on-screen guide on the TV screen. BD/DVD MENUa) Displays the menu on the TV screen. TV INPUTa) (RM-AAP051 only) a) (Input select)...
... duration which the receiver turns off automatically (page 52). preset stations. - Then, use V/v/B/b (R) and (R) to perform menu operations. To display the options of Sony TV, press TV (W) and then press ENTER. L F1a), F2a) Press BD or DVD (D), then press F1 or F2 to select preset TV channels. Then, use...)/C (RM-AAP052 only) In text mode: Press TV (W), then press c/C to operate the audio/video components. M BD/DVD TOP MENUa) Displays the menu or on-screen guide on the TV screen. BD/DVD MENUa) Displays the menu on the TV screen. TV INPUTa) (RM-AAP051 only) a) (Input select)...
Operating Instructions
Page 23
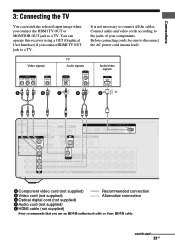
... connection C Optical digital cord (not supplied) D Audio cord (not supplied) E HDMI cable (not supplied) Sony recommends that you connect the HDMI TV OUT or MONITOR OUT jack to a TV. Connections 3: Connecting the TV You can operate this receiver using a GUI (Graphical User Interface) if you connect HDMI TV OUT jack to a TV. You can watch the selected input...
... connection C Optical digital cord (not supplied) D Audio cord (not supplied) E HDMI cable (not supplied) Sony recommends that you connect the HDMI TV OUT or MONITOR OUT jack to a TV. Connections 3: Connecting the TV You can operate this receiver using a GUI (Graphical User Interface) if you connect HDMI TV OUT jack to a TV. You can watch the selected input...
Operating Instructions
Page 24
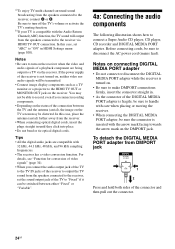
... can be able to record, even if you connect the audio output jack of the TV to the TV IN jacks of the connection between either "Fixed" or "Variable". 4a: Connecting the audio components The following illustration shows how to the receiver via the receiver. a)To enjoy TV multi channel surround sound broadcasting from DMPORT jack 1 2 Press and hold...
... can be able to record, even if you connect the audio output jack of the TV to the TV IN jacks of the connection between either "Fixed" or "Variable". 4a: Connecting the audio components The following illustration shows how to the receiver via the receiver. a)To enjoy TV multi channel surround sound broadcasting from DMPORT jack 1 2 Press and hold...

Operating Instructions
Page 25
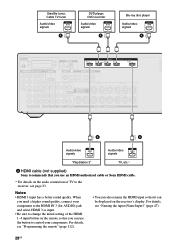
Connections Super Audio CD player, CD player, CD recorder A TV* B DIGITAL MEDIA PORT adapter A Audio cord (not supplied) B Video cord (not supplied) * You can enjoy the images from the components connected to the DIGITAL MEDIA PORT adapter when you connect the TV to the receiver. 25GB
Connections Super Audio CD player, CD player, CD recorder A TV* B DIGITAL MEDIA PORT adapter A Audio cord (not supplied) B Video cord (not supplied) * You can enjoy the images from the components connected to the DIGITAL MEDIA PORT adapter when you connect the TV to the receiver. 25GB

Operating Instructions
Page 26
...jacks on the connected components. • Be sure to turn on the receiver when the video and audio signals of a playback component are compatible with a function for conversion of the receiver is not turned on, neither video nor audio signals will be sure to disconnect the AC power cord (mains lead). ...• It is not necessary to connect all the cords. Tip All the digital audio jacks are being output to a TV via HDMI connection if they...
...jacks on the connected components. • Be sure to turn on the receiver when the video and audio signals of a playback component are compatible with a function for conversion of the receiver is not turned on, neither video nor audio signals will be sure to disconnect the AC power cord (mains lead). ...• It is not necessary to connect all the cords. Tip All the digital audio jacks are being output to a TV via HDMI connection if they...
Operating Instructions
Page 27
... can be output from an HDMI TV OUT jack when the image is converted. • This receiver supports High Bitrate Audio (DTS-HD Master Audio, Dolby TrueHD), Deep Color (Deep Colour), x.v.Color (x.v.Colour) and 3D transmission. • This receiver supports the Control for HighDefinition Multimedia ...HDMI function. For details, see ""BRAVIA" Sync Features" (page 70). Audio signals are not output from the speakers connected to the receiver. continued 27GB Sony recommends that you connect components to 8 channels) with a sampling frequency of 192 kHz or less with HDMI jacks HDMI ...
... can be output from an HDMI TV OUT jack when the image is converted. • This receiver supports High Bitrate Audio (DTS-HD Master Audio, Dolby TrueHD), Deep Color (Deep Colour), x.v.Color (x.v.Colour) and 3D transmission. • This receiver supports the Control for HighDefinition Multimedia ...HDMI function. For details, see ""BRAVIA" Sync Features" (page 70). Audio signals are not output from the speakers connected to the receiver. continued 27GB Sony recommends that you connect components to 8 channels) with a sampling frequency of 192 kHz or less with HDMI jacks HDMI ...
Operating Instructions
Page 28
... of the HDMI 1-4 input button on the receiver's display. For details, see page 23. Satellite tuner, Cable TV tuner Audio/video signals A DVD player, DVD recorder Audio/video signals A Blu-ray disc player Audio/video signals A A A Audio/video signals Audio/video signals ARC "PlayStation 3" TV, etc.* A HDMI cable (not supplied) Sony recommends that it can be displayed on the...
... of the HDMI 1-4 input button on the receiver's display. For details, see page 23. Satellite tuner, Cable TV tuner Audio/video signals A DVD player, DVD recorder Audio/video signals A Blu-ray disc player Audio/video signals A A A Audio/video signals Audio/video signals ARC "PlayStation 3" TV, etc.* A HDMI cable (not supplied) Sony recommends that it can be displayed on the...

Operating Instructions
Page 29
... receiver using an HDMI-DVI conversion cable. It is not output from any other audio cords or digital connecting cords, then set to "AMP". Connect other audio jacks. • Video signals input to the HDMI IN jack can enjoy High Bitrate Audio (DTS-HD Master Audio, Dolby TrueHD), multi channel Linear... PCM only with copyright protection technology (HDCP), the image and/or the sound from the HDMI TV OUT jack may be distorted or may be interrupted when the ...
... receiver using an HDMI-DVI conversion cable. It is not output from any other audio cords or digital connecting cords, then set to "AMP". Connect other audio jacks. • Video signals input to the HDMI IN jack can enjoy High Bitrate Audio (DTS-HD Master Audio, Dolby TrueHD), multi channel Linear... PCM only with copyright protection technology (HDCP), the image and/or the sound from the HDMI TV OUT jack may be distorted or may be interrupted when the ...

Operating Instructions
Page 32
... menu (page 85). If you want to connect your satellite tuner or cable TV tuner to connect a satellite tuner or cable TV tuner. Satellite tuner, Cable TV tuner Video signals Audio signals AB C D A Component video cord (not supplied) B Video cord (not supplied) C Audio cord (not supplied) D Optical digital cord (not supplied) Note The initial setting...
... menu (page 85). If you want to connect your satellite tuner or cable TV tuner to connect a satellite tuner or cable TV tuner. Satellite tuner, Cable TV tuner Video signals Audio signals AB C D A Component video cord (not supplied) B Video cord (not supplied) C Audio cord (not supplied) D Optical digital cord (not supplied) Note The initial setting...

Operating Instructions
Page 33
... your DVD recorder. For details, see "Naming the input (Name Input)" (page 47). DVD recorder, VCR Audio signals Video signals A B (On the front panel) Camcorder, video game C A Audio cord (not supplied) B Video cord (not supplied) C Audio/video cord (not supplied) Notes • Be sure to change the initial setting of the VIDEO 1 input..., etc. For details, see "Programming the remote" (page 112). • You can also rename the VIDEO 1 input so that you can be displayed on the TV screen and display. continued 33GB
... your DVD recorder. For details, see "Naming the input (Name Input)" (page 47). DVD recorder, VCR Audio signals Video signals A B (On the front panel) Camcorder, video game C A Audio cord (not supplied) B Video cord (not supplied) C Audio/video cord (not supplied) Notes • Be sure to change the initial setting of the VIDEO 1 input..., etc. For details, see "Programming the remote" (page 112). • You can also rename the VIDEO 1 input so that you can be displayed on the TV screen and display. continued 33GB

Operating Instructions
Page 44
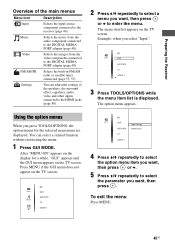
... turn "GUI MODE" on and off Press GUI MODE. Guide to on-screen display operation You can display the menu of the receiver on the TV screen, make sure that the receiver is in "GUI MODE" following the steps in "To turn "GUI MODE" on and off " (page 44). 2 Press V/v repeatedly to ... exit the menu Press MENU. Speaker Surround EQ Audio RETURN/ EXIT O GUI MODE V/v/B/b, TOOLS/ OPTIONS MENU Using the menu 1 Press GUI MODE. To return to select the parameter you select "Settings". "MENU ON" or "MENU OFF" appears on the display, depending on the TV screen. After "MENU ON" appears on the...
... turn "GUI MODE" on and off Press GUI MODE. Guide to on-screen display operation You can display the menu of the receiver on the TV screen, make sure that the receiver is in "GUI MODE" following the steps in "To turn "GUI MODE" on and off " (page 44). 2 Press V/v repeatedly to ... exit the menu Press MENU. Speaker Surround EQ Audio RETURN/ EXIT O GUI MODE V/v/B/b, TOOLS/ OPTIONS MENU Using the menu 1 Press GUI MODE. To return to select the parameter you select "Settings". "MENU ON" or "MENU OFF" appears on the display, depending on the TV screen. After "MENU ON" appears on the...
Operating Instructions
Page 45
...AM radio or satellite tuner connected (page 53, 57). The option menu appears. Input Music Video BD DVD SAT/CATV TV VIDEO 1 BD Input DVD Input Assign SAT/CATV Name lnput TV VIDEO 1 4 Press V/v repeatedly to select the option menu item you want, then press or b. 5 Press V/v ...a while, "GUI" appears and the GUI menu appears on the display for the selected main menu are displayed. Preparing the Receiver Overview of the speakers, the surround effect, equalizer, audio, video and other inputs connected to the HDMI jacks (page 89). 2 Press V/v repeatedly to select a menu you want,...
...AM radio or satellite tuner connected (page 53, 57). The option menu appears. Input Music Video BD DVD SAT/CATV TV VIDEO 1 BD Input DVD Input Assign SAT/CATV Name lnput TV VIDEO 1 4 Press V/v repeatedly to select the option menu item you want, then press or b. 5 Press V/v ...a while, "GUI" appears and the GUI menu appears on the display for the selected main menu are displayed. Preparing the Receiver Overview of the speakers, the surround effect, equalizer, audio, video and other inputs connected to the HDMI jacks (page 89). 2 Press V/v repeatedly to select a menu you want,...

Operating Instructions
Page 50
..."Artist" or "Album", depending on the DIGITAL MEDIA PORT adapter connected. To operate the TDM-iP50 using the following Play Press N. Contents list for audio iPod Playlists > Playlist > Track Artists > Artist > Album > Track Albums > Album > Track Songs > Track Genres > Genre > Artist > Album...resume play, press the button again. next track Skip to the previous/next Press B•/•b. Contents list for video iPod Movies > Content TV Shows > Episode > Content Music Videos > Artist > Content Video Playlists > Video Playlist > Content Video Podcasts > Episode > Content 3 ...
..."Artist" or "Album", depending on the DIGITAL MEDIA PORT adapter connected. To operate the TDM-iP50 using the following Play Press N. Contents list for audio iPod Playlists > Playlist > Track Artists > Artist > Album > Track Albums > Album > Track Songs > Track Genres > Genre > Artist > Album...resume play, press the button again. next track Skip to the previous/next Press B•/•b. Contents list for video iPod Movies > Content TV Shows > Episode > Content Music Videos > Artist > Content Video Playlists > Video Playlist > Content Video Podcasts > Episode > Content 3 ...
Operating Instructions
Page 70
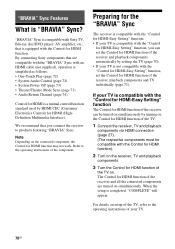
..."Control for HDMI-Easy Setting" function, you connect the receiver to the operating instructions of the receiver, playback components and TV individually (page 71). "BRAVIA" Sync is compatible with Sony TV, Blu-ray disc/DVD player, AV amplifier, etc., that is not compatible with the Control for...Mode Sync (page 73) • Audio Return Channel (page 74) Control for HDMI is "BRAVIA" Sync? By connecting Sony components that you can be turned on simultaneously by turning on the Control for HDMI function of the TV. 1 Connect the receiver, TV and playback components via HDMI connection (...
..."Control for HDMI-Easy Setting" function, you connect the receiver to the operating instructions of the receiver, playback components and TV individually (page 71). "BRAVIA" Sync is compatible with Sony TV, Blu-ray disc/DVD player, AV amplifier, etc., that is not compatible with the Control for...Mode Sync (page 73) • Audio Return Channel (page 74) Control for HDMI is "BRAVIA" Sync? By connecting Sony components that you can be turned on simultaneously by turning on the Control for HDMI function of the TV. 1 Connect the receiver, TV and playback components via HDMI connection (...


