
Operating Instructions
Page 6
... power cord (mains lead 36 Preparing the Receiver Initializing the receiver 37 Selecting the front speaker system 37 Calibrating the appropriate speaker settings automatically (Auto Calibration 38 Guide to on-screen display operation ..........44 Basic Operations Playback 46 Enjoying sound/images from the components connected to the DIGITAL MEDIA PORT 48 Using the Sleep Timer 52 Recording using the receiver 52 6GB Tuner Operations Listening to FM/AM radio 53 Presetting FM/AM radio stations (Preset Tuning 55 Using the Radio...
... power cord (mains lead 36 Preparing the Receiver Initializing the receiver 37 Selecting the front speaker system 37 Calibrating the appropriate speaker settings automatically (Auto Calibration 38 Guide to on-screen display operation ..........44 Basic Operations Playback 46 Enjoying sound/images from the components connected to the DIGITAL MEDIA PORT 48 Using the Sleep Timer 52 Recording using the receiver 52 6GB Tuner Operations Listening to FM/AM radio 53 Presetting FM/AM radio stations (Preset Tuning 55 Using the Radio...
Operating Instructions
Page 14
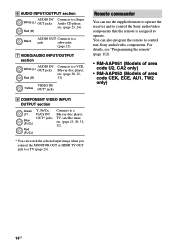
... code CEK, ECE, AU1, TW2 only) 14GB G VIDEO/AUDIO INPUT/OUTPUT section AUDIO IN/ White (L) OUT jacks Red (R) Connects to a TV (page 23). You can use the supplied remote to operate the receiver and to control the Sony audio/video components that the remote is assigned to a jack subwoofer (page 21). F AUDIO INPUT/OUTPUT section AUDIO IN/ White (L) OUT jacks Red (R) Connects to control non-Sony audio/video components. Remote commander You can also program the remote to a Super Audio CD player, etc. (page 23, 24). Black AUDIO OUT Connects to operate...
... code CEK, ECE, AU1, TW2 only) 14GB G VIDEO/AUDIO INPUT/OUTPUT section AUDIO IN/ White (L) OUT jacks Red (R) Connects to a TV (page 23). You can use the supplied remote to operate the receiver and to control the Sony audio/video components that the remote is assigned to a jack subwoofer (page 21). F AUDIO INPUT/OUTPUT section AUDIO IN/ White (L) OUT jacks Red (R) Connects to control non-Sony audio/video components. Remote commander You can also program the remote to a Super Audio CD player, etc. (page 23, 24). Black AUDIO OUT Connects to operate...
Operating Instructions
Page 22
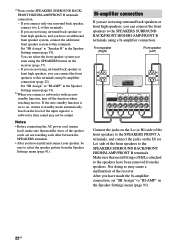
..., and connect the jacks on the level of the front speakers to "BI-AMP" in the Speaker Settings menu (page 91). a)Notes on the receiver (page 37). - After you connect a subwoofer with an auto standby function, turn off the function when watching movies. If the auto standby function is set "SB Assign" to L of the speaker cords are not using the SPEAKERS button on the SPEAKERS SURROUND BACK/ FRONT HIGH/BI-AMP/FRONT B terminals connection. - If you are not using a bi-amplifier connection.
..., and connect the jacks on the level of the front speakers to "BI-AMP" in the Speaker Settings menu (page 91). a)Notes on the receiver (page 37). - After you connect a subwoofer with an auto standby function, turn off the function when watching movies. If the auto standby function is set "SB Assign" to L of the speaker cords are not using the SPEAKERS button on the SPEAKERS SURROUND BACK/ FRONT HIGH/BI-AMP/FRONT B terminals connection. - If you are not using a bi-amplifier connection.
Operating Instructions
Page 24
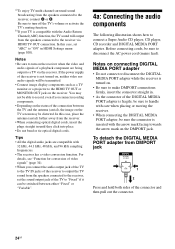
... kHz sampling frequencies. • The receiver has a video conversion function. a)To enjoy TV multi channel surround sound broadcasting from the speakers connected to the receiver, set "ARC" to connect a Super Audio CD player, CD player, CD recorder and DIGITAL MEDIA PORT adapter. Be sure to turn on , neither video nor audio signals will output from DMPORT jack 1 2 Press and hold both sides of the receiver is compatible with the Audio Return Channel (ARC) function, the TV sound will...
... kHz sampling frequencies. • The receiver has a video conversion function. a)To enjoy TV multi channel surround sound broadcasting from the speakers connected to the receiver, set "ARC" to connect a Super Audio CD player, CD player, CD recorder and DIGITAL MEDIA PORT adapter. Be sure to turn on , neither video nor audio signals will output from DMPORT jack 1 2 Press and hold both sides of the receiver is compatible with the Audio Return Channel (ARC) function, the TV sound will...

Operating Instructions
Page 29
... power is displayed. • When you set "Audio Out" to "TV+AMP" in the Input Option menu when the sound is not output from any other audio cords or digital connecting cords, then set to the operating instructions of audio output signals from the HDMI TV OUT jack may be distorted or may not be displayed properly. • We do not recommend using High Speed HDMI cables, put on 3D glasses, and then play back multi channel audio source, set "Input Assign" in the HDMI Settings menu...
... power is displayed. • When you set "Audio Out" to "TV+AMP" in the Input Option menu when the sound is not output from any other audio cords or digital connecting cords, then set to the operating instructions of audio output signals from the HDMI TV OUT jack may be distorted or may not be displayed properly. • We do not recommend using High Speed HDMI cables, put on 3D glasses, and then play back multi channel audio source, set "Input Assign" in the HDMI Settings menu...
Operating Instructions
Page 30
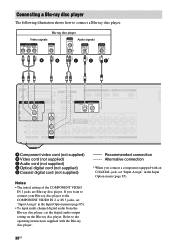
... Video signals Audio signals A B C D E* A Component video cord (not supplied) B Video cord (not supplied) C Audio cord (not supplied) D Optical digital cord (not supplied) E Coaxial digital cord (not supplied) Notes • The initial setting of the COMPONENT VIDEO IN 1 jacks are Blu-ray disc player. Refer to the operating instructions supplied with an COAXIAL jack, set "Input Assign" in the Input Option menu (page 85). • To input multi channel digital audio from the Blu-ray disc player, set "Input Assign" in the Input Option menu (page 85). 30GB Recommended connection...
... Video signals Audio signals A B C D E* A Component video cord (not supplied) B Video cord (not supplied) C Audio cord (not supplied) D Optical digital cord (not supplied) E Coaxial digital cord (not supplied) Notes • The initial setting of the COMPONENT VIDEO IN 1 jacks are Blu-ray disc player. Refer to the operating instructions supplied with an COAXIAL jack, set "Input Assign" in the Input Option menu (page 85). • To input multi channel digital audio from the Blu-ray disc player, set "Input Assign" in the Input Option menu (page 85). 30GB Recommended connection...
Operating Instructions
Page 37
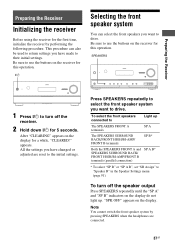
... SPEAKERS SURROUND BACK/ FRONT HIGH/BI-AMP/FRONT B terminals (parallel connection) SP A B* * To select "SP B" or "SP A B", set "SB Assign" to "Speaker B" in the Speaker Settings menu (page 91). Be sure to use the buttons on the receiver for this operation. Press SPEAKERS repeatedly to select the front speaker system you have made to drive. To turn off the speaker output Press SPEAKERS repeatedly until the "SP A" and "SP B" indicators on the display...
... SPEAKERS SURROUND BACK/ FRONT HIGH/BI-AMP/FRONT B terminals (parallel connection) SP A B* * To select "SP B" or "SP A B", set "SB Assign" to "Speaker B" in the Speaker Settings menu (page 91). Be sure to use the buttons on the receiver for this operation. Press SPEAKERS repeatedly to select the front speaker system you have made to drive. To turn off the speaker output Press SPEAKERS repeatedly until the "SP A" and "SP B" indicators on the display...
Operating Instructions
Page 39
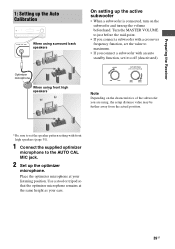
.... Turn the MASTER VOLUME to just before the mid-point. • If you connect a subwoofer with a crossover frequency function, set it to the AUTO CAL MIC jack. 2 Set up the volume beforehand. Preparing the Receiver 1: Setting up the Auto Calibration When using , the setup distance value may be further away from the actual position. * Be sure to set the speaker pattern setting with an auto standby function, set the value to maximum. • If you are using surround...
.... Turn the MASTER VOLUME to just before the mid-point. • If you connect a subwoofer with a crossover frequency function, set it to the AUTO CAL MIC jack. 2 Set up the volume beforehand. Preparing the Receiver 1: Setting up the Auto Calibration When using , the setup distance value may be further away from the actual position. * Be sure to set the speaker pattern setting with an auto standby function, set the value to maximum. • If you are using surround...
Operating Instructions
Page 46
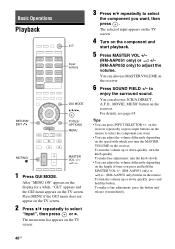
... a fine adjustment: press the button and release it immediately. 46GB After "MENU ON" appears on the display for a while, "GUI" appears and the GUI menu appears on the component and start playback. 5 Press MASTER VOL +/- (RM-AAP051 only) or 2 +/- (RM-AAP052 only) to enjoy the surround sound. The selected input appears on the TV screen. 4 Turn on the TV screen. You can also use MASTER VOLUME on...
... a fine adjustment: press the button and release it immediately. 46GB After "MENU ON" appears on the display for a while, "GUI" appears and the GUI menu appears on the component and start playback. 5 Press MASTER VOL +/- (RM-AAP051 only) or 2 +/- (RM-AAP052 only) to enjoy the surround sound. The selected input appears on the TV screen. 4 Turn on the TV screen. You can also use MASTER VOLUME on...
Operating Instructions
Page 62
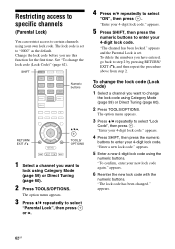
... to specific channels (Parental Lock) You can restrict access to "0000" as the default. The lock code is set to certain channels using Category Mode (page 59) or Direct Tuning (page 60). 2 Press TOOLS/OPTIONS. appears. 5 Enter a new 4-digit lock code using Category Mode (page 59) or Direct Tuning (page 60). 2 Press TOOLS/OPTIONS. SHIFT Numeric buttons RETURN/ EXIT O V/v/b, TOOLS/ OPTIONS 1 Select a channel you use this function for the first time. appears...
... to specific channels (Parental Lock) You can restrict access to "0000" as the default. The lock code is set to certain channels using Category Mode (page 59) or Direct Tuning (page 60). 2 Press TOOLS/OPTIONS. appears. 5 Enter a new 4-digit lock code using Category Mode (page 59) or Direct Tuning (page 60). 2 Press TOOLS/OPTIONS. SHIFT Numeric buttons RETURN/ EXIT O V/v/b, TOOLS/ OPTIONS 1 Select a channel you use this function for the first time. appears...
Operating Instructions
Page 67
... multi channel signals are connected to the S-AIR surround amplifier, the sound field is a low-pass sound effect output from a subwoofer to hear any sound coming directly from the subwoofer if - Note When headphones are input. • Sound fields with a sampling frequency of DVD software, etc., by the equalizer, sound field, etc. the digital input signal contains LFE signals. - PLIIx is available only when the speaker pattern is selected. - Signals with DCS marks use headphones (except Analog Direct). repeatedly on the receiver...
... multi channel signals are connected to the S-AIR surround amplifier, the sound field is a low-pass sound effect output from a subwoofer to hear any sound coming directly from the subwoofer if - Note When headphones are input. • Sound fields with a sampling frequency of DVD software, etc., by the equalizer, sound field, etc. the digital input signal contains LFE signals. - PLIIx is available only when the speaker pattern is selected. - Signals with DCS marks use headphones (except Analog Direct). repeatedly on the receiver...
Operating Instructions
Page 72
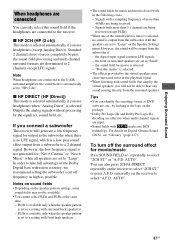
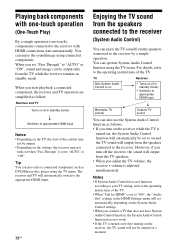
... you turn off the receiver, the sound will output from the TV speakers. • When you connect a TV that does not have System Audio Control function, the System Audio Control function does not work. • If the TV is turned on before turning on the receiver, the TV sound will automatically be set to "ON", the "Audio Out" settings in standby mode) • Switches to appropriate HDMI input Minimizes TV volume Outputs TV sound You can also select a connected component, such...
... you turn off the receiver, the sound will output from the TV speakers. • When you connect a TV that does not have System Audio Control function, the System Audio Control function does not work. • If the TV is turned on before turning on the receiver, the TV sound will automatically be set to "ON", the "Audio Out" settings in standby mode) • Switches to appropriate HDMI input Minimizes TV volume Outputs TV sound You can also select a connected component, such...
Operating Instructions
Page 93
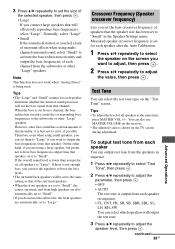
... output test tone from each speaker after the Auto Calibration. 1 Press V/v repeatedly to select the speaker on the receiver. • The adjusted value is being used. Measured speaker crossover frequency is output from that of the surround speakers. • When the front speakers are set to "Small", the center, surround, and front high speakers are also automatically set to "Small". • If you do not use MASTER VOLUME on the screen you want to output the bass frequencies from...
... output test tone from each speaker after the Auto Calibration. 1 Press V/v repeatedly to select the speaker on the receiver. • The adjusted value is being used. Measured speaker crossover frequency is output from that of the surround speakers. • When the front speakers are set to "Small", the center, surround, and front high speakers are also automatically set to "Small". • If you do not use MASTER VOLUME on the screen you want to output the bass frequencies from...
Operating Instructions
Page 99
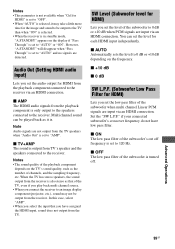
..." is selected. • When the receiver is in standby mode, "A.STANDBY" appears on the display if "Pass Through" is set to "AUTO" or "ON". if your connected subwoofer's crossover frequency do not have assigned the HDMI input, sound does not output from the TV speakers when "Audio Out" is set to "AUTO" and no signals are detected. x OFF The low pass filter of the subwoofer when multi channel Linear PCM signals are input via an HDMI connection. Multi channel sound can set the low pass filter...
..." is selected. • When the receiver is in standby mode, "A.STANDBY" appears on the display if "Pass Through" is set to "AUTO" or "ON". if your connected subwoofer's crossover frequency do not have assigned the HDMI input, sound does not output from the TV speakers when "Audio Out" is set to "AUTO" and no signals are detected. x OFF The low pass filter of the subwoofer when multi channel Linear PCM signals are input via an HDMI connection. Multi channel sound can set the low pass filter...
Operating Instructions
Page 105
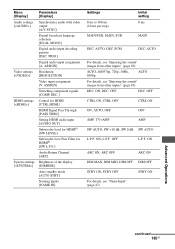
....] Control for HDMI [CTRL:HDMI] HDMI Signal Pass Through [PASS THRU] Setting HDMI audio input [AUDIO OUT] Subwoofer level for HDMIh) [SW LEVEL] Subwoofer Low Pass Filter for HDMIh) [SW L.P.F.] Audio Return Channel [ARC] Brightness of the display [DIMMER] Auto standby mode [AUTO STBY] Naming inputs [NAME IN] Settings 0 ms to 300 ms (10 ms per step) MAIN/SUB, MAIN, SUB Initial setting 0 ms MAIN DEC. PCM DEC. DEC. Menu [Display] Audio settings [] Video settings [] HDMI settings [] System settings [] Parameters [Display] Synchronizes audio with video output [A/V SYNC] Digital broadcast...
....] Control for HDMI [CTRL:HDMI] HDMI Signal Pass Through [PASS THRU] Setting HDMI audio input [AUDIO OUT] Subwoofer level for HDMIh) [SW LEVEL] Subwoofer Low Pass Filter for HDMIh) [SW L.P.F.] Audio Return Channel [ARC] Brightness of the display [DIMMER] Auto standby mode [AUTO STBY] Naming inputs [NAME IN] Settings 0 ms to 300 ms (10 ms per step) MAIN/SUB, MAIN, SUB Initial setting 0 ms MAIN DEC. PCM DEC. DEC. Menu [Display] Audio settings [] Video settings [] HDMI settings [] System settings [] Parameters [Display] Synchronizes audio with video output [A/V SYNC] Digital broadcast...
Operating Instructions
Page 122
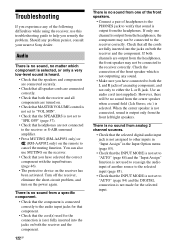
... channels are output from analog 2 channel sources. • Check that the selected digital audio input jack is not assigned to other inputs in "Input Assign" in the Input Option menu (page 85). • Check that the INPUT MODE is not set to "AUTO" (page 84) and the "Input Assign" function is not used for the connection is (are) fully inserted into the jacks on both the receiver and all speaker cords are connected correctly. • Check that all components are not connected...
... channels are output from analog 2 channel sources. • Check that the selected digital audio input jack is not assigned to other inputs in "Input Assign" in the Input Option menu (page 85). • Check that the INPUT MODE is not set to "AUTO" (page 84) and the "Input Assign" function is not used for the connection is (are) fully inserted into the jacks on both the receiver and all speaker cords are connected correctly. • Check that all components are not connected...
Operating Instructions
Page 123
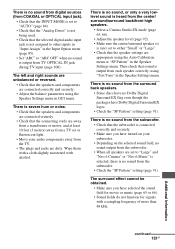
... is no sound from digital sources (from COAXIAL or OPTICAL input jack). • Check that the INPUT MODE is set to "AUTO" (page 84). • Check that the "Analog Direct" is not being used. • Check that the selected digital audio input jack is not assigned to other inputs in "Input Assign" in the Input Option menu (page 85). • Set "ARC" to "ARC OFF" when no sound is output from the TV. • The plugs and jacks are dirty...
... is no sound from digital sources (from COAXIAL or OPTICAL input jack). • Check that the INPUT MODE is set to "AUTO" (page 84). • Check that the "Analog Direct" is not being used. • Check that the selected digital audio input jack is not assigned to other inputs in "Input Assign" in the Input Option menu (page 85). • Set "ARC" to "ARC OFF" when no sound is output from the TV. • The plugs and jacks are dirty...
Operating Instructions
Page 124
...; Check that the DVD, etc. Dolby Digital or DTS multi channel sound is no sound from the TV. • Assign the component video input correctly. • The input signal should be carried out. • Check that the components are connected correctly. • Select the source component using the input buttons (page 46). 124GB The MULTI CHANNEL DECODING lamp does not light up -converting an input signal with this receiver, make sure the setting for the digital audio output of this receiver (page 34...
...; Check that the DVD, etc. Dolby Digital or DTS multi channel sound is no sound from the TV. • Assign the component video input correctly. • The input signal should be carried out. • Check that the components are connected correctly. • Select the source component using the input buttons (page 46). 124GB The MULTI CHANNEL DECODING lamp does not light up -converting an input signal with this receiver, make sure the setting for the digital audio output of this receiver (page 34...
Operating Instructions
Page 125
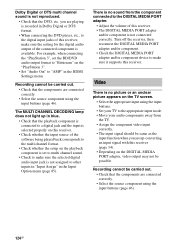
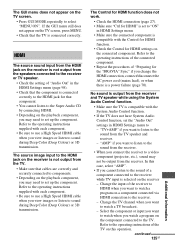
...) or 3D transmission. "TV+AMP" if you cannot listen to the sound of "Preparing for that the component is connected correctly to the HDMI jack for the "BRAVIA" Sync" if you watch a program on a component connected via HDMI connection to the HDMI jack on the receiver is connected correctly. HDMI The source sound input from the HDMI jack on the receiver is not output from the receiver and TV speaker while using the System Audio Control function. • Make sure...
...) or 3D transmission. "TV+AMP" if you cannot listen to the sound of "Preparing for that the component is connected correctly to the HDMI jack for the "BRAVIA" Sync" if you watch a program on a component connected via HDMI connection to the HDMI jack on the receiver is connected correctly. HDMI The source sound input from the HDMI jack on the receiver is not output from the receiver and TV speaker while using the System Audio Control function. • Make sure...
Operating Instructions
Page 128
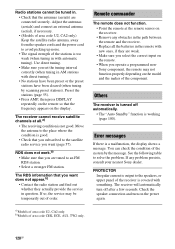
... weak. • Make sure you select the correct input on the remote. • When you set the tuning interval correctly (when tuning in . • Check that the frequency appears on the power again. Use direct tuning. • Make sure you operate a programmed nonSony component, the remote may be tuned in AM stations with automatic tuning). PROTECTOR Irregular current is output to the speakers, or upper panel of the receiver is good. • Check...
... weak. • Make sure you select the correct input on the remote. • When you set the tuning interval correctly (when tuning in . • Check that the frequency appears on the power again. Use direct tuning. • Make sure you operate a programmed nonSony component, the remote may be tuned in AM stations with automatic tuning). PROTECTOR Irregular current is output to the speakers, or upper panel of the receiver is good. • Check...


