Operating Instructions
Page 7
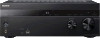
... Direct function ....46 Resetting sound fields to the default settings 46 "BRAVIA" Sync Features What is "BRAVIA" Sync? ..........47 Preparing for the "BRAVIA" Sync 47 One-Touch Play 48 System Audio Control 49 System Power-Off 49 Scene Select 50 Home Theatre Control 50 Remote Easy Control 50 Other Operations Switching between digital and analog audio (INPUT MODE 51 Using other audio input jacks (Audio Input Assign 51 Reverting back to the factory default settings 52 Adjusting Settings Using the Settings menu 53 Easy Setup 55 Speaker Settings menu 55 Audio Settings menu 58 HDMI...
... Direct function ....46 Resetting sound fields to the default settings 46 "BRAVIA" Sync Features What is "BRAVIA" Sync? ..........47 Preparing for the "BRAVIA" Sync 47 One-Touch Play 48 System Audio Control 49 System Power-Off 49 Scene Select 50 Home Theatre Control 50 Remote Easy Control 50 Other Operations Switching between digital and analog audio (INPUT MODE 51 Using other audio input jacks (Audio Input Assign 51 Reverting back to the factory default settings 52 Adjusting Settings Using the Settings menu 53 Easy Setup 55 Speaker Settings menu 55 Audio Settings menu 58 HDMI...
Operating Instructions
Page 14
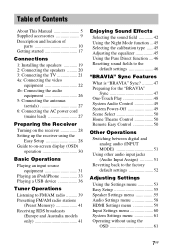
... Menu, or the DVD's menu. REPEAT1) Plays a track or a folder repeatedly. SHUFFLE1) Plays a track or a folder in standby mode When "Control for HDMI" (page 59) and "Pass Through" (page 60) are assigned to operate Sony audio/video equipment. E +/- TUNING +/-1) Scans a station. Saving the power in random order. Selects a folder. Remote control Use the supplied remote control to "Off". H OPTIONS1) Displays and selects items from the options menu. J ./>1), m/M1), N1), X1), x1) Skip, backward/forward, play, pause, stop operation. PRESET +/-1) Selects preset...
... Menu, or the DVD's menu. REPEAT1) Plays a track or a folder repeatedly. SHUFFLE1) Plays a track or a folder in standby mode When "Control for HDMI" (page 59) and "Pass Through" (page 60) are assigned to operate Sony audio/video equipment. E +/- TUNING +/-1) Scans a station. Saving the power in random order. Selects a folder. Remote control Use the supplied remote control to "Off". H OPTIONS1) Displays and selects items from the options menu. J ./>1), m/M1), N1), X1), x1) Skip, backward/forward, play, pause, stop operation. PRESET +/-1) Selects preset...
Operating Instructions
Page 15
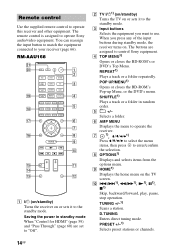
... connected to select each equipment. 2) The 5 and SOUND FIELD + buttons have tactile dots. When "Fast View" is displayed on the TV screen. MEM Stores a station during tuner operation. select track numbers. Turns on the display panel. N +/- Each time you press SLEEP again, the Sleep Timer will be canceled. Adjusts the volume level of HDMI inputs connected to "Off". - P RETURN O1) Returns to the previous menu while the menu or on-screen guide is set to this receiver. Use...
... connected to select each equipment. 2) The 5 and SOUND FIELD + buttons have tactile dots. When "Fast View" is displayed on the TV screen. MEM Stores a station during tuner operation. select track numbers. Turns on the display panel. N +/- Each time you press SLEEP again, the Sleep Timer will be canceled. Adjusts the volume level of HDMI inputs connected to "Off". - P RETURN O1) Returns to the previous menu while the menu or on-screen guide is set to this receiver. Use...
Operating Instructions
Page 22
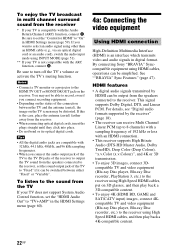
... HDMI Settings menu (page 59). HDMI features • A digital audio signals transmitted by the receiver" (page 18). • The receiver can be distorted. To enjoy the TV broadcast in multi channel surround sound from the receiver * If your TV is not compatible with the ARC function, connect A. You may be simplified. If you want to select an audio signal using other than an HDMI cable (e.g., via an optical digital cord or an audio cord), switch the audio input mode using High Speed HDMI cables...
... HDMI Settings menu (page 59). HDMI features • A digital audio signals transmitted by the receiver" (page 18). • The receiver can be distorted. To enjoy the TV broadcast in multi channel surround sound from the receiver * If your TV is not compatible with the ARC function, connect A. You may be simplified. If you want to select an audio signal using other than an HDMI cable (e.g., via an optical digital cord or an audio cord), switch the audio input mode using High Speed HDMI cables...
Operating Instructions
Page 29
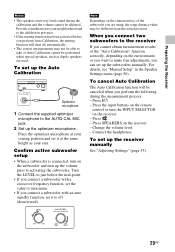
... you connect a subwoofer with a crossover frequency function, set it at your ears. Connect the headphones. Provide consideration to your neighborhood and to the children in the Speaker Settings menu (page 56). To cancel Auto Calibration The Auto Calibration function will shut off automatically. • The correct measurements may be adjusted. Press . - Press the input buttons on the remote control or turn the INPUT SELECTOR on the characteristics of the "Auto Calibration" function correctly...
... you connect a subwoofer with a crossover frequency function, set it at your ears. Connect the headphones. Provide consideration to your neighborhood and to the children in the Speaker Settings menu (page 56). To cancel Auto Calibration The Auto Calibration function will shut off automatically. • The correct measurements may be adjusted. Press . - Press the input buttons on the remote control or turn the INPUT SELECTOR on the characteristics of the "Auto Calibration" function correctly...
Operating Instructions
Page 43
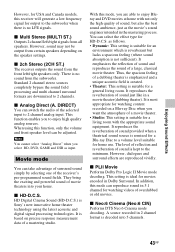
x Multi Stereo (MULTI ST.) Outputs 2 channel left /right speakers only. Standard 2 channel stereo sources completely bypass the sound field processing and multi channel surround formats are downmixed to a volume level suitable for home use. They bring the exciting and powerful sound of movie theaters into 5 channels. 43GB Thus, the spacious feeling of the receiver's pre-programmed sound fields. However, dialogues and surround effects are able to 2 channel analog input. In addition, this mode, you to enjoy high quality analog sources. There is suitable...
x Multi Stereo (MULTI ST.) Outputs 2 channel left /right speakers only. Standard 2 channel stereo sources completely bypass the sound field processing and multi channel surround formats are downmixed to a volume level suitable for home use. They bring the exciting and powerful sound of movie theaters into 5 channels. 43GB Thus, the spacious feeling of the receiver's pre-programmed sound fields. However, dialogues and surround effects are able to 2 channel analog input. In addition, this mode, you to enjoy high quality analog sources. There is suitable...
Operating Instructions
Page 44
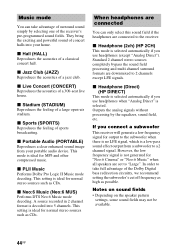
... "Analog Direct"). However, the low frequency signal is a low-pass sound effect output from your home. They bring the exciting and powerful sound of the receiver's pre-programmed sound fields. x Hall (HALL) Reproduces the acoustics of a large open-air stadium. This mode is ideal for output to the subwoofer when there is no LFE signal, which is not generated for "Neo:6 Cinema" or "Neo:6 Music" when all speakers are downmixed to 2 channels except LFE signals. Standard 2 channel stereo sources...
... "Analog Direct"). However, the low frequency signal is a low-pass sound effect output from your home. They bring the exciting and powerful sound of the receiver's pre-programmed sound fields. x Hall (HALL) Reproduces the acoustics of a large open-air stadium. This mode is ideal for output to the subwoofer when there is no LFE signal, which is not generated for "Neo:6 Cinema" or "Neo:6 Music" when all speakers are downmixed to 2 channels except LFE signals. Standard 2 channel stereo sources...

Operating Instructions
Page 48
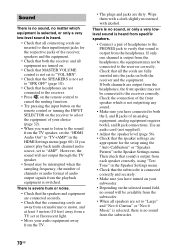
... the "Control for HDMI-Easy Setting" function" (page 48). • Before you perform the "Control for HDMIEasy Setting" on your TV is set the receiver to standby mode, sound and image can be sure to turn on the TV screen. 3 Select "HDMI Settings", then press . 4 Select "Control for HDMI-Easy Setting" from the TV. * For USA, Canada and Australia models only. If your TV, be output only from the TV. The Settings menu list...
... the "Control for HDMI-Easy Setting" function" (page 48). • Before you perform the "Control for HDMIEasy Setting" on your TV is set the receiver to standby mode, sound and image can be sure to turn on the TV screen. 3 Select "HDMI Settings", then press . 4 Select "Control for HDMI-Easy Setting" from the TV. * For USA, Canada and Australia models only. If your TV, be output only from the TV. The Settings menu list...
Operating Instructions
Page 49
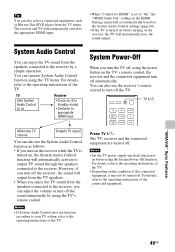
... can operate System Audio Control function using the TV menu. The receiver and TV will automatically switch to the appropriate HDMI input. • When "Control for HDMI" is set to "On", the "HDMI Audio Out" settings in standby mode) • Switches to the receiver by using the TV's remote control. System Audio Control You can enjoy the TV sound from the TV menu. Tip You can also select a connected equipment, such as follows. • If you can adjust the volume or turn...
... can operate System Audio Control function using the TV menu. The receiver and TV will automatically switch to the appropriate HDMI input. • When "Control for HDMI" is set to "On", the "HDMI Audio Out" settings in standby mode) • Switches to the receiver by using the TV's remote control. System Audio Control You can enjoy the TV sound from the TV menu. Tip You can also select a connected equipment, such as follows. • If you can adjust the volume or turn...
Operating Instructions
Page 56
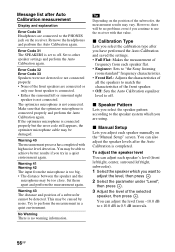
... PHONES jack on the receiver. You can also adjust the speaker levels after Auto Calibration measurement Display and explanation Error Code 30 Headphones are connected to use the receiver with high noise level detection. Remove the headphones and perform the Auto Calibration again. You may be no warning information. Set them apart and perform the measurement again. Tip Depending on the "Manual Setup" screen. x Calibration Type Lets you select...
... PHONES jack on the receiver. You can also adjust the speaker levels after Auto Calibration measurement Display and explanation Error Code 30 Headphones are connected to use the receiver with high noise level detection. Remove the headphones and perform the Auto Calibration again. You may be no warning information. Set them apart and perform the measurement again. Tip Depending on the "Manual Setup" screen. x Calibration Type Lets you select...

Operating Instructions
Page 59
Dolby Digital Plus, Dolby TrueHD, DTS 96/24, DTS-HD Master Audio, or DTS-HD High Resolution Audio signals are being received. This may be output. HDMI Settings menu You can adjust the volume automatically depending on /off . x Control for HDMI Lets you want when you set to "On". x Auto Volume This receiver can adjust the required settings for equipment connected to the HDMI jack. This function is useful, for HDMI" is available only when Dolby Digital, DTS or Linear PCM signals are input, the sound may be output. •...
Dolby Digital Plus, Dolby TrueHD, DTS 96/24, DTS-HD Master Audio, or DTS-HD High Resolution Audio signals are being received. This may be output. HDMI Settings menu You can adjust the volume automatically depending on /off . x Control for HDMI Lets you want when you set to "On". x Auto Volume This receiver can adjust the required settings for equipment connected to the HDMI jack. This function is useful, for HDMI" is available only when Dolby Digital, DTS or Linear PCM signals are input, the sound may be output. •...

Operating Instructions
Page 60
... set the operation of channels, and the sampling frequency, etc. In this setting if you use a "BRAVIA" Sync compatible Sony TV. x Input Mode Lets you fix the audio input mode when you connect equipment to enjoy the connected equipment's source on the TV. x HDMI Audio Out Lets you set to "On". • Off: The receiver does not output HDMI signals when in standby mode. Multi channel sound can select HDMI input faster than when "On" is selected, it is also in stereo as the number...
... set the operation of channels, and the sampling frequency, etc. In this setting if you use a "BRAVIA" Sync compatible Sony TV. x Input Mode Lets you fix the audio input mode when you connect equipment to enjoy the connected equipment's source on the TV. x HDMI Audio Out Lets you set to "On". • Off: The receiver does not output HDMI signals when in standby mode. Multi channel sound can select HDMI input faster than when "On" is selected, it is also in stereo as the number...
Operating Instructions
Page 67
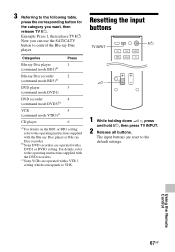
... TV INPUT. 2 Release all buttons. b) Sony DVD recorders are operated with the DVD recorders. For details, refer to the operating instructions supplied with a DVD1 or DVD3 setting. c) Sony VCRs are reset to the default settings. Using the Remote Control 67GB The input buttons are operated with the Blu-ray Disc player or Blu-ray Disc recorder. Categories Press Blu-ray Disc player 1 (command mode BD1)a) Blu-ray Disc recorder 2 (command mode BD3)a) DVD player 3 (command mode DVD1) DVD recorder 4 (command mode DVD3...
... TV INPUT. 2 Release all buttons. b) Sony DVD recorders are operated with the DVD recorders. For details, refer to the operating instructions supplied with a DVD1 or DVD3 setting. c) Sony VCRs are reset to the default settings. Using the Remote Control 67GB The input buttons are operated with the Blu-ray Disc player or Blu-ray Disc recorder. Categories Press Blu-ray Disc player 1 (command mode BD1)a) Blu-ray Disc recorder 2 (command mode BD3)a) DVD player 3 (command mode DVD1) DVD recorder 4 (command mode DVD3...
Operating Instructions
Page 69
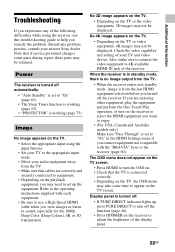
... video equipment to adjust the brightness of the receiver. The OSD menu does not appear on the TV screen. • Press HOME to turn on the receiver to 4K available HDMI IN jack of the display panel. 69GB Refer to the operating instructions supplied with each equipment. • Be sure to use this troubleshooting guide to turn off the receiver. Note that the TV is set up , press PURE DIRECT to help...
... video equipment to adjust the brightness of the receiver. The OSD menu does not appear on the TV screen. • Press HOME to turn on the receiver to 4K available HDMI IN jack of the display panel. 69GB Refer to the operating instructions supplied with each equipment. • Be sure to use this troubleshooting guide to turn off the receiver. Note that the TV is set up , press PURE DIRECT to help...
Operating Instructions
Page 70
... sampling frequency, the number of channels or audio format of the front speaker which equipment is selected, or only a very low-level sound is heard. • Check that all connecting cords are inserted to their input/output jacks for the setup using "Test Tone" in the Speaker Settings menu. • Check that the subwoofer is connected correctly and securely. • Make sure you have connected to "TV+AMP" in the Speaker Settings menu. If you cannot play back multi channel audio source, set the "HDMI Audio...
... sampling frequency, the number of channels or audio format of the front speaker which equipment is selected, or only a very low-level sound is heard. • Check that all connecting cords are inserted to their input/output jacks for the setup using "Test Tone" in the Speaker Settings menu. • Check that the subwoofer is connected correctly and securely. • Make sure you have connected to "TV+AMP" in the Speaker Settings menu. If you cannot play back multi channel audio source, set the "HDMI Audio...
Operating Instructions
Page 71
... connected correctly to the audio input jacks for that equipment. • Check that the cord(s) used for the connection is (are) fully inserted into the jacks on both the receiver and the equipment. • Check the INPUT MODE (page 51). • Check that the equipment is connected correctly to the HDMI jack for that the "Analog Direct" is not being used. • When using TV's remote control. 71GB Check the setup...
... connected correctly to the audio input jacks for that equipment. • Check that the cord(s) used for the connection is (are) fully inserted into the jacks on both the receiver and the equipment. • Check the INPUT MODE (page 51). • Check that the equipment is connected correctly to the HDMI jack for that the "Analog Direct" is not being used. • When using TV's remote control. 71GB Check the setup...
Operating Instructions
Page 72
A test tone is not output from the last HDMI equipment selection before you turned off the receiver. Check to "On" in the HDMI Settings menu (page 60). • You can enjoy High Bitrate Audio (DTS-HD Master Audio, Dolby TrueHD), Multi Channel Linear PCM only with the "BRAVIA" Sync to the digital input jacks of this receiver, make sure the digital audio output setting of more than the speaker displayed on them slightly. • The speaker cords may have selected the sound field for...
A test tone is not output from the last HDMI equipment selection before you turned off the receiver. Check to "On" in the HDMI Settings menu (page 60). • You can enjoy High Bitrate Audio (DTS-HD Master Audio, Dolby TrueHD), Multi Channel Linear PCM only with the "BRAVIA" Sync to the digital input jacks of this receiver, make sure the digital audio output setting of more than the speaker displayed on them slightly. • The speaker cords may have selected the sound field for...
Operating Instructions
Page 73
... not change. • Adjust the ring volume using the controls on the iPhone. Preset the stations (page 41). • Press AMP, then press DISPLAY repeatedly on the remote control so that you are connected securely. The iPod/iPhone cannot be operated. • Check that the frequency appears on the contents of the iPod/ iPhone, it may take time to "Off" or "Flat". The sound is no sound from the iPod...
... not change. • Adjust the ring volume using the controls on the iPhone. Preset the stations (page 41). • Press AMP, then press DISPLAY repeatedly on the remote control so that you are connected securely. The iPod/iPhone cannot be operated. • Check that the frequency appears on the contents of the iPod/ iPhone, it may take time to "Off" or "Flat". The sound is no sound from the iPod...
Operating Instructions
Page 75
... nearest Sony dealer. AV receiver (audio system): up to the HDMI IN jack. • The types and the number of equipment which can check the condition of them for HDMI settings on the display panel. If any obstacles in the path between the remote control and the receiver. • Replace all the batteries in the remote control with the Control for HDMI function. • Check the Control for its OSD operations.) -
... nearest Sony dealer. AV receiver (audio system): up to the HDMI IN jack. • The types and the number of equipment which can check the condition of them for HDMI settings on the display panel. If any obstacles in the path between the remote control and the receiver. • Replace all the batteries in the remote control with the Control for HDMI function. • Check the Control for its OSD operations.) -
Operating Instructions
Page 79
... Play 48 OSD (On-Screen Display) 30 P Pass Through 60, 65 PlayStation 3 24 Preset stations 41 PROTECTOR 75 Pure Direct 46 R Remote control 14 Remote Easy Control 50 Resetting 52 S Satellite tuner 24, 25 Scene Select 50 Settings menu 53 Sleep Timer 15 Sound field 42 Speaker Pattern 56, 63 Speaker Settings 55, 63 Super Audio CD player 26 Surround Settings 64 System Audio Control 49 System Power-Off 49 System Settings 61, 65 T Test Tone 58, 63 Treble 45, 64 Tuner...
... Play 48 OSD (On-Screen Display) 30 P Pass Through 60, 65 PlayStation 3 24 Preset stations 41 PROTECTOR 75 Pure Direct 46 R Remote control 14 Remote Easy Control 50 Resetting 52 S Satellite tuner 24, 25 Scene Select 50 Settings menu 53 Sleep Timer 15 Sound field 42 Speaker Pattern 56, 63 Speaker Settings 55, 63 Super Audio CD player 26 Surround Settings 64 System Audio Control 49 System Power-Off 49 System Settings 61, 65 T Test Tone 58, 63 Treble 45, 64 Tuner...


