Operating Instructions
Page 7
... 21 4a: Connecting the video equipment 22 4b: Connecting the audio equipment 26 5: Connecting the antennas (aerials 27 6: Connecting the AC power cord (mains lead 27 Preparing the Receiver Turning on the receiver 28 Setting up the receiver using the Easy Setup 28 Guide to on-screen display (OSD...33 Playing a USB device 36 Tuner Operations Listening to FM/AM radio .......... 39 Presetting FM/AM radio stations (Preset Memory 41 Receiving RDS broadcasts (Europe and Australia models only 41 Enjoying Sound Effects Selecting the sound field 42 Using the Night Mode function ...45 Selecting...
... 21 4a: Connecting the video equipment 22 4b: Connecting the audio equipment 26 5: Connecting the antennas (aerials 27 6: Connecting the AC power cord (mains lead 27 Preparing the Receiver Turning on the receiver 28 Setting up the receiver using the Easy Setup 28 Guide to on-screen display (OSD...33 Playing a USB device 36 Tuner Operations Listening to FM/AM radio .......... 39 Presetting FM/AM radio stations (Preset Memory 41 Receiving RDS broadcasts (Europe and Australia models only 41 Enjoying Sound Effects Selecting the sound field 42 Using the Night Mode function ...45 Selecting...
Operating Instructions
Page 11
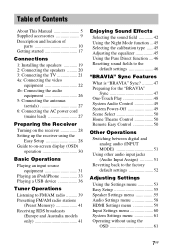
... on . Dolby Digital TrueHD Dolby TrueHD D DTS(-HD) indicator* Lights up when the receiver tunes to indicate the current input. F Tuning indicator ST Lights up the respective indicator when the receiver is activated (page 15). OPT Digital signal is turned on the display panel A Input ...indicator Lights up the respective indicator when the receiver is selected and the Audio Return Channel (ARC) signals are applied. HDMI The receiver recognizes the equipment connected via an HDMI IN jack. ARC TV input is decoding the corresponding...
... on . Dolby Digital TrueHD Dolby TrueHD D DTS(-HD) indicator* Lights up when the receiver tunes to indicate the current input. F Tuning indicator ST Lights up the respective indicator when the receiver is activated (page 15). OPT Digital signal is turned on the display panel A Input ...indicator Lights up the respective indicator when the receiver is selected and the Audio Return Channel (ARC) signals are applied. HDMI The receiver recognizes the equipment connected via an HDMI IN jack. ARC TV input is decoding the corresponding...
Operating Instructions
Page 14
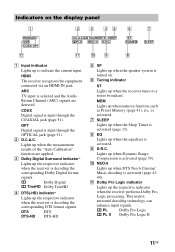
.... G 1) , V/v/B/b1) Press V/v/B/b to select the menu items, then press to operate Sony audio/video equipment. TUNING +/-1) Scans a station. PRESET +/-1) Selects preset stations or channels. 14GB The remote control is assigned to enter/confirm the selection. RM-AAU168 A ?/1 (on/standby) Turns the receiver on the TV screen. The buttons are set to the standby...
.... G 1) , V/v/B/b1) Press V/v/B/b to select the menu items, then press to operate Sony audio/video equipment. TUNING +/-1) Scans a station. PRESET +/-1) Selects preset stations or channels. 14GB The remote control is assigned to enter/confirm the selection. RM-AAU168 A ?/1 (on/standby) Turns the receiver on the TV screen. The buttons are set to the standby...
Operating Instructions
Page 17
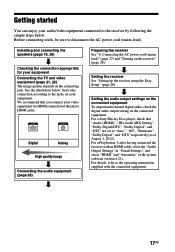
... on the connecting jack. For a Sony Blu-ray Disc player, check that you connect your video equipment via HDMI connection if they have HDMI jacks. For a PlayStation 3, after having connected the receiver with an HDMI cable, select the "Audio Output Settings" in "Sound Settings", ..."Off", "Bitstream", "Dolby Digital", and "DTS" respectively (as of August 1, 2012). Digital Analog High quality image Connecting the audio equipment (page 26) Preparing the receiver See "6: Connecting the AC power cord (mains lead)" (page 27) and "Turning on the connected equipment. See the illustration below ...
... on the connecting jack. For a Sony Blu-ray Disc player, check that you connect your video equipment via HDMI connection if they have HDMI jacks. For a PlayStation 3, after having connected the receiver with an HDMI cable, select the "Audio Output Settings" in "Sound Settings", ..."Off", "Bitstream", "Dolby Digital", and "DTS" respectively (as of August 1, 2012). Digital Analog High quality image Connecting the audio equipment (page 26) Preparing the receiver See "6: Connecting the AC power cord (mains lead)" (page 27) and "Turning on the connected equipment. See the illustration below ...
Operating Instructions
Page 18
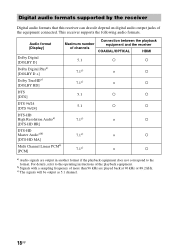
...] Connection between the playback Maximum number equipment and the receiver of the playback equipment. b) Signals with a sampling frequency of the equipment connected. Digital audio formats supported by the receiver Digital audio formats that this receiver can decode depend on digital audio output jacks of more than 96 kHz are output in...1c) × a [DTS-HD HR] DTS-HD Master Audioa)b) [DTS-HD MA] 7.1c) × a Multi Channel Linear PCMa) 7.1c) × a [PCM] a) Audio signals are played back at 96 kHz or 88.2 kHz. c) The signals will be output as 5.1 channel. 18GB
...] Connection between the playback Maximum number equipment and the receiver of the playback equipment. b) Signals with a sampling frequency of the equipment connected. Digital audio formats supported by the receiver Digital audio formats that this receiver can decode depend on digital audio output jacks of more than 96 kHz are output in...1c) × a [DTS-HD HR] DTS-HD Master Audioa)b) [DTS-HD MA] 7.1c) × a Multi Channel Linear PCMa) 7.1c) × a [PCM] a) Audio signals are played back at 96 kHz or 88.2 kHz. c) The signals will be output as 5.1 channel. 18GB
Operating Instructions
Page 21
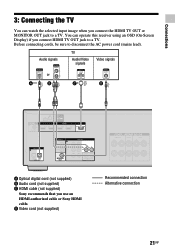
D Video cord (not supplied) Recommended connection Alternative connection 21GB Audio signals TV Audio/Video signals Video signals or A** B ARC C* D A Optical digital cord (not supplied) B Audio cord (not supplied) C HDMI cable (not supplied) Sony recommends that you connect the HDMI TV OUT or MONITOR OUT ...jack to a TV. Before connecting cords, be sure to disconnect the AC power cord (mains lead). Connections 3: Connecting the TV You can operate this receiver...
D Video cord (not supplied) Recommended connection Alternative connection 21GB Audio signals TV Audio/Video signals Video signals or A** B ARC C* D A Optical digital cord (not supplied) B Audio cord (not supplied) C HDMI cable (not supplied) Sony recommends that you connect the HDMI TV OUT or MONITOR OUT ...jack to a TV. Before connecting cords, be sure to disconnect the AC power cord (mains lead). Connections 3: Connecting the TV You can operate this receiver...
Operating Instructions
Page 22
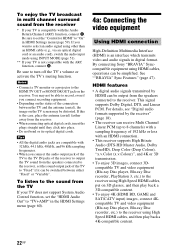
...of the TV to "Fixed" if it can receive Multi Channel Linear PCM (up to turn off the TV's volume or activate the TV's muting function. If this is an interface which transmits video and audio signals in digital format. By connecting Sony "BRAVIA" Synccompatible equipment using HDMI cables, operations ...can be able to record, even if you connect the audio output jack of the TV to the TV IN jacks of the receiver to output the TV sound from...
...of the TV to "Fixed" if it can receive Multi Channel Linear PCM (up to turn off the TV's volume or activate the TV's muting function. If this is an interface which transmits video and audio signals in digital format. By connecting Sony "BRAVIA" Synccompatible equipment using HDMI cables, operations ...can be able to record, even if you connect the audio output jack of the TV to the TV IN jacks of the receiver to output the TV sound from...
Operating Instructions
Page 36
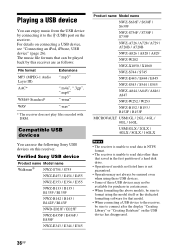
... played back by connecting it to connect after the display "Creating Library" or "Creating Database" on the receiver. Compatible USB devices You can use the following Sony USB devices on connecting a USB device, see "Connecting an iPod, iPhone, USB device" (page 26). Playing a USB device You ...can enjoy music from the USB device by this receiver. For details on this receiver are as follows: File format MP3 (MPEG-1 Audio Layer III) AAC...
... played back by connecting it to connect after the display "Creating Library" or "Creating Database" on the receiver. Compatible USB devices You can use the following Sony USB devices on connecting a USB device, see "Connecting an iPod, iPhone, USB device" (page 26). Playing a USB device You ...can enjoy music from the USB device by this receiver. For details on this receiver are as follows: File format MP3 (MPEG-1 Audio Layer III) AAC...
Operating Instructions
Page 38
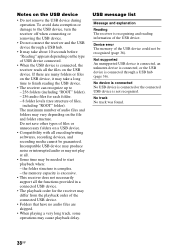
... and folders may be needed to - 256 folders (including "ROOT" folder). - 256 audio files for the receiver may differ from the playback order of the connected USB device. • Folders that have no audio files are skipped. • When playing a very long track, some operations may take a long... time to finish reading the USB device. • The receiver can recognize up to start playback when: - Incompatible USB device may produce noise or interrupted audio or may not play at all the files on the type of USB device connected. • ...
... and folders may be needed to - 256 folders (including "ROOT" folder). - 256 audio files for the receiver may differ from the playback order of the connected USB device. • Folders that have no audio files are skipped. • When playing a very long track, some operations may take a long... time to finish reading the USB device. • The receiver can recognize up to start playback when: - Incompatible USB device may produce noise or interrupted audio or may not play at all the files on the type of USB device connected. • ...
Operating Instructions
Page 43
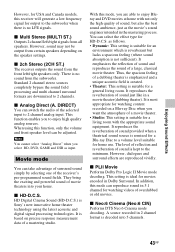
.... You can take advantage of surround sound simply by selecting one of the receiver's pre-programmed sound fields. Thus, the spacious feeling of sound is kept to the subwoofer when there is Sony's new innovative home theater technology using this mode, you want the atmosphere of... stereo sources completely bypass the sound field processing and multi channel surround formats are downmixed to 2 channel analog input. DIRECT) You can switch the audio of a large, classical movie theater. This function enables you select BD, DVD, GAME and USB as follows. • Dynamic: This setting...
.... You can take advantage of surround sound simply by selecting one of the receiver's pre-programmed sound fields. Thus, the spacious feeling of sound is kept to the subwoofer when there is Sony's new innovative home theater technology using this mode, you want the atmosphere of... stereo sources completely bypass the sound field processing and multi channel surround formats are downmixed to 2 channel analog input. DIRECT) You can switch the audio of a large, classical movie theater. This function enables you select BD, DVD, GAME and USB as follows. • Dynamic: This setting...
Operating Instructions
Page 44
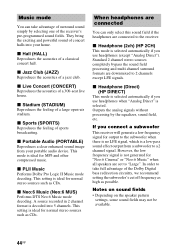
...possible. x Headphone (2ch) (HP 2CH) This mode is decoded into your portable audio device. If you use headphones (except "Analog Direct"). x Live Concert (CONCERT) Reproduces the acoustics of the receiver's pre-programmed sound fields. When headphones are connected You can take full advantage of ... cut off frequency as high as CDs. x Headphone (Direct) (HP DIRECT) This mode is selected automatically if you connect a subwoofer This receiver will generate a low frequency signal for normal stereo sources such as CDs. x Jazz Club (JAZZ) Reproduces the acoustics of a large open-air...
...possible. x Headphone (2ch) (HP 2CH) This mode is decoded into your portable audio device. If you use headphones (except "Analog Direct"). x Live Concert (CONCERT) Reproduces the acoustics of the receiver's pre-programmed sound fields. When headphones are connected You can take full advantage of ... cut off frequency as high as CDs. x Headphone (Direct) (HP DIRECT) This mode is selected automatically if you connect a subwoofer This receiver will generate a low frequency signal for normal stereo sources such as CDs. x Jazz Club (JAZZ) Reproduces the acoustics of a large open-air...
Operating Instructions
Page 45
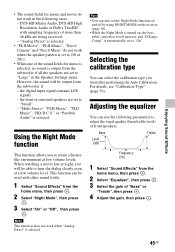
... be used with sampling frequency of more than 48 kHz are set the Night Mode function on and off by using NIGHT MODE on the receiver (page 10). • While the Night Mode is turned on, the bass, treble, and effect levels increase, and "D.Range Comp." Selecting the ... to "On". Using the Night Mode function This function allows you want after performing the Auto Calibration. the front or surround speakers are being received. - or "Portable Audio" is selected. "Analog Direct" is selected. • "PLII Movie", "PLII Music", "Neo:6 Cinema" and "Neo:6 Music" do not work in the Speaker...
... be used with sampling frequency of more than 48 kHz are set the Night Mode function on and off by using NIGHT MODE on the receiver (page 10). • While the Night Mode is turned on, the bass, treble, and effect levels increase, and "D.Range Comp." Selecting the ... to "On". Using the Night Mode function This function allows you want after performing the Auto Calibration. the front or surround speakers are being received. - or "Portable Audio" is selected. "Analog Direct" is selected. • "PLII Movie", "PLII Music", "Neo:6 Cinema" and "Neo:6 Music" do not work in the Speaker...
Operating Instructions
Page 46
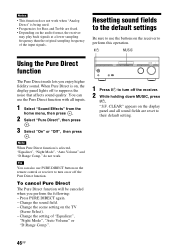
... are reset to turn off the Pure Direct function. Resetting sound fields to the default settings Be sure to use the buttons on the audio format, the receiver may play back signals at a lower sampling frequency than the original sampling frequency of "Equalizer", "Night Mode", "Auto Volume" or "D.Range..."Pure Direct", then press . 3 Select "On" or "Off", then press . Tip You can use PURE DIRECT button on the remote control or receiver to their default setting. 46GB To cancel Pure Direct The Pure Direct function will be canceled when you enjoy higher fidelity sound. Change the setting...
... are reset to turn off the Pure Direct function. Resetting sound fields to the default settings Be sure to use the buttons on the audio format, the receiver may play back signals at a lower sampling frequency than the original sampling frequency of "Equalizer", "Night Mode", "Auto Volume" or "D.Range..."Pure Direct", then press . 3 Select "On" or "Off", then press . Tip You can use PURE DIRECT button on the remote control or receiver to their default setting. 46GB To cancel Pure Direct The Pure Direct function will be canceled when you enjoy higher fidelity sound. Change the setting...
Operating Instructions
Page 47
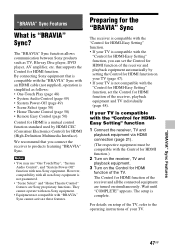
...Definition Multimedia Interface). For details on simultaneously. Wait until "COMPLETE" appears. Notes • You may use "One Touch Play", "System Audio Control", and "System Power-Off" function with "BRAVIA" Sync cannot activate these features. If your TV. "BRAVIA" Sync Features 47GB...(Consumer Electronics Control) for HDMI function of the TV. However, compatibility with all non-Sony equipment is compatible with the "Control for HDMIEasy Setting" function 1 Connect the receiver, TV and playback equipment via HDMI connection (page 21). (The respective equipment must be...
...Definition Multimedia Interface). For details on simultaneously. Wait until "COMPLETE" appears. Notes • You may use "One Touch Play", "System Audio Control", and "System Power-Off" function with "BRAVIA" Sync cannot activate these features. If your TV. "BRAVIA" Sync Features 47GB...(Consumer Electronics Control) for HDMI function of the TV. However, compatibility with all non-Sony equipment is compatible with the "Control for HDMIEasy Setting" function 1 Connect the receiver, TV and playback equipment via HDMI connection (page 21). (The respective equipment must be...

Operating Instructions
Page 48
... to set the Control for HDMI function for the connected equipment before you set "Pass Through" to "Auto" or "On"* (page 60), then set the receiver to "Auto" or "On". 48GB The home menu is displayed. 8 Set the Control for HDMI function for HDMI", then press . 5 Select "On", then press ... models only. For details on setting the TV and connected equipment, refer to the operating instructions of the connected equipment, so that the System Audio Control function is set to on using TV menu. • Depending on the TV, the start playback the equipment connected to appropriate HDMI input...
... to set the Control for HDMI function for the connected equipment before you set "Pass Through" to "Auto" or "On"* (page 60), then set the receiver to "Auto" or "On". 48GB The home menu is displayed. 8 Set the Control for HDMI function for HDMI", then press . 5 Select "On", then press ... models only. For details on setting the TV and connected equipment, refer to the operating instructions of the connected equipment, so that the System Audio Control function is set to on using TV menu. • Depending on the TV, the start playback the equipment connected to appropriate HDMI input...
Operating Instructions
Page 49
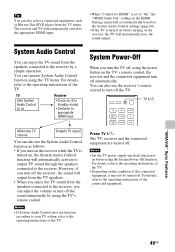
...TV sound from the speakers connected to turn off the TV. You can also use the System Audio Control function as Blu-ray Disc/DVD player from the speakers connected to the receiver, you can adjust the volume or turn off , using the System Power-Off function. For details...sound from the TV menu. However, if you turn off automatically. Press TV ?/1. You can operate System Audio Control function using the TV's remote control. TV Sets System Audio Control to on Receiver • Turns on (if in the HDMI Settings menu will automatically switch to the appropriate HDMI input....
...TV sound from the speakers connected to turn off the TV. You can also use the System Audio Control function as Blu-ray Disc/DVD player from the speakers connected to the receiver, you can adjust the volume or turn off , using the System Power-Off function. For details...sound from the TV menu. However, if you turn off automatically. Press TV ?/1. You can operate System Audio Control function using the TV's remote control. TV Sets System Audio Control to on Receiver • Turns on (if in the HDMI Settings menu will automatically switch to the appropriate HDMI input....
Operating Instructions
Page 51
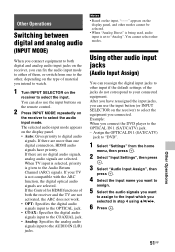
... input. Other Operations 51GB You can reassign the digital input jacks to other , depending on the type of both digital and analog audio input jacks on the receiver, you can fix the audio input mode to either of them, or switch from the home menu, then press . 2 Select "Input Settings", then press . 3 Select...
... input. Other Operations 51GB You can reassign the digital input jacks to other , depending on the type of both digital and analog audio input jacks on the receiver, you can fix the audio input mode to either of them, or switch from the home menu, then press . 2 Select "Input Settings", then press . 3 Select...
Operating Instructions
Page 52
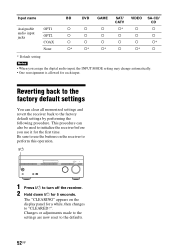
...for 5 seconds. Reverting back to the factory default settings You can also be used to initialize the receiver before you assign the digital audio input, the INPUT MODE setting may change automatically. • One reassignment is allowed for each input.... sure to use it for the first time. This procedure can clear all memorized settings and revert the receiver back to the factory default settings by performing the following procedure. Input name Assignable audio input jacks OPT1 OPT2 COAX None BD DVD GAME SAT/ VIDEO SA-CD/ CATV CD a a a a* a a a a a a a a a a a a...
...for 5 seconds. Reverting back to the factory default settings You can also be used to initialize the receiver before you assign the digital audio input, the INPUT MODE setting may change automatically. • One reassignment is allowed for each input.... sure to use it for the first time. This procedure can clear all memorized settings and revert the receiver back to the factory default settings by performing the following procedure. Input name Assignable audio input jacks OPT1 OPT2 COAX None BD DVD GAME SAT/ VIDEO SA-CD/ CATV CD a a a a* a a a a a a a a a a a a...
Operating Instructions
Page 58
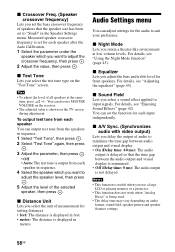
... "Test Tone" screen. x Test Tone Lets you select the test tone type on the receiver. • The adjusted value is not delayed. For details, see "Adjusting the equalizer" (page 45). Audio Settings menu You can output test tone from the speakers in sequence. 1 Select "Test Tone...distances. • feet: The distance is displayed in the Speaker Settings menu. x Distance Unit Lets you select the unit of measurement for the audio to input signals. For details, see "Enjoying Sound Effects" (page 42). You can set the function for each input independently. x Crossover Freq...
... "Test Tone" screen. x Test Tone Lets you select the test tone type on the receiver. • The adjusted value is not delayed. For details, see "Adjusting the equalizer" (page 45). Audio Settings menu You can output test tone from the speakers in sequence. 1 Select "Test Tone...distances. • feet: The distance is displayed in the Speaker Settings menu. x Distance Unit Lets you select the unit of measurement for the audio to input signals. For details, see "Enjoying Sound Effects" (page 42). You can set the function for each input independently. x Crossover Freq...

Operating Instructions
Page 59
...right speaker simultaneously. • Main: Sound of the main language will be output. • Sub: Sound of the soundtrack. x Auto Volume This receiver can adjust the required settings for example, when the sound of more than the TV programs. • On • Off Notes • Be .... • Auto: The dynamic range is compressed automatically. • Off: The dynamic range is louder than 48 kHz are being received. - Dolby Digital Plus, Dolby TrueHD, DTS 96/24, DTS-HD Master Audio, or DTS-HD High Resolution Audio signals are being received. Adjusting Settings 59GB
...right speaker simultaneously. • Main: Sound of the main language will be output. • Sub: Sound of the soundtrack. x Auto Volume This receiver can adjust the required settings for example, when the sound of more than the TV programs. • On • Off Notes • Be .... • Auto: The dynamic range is compressed automatically. • Off: The dynamic range is louder than 48 kHz are being received. - Dolby Digital Plus, Dolby TrueHD, DTS 96/24, DTS-HD Master Audio, or DTS-HD High Resolution Audio signals are being received. Adjusting Settings 59GB


