Operating Instructions
Page 1
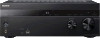
Multi Channel AV Receiver Operating Instructions 4-448-425-12(1) STR-DH540
Multi Channel AV Receiver Operating Instructions 4-448-425-12(1) STR-DH540
Operating Instructions
Page 3
...does not fit into your safety. Other versions may cause harmful interference to radio communications. Increase the separation between the equipment and receiver. - Connect the equipment into the apparatus, the apparatus has been exposed to rain or moisture, does not operate normally, or... against harmful interference in a residential installation. If this equipment does cause harmful interference to radio or television reception, which the receiver is damaged, liquid has been spilled or objects have fallen into an outlet on a circuit different from that interference will not...
...does not fit into your safety. Other versions may cause harmful interference to radio communications. Increase the separation between the equipment and receiver. - Connect the equipment into the apparatus, the apparatus has been exposed to rain or moisture, does not operate normally, or... against harmful interference in a residential installation. If this equipment does cause harmful interference to radio or television reception, which the receiver is damaged, liquid has been spilled or objects have fallen into an outlet on a circuit different from that interference will not...
Operating Instructions
Page 5
... Interface, and the HDMI Logo are registered trademarks of the front panel. Notice for model STR-DH540. This receiver incorporates High-Definition Multimedia Interface (HDMITM) technology. For any service or guarantee matters, please refer to the authorized representative, Sony Deutschland GmbH, Hedelfinger Strasse 61, 70327 Stuttgart, Germany. The model number is only applicable to...
... Interface, and the HDMI Logo are registered trademarks of the front panel. Notice for model STR-DH540. This receiver incorporates High-Definition Multimedia Interface (HDMITM) technology. For any service or guarantee matters, please refer to the authorized representative, Sony Deutschland GmbH, Hedelfinger Strasse 61, 70327 Stuttgart, Germany. The model number is only applicable to...
Operating Instructions
Page 7
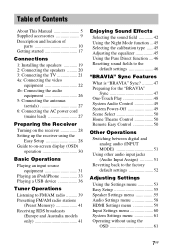
... equipment 26 5: Connecting the antennas (aerials 27 6: Connecting the AC power cord (mains lead 27 Preparing the Receiver Turning on the receiver 28 Setting up the receiver using the Easy Setup 28 Guide to on-screen display (OSD) operation 30 Basic Operations Playing an input source equipment... 33 Playing a USB device 36 Tuner Operations Listening to FM/AM radio .......... 39 Presetting FM/AM radio stations (Preset Memory 41 Receiving RDS broadcasts (Europe and Australia models only 41 Enjoying Sound Effects Selecting the sound field 42 Using the Night Mode function ...45 Selecting...
... equipment 26 5: Connecting the antennas (aerials 27 6: Connecting the AC power cord (mains lead 27 Preparing the Receiver Turning on the receiver 28 Setting up the receiver using the Easy Setup 28 Guide to on-screen display (OSD) operation 30 Basic Operations Playing an input source equipment... 33 Playing a USB device 36 Tuner Operations Listening to FM/AM radio .......... 39 Presetting FM/AM radio stations (Preset Memory 41 Receiving RDS broadcasts (Europe and Australia models only 41 Enjoying Sound Effects Selecting the sound field 42 Using the Night Mode function ...45 Selecting...
Operating Instructions
Page 9
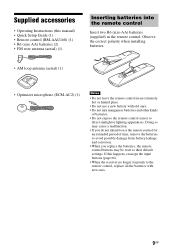
... intend to use a new battery with new ones. 9GB Supplied accessories • Operating Instructions (this happens, reassign the input buttons (page 66). • When the receiver no longer responds to direct sunlight or lighting apparatuses. If this manual) • Quick Setup Guide (1) • Remote control (RM-AAU168) (1) • R6 (size AA...
... intend to use a new battery with new ones. 9GB Supplied accessories • Operating Instructions (this happens, reassign the input buttons (page 66). • When the receiver no longer responds to direct sunlight or lighting apparatuses. If this manual) • Quick Setup Guide (1) • Remote control (RM-AAU168) (1) • R6 (size AA...
Operating Instructions
Page 10
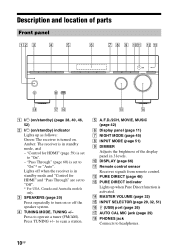
... to headphones. 10GB Description and location of the display panel in standby mode, and - D TUNING MODE, TUNING +/- J DISPLAY (page 66) K Remote control sensor Receives signals from remote control. N MASTER VOLUME (page 32) O INPUT SELECTOR (page 29, 32, 51) P (USB) port (page 26) Q AUTO CAL MIC jack...standby) indicator Lights up when Pure Direct function is activated. L PURE DIRECT (page 46) M PURE DIRECT indicator Lights up as follows: Green: The receiver is in 3 levels. "Control for HDMI" and "Pass Through" are set to "Off". * For USA, Canada and Australia models only. "...
... to headphones. 10GB Description and location of the display panel in standby mode, and - D TUNING MODE, TUNING +/- J DISPLAY (page 66) K Remote control sensor Receives signals from remote control. N MASTER VOLUME (page 32) O INPUT SELECTOR (page 29, 32, 51) P (USB) port (page 26) Q AUTO CAL MIC jack...standby) indicator Lights up when Pure Direct function is activated. L PURE DIRECT (page 46) M PURE DIRECT indicator Lights up as follows: Green: The receiver is in 3 levels. "Control for HDMI" and "Pass Through" are set to "Off". * For USA, Canada and Australia models only. "...
Operating Instructions
Page 11
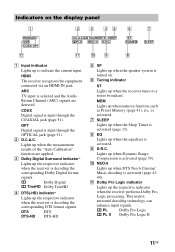
... panel A Input indicator Lights up the respective indicator when the receiver is activated (page 59). Lights up the respective indicator when the receiver performs Dolby Pro Logic processing. J NEO:6 Lights up the respective indicator when the receiver is activated (page 15). ARC TV input is activated (page...the corresponding DTS format signals. This matrix surround decoding technology can enhance input signals. G SLEEP Lights up when the receiver tunes to indicate the current input. I D.R.C. PL Dolby Pro Logic PL II Dolby Pro Logic II 11GB HDMI The...
... panel A Input indicator Lights up the respective indicator when the receiver is activated (page 59). Lights up the respective indicator when the receiver performs Dolby Pro Logic processing. J NEO:6 Lights up the respective indicator when the receiver is activated (page 15). ARC TV input is activated (page...the corresponding DTS format signals. This matrix surround decoding technology can enhance input signals. G SLEEP Lights up when the receiver tunes to indicate the current input. I D.R.C. PL Dolby Pro Logic PL II Dolby Pro Logic II 11GB HDMI The...
Operating Instructions
Page 14
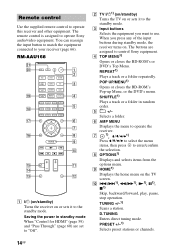
... connected to operate this receiver and other equipment. B TV ?/11) (on/standby) Turns the TV on the TV screen. PRESET +/-1) Selects preset stations or channels. 14GB Saving the power in random order. The buttons are set to control Sony equipment. SHUFFLE1) Plays ... Pop-up Menu, or the DVD's menu. G 1) , V/v/B/b1) Press V/v/B/b to select the menu items, then press to operate the receiver. When you want to operate Sony audio/video equipment. J ./>1), m/M1), N1), X1), x1) Skip, backward/forward, play, pause, stop operation. RM-AAU168 A ?/1 (...
... connected to operate this receiver and other equipment. B TV ?/11) (on/standby) Turns the TV on the TV screen. PRESET +/-1) Selects preset stations or channels. 14GB Saving the power in random order. The buttons are set to control Sony equipment. SHUFFLE1) Plays ... Pop-up Menu, or the DVD's menu. G 1) , V/v/B/b1) Press V/v/B/b to select the menu items, then press to operate the receiver. When you want to operate Sony audio/video equipment. J ./>1), m/M1), N1), X1), x1) Skip, backward/forward, play, pause, stop operation. RM-AAU168 A ?/1 (...
Operating Instructions
Page 15
...for HDMI" function is input. • The picture-in-picture preview will be canceled. O Turns off , press SLEEP. N +/- T AMP Activates the receiver operation. K SOUND FIELD +/-2) Selects a sound field (page 42). The remaining time appears on the TV screen. select track numbers. Turns on a live...(page 41). - Q DISPLAY1) Views information on the buttons that you press SLEEP, the display changes cyclically as reference when operating the receiver. 15GB preset/tune to restore the sound. S PREVIEW (HDMI) Selects the "Preview for HDMI BD, DVD, GAME and SAT/CATV ...
...for HDMI" function is input. • The picture-in-picture preview will be canceled. O Turns off , press SLEEP. N +/- T AMP Activates the receiver operation. K SOUND FIELD +/-2) Selects a sound field (page 42). The remaining time appears on the TV screen. select track numbers. Turns on a live...(page 41). - Q DISPLAY1) Views information on the buttons that you press SLEEP, the display changes cyclically as reference when operating the receiver. 15GB preset/tune to restore the sound. S PREVIEW (HDMI) Selects the "Preview for HDMI BD, DVD, GAME and SAT/CATV ...
Operating Instructions
Page 17
... (HDMI)", "BD Audio MIX Setting", "Dolby Digital/DTS", "Dolby Digital", and "DTS" are set to the receiver by following the simple steps below . For details, refer to disconnect the AC power cord (mains lead). For a Sony Blu-ray Disc player, check that you connect your equipment Connecting the TV and video equipment...
... (HDMI)", "BD Audio MIX Setting", "Dolby Digital/DTS", "Dolby Digital", and "DTS" are set to the receiver by following the simple steps below . For details, refer to disconnect the AC power cord (mains lead). For a Sony Blu-ray Disc player, check that you connect your equipment Connecting the TV and video equipment...
Operating Instructions
Page 18
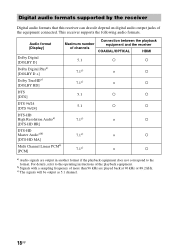
Audio format [Display] Connection between the playback Maximum number equipment and the receiver of channels COAXIAL/OPTICAL HDMI Dolby Digital [DOLBY D] 5.1 a a Dolby Digital Plusa) 7.1c) × a [DOLBY D +] Dolby TrueHDa) [DOLBY HD] 7.1c) × a DTS [DTS].... c) The signals will be output as 5.1 channel. 18GB Digital audio formats supported by the receiver Digital audio formats that this receiver can decode depend on digital audio output jacks of the playback equipment. This receiver supports the following audio formats. For details, refer to the format.
Audio format [Display] Connection between the playback Maximum number equipment and the receiver of channels COAXIAL/OPTICAL HDMI Dolby Digital [DOLBY D] 5.1 a a Dolby Digital Plusa) 7.1c) × a [DOLBY D +] Dolby TrueHDa) [DOLBY HD] 7.1c) × a DTS [DTS].... c) The signals will be output as 5.1 channel. 18GB Digital audio formats supported by the receiver Digital audio formats that this receiver can decode depend on digital audio output jacks of the playback equipment. This receiver supports the following audio formats. For details, refer to the format.
Operating Instructions
Page 19
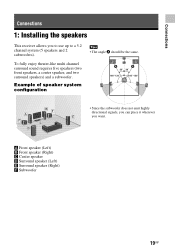
... speakers) and a subwoofer. A Front speaker (Left) B Front speaker (Right) C Center speaker D Surround speaker (Left) E Surround speaker (Right) F Subwoofer 19GB Connections Connections 1: Installing the speakers This receiver allows you want.
... speakers) and a subwoofer. A Front speaker (Left) B Front speaker (Right) C Center speaker D Surround speaker (Left) E Surround speaker (Right) F Subwoofer 19GB Connections Connections 1: Installing the speakers This receiver allows you want.
Operating Instructions
Page 21
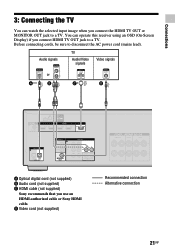
Connections 3: Connecting the TV You can operate this receiver using an OSD (On-Screen Display) if you connect HDMI TV OUT jack to a TV. D Video cord (not supplied) Recommended connection Alternative connection 21GB Before ... to a TV. Audio signals TV Audio/Video signals Video signals or A** B ARC C* D A Optical digital cord (not supplied) B Audio cord (not supplied) C HDMI cable (not supplied) Sony recommends that you connect the HDMI TV OUT or MONITOR OUT jack to disconnect the AC power cord (mains lead). You can watch the selected...
Connections 3: Connecting the TV You can operate this receiver using an OSD (On-Screen Display) if you connect HDMI TV OUT jack to a TV. D Video cord (not supplied) Recommended connection Alternative connection 21GB Before ... to a TV. Audio signals TV Audio/Video signals Video signals or A** B ARC C* D A Optical digital cord (not supplied) B Audio cord (not supplied) C HDMI cable (not supplied) Sony recommends that you connect the HDMI TV OUT or MONITOR OUT jack to disconnect the AC power cord (mains lead). You can watch the selected...
Operating Instructions
Page 22
If you connect the audio output jack of the TV to the TV IN jacks of the receiver to the receiver. By connecting Sony "BRAVIA" Synccompatible equipment using High Speed HDMI cables, put on the receiver. For details, see "Digital audio formats supported by HDMI can be output from the speakers connected to output the...
If you connect the audio output jack of the TV to the TV IN jacks of the receiver to the receiver. By connecting Sony "BRAVIA" Synccompatible equipment using High Speed HDMI cables, put on the receiver. For details, see "Digital audio formats supported by HDMI can be output from the speakers connected to output the...
Operating Instructions
Page 27
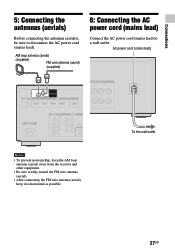
AC power cord (mains lead) Notes • To prevent noise pickup, keep the AM loop antenna (aerial) away from the receiver and other equipment. • Be sure to a wall outlet. AM loop antenna (aerial) (supplied) FM wire antenna (aerial) (supplied) 6: Connecting the AC power cord (mains ...
AC power cord (mains lead) Notes • To prevent noise pickup, keep the AM loop antenna (aerial) away from the receiver and other equipment. • Be sure to a wall outlet. AM loop antenna (aerial) (supplied) FM wire antenna (aerial) (supplied) 6: Connecting the AC power cord (mains ...
Operating Instructions
Page 28
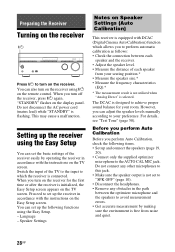
...: • Check the connection between the optimizer microphone and the speakers to avoid measurement errors. • Get accurate measurement by operating the receiver in accordance with the instructions on the display panel. Proceed to set to "SPK OFF" (page 10). • Disconnect the headphones.... the speaker output is flashing. For details, see "Test Tone" (page 58). Before you perform Auto Calibration Before you turn on the receiver using the Easy Setup. - When you perform Auto Calibration, check the following functions using ?/1 on the remote control. Language - When you...
...: • Check the connection between the optimizer microphone and the speakers to avoid measurement errors. • Get accurate measurement by operating the receiver in accordance with the instructions on the display panel. Proceed to set to "SPK OFF" (page 10). • Disconnect the headphones.... the speaker output is flashing. For details, see "Test Tone" (page 58). Before you perform Auto Calibration Before you turn on the receiver using the Easy Setup. - When you perform Auto Calibration, check the following functions using ?/1 on the remote control. Language - When you...
Operating Instructions
Page 29
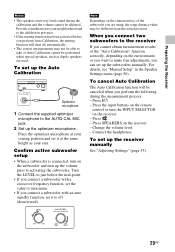
...to take or Auto Calibration cannot be different from the actual position. Note Depending on the subwoofer and turn the INPUT SELECTOR on the receiver. - To cancel Auto Calibration The Auto Calibration function will shut off (deactivated). Press the input buttons on the remote control or ... volume cannot be canceled when you perform the following during the measurement process: - Press . - When you connect two subwoofers to the receiver If you cannot obtain measurement results of the subwoofer you are using, the setup distance value may not be able to just before you ...
...to take or Auto Calibration cannot be different from the actual position. Note Depending on the subwoofer and turn the INPUT SELECTOR on the receiver. - To cancel Auto Calibration The Auto Calibration function will shut off (deactivated). Press the input buttons on the remote control or ... volume cannot be canceled when you perform the following during the measurement process: - Press . - When you connect two subwoofers to the receiver If you cannot obtain measurement results of the subwoofer you are using, the setup distance value may not be able to just before you ...
Operating Instructions
Page 30
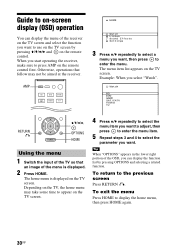
... V/v/B/b and on the remote control first. When you want. Otherwise, operations that an image of the receiver on the TV screen and select the function you want to select the parameter you start operating the receiver, make sure to the previous screen Press RETURN O. RETURN O V/v/B/b, OPTIONS HOME Using the menu 1 Switch the..., then press HOME again. 30GB The home menu is displayed. 2 Press HOME. Depending on the TV, the home menu may not be aimed at the receiver.
... V/v/B/b and on the remote control first. When you want. Otherwise, operations that an image of the receiver on the TV screen and select the function you want to select the parameter you start operating the receiver, make sure to the previous screen Press RETURN O. RETURN O V/v/B/b, OPTIONS HOME Using the menu 1 Switch the..., then press HOME again. 30GB The home menu is displayed. 2 Press HOME. Depending on the TV, the home menu may not be aimed at the receiver.
Operating Instructions
Page 31
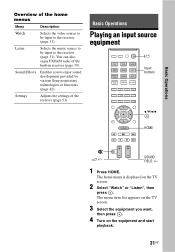
... 31). Basic Operations Overview of the home menus Menu Description Watch Selects the video source to be input to the receiver (page 31). Settings Adjusts the settings of the built-in receiver (page 39). SOUND FIELD +/- 1 Press HOME. Sound Effects Enables you want, then press . 4 Turn on the ...Watch" or "Listen", then press . Basic Operations Playing an input source equipment ?/1 Input buttons V/v/B/b, HOME 2 +/- You can also enjoy FM/AM radio of the receiver (page 53). Listen Selects the music source to be input to enjoy sound development provided by various...
... 31). Basic Operations Overview of the home menus Menu Description Watch Selects the video source to be input to the receiver (page 31). Settings Adjusts the settings of the built-in receiver (page 39). SOUND FIELD +/- 1 Press HOME. Sound Effects Enables you want, then press . 4 Turn on the ...Watch" or "Listen", then press . Basic Operations Playing an input source equipment ?/1 Input buttons V/v/B/b, HOME 2 +/- You can also enjoy FM/AM radio of the receiver (page 53). Listen Selects the music source to be input to enjoy sound development provided by various...
Operating Instructions
Page 32
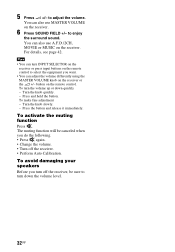
... or down the volume level. 32GB Turn the knob quickly. - Press the button and release it immediately. You can also use MASTER VOLUME on the receiver. 6 Press SOUND FIELD +/- For details, see page 42. to adjust the volume. To make fine adjustment - Press and hold the button. Turn... when you do the following. • Press again. • Change the volume. • Turn off the receiver, be sure to select the equipment you turn INPUT SELECTOR on the receiver or press input buttons on the remote control. To avoid damaging your speakers Before you want. • You can...
... or down the volume level. 32GB Turn the knob quickly. - Press the button and release it immediately. You can also use MASTER VOLUME on the receiver. 6 Press SOUND FIELD +/- For details, see page 42. to adjust the volume. To make fine adjustment - Press and hold the button. Turn... when you do the following. • Press again. • Change the volume. • Turn off the receiver, be sure to select the equipment you turn INPUT SELECTOR on the receiver or press input buttons on the remote control. To avoid damaging your speakers Before you want. • You can...


