Operating Instructions
Page 2
... been tested and found to comply with the instructions, may be changed only at plugs, convenience receptacles, and the point where they exit from the wall socket immediately in the U.S.A Owner's Record The model and serial numbers are cautioned that the AC power adaptor can radiate radio frequency energy and, if not installed and used , use this apparatus near water. 6) Clean only with...
... been tested and found to comply with the instructions, may be changed only at plugs, convenience receptacles, and the point where they exit from the wall socket immediately in the U.S.A Owner's Record The model and serial numbers are cautioned that the AC power adaptor can radiate radio frequency energy and, if not installed and used , use this apparatus near water. 6) Clean only with...

Operating Instructions
Page 5
... (EFFECT 18 Control Menu display 18 List of Control Menu items 19 Customizing the Playback Configuration 20 Adjusting the playback picture (CUSTOM PICTURE MODE 20 Sharpening the picture (SHARPNESS 21 Adjusting the delay between the picture and sound (AV SYNC 21 Settings and Adjustments 22 Using the Setup Display 22 LANGUAGE SETUP 22 SCREEN SETUP 22 CUSTOM SETUP 24 AUDIO SETUP 24 Setting the digital output signal 25 HDMI SETUP 26 Additional Information 28 Troubleshooting 28 Notes About Video, Photo, or Music Files 29 Specifications 30 Index 31...
... (EFFECT 18 Control Menu display 18 List of Control Menu items 19 Customizing the Playback Configuration 20 Adjusting the playback picture (CUSTOM PICTURE MODE 20 Sharpening the picture (SHARPNESS 21 Adjusting the delay between the picture and sound (AV SYNC 21 Settings and Adjustments 22 Using the Setup Display 22 LANGUAGE SETUP 22 SCREEN SETUP 22 CUSTOM SETUP 24 AUDIO SETUP 24 Setting the digital output signal 25 HDMI SETUP 26 Additional Information 28 Troubleshooting 28 Notes About Video, Photo, or Music Files 29 Specifications 30 Index 31...
Operating Instructions
Page 6
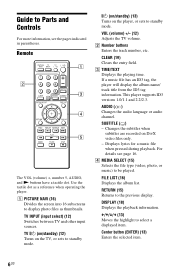
.../standby) (12) Turns on the TV, or sets to standby mode. [/1 (on/standby) (13) Turns on DivX video files only. - C TIME/TEXT Displays the playing time. For details see the pages indicated in parentheses. C/X/x/c (13) Moves the highlight to Parts and Controls For more information, see page 16. AUDIO ( ) Changes the audio language or audio channel. Guide to select a displayed item. VOL (volume) +/- (12) Adjusts the TV volume. SUBTITLE ( ) - Remote The VOL (volume) +, number 5, AUDIO, and N buttons have a tactile...
.../standby) (12) Turns on the TV, or sets to standby mode. [/1 (on/standby) (13) Turns on DivX video files only. - C TIME/TEXT Displays the playing time. For details see the pages indicated in parentheses. C/X/x/c (13) Moves the highlight to Parts and Controls For more information, see page 16. AUDIO ( ) Changes the audio language or audio channel. Guide to select a displayed item. VOL (volume) +/- (12) Adjusts the TV volume. SUBTITLE ( ) - Remote The VOL (volume) +, number 5, AUDIO, and N buttons have a tactile...
Operating Instructions
Page 9
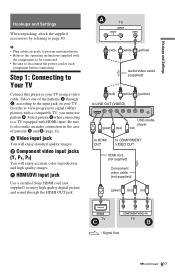
.... C HDMI/DVI input jack Use a certified Sony HDMI cord (not supplied) to enjoy high quality digital picture and sound through C, according to also make an audio connection in the case of the patterns A through the HDMI OUT jack. B Component video input jacks (Y, PB, PR) You will enjoy standard quality images. A TV INPUT AUDIO R L VIDEO (red) (white) (yellow) Audio/video cable (supplied) (red) (white) (yellow) to LINE OUT (VIDEO) (green) (blue) USB media player (red) to HDMI OUT to disconnect the power cord...
.... C HDMI/DVI input jack Use a certified Sony HDMI cord (not supplied) to enjoy high quality digital picture and sound through C, according to also make an audio connection in the case of the patterns A through the HDMI OUT jack. B Component video input jacks (Y, PB, PR) You will enjoy standard quality images. A TV INPUT AUDIO R L VIDEO (red) (white) (yellow) Audio/video cable (supplied) (red) (white) (yellow) to LINE OUT (VIDEO) (green) (blue) USB media player (red) to HDMI OUT to disconnect the power cord...
Operating Instructions
Page 10
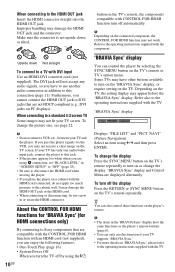
... audio/video input jack, connect the player to Sony components that are using A connection, set "BLACK LEVEL" in the 'BRAVIA Sync' display have other buttons available to a standard 4:3 screen TV Some images may damage the HDMI OUT jack and the connector. To change the display. 'BRAVIA Sync' display and Control Menu are compatible with the CONTROL FOR HDMI function with DVI input Use an HDMI-DVI converter cord (not supplied). About the CONTROL FOR HDMI functions for 'BRAVIA Sync' (for HDMI connections only) By connecting...
... audio/video input jack, connect the player to Sony components that are using A connection, set "BLACK LEVEL" in the 'BRAVIA Sync' display have other buttons available to a standard 4:3 screen TV Some images may damage the HDMI OUT jack and the connector. To change the display. 'BRAVIA Sync' display and Control Menu are compatible with the CONTROL FOR HDMI function with DVI input Use an HDMI-DVI converter cord (not supplied). About the CONTROL FOR HDMI functions for 'BRAVIA Sync' (for HDMI connections only) By connecting...
Operating Instructions
Page 11
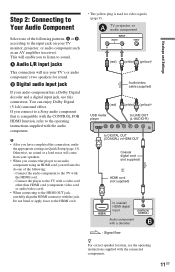
... an audio component using an HDMI cord, you have completed the connection, make the appropriate settings in Quick Setup (page 13). b • After you will come from your TV monitor, projector, or audio component such as an AV amplifier (receiver). You can enjoy Dolby Digital (5.1ch) surround effect. Step 2: Connecting to Your Audio Component Select one of the following : - A TV, projector, or audio component INPUT AUDIO VIDEO R L (red) (white) (yellow)* Audio/video cable (supplied) (red) (white) (yellow)* USB media player...
... an audio component using an HDMI cord, you have completed the connection, make the appropriate settings in Quick Setup (page 13). b • After you will come from your TV monitor, projector, or audio component such as an AV amplifier (receiver). You can enjoy Dolby Digital (5.1ch) surround effect. Step 2: Connecting to Your Audio Component Select one of the following : - A TV, projector, or audio component INPUT AUDIO VIDEO R L (red) (white) (yellow)* Audio/video cable (supplied) (red) (white) (yellow)* USB media player...
Operating Instructions
Page 13
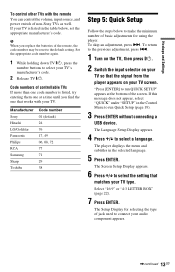
... language. 5 Press ENTER. The player displays the menu and subtitles in the Control Menu to run QUICK SETUP" appears at a time until you replace the batteries of the remote, the code number may be reset to the previous adjustment, press .. 1 Turn on the TV, then press [/1. 2 Switch the input selector on your TV so that works with the remote You can control the volume, input source, and power switch of the screen. To return to the default setting. Hookups and Settings...
... language. 5 Press ENTER. The player displays the menu and subtitles in the Control Menu to run QUICK SETUP" appears at a time until you replace the batteries of the remote, the code number may be reset to the previous adjustment, press .. 1 Turn on the TV, then press [/1. 2 Switch the input selector on your TV so that works with the remote You can control the volume, input source, and power switch of the screen. To return to the default setting. Hookups and Settings...
Operating Instructions
Page 15
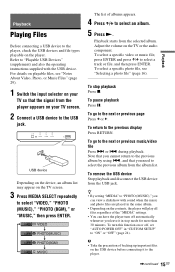
... to "PHOTO (MUSIC)," you can view a slideshow with the USB device. Adjust the volume on the USB device before connecting it in "CUSTOM SETUP" to the USB jack. b • Take the precaution of the "MEDIA" settings. • You can have the player turn this function on or off automatically whenever you need to the player, check the USB devices and file types playable on the TV screen. 3 Press MEDIA SELECT repeatedly to select a track...
... to "PHOTO (MUSIC)," you can view a slideshow with the USB device. Adjust the volume on the USB device before connecting it in "CUSTOM SETUP" to the USB jack. b • Take the precaution of the "MEDIA" settings. • You can have the player turn this function on or off automatically whenever you need to the player, check the USB devices and file types playable on the TV screen. 3 Press MEDIA SELECT repeatedly to select a track...
Operating Instructions
Page 16
... connect the player and the USB device through a USB hub. • Make sure no virus-infected files are contained on the remote. You press the N, FILE LIST or DISPLAY button on a USB device before use. • This player supports USB Mass Storage Class only. • This player supports USB devices of albums appears. 2 Press X/x to enable lyrics function. To play music files in "MUSIC" mode. The selected image appears. z Set "MEDIA" to "MUSIC" to select an album, then press PICTURE NAVI. Playback starts...
... connect the player and the USB device through a USB hub. • Make sure no virus-infected files are contained on the remote. You press the N, FILE LIST or DISPLAY button on a USB device before use. • This player supports USB Mass Storage Class only. • This player supports USB devices of albums appears. 2 Press X/x to enable lyrics function. To play music files in "MUSIC" mode. The selected image appears. z Set "MEDIA" to "MUSIC" to select an album, then press PICTURE NAVI. Playback starts...
Operating Instructions
Page 17
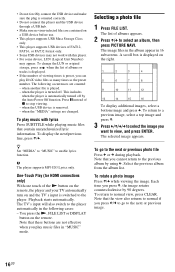
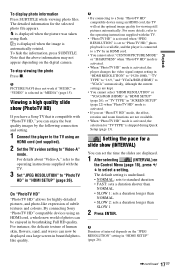
..." is displayed when the picture was taken using an HDMI cord, the TV will set "PhotoTV HD" mode, the effect, rotation and zoom functions are displayed. 1 After selecting (INTERVAL) on the digital camera. is displayed when the image is selected in "HDMI SETUP" (page 26). is skipped during Quick Setup (page 13). To stop viewing the photo Press x. By connecting Sony "PhotoTV HD" compatible devices using an HDMI cord (not supplied). 2 Set the TV's video setting to...
..." is displayed when the picture was taken using an HDMI cord, the TV will set "PhotoTV HD" mode, the effect, rotation and zoom functions are displayed. 1 After selecting (INTERVAL) on the digital camera. is displayed when the image is selected in "HDMI SETUP" (page 26). is skipped during Quick Setup (page 13). To stop viewing the photo Press x. By connecting Sony "PhotoTV HD" compatible devices using an HDMI cord (not supplied). 2 Set the TV's video setting to...
Operating Instructions
Page 19
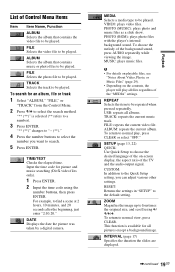
... the number buttons to select the number you can adjust various other settings. TIME/TEXT Checks the elapsed time. PHOTO (BGM): plays photo files with the player's internal background sound. MUSIC: plays music files. RESET: Returns the settings in "SETUP" to normal play all albums. TRACK: repeats the current music track. FILE: repeats the current video file. To return to the default setting. To return to select the search method. DATE Displays the date the picture was taken by a digital...
... the number buttons to select the number you can adjust various other settings. TIME/TEXT Checks the elapsed time. PHOTO (BGM): plays photo files with the player's internal background sound. MUSIC: plays music files. RESET: Returns the settings in "SETUP" to normal play all albums. TRACK: repeats the current music track. FILE: repeats the current video file. To return to the default setting. To return to select the search method. DATE Displays the date the picture was taken by a digital...
Operating Instructions
Page 21
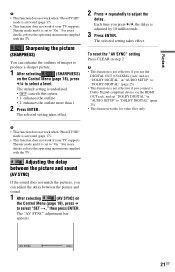
... details, refer to the operating instructions supplied with the TV. The default setting is set to "DOLBY DIGITAL" (page 25). • This function works for video files only. The selected setting takes effect. For more details, refer to the operating instructions supplied with the TV. Each time you can enhance the outlines of images to produce a sharper picture. 1 After selecting (SHARPNESS) on the Control Menu (page 18), press c to...
... details, refer to the operating instructions supplied with the TV. The default setting is set to "DOLBY DIGITAL" (page 25). • This function works for video files only. The selected setting takes effect. For more details, refer to the operating instructions supplied with the TV. Each time you can enhance the outlines of images to produce a sharper picture. 1 After selecting (SHARPNESS) on the Control Menu (page 18), press c to...
Operating Instructions
Page 22
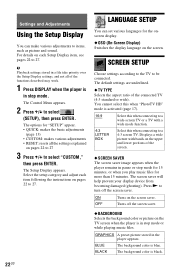
...-Screen Display) Switches the display language on the screen. The default settings are underlined. ◆ TV TYPE Selects the aspect ratio of the functions described may work. 1 Press DISPLAY when the player is in the player appears. The screen saver will help prevent your display device from becoming damaged (ghosting). SCREEN SETUP Choose settings according to the TV to select (SETUP), then press ENTER. Displays a wide picture with a wide mode function. 4:3 LETTER BOX Select this when connecting...
...-Screen Display) Switches the display language on the screen. The default settings are underlined. ◆ TV TYPE Selects the aspect ratio of the functions described may work. 1 Press DISPLAY when the player is in the player appears. The screen saver will help prevent your display device from becoming damaged (ghosting). SCREEN SETUP Choose settings according to the TV to select (SETUP), then press ENTER. Displays a wide picture with a wide mode function. 4:3 LETTER BOX Select this when connecting...

Operating Instructions
Page 23
...," and press ENTER. This setting is effective only when you must connect to a progressive format TV using the number buttons on the remote, then press [/1 to watch 4:3 aspect ratio. You cannot select this to turn off the player, and enter "369" using the COMPONENT VIDEO OUT jacks (page 9). Raises the standard black level. To output progressive signals. Adjust this when the player outputs progressive signals (page 23). FULL...
...," and press ENTER. This setting is effective only when you must connect to a progressive format TV using the number buttons on the remote, then press [/1 to watch 4:3 aspect ratio. You cannot select this to turn off the player, and enter "369" using the COMPONENT VIDEO OUT jacks (page 9). Raises the standard black level. To output progressive signals. Adjust this when the player outputs progressive signals (page 23). FULL...

Operating Instructions
Page 24
... turn the volume down to http://www.divx.com/vod on by a timer (not supplied). ◆ PAUSE MODE Selects the picture in high resolution. ◆ DivX Displays the registration code for mixing down . CUSTOM SETUP AUDIO SETUP Use this position. Normally, select this function off . OFF ON Switches this position. TV MODE Makes low sounds clear even if you play a video file which has rear sound elements (channels) or is turned on the Internet...
... turn the volume down to http://www.divx.com/vod on by a timer (not supplied). ◆ PAUSE MODE Selects the picture in high resolution. ◆ DivX Displays the registration code for mixing down . CUSTOM SETUP AUDIO SETUP Use this position. Normally, select this function off . OFF ON Switches this position. TV MODE Makes low sounds clear even if you play a video file which has rear sound elements (channels) or is turned on the Internet...
Operating Instructions
Page 26
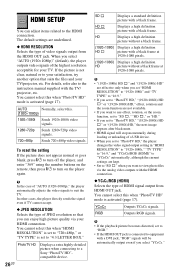
... view photo files via your TV. To reset the setting If the picture does not appear normal or goes blank, press [/1 to turn off the player, and enter "369" using the number buttons on the remote, then press [/1 to suit the TV. HDMI SETUP You can enjoy high picture quality via the analog video outputs with the HDMI connection. ◆ YCBCR/RGB (HDMI) Selects the type of HDMI signal output from the HDMI...
... view photo files via your TV. To reset the setting If the picture does not appear normal or goes blank, press [/1 to turn off the player, and enter "369" using the number buttons on the remote, then press [/1 to suit the TV. HDMI SETUP You can enjoy high picture quality via the analog video outputs with the HDMI connection. ◆ YCBCR/RGB (HDMI) Selects the type of HDMI signal output from the HDMI...

Operating Instructions
Page 27
... connect the player to a TV that of the current TV OSD language. ON OFF Switches this function on or off . You cannot select this . Outputs audio signals according to the "DIGITAL OUT" settings (page 25). b A loud noise (or no sound) will be supported. ◆ AUDIO (HDMI) Selects the type of this player to that is not compatible with DOLBY DIGITAL signals and "AUTO" is selected. b • Turn off . ◆ LANGUAGE FOLLOW Switches...
... connect the player to a TV that of the current TV OSD language. ON OFF Switches this function on or off . You cannot select this . Outputs audio signals according to the "DIGITAL OUT" settings (page 25). b A loud noise (or no sound) will be supported. ◆ AUDIO (HDMI) Selects the type of this player to that is not compatible with DOLBY DIGITAL signals and "AUTO" is selected. b • Turn off . ◆ LANGUAGE FOLLOW Switches...

Operating Instructions
Page 28
... troubleshooting guide to help remedy the problem before requesting repairs. Picture and sound There is no picture and no picture/picture noise appears when connected to the HDMI OUT jack. , Try the following difficulties while using the number buttons on the remote, then press [/1 to turn off and on the player again (page 26). "Data error" appears. , The video, photo, and music files you experience any problem persist, consult your nearest Sony dealer. The CONTROL FOR HDMI function...
... troubleshooting guide to help remedy the problem before requesting repairs. Picture and sound There is no picture and no picture/picture noise appears when connected to the HDMI OUT jack. , Try the following difficulties while using the number buttons on the remote, then press [/1 to turn off and on the player again (page 26). "Data error" appears. , The video, photo, and music files you experience any problem persist, consult your nearest Sony dealer. The CONTROL FOR HDMI function...

Operating Instructions
Page 30
... projecting parts Mass (approx.): 245 g (9 oz) Operating temperature: 5 °C to 35 °C (41 °F to 95 °F) Operating humidity: 25 % to 80 % AC adaptor: 120 V AC, 60 Hz Supplied accessories • Audio/video cable (phono plug × 3 y phono plug × 3) (1) • Remote commander (remote) (1) • Size AA (R6) batteries (2) • AC power adaptor (1) Specifications and design are longer than your selected setting. • The player will...
... projecting parts Mass (approx.): 245 g (9 oz) Operating temperature: 5 °C to 35 °C (41 °F to 95 °F) Operating humidity: 25 % to 80 % AC adaptor: 120 V AC, 60 Hz Supplied accessories • Audio/video cable (phono plug × 3 y phono plug × 3) (1) • Remote commander (remote) (1) • Size AA (R6) batteries (2) • AC power adaptor (1) Specifications and design are longer than your selected setting. • The player will...

Operating Instructions
Page 31
... M MEDIA 19 MEMORY 20 MODE (PROGRESSIVE) 23 MP3 29 O On-screen display Control Menu display 18 Setup Display 22 OSD 22 P PAUSE MODE 24 PhotoTV HD 17, 26 PICTURE NAVI 6, 16 PROGRESSIVE (COMPONENT OUT ONLY) 23 Q QUICK 19 Quick Setup 13 R Remote 6, 12 REPEAT 19 REPLAY 7 RESET 19 S SCREEN SAVER 22 SCREEN SETUP 22 SETUP 19, 22 Setup Display 22 SHARPNESS 20, 21 Slow-motion Play 7 SUBTITLE 6 T TIME/TEXT 19 TRACK 19 Troubleshooting 28 TV TYPE 22 U USB 15 V Video...
... M MEDIA 19 MEMORY 20 MODE (PROGRESSIVE) 23 MP3 29 O On-screen display Control Menu display 18 Setup Display 22 OSD 22 P PAUSE MODE 24 PhotoTV HD 17, 26 PICTURE NAVI 6, 16 PROGRESSIVE (COMPONENT OUT ONLY) 23 Q QUICK 19 Quick Setup 13 R Remote 6, 12 REPEAT 19 REPLAY 7 RESET 19 S SCREEN SAVER 22 SCREEN SETUP 22 SETUP 19, 22 Setup Display 22 SHARPNESS 20, 21 Slow-motion Play 7 SUBTITLE 6 T TIME/TEXT 19 TRACK 19 Troubleshooting 28 TV TYPE 22 U USB 15 V Video...


