Note On Blank Screen
Page 1
... "Progressive" setting in the Screen Setup Menu, the images on page 58. © 2006 Sony Corporation Printed in China 2-671-556-11(1) US AK68-00929A If you have connected a progressive format TV to the DVD-VCR's COMPONENT VIDEO OUT jacks (red/green/blue) using a component video cord. You can be... canceled by pressing SELECT DVD and then press X (pause) button on the front panel of the unit continuously for 5...
... "Progressive" setting in the Screen Setup Menu, the images on page 58. © 2006 Sony Corporation Printed in China 2-671-556-11(1) US AK68-00929A If you have connected a progressive format TV to the DVD-VCR's COMPONENT VIDEO OUT jacks (red/green/blue) using a component video cord. You can be... canceled by pressing SELECT DVD and then press X (pause) button on the front panel of the unit continuously for 5...

Note On Connections
Page 1
... audio cord (not supplied) to S-VIDEO OUT Audio/video cord (not supplied) S-VIDEO cord (not supplied) INCORRECT TV rear panel INPUT 1 INPUT 2 DVD-VCR rear panel Audio/video cord (not supplied) S-VIDEO cord (not supplied) to a different set of TV inputs such as LINE 2 on making connections Do...both the DVD&VCR outputs (LINE OUT VIDEO/AUDIO L/R) and S-video output (S-VIDEO OUT) to the same TV input. You can enjoy higher quality DVD images by connecting the S-video output (S-VIDEO OUT) and the audio output for DVDs (LINE OUT AUDIO L/R) to S-VIDEO OUT © 2006 Sony Corporation ...
... audio cord (not supplied) to S-VIDEO OUT Audio/video cord (not supplied) S-VIDEO cord (not supplied) INCORRECT TV rear panel INPUT 1 INPUT 2 DVD-VCR rear panel Audio/video cord (not supplied) S-VIDEO cord (not supplied) to a different set of TV inputs such as LINE 2 on making connections Do...both the DVD&VCR outputs (LINE OUT VIDEO/AUDIO L/R) and S-video output (S-VIDEO OUT) to the same TV input. You can enjoy higher quality DVD images by connecting the S-video output (S-VIDEO OUT) and the audio output for DVDs (LINE OUT AUDIO L/R) to S-VIDEO OUT © 2006 Sony Corporation ...
Operating Instructions
Page 1
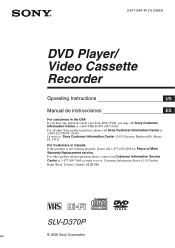
... questions about your Sony DVD-VCR, you may call Sony Customer Information Center at : Customer Information Service 115 Gordon Baker Road, Toronto, Ontario, M2H 3R6 SLV-D370P © 2006 Sony Corporation For other Sony product questions, please call Sony Customer Information Center at 1-800-222-SONY (7669). Or ...write to us at 1-800-VHS-SONY (847-7669). 2-671-544-11 (1) US/ES DVD Player/ Video Cassette Recorder ...
... questions about your Sony DVD-VCR, you may call Sony Customer Information Center at : Customer Information Service 115 Gordon Baker Road, Toronto, Ontario, M2H 3R6 SLV-D370P © 2006 Sony Corporation For other Sony product questions, please call Sony Customer Information Center at 1-800-222-SONY (7669). Or ...write to us at 1-800-VHS-SONY (847-7669). 2-671-544-11 (1) US/ES DVD Player/ Video Cassette Recorder ...

Operating Instructions
Page 5
...-screen display 41 Playing a tape 45 Recording TV programs 48 Recording TV programs using the timer 51 Checking/changing/canceling timer settings 53 Locking the DVD-VCR (Child Lock) continued Table of contents 5US
...-screen display 41 Playing a tape 45 Recording TV programs 48 Recording TV programs using the timer 51 Checking/changing/canceling timer settings 53 Locking the DVD-VCR (Child Lock) continued Table of contents 5US

Operating Instructions
Page 7
... format of files and folders on the DVD-VCR having the same or similar names. • "DVD" may be performed using the remote, but the same operations can play the following discs Format of discs DVD VIDEO DVD-RW/-R DVD+RW/+R VIDEO CD/ Music CD CD-RW/-R "DVD+RW," "DVD-RW," "DVD+R," "DVD+R DL," "DVD-R," "DVD VIDEO," and "CD" logos are trademarks...
... format of files and folders on the DVD-VCR having the same or similar names. • "DVD" may be performed using the remote, but the same operations can play the following discs Format of discs DVD VIDEO DVD-RW/-R DVD+RW/+R VIDEO CD/ Music CD CD-RW/-R "DVD+RW," "DVD-RW," "DVD+R," "DVD+R DL," "DVD-R," "DVD VIDEO," and "CD" logos are trademarks...

Operating Instructions
Page 10
Getting Started Step 1 : Unpacking Check that you have received the following items with the DVD-VCR: • Remote commander • 75-ohm coaxial cable with F-type connectors • Size AA (R6) batteries Note • The supplied remote commander is for the exclusive use of this DVD-VCR. 10US Unpacking
Getting Started Step 1 : Unpacking Check that you have received the following items with the DVD-VCR: • Remote commander • 75-ohm coaxial cable with F-type connectors • Size AA (R6) batteries Note • The supplied remote commander is for the exclusive use of this DVD-VCR. 10US Unpacking
Operating Instructions
Page 11
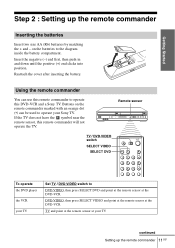
Reattach the cover after inserting the battery. If the TV does not have the symbol near the remote sensor, this DVD-VCR and a Sony TV. Using the remote commander You can be used to the diagram inside the battery compartment. Insert the negative (-) end first, then push in and ... (•) can use this remote commander to DVD·VIDEO, then press SELECT DVD and point at the remote sensor at the DVD-VCR DVD·VIDEO, then press SELECT VIDEO and point at the remote sensor at the DVD-VCR TV and point at the remote sensor at your Sony TV. Getting Started Step 2 : Setting up ...
Reattach the cover after inserting the battery. If the TV does not have the symbol near the remote sensor, this DVD-VCR and a Sony TV. Using the remote commander You can be used to the diagram inside the battery compartment. Insert the negative (-) end first, then push in and ... (•) can use this remote commander to DVD·VIDEO, then press SELECT DVD and point at the remote sensor at the DVD-VCR DVD·VIDEO, then press SELECT VIDEO and point at the remote sensor at the DVD-VCR TV and point at the remote sensor at your Sony TV. Getting Started Step 2 : Setting up ...

Operating Instructions
Page 13
... cannot control your TV. Setting up the remote commander 13US Getting Started Code numbers of the remote commander, the code number may change. TV brand Sony Akai AOC Centurion Coronado Curtis-Mathes Daewoo Daytron Emerson Fisher General Electric LG/Gold Star Hitachi J.C.Penney JVC KMC Magnavox Marantz MGA/Mitsubishi NEC Code... TVs If more than one code number is listed, try entering them one at a time until you find the one programmed to work with the DVD-VCR, you replace the batteries.
... cannot control your TV. Setting up the remote commander 13US Getting Started Code numbers of the remote commander, the code number may change. TV brand Sony Akai AOC Centurion Coronado Curtis-Mathes Daewoo Daytron Emerson Fisher General Electric LG/Gold Star Hitachi J.C.Penney JVC KMC Magnavox Marantz MGA/Mitsubishi NEC Code... TVs If more than one code number is listed, try entering them one at a time until you find the one programmed to work with the DVD-VCR, you replace the batteries.

Operating Instructions
Page 14
... so may cause picture distortion. • If your TV does not match any of the examples provided, see your nearest Sony dealer or qualified technician. Never connect the output of the DVD-VCR to an antenna or make connections firmly. Note to CATV system installer (in USA) This reminder is provided to call... and 18 Page 17 and 18 Page 19 After you have completed the setup, you are completed, you may not be able to use your DVD-VCR. If your TV does not have A/V inputs, go directly to one of the hookups below . Then follow the instructions for proper grounding and, in ...
... so may cause picture distortion. • If your TV does not match any of the examples provided, see your nearest Sony dealer or qualified technician. Never connect the output of the DVD-VCR to an antenna or make connections firmly. Note to CATV system installer (in USA) This reminder is provided to call... and 18 Page 17 and 18 Page 19 After you have completed the setup, you are completed, you may not be able to use your DVD-VCR. If your TV does not have A/V inputs, go directly to one of the hookups below . Then follow the instructions for proper grounding and, in ...

Operating Instructions
Page 15
...has audio/video (A/V) input jacks, you will optimize the picture and sound for a true "hometheater" experience. A Use this hookup if your TV has stereo jacks DVD-VCR Stereo receiver TV Audio/video cord (not supplied) Audio cord (not supplied) B Use this hookup if your TV does not have stereo jacks... receiver TV Video cord (not supplied) Audio cord (not supplied) Notes • To play a tape/disc in stereo, you must use your DVD-VCR using these connections first, and then go to the AUDIO IN jack on this page. Note that "Advanced Hookups" (page 30) explains additional hookup ...
...has audio/video (A/V) input jacks, you will optimize the picture and sound for a true "hometheater" experience. A Use this hookup if your TV has stereo jacks DVD-VCR Stereo receiver TV Audio/video cord (not supplied) Audio cord (not supplied) B Use this hookup if your TV does not have stereo jacks... receiver TV Video cord (not supplied) Audio cord (not supplied) Notes • To play a tape/disc in stereo, you must use your DVD-VCR using these connections first, and then go to the AUDIO IN jack on this page. Note that "Advanced Hookups" (page 30) explains additional hookup ...

Operating Instructions
Page 16
... you are using : • VHF/UHF antenna (you get channels 2-13 and channels 14 and higher) • UHF-only antenna (you get channels 2-13 only) DVD-VCR Rear of TV VHF/UHF A Match the type of connector on your or TV: A, B, or C. Hookup 1 (Plug and Play) A Use this hookup if you ...are using a VHF-only antenna (you get channels 14 and higher) • Separate VHF and UHF antennas DVD-VCR Rear of TV VHF/UHF A Match the type of connector on your or TV: A, B, or C. VHF B For connector types B and C, no or UHF UHF connection...
... you are using : • VHF/UHF antenna (you get channels 2-13 and channels 14 and higher) • UHF-only antenna (you get channels 2-13 only) DVD-VCR Rear of TV VHF/UHF A Match the type of connector on your or TV: A, B, or C. Hookup 1 (Plug and Play) A Use this hookup if you ...are using a VHF-only antenna (you get channels 14 and higher) • Separate VHF and UHF antennas DVD-VCR Rear of TV VHF/UHF A Match the type of connector on your or TV: A, B, or C. VHF B For connector types B and C, no or UHF UHF connection...

Operating Instructions
Page 17
Cable box Rear of TV VHF/UHF A Match the type of connector or on the VCR What you cannot do not have no UHF VHF connection is required. C UHF continued Basic hookups 17US B For connector or UHF types B and C, no cable ... hookup • Record any unscrambled channel by selecting the channel on your TV if you do • Record scrambled channels that require a cable box Wall DVD-VCR Connect this cable directly to your TV: A, VHF B, or C. Getting Started C Use this hookup if you have a cable box.
Cable box Rear of TV VHF/UHF A Match the type of connector or on the VCR What you cannot do not have no UHF VHF connection is required. C UHF continued Basic hookups 17US B For connector or UHF types B and C, no cable ... hookup • Record any unscrambled channel by selecting the channel on your TV if you do • Record scrambled channels that require a cable box Wall DVD-VCR Connect this cable directly to your TV: A, VHF B, or C. Getting Started C Use this hookup if you have a cable box.

Operating Instructions
Page 18
...disabling channels manually" on page 24. If this happens, see "Using Manual Clock Set" on page 28. The DVD-VCR automatically presets the DVD-VCR's clock and TV channels when the DVD-VCR is completed, the current time appears in the AC power cord for the first time after you connect the AC ..., or "-:-" appears in the display window, see "Step 6 : Presetting channels" on page 26. • Do not press any buttons on the DVD-VCR or remote commander during Auto preset. • Auto preset starts automatically only when you plug in the display window. When Auto preset is plugged into...
...disabling channels manually" on page 24. If this happens, see "Using Manual Clock Set" on page 28. The DVD-VCR automatically presets the DVD-VCR's clock and TV channels when the DVD-VCR is completed, the current time appears in the AC power cord for the first time after you connect the AC ..., or "-:-" appears in the display window, see "Step 6 : Presetting channels" on page 26. • Do not press any buttons on the DVD-VCR or remote commander during Auto preset. • Auto preset starts automatically only when you plug in the display window. When Auto preset is plugged into...

Operating Instructions
Page 19
... you can do with this hookup • Record any channel by selecting the channel on the cable box What you have completed hookup, plug the DVD-VCR into an AC outlet and see "Step 4 : Selecting a language" on your or TV: A, B, or C. After you have completed hookup... to AC outlet AC power cord... required. C UHF After you cannot do • Record with the cable box turned off • Record one channel while watching another channel Wall Cable box DVD-VCR Rear of TV VHF/UHF A Match the type of connector on page 20.
... you can do with this hookup • Record any channel by selecting the channel on the cable box What you have completed hookup, plug the DVD-VCR into an AC outlet and see "Step 4 : Selecting a language" on your or TV: A, B, or C. After you have completed hookup... to AC outlet AC power cord... required. C UHF After you cannot do • Record with the cable box turned off • Record one channel while watching another channel Wall Cable box DVD-VCR Rear of TV VHF/UHF A Match the type of connector on page 20.
Operating Instructions
Page 20
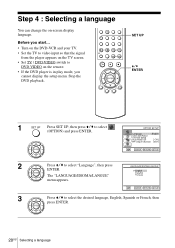
... press ENTER. 2 Press V/v to select the desired language, English, Spanish or French, then press ENTER. 20US Selecting a language Before you start... • Turn on the DVD-VCR and your TV. • Set the TV to video input so that the signal from the player appears on the TV screen. • Set TV... / DVD·VIDEO switch to DVD·VIDEO on -screen display language. Stop the DVD playback. Step 4 : Selecting a language You can change the on the remote. • If the...
... press ENTER. 2 Press V/v to select the desired language, English, Spanish or French, then press ENTER. 20US Selecting a language Before you start... • Turn on the DVD-VCR and your TV. • Set the TV to video input so that the signal from the player appears on the TV screen. • Set TV... / DVD·VIDEO switch to DVD·VIDEO on -screen display language. Stop the DVD playback. Step 4 : Selecting a language You can change the on the remote. • If the...
Operating Instructions
Page 22
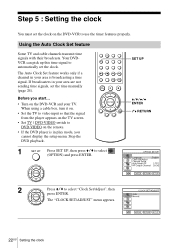
... is in your TV. The "CLOCK SET/ADJUST" menu appears. 22US Setting the clock If broadcasters in play mode, you start... • Turn on the DVD-VCR and your area are not sending time signals, set the time manually (page 24). SET UP V/v/B/b ENTER O RETURN 1 Press SET UP, then press V/v.... 2 Press V/v to use the timer features properly. Step 5 : Setting the clock You must set the clock on the DVD-VCR to select "Clock Set/Adjust", then press ENTER. Stop the DVD playback. Before you cannot display the setup menu. When using a cable box, turn it on. • Set the TV ...
... is in your TV. The "CLOCK SET/ADJUST" menu appears. 22US Setting the clock If broadcasters in play mode, you start... • Turn on the DVD-VCR and your area are not sending time signals, set the time manually (page 24). SET UP V/v/B/b ENTER O RETURN 1 Press SET UP, then press V/v.... 2 Press V/v to use the timer features properly. Step 5 : Setting the clock You must set the clock on the DVD-VCR to select "Clock Set/Adjust", then press ENTER. Stop the DVD playback. Before you cannot display the setup menu. When using a cable box, turn it on. • Set the TV ...

Operating Instructions
Page 23
... Press V/v to select the item you know of your area, or select "Auto" to have the DVD-VCR automatically set the daylight saving time. 5 Press O RETURN, then press SET UP to have the DVD-VCR automatically search for a channel that carries a time signal. The options are: Auto y Atl. (Atlantic)...to exit the menu. 6 To activate the Auto Clock Set function, turn off the DVD-VCR. continued Setting the clock 23US Most PBS member stations broadcast a time signal. Press B/b to have the DVD-VCR automatically set your local PBS station. • For "Time zone" Select the time ...
... Press V/v to select the item you know of your area, or select "Auto" to have the DVD-VCR automatically set the daylight saving time. 5 Press O RETURN, then press SET UP to have the DVD-VCR automatically search for a channel that carries a time signal. The options are: Auto y Atl. (Atlantic)...to exit the menu. 6 To activate the Auto Clock Set function, turn off the DVD-VCR. continued Setting the clock 23US Most PBS member stations broadcast a time signal. Press B/b to have the DVD-VCR automatically set your local PBS station. • For "Time zone" Select the time ...
Operating Instructions
Page 24
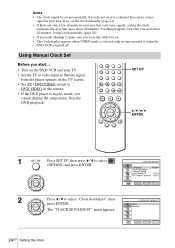
... signal from the player appears on the TV screen. • Set TV / DVD·VIDEO switch to DVD·VIDEO on . • The clock display appears when VIDEO mode is selected with no tape inserted or when the DVD-VCR is in your area that carry time signals, setting the clock automatically may... take up to about 20 minutes, set automatically if you start... • Turn on the DVD-VCR and your TV. • Set the TV to select "Clock Set/Adjust", then press ENTER. Stop the DVD playback. Notes • The clock cannot be set the clock manually (page 24). • If ...
... signal from the player appears on the TV screen. • Set TV / DVD·VIDEO switch to DVD·VIDEO on . • The clock display appears when VIDEO mode is selected with no tape inserted or when the DVD-VCR is in your area that carry time signals, setting the clock automatically may... take up to about 20 minutes, set automatically if you start... • Turn on the DVD-VCR and your TV. • Set the TV to select "Clock Set/Adjust", then press ENTER. Stop the DVD playback. Notes • The clock cannot be set the clock manually (page 24). • If ...

Operating Instructions
Page 25
Setting the clock 25US Getting Started 3 Press V/v to select "Manual", then press ENTER. 4 Set the hour, minutes, month, day and year in sequence by pressing B/b to select the item to be set automatically. 5 Press ENTER to confirm the setting. 6 Press SET UP to select the digits. Note • The clock display appears when VIDEO mode is selected with no tape inserted or when the DVD-VCR is set , and press V/v to exit the menu. The day of the week is turned off.
Setting the clock 25US Getting Started 3 Press V/v to select "Manual", then press ENTER. 4 Set the hour, minutes, month, day and year in sequence by pressing B/b to select the item to be set automatically. 5 Press ENTER to confirm the setting. 6 Press SET UP to select the digits. Note • The clock display appears when VIDEO mode is selected with no tape inserted or when the DVD-VCR is set , and press V/v to exit the menu. The day of the week is turned off.

Operating Instructions
Page 26
Step 6 : Presetting channels This DVD-VCR is capable of receiving VHF channels 2 to 13, UHF channels 14 to 69 and unscrambled CATV channels 1 to DVD·VIDEO on the remote. • If the DVD player is in your TV. When using a cable box, turn it on. • Set the TV to video input... automatically Before you start... • Turn on the TV screen. • Set TV / DVD·VIDEO switch to 125. Stop the DVD playback. First, we recommend that the signal from the player appears on the DVD-VCR and your area using manual presetting methods (page 28). If you have already decided which...
Step 6 : Presetting channels This DVD-VCR is capable of receiving VHF channels 2 to 13, UHF channels 14 to 69 and unscrambled CATV channels 1 to DVD·VIDEO on the remote. • If the DVD player is in your TV. When using a cable box, turn it on. • Set the TV to video input... automatically Before you start... • Turn on the TV screen. • Set TV / DVD·VIDEO switch to 125. Stop the DVD playback. First, we recommend that the signal from the player appears on the DVD-VCR and your area using manual presetting methods (page 28). If you have already decided which...


