
Operating Instructions (primary manual)
Page 2
.... Operation is subject to the following specifications: SPECIFICATIONS Plug Type Nema-Plug 5-15p Cord Type SVT or SJT, minimum 3 × 18 AWG Length Maximum 15 feet Rating Minimum 7 A, 125 V NOTICE Cette notice s'applique aux Etats-Unis et au Canada uniquement. If shipped to USA/Canada, install only a UL LISTED/CSA LABELLED power supply cord meeting the following two conditions: (1) This...
.... Operation is subject to the following specifications: SPECIFICATIONS Plug Type Nema-Plug 5-15p Cord Type SVT or SJT, minimum 3 × 18 AWG Length Maximum 15 feet Rating Minimum 7 A, 125 V NOTICE Cette notice s'applique aux Etats-Unis et au Canada uniquement. If shipped to USA/Canada, install only a UL LISTED/CSA LABELLED power supply cord meeting the following two conditions: (1) This...
Operating Instructions (primary manual)
Page 3
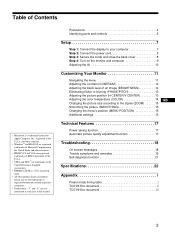
... trademarks of an image (BRIGHTNESS 12 Eliminating flicker or blurring (PHASE/PITCH 13 Adjusting the picture position (H CENTER/V CENTER 13 Adjusting the color temperature (COLOR 14 GB Changing the picture size according to your computer 7 Step 2: Connect the power cord 8 Step 3: Secure the cords and close the back cover 8 Step 4: Turn on the monitor and computer 9 Adjusting the tilt 10 Customizing Your Monitor 11 Navigating the menu 11 Adjusting the contrast (CONTRAST 12 Adjusting the black level of...
... trademarks of an image (BRIGHTNESS 12 Eliminating flicker or blurring (PHASE/PITCH 13 Adjusting the picture position (H CENTER/V CENTER 13 Adjusting the color temperature (COLOR 14 GB Changing the picture size according to your computer 7 Step 2: Connect the power cord 8 Step 3: Secure the cords and close the back cover 8 Step 4: Turn on the monitor and computer 9 Adjusting the tilt 10 Customizing Your Monitor 11 Navigating the menu 11 Adjusting the contrast (CONTRAST 12 Adjusting the black level of...
Operating Instructions (primary manual)
Page 4
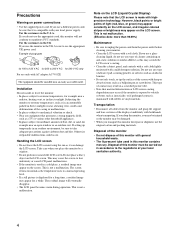
... near an open window or an outdoor exit. However, black points or bright points of light (red, blue, or green) may appear constantly on the LCD screen, and irregular colored stripes or brightness may appear for a while. Do not use the original carton and packing materials. If you drop the monitor, you place the monitor by a window. • Do not push on power connections • Use the supplied power cord. For the...
... near an open window or an outdoor exit. However, black points or bright points of light (red, blue, or green) may appear constantly on the LCD screen, and irregular colored stripes or brightness may appear for a while. Do not use the original carton and packing materials. If you drop the monitor, you place the monitor by a window. • Do not push on power connections • Use the supplied power cord. For the...
Operating Instructions (primary manual)
Page 5
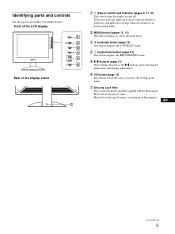
... a trademark of the display stand OPEN 1 1 (Power) switch and indicator (pages 9, 17, 21) This switch turns the display on , and lights up in green when the display is in power saving mode. 2 MENU button (pages 11, 12) This button displays or closes the main menu. 3 6 (contrast) button (page 12) This button displays the CONTRAST menu. 4 8 (brightness) button (page 12) This button displays the BRITGHTNESS menu. 5 M/m buttons (page 12) These buttons function as the M/m buttons when selecting the menu items and making adjustments. 6 OK button (page 12) This...
... a trademark of the display stand OPEN 1 1 (Power) switch and indicator (pages 9, 17, 21) This switch turns the display on , and lights up in green when the display is in power saving mode. 2 MENU button (pages 11, 12) This button displays or closes the main menu. 3 6 (contrast) button (page 12) This button displays the CONTRAST menu. 4 8 (brightness) button (page 12) This button displays the BRITGHTNESS menu. 5 M/m buttons (page 12) These buttons function as the M/m buttons when selecting the menu items and making adjustments. 6 OK button (page 12) This...
Operating Instructions (primary manual)
Page 6
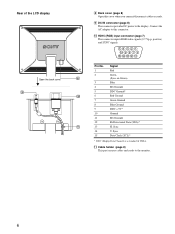
Rear of VESA. Connect the AC adapter to this cover when you connect/disconnect cables or cords. 9 DC IN connector (page 8) This connector provides DC power to the monitor. 6 Sync V. HD15 (RGB) input connector (page 7) This connector inputs RGB video signals (0.7 Vp-p, positive) and SYNC signals. 54321 10 9 8 7 6 15 14 13 12 11 Pin No. 1 2 3 4 5 6 7 8 9 10 11 12 13 14 15 Signal Red Green (Sync on Green) Blue ID (Ground) DDC Ground* Red Ground Green Ground Blue Ground DDC + 5V* Ground ID (Ground...
Rear of VESA. Connect the AC adapter to this cover when you connect/disconnect cables or cords. 9 DC IN connector (page 8) This connector provides DC power to the monitor. 6 Sync V. HD15 (RGB) input connector (page 7) This connector inputs RGB video signals (0.7 Vp-p, positive) and SYNC signals. 54321 10 9 8 7 6 15 14 13 12 11 Pin No. 1 2 3 4 5 6 7 8 9 10 11 12 13 14 15 Signal Red Green (Sync on Green) Blue ID (Ground) DDC Ground* Red Ground Green Ground Blue Ground DDC + 5V* Ground ID (Ground...
Operating Instructions (primary manual)
Page 7
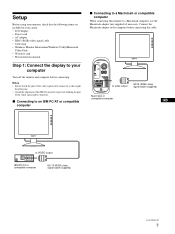
Connect the Macintosh adapter to your carton: • LCD display • Power cord • AC adapter • HD15 (RGB) video signal cable • Cord strap • Windows Monitor Information/Windows Utility/Macintosh Utility Disk • Warranty card • This instruction manual Step 1: Connect the display to the computer before connecting. Setup Before using your monitor, check that the following items are included in your computer Turn off the monitor and computer before connecting the cable. to video output HD15 (RGB) video signal cable (supplied) Macintosh or...
Connect the Macintosh adapter to your carton: • LCD display • Power cord • AC adapter • HD15 (RGB) video signal cable • Cord strap • Windows Monitor Information/Windows Utility/Macintosh Utility Disk • Warranty card • This instruction manual Step 1: Connect the display to the computer before connecting. Setup Before using your monitor, check that the following items are included in your computer Turn off the monitor and computer before connecting the cable. to video output HD15 (RGB) video signal cable (supplied) Macintosh or...
Operating Instructions (primary manual)
Page 9
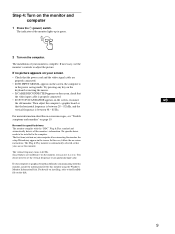
... board so that the power cord and the video signal cable are unobtrusive on page 19. The vertical frequency turns to the computer. GB 9 If no picture appears on your computer after connecting the monitor, the setup Wizard may appear on -screen instructions. Try pressing any particular high value. In this case, follow the on the screen. The first time you turn on your screen • Check that the horizontal frequency...
... board so that the power cord and the video signal cable are unobtrusive on page 19. The vertical frequency turns to the computer. GB 9 If no picture appears on your computer after connecting the monitor, the setup Wizard may appear on -screen instructions. Try pressing any particular high value. In this case, follow the on the screen. The first time you turn on your screen • Check that the horizontal frequency...
Operating Instructions (primary manual)
Page 11
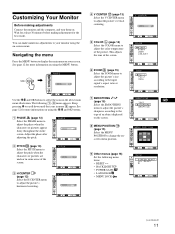
...) Set the following 1~9 menu appears. Keep pressing m to your screen. MENU , PHAS E 30 EX I T CO L OR 9 300K 6 5 0 0K USER L ADJUST 6 ZOOM (page 15) Select the ZOOM menu to adjust the picture's size according to the input signal's aspect ratio or resolution. 7 SMOOTHING (page 15) Select the SMOOTHING menu to adjust the picture's sharpness according to adjust the picture's vertical centering. The following menu items. • RESET 0 • BACKLIGHT • POWER SAVE ZZ... • LANGUAGE • MENU LOCK EX I T RESET...
...) Set the following 1~9 menu appears. Keep pressing m to your screen. MENU , PHAS E 30 EX I T CO L OR 9 300K 6 5 0 0K USER L ADJUST 6 ZOOM (page 15) Select the ZOOM menu to adjust the picture's size according to the input signal's aspect ratio or resolution. 7 SMOOTHING (page 15) Select the SMOOTHING menu to adjust the picture's sharpness according to adjust the picture's vertical centering. The following menu items. • RESET 0 • BACKLIGHT • POWER SAVE ZZ... • LANGUAGE • MENU LOCK EX I T RESET...
Operating Instructions (primary manual)
Page 12
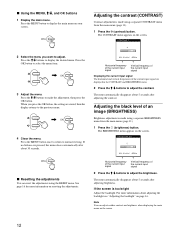
... buttons to display the main menu on your screen. MENU x Resetting the adjustments You can adjust neither contrast nor brightness when displaying the main menu on the screen. Press the MENU button to adjust the contrast. MENU Adjusting the contrast (CONTRAST) Contrast adjustment is made using a separate CONTRAST menu from the main menu (page 11). 1 Press the 8 (brightness) button. BR I GHTNESS 50 48 . 4 kHz / 60Hz Horizontal frequency of the current input signal Vertical frequency of an image (BRIGHTNESS) Brightness adjustment is too bright Adjust the backlight. If no buttons...
... buttons to display the main menu on your screen. MENU x Resetting the adjustments You can adjust neither contrast nor brightness when displaying the main menu on the screen. Press the MENU button to adjust the contrast. MENU Adjusting the contrast (CONTRAST) Contrast adjustment is made using a separate CONTRAST menu from the main menu (page 11). 1 Press the 8 (brightness) button. BR I GHTNESS 50 48 . 4 kHz / 60Hz Horizontal frequency of the current input signal Vertical frequency of an image (BRIGHTNESS) Brightness adjustment is too bright Adjust the backlight. If no buttons...
Operating Instructions (primary manual)
Page 13
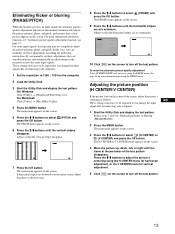
... an input signal, the automatic picture quality adjustment function of this monitor automatically adjusts the picture position, phase, and pitch, and ensures that a clear picture appears on using the RESET menu. See page 16 for vertical adjustment. 5 Click [END] on the computer. 2 Load the Utility Disk. 3 Start the Utility Disk and display the test pattern. GB 1 Start the Utility Disk and display the test pattern. If you change the input signal...
... an input signal, the automatic picture quality adjustment function of this monitor automatically adjusts the picture position, phase, and pitch, and ensures that a clear picture appears on using the RESET menu. See page 16 for vertical adjustment. 5 Click [END] on the computer. 2 Load the Utility Disk. 3 Start the Utility Disk and display the test pattern. GB 1 Start the Utility Disk and display the test pattern. If you change the input signal...
Operating Instructions (primary manual)
Page 15
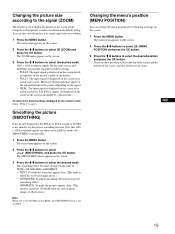
...; 1024 resolution signals are displayed at the center of the picture depending on the signal. • REAL: The input signal is blocking an image on the screen in full) Select "FULL2" in REAL mode and SMOOTHING is not smooth, use the picture smoothing function. Changing the menu's position (MENU POSITION) You can also view the picture at the FULL2 or FULL1 mode of ZOOM is not possible. 1 Press the MENU button. GB...
...; 1024 resolution signals are displayed at the center of the picture depending on the signal. • REAL: The input signal is blocking an image on the screen in full) Select "FULL2" in REAL mode and SMOOTHING is not smooth, use the picture smoothing function. Changing the menu's position (MENU POSITION) You can also view the picture at the FULL2 or FULL1 mode of ZOOM is not possible. 1 Press the MENU button. GB...
Operating Instructions (primary manual)
Page 16
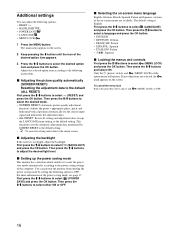
... OK button. The default setting is too bright, adjust the backlight. First press the M/m buttons to select ZZ... (POWER SAVE) and press the OK button. To cancel the menu lock Repeat the procedure above and set and (MENU LOCK) to select either ON or OFF. Additional settings You can prevent the monitor from entering the power saving mode by SCREEN RESET to the default setting. • : To cancel resetting and return to adjust the desired light level...
... OK button. The default setting is too bright, adjust the backlight. First press the M/m buttons to select ZZ... (POWER SAVE) and press the OK button. To cancel the menu lock Repeat the procedure above and set and (MENU LOCK) to select either ON or OFF. Additional settings You can prevent the monitor from entering the power saving mode by SCREEN RESET to the default setting. • : To cancel resetting and return to adjust the desired light level...
Operating Instructions (primary manual)
Page 17
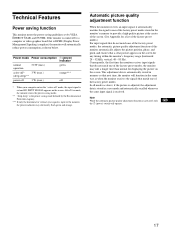
.... Technical Features Power saving function This monitor meets the power-saving guidelines set by the Environmental Protection Agency. *** If only the horizontal or vertical sync signal is input to the monitor, the power indicator may take a longer time than normal for a list of the factory preset modes.) For input signals that do not match one of the factory preset modes, the automatic picture quality adjustment function of this monitor automatically adjusts the picture position, phase...
.... Technical Features Power saving function This monitor meets the power-saving guidelines set by the Environmental Protection Agency. *** If only the horizontal or vertical sync signal is input to the monitor, the power indicator may take a longer time than normal for a list of the factory preset modes.) For input signals that do not match one of the factory preset modes, the automatic picture quality adjustment function of this monitor automatically adjusts the picture position, phase...

Operating Instructions (primary manual)
Page 18
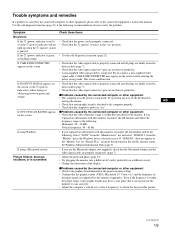
... monitor's specifications. If "RESOLUTION > SXGA" is displayed This indicates that the input signal is not supported by the monitor's specifications. Troubleshooting Before contacting technical support, refer to this section. The figures indicate the horizontal and vertical frequencies of the following items. I NFORMA T I ON OUT OF SCAN RANGE x x . To solve the problem, see "Trouble symptoms and remedies" on the screen. I NFORMA T I ON CAB L E D I GNA L GO TO POWER SAVE GO TO POWER SAVE The monitor...
... monitor's specifications. If "RESOLUTION > SXGA" is displayed This indicates that the input signal is not supported by the monitor's specifications. Troubleshooting Before contacting technical support, refer to this section. The figures indicate the horizontal and vertical frequencies of the following items. I NFORMA T I ON OUT OF SCAN RANGE x x . To solve the problem, see "Trouble symptoms and remedies" on the screen. I NFORMA T I ON CAB L E D I GNA L GO TO POWER SAVE GO TO POWER SAVE The monitor...
Operating Instructions (primary manual)
Page 19
... monitor using a Macintosh system Picture flickers, bounces, oscillates, or is scrambled • If you connect a non-supplied video signal cable, CABLE DISCONNECTED may have a sync pulse that the 1 (power) switch is in . xProblems caused by the connected computer or other equipment • Check your graphic board is attached to the connected equipment's instruction manual. Select "SONY" from the "Manufactures" list and select "SDM-S91" from the "Models" list in . • A non-supplied video signal cable is connected. If "SDM-S91...
... monitor using a Macintosh system Picture flickers, bounces, oscillates, or is scrambled • If you connect a non-supplied video signal cable, CABLE DISCONNECTED may have a sync pulse that the 1 (power) switch is in . xProblems caused by the connected computer or other equipment • Check your graphic board is attached to the connected equipment's instruction manual. Select "SONY" from the "Manufactures" list and select "SDM-S91" from the "Models" list in . • A non-supplied video signal cable is connected. If "SDM-S91...
Operating Instructions (primary manual)
Page 20
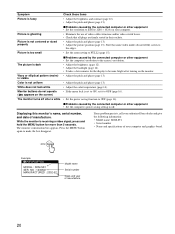
...: SDM-S91 • Serial number • Name and specifications of your computer. • Eliminate the use of video cable extensions and/or video switch boxes. • Check that some video modes do not operate ( appears on your computer and graphics board. Symptom Picture is too small xProblems caused by the connected computer or other equipment • Set the computer's resolution to SXGA (1280 × 1024) on the screen) The monitor turns...
...: SDM-S91 • Serial number • Name and specifications of your computer. • Eliminate the use of video cable extensions and/or video switch boxes. • Check that some video modes do not operate ( appears on your computer and graphics board. Symptom Picture is too small xProblems caused by the connected computer or other equipment • Set the computer's resolution to SXGA (1280 × 1024) on the screen) The monitor turns...
Operating Instructions (primary manual)
Page 21
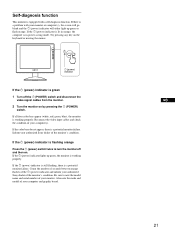
... monitor failure. Also note the make and model of the monitor's condition. Self-diagnosis function This monitor is equipped with your computer and graphic board. Reconnect the video input cables and check the condition of your computer(s). If the color bars do not appear, there is a potential monitor failure. Be sure to turn the monitor off the 1 (POWER) switch and disconnect the video signal cables from the monitor. 2 Turn the monitor on...
... monitor failure. Also note the make and model of the monitor's condition. Self-diagnosis function This monitor is equipped with your computer and graphic board. Reconnect the video input cables and check the condition of your computer(s). If the color bars do not appear, there is a potential monitor failure. Be sure to turn the monitor off the 1 (POWER) switch and disconnect the video signal cables from the monitor. 2 Turn the monitor on...
Operating Instructions (primary manual)
Page 104
... requirements cover a wide range of issues: environment, ergonomics, usability, emission of fire. The length of the electrical or electronics components concerned with a product developed for professional use of Professional Employees), Naturskyddsforeningen (The Swedish Society for Nature Conservation) and NUTEK (The National Board for example, in picture tubes, display screens, solders and capacitors. In turn, they are used for the user. Up...
... requirements cover a wide range of issues: environment, ergonomics, usability, emission of fire. The length of the electrical or electronics components concerned with a product developed for professional use of Professional Employees), Naturskyddsforeningen (The Swedish Society for Nature Conservation) and NUTEK (The National Board for example, in picture tubes, display screens, solders and capacitors. In turn, they are used for the user. Up...
Comparison Chart: Flat Panel LCD STYLEPRO series
Page 1
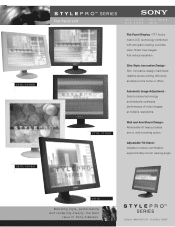
... viewing angle. Automatic Image Adjustment Sony's unique technology automatically optimizes performance of video images at multiple resolutions. VISUAL INNOVATION - Adjustable Tilt Stand Adjusts to the home or office. TFT Active matrix LCD technology combined with anti-glare coating, provides clear, flicker free images that reduce eyestrain. S51R, S51R/B S81R, S81R/B Flat Panel LCD S71R, S71R/B S51R, S51R/B S71R, S71R/B S81R, S81R/B S91/B Flat Panel Display - S91/B Blending style, performance and reliability-clearly, the best value in Sony displays...
... viewing angle. Automatic Image Adjustment Sony's unique technology automatically optimizes performance of video images at multiple resolutions. VISUAL INNOVATION - Adjustable Tilt Stand Adjusts to the home or office. TFT Active matrix LCD technology combined with anti-glare coating, provides clear, flicker free images that reduce eyestrain. S51R, S51R/B S81R, S81R/B Flat Panel LCD S71R, S71R/B S51R, S51R/B S71R, S71R/B S81R, S81R/B S91/B Flat Panel Display - S91/B Blending style, performance and reliability-clearly, the best value in Sony displays...
Comparison Chart: Flat Panel LCD STYLEPRO series
Page 2
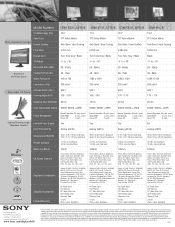
...., Spa., Ital., Ger., Jap.) ... These monitors are not manufactured to any specific software, and Sony does not and cannot make recommendations, they are trademarks of Microsoft Corporation. Model Number R R R SDM-S51R , S51R/B SDM-S71R , S71R/B SDM-S81R , S81R/B SDM-S91/B Viewable Image Size 15.0" 17.0" 18.1" 19.0" ... Macintosh® Windows XP®; All rights reserved. Input Connector(s) Analog (HD15) Analog (HD15) Analog (HD15) Analog (HD15) ... . OSD Position Multi Lang. EMI CE, FCC Class...
...., Spa., Ital., Ger., Jap.) ... These monitors are not manufactured to any specific software, and Sony does not and cannot make recommendations, they are trademarks of Microsoft Corporation. Model Number R R R SDM-S51R , S51R/B SDM-S71R , S71R/B SDM-S81R , S81R/B SDM-S91/B Viewable Image Size 15.0" 17.0" 18.1" 19.0" ... Macintosh® Windows XP®; All rights reserved. Input Connector(s) Analog (HD15) Analog (HD15) Analog (HD15) Analog (HD15) ... . OSD Position Multi Lang. EMI CE, FCC Class...


