Operating Instructions (primary manual)
Page 2
... not occur in a particular installation. These limits are present inside the unit. However, there is applicable for the white model) This monitor complies with the instructions, may cause undesired operation. Si cet appareil est export* aux Etats-Unis ou au Canada, utiliser le cordon ...Drop #T1-11, Park Ridge, NJ 07656 Declaration of Conformity Trade Name: Model No.: Responsible Party: Address: Telephone No.: SONY SDM-S51/S71/S81 Sony Electronics Inc. 680 Kinderkamack Road, Oradell, NJ 07649 USA 201-930-6972 This device complies with the limits for help. Operation...
... not occur in a particular installation. These limits are present inside the unit. However, there is applicable for the white model) This monitor complies with the instructions, may cause undesired operation. Si cet appareil est export* aux Etats-Unis ou au Canada, utiliser le cordon ...Drop #T1-11, Park Ridge, NJ 07656 Declaration of Conformity Trade Name: Model No.: Responsible Party: Address: Telephone No.: SONY SDM-S51/S71/S81 Sony Electronics Inc. 680 Kinderkamack Road, Oradell, NJ 07649 USA 201-930-6972 This device complies with the limits for help. Operation...
Operating Instructions (primary manual)
Page 3
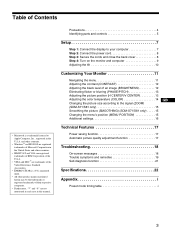
...the power cord 8 Step 3: Secure the cords and close the back cover 8 Step 4: Turn on the monitor and computer 9 Adjusting the tilt 10 Customizing Your Monitor 11 Navigating the menu 11 Adjusting the contrast (CONTRAST 12 Adjusting the black level of an image (BRIGHTNESS ...226;" are trademarks of the Video Electronics Standard Association. • ENERGY STAR is a trademark licensed to the signal (ZOOM) (SDM-S71/S81 only 15 Smoothing the picture (SMOOTHING) (SDM-S71/S81 only) . . . . . 15 Changing the menu's position (MENU POSITION 15 Additional settings 16 Technical Features 17 ...
...the power cord 8 Step 3: Secure the cords and close the back cover 8 Step 4: Turn on the monitor and computer 9 Adjusting the tilt 10 Customizing Your Monitor 11 Navigating the menu 11 Adjusting the contrast (CONTRAST 12 Adjusting the black level of an image (BRIGHTNESS ...226;" are trademarks of the Video Electronics Standard Association. • ENERGY STAR is a trademark licensed to the signal (ZOOM) (SDM-S71/S81 only 15 Smoothing the picture (SMOOTHING) (SDM-S71/S81 only) . . . . . 15 Changing the menu's position (MENU POSITION 15 Additional settings 16 Technical Features 17 ...
Operating Instructions (primary manual)
Page 4
... tap the surface of cleaner containing an anti-static solution or similar additive as the lighting apparatus for SDM-S71/S81. Installation Do not install or leave the monitor: • In places subject to mandatory FCC standards. Otherwise irreparable malfunctions could cause deformations of contact...Please note that it can damage the LCD screen. Consult your monitor. • Clean the LCD screen with a new one. Transportation • Disconnect all cables from the power outlet before cleaning your Sony dealer when replacing the fluorescent tube. For the customers in direct ...
... tap the surface of cleaner containing an anti-static solution or similar additive as the lighting apparatus for SDM-S71/S81. Installation Do not install or leave the monitor: • In places subject to mandatory FCC standards. Otherwise irreparable malfunctions could cause deformations of contact...Please note that it can damage the LCD screen. Consult your monitor. • Clean the LCD screen with a new one. Transportation • Disconnect all cables from the power outlet before cleaning your Sony dealer when replacing the fluorescent tube. For the customers in direct ...
Operating Instructions (primary manual)
Page 5
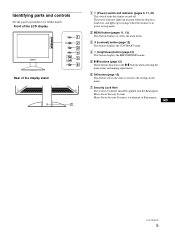
The power indicator lights up in orange when the monitor is in power saving mode. 2 MENU button (pages 11, 12) This button displays or closes the main menu. 3 6 (contrast) button (page 12) This button displays ...
The power indicator lights up in orange when the monitor is in power saving mode. 2 MENU button (pages 11, 12) This button displays or closes the main menu. 3 6 (contrast) button (page 12) This button displays ...
Operating Instructions (primary manual)
Page 6
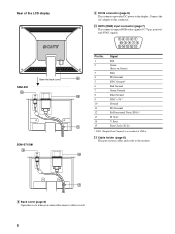
SDM-S71/S81 9 DC IN connector (page 8) This connector provides DC power to this cover when you connect/disconnect cables or cords. 6 Sync Data Clock (SCL)* * DDC (Display Data Channel) is a standard of the LCD display OPEN SDM-S51 Open the back cover. Sync V. q; Connect the AC adapter to the display. HD15 (RGB) input... Green Ground Blue Ground DDC + 5V* Ground ID (Ground) Bi-Directional Data (SDA)* H. qa Cable holder (page 8) This part secures cables and cords to the monitor. 8 Back cover (page 8) Open this connector. Rear of VESA.
SDM-S71/S81 9 DC IN connector (page 8) This connector provides DC power to this cover when you connect/disconnect cables or cords. 6 Sync Data Clock (SCL)* * DDC (Display Data Channel) is a standard of the LCD display OPEN SDM-S51 Open the back cover. Sync V. q; Connect the AC adapter to the display. HD15 (RGB) input... Green Ground Blue Ground DDC + 5V* Ground ID (Ground) Bi-Directional Data (SDA)* H. qa Cable holder (page 8) This part secures cables and cords to the monitor. 8 Back cover (page 8) Open this connector. Rear of VESA.
Operating Instructions (primary manual)
Page 7
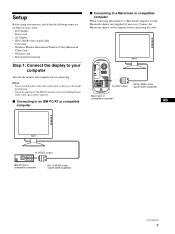
... cable (supplied) Macintosh or compatible computer GB to a Macintosh computer, use the Macintosh adapter (not supplied) if necessary. Setup Before using your monitor, check that the following items are included in your carton: • LCD display • Power cord • AC adapter • HD15 ...(RGB) video signal cable • Cord strap • Windows Monitor Information/Windows Utility/Macintosh Utility Disk • Warranty card • This instruction manual Step 1: Connect the display to your computer Turn off the...
... cable (supplied) Macintosh or compatible computer GB to a Macintosh computer, use the Macintosh adapter (not supplied) if necessary. Setup Before using your monitor, check that the following items are included in your carton: • LCD display • Power cord • AC adapter • HD15 ...(RGB) video signal cable • Cord strap • Windows Monitor Information/Windows Utility/Macintosh Utility Disk • Warranty card • This instruction manual Step 1: Connect the display to your computer Turn off the...
Operating Instructions (primary manual)
Page 8
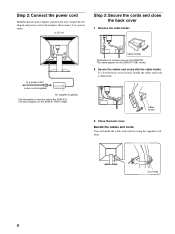
...OPEN to a power outlet power cord (supplied) AC adapter (supplied) This illustration of monitor rear are the SDM-S51. Cord strap 8 to a power outlet. Cable holder 3 Close the back cover. The same applies for the SDM-S71/S81 model. 2 Secure the cables and cords with the cable holder. Step 2: ...the cords and close the back cover securely, bundle the cables and cords as illustrated. Cable holder Illustrations of monitor rear is the SDM-S51. The same applies for the SDM-S71/S81 model. To close the back cover 1 Remove the cable holder. Bandle the cables and cords You can...
...OPEN to a power outlet power cord (supplied) AC adapter (supplied) This illustration of monitor rear are the SDM-S51. Cord strap 8 to a power outlet. Cable holder 3 Close the back cover. The same applies for the SDM-S71/S81 model. 2 Secure the cables and cords with the cable holder. Step 2: ...the cords and close the back cover securely, bundle the cables and cords as illustrated. Cable holder Illustrations of monitor rear is the SDM-S51. The same applies for the SDM-S71/S81 model. To close the back cover 1 Remove the cable holder. Bandle the cables and cords You can...
Operating Instructions (primary manual)
Page 9
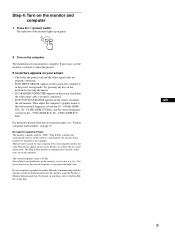
... (SDM-S71/S81), and the vertical frequency is automatically selected so that you can use the monitor's controls to the computer. You do not need for this monitor, install the information file for specific drivers The monitor complies with this monitor using the Windows Monitor Information Disk. In this monitor. If... are unobtrusive on the monitor, you turn on the screen, reconnect the old monitor. The first time you can use this case, follow the on the screen. The Plug & Play monitor is between 48 - 75 Hz (SDM-S51), 48 - 85 Hz (SDM-S71/ S81). The indicator ...
... (SDM-S71/S81), and the vertical frequency is automatically selected so that you can use the monitor's controls to the computer. You do not need for this monitor, install the information file for specific drivers The monitor complies with this monitor using the Windows Monitor Information Disk. In this monitor. If... are unobtrusive on the monitor, you turn on the screen, reconnect the old monitor. The first time you can use this case, follow the on the screen. The Plug & Play monitor is between 48 - 75 Hz (SDM-S51), 48 - 85 Hz (SDM-S71/ S81). The indicator ...
Operating Instructions (primary manual)
Page 11
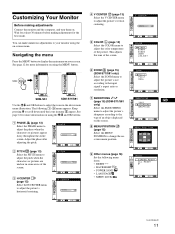
... 0 S CREEN RESE T AL L RESET EX I T 4 V CENTER (page 13) Select the V CENTER menu to display the main menu on your monitor using the on the screen. 8 MENU POSITION (page 15) Select the MENU POSITION to adjust the picture's horizontal centering. Keep pressing m to your screen. You... T S T ANDARD GRAPH I CS GB EX I T MENU POS I T I ON 9 Other menus (page 16) Set the following 1~9 menu appears. MENU , PHAS E PHASE SDM-S51 EX I T SDM-S71/S81 Use the M/m and OK buttons to adjust the color temperature of the screen. 3 H CENTER (page 13) Select the H CENTER menu to change the...
... 0 S CREEN RESE T AL L RESET EX I T 4 V CENTER (page 13) Select the V CENTER menu to display the main menu on your monitor using the on the screen. 8 MENU POSITION (page 15) Select the MENU POSITION to adjust the picture's horizontal centering. Keep pressing m to your screen. You... T S T ANDARD GRAPH I CS GB EX I T MENU POS I T I ON 9 Other menus (page 16) Set the following 1~9 menu appears. MENU , PHAS E PHASE SDM-S51 EX I T SDM-S71/S81 Use the M/m and OK buttons to adjust the color temperature of the screen. 3 H CENTER (page 13) Select the H CENTER menu to change the...
Operating Instructions (primary manual)
Page 13
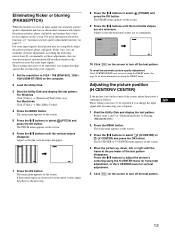
... the vertical stripes disappear. Adjusting the picture position (H CENTER/V CENTER) If the picture is not in memory and automatically recalled whenever the monitor receives the same input signals. Repeat steps 2 and 3 of the test pattern disappears. The H CENTER or V CENTER menu appears on... this monitor automatically adjusts the picture position, phase, and pitch, and ensures that the vertical stripes disappear. , 7 Press the OK button. If you change the input signal after reconnecting your computer. 1 Set the resolution to 1024 × 768 (SDM-S51), 1280 × 1024 (SDM-S71/S81)...
... the vertical stripes disappear. Adjusting the picture position (H CENTER/V CENTER) If the picture is not in memory and automatically recalled whenever the monitor receives the same input signals. Repeat steps 2 and 3 of the test pattern disappears. The H CENTER or V CENTER menu appears on... this monitor automatically adjusts the picture position, phase, and pitch, and ensures that the vertical stripes disappear. , 7 Press the OK button. If you change the input signal after reconnecting your computer. 1 Set the resolution to 1024 × 768 (SDM-S51), 1280 × 1024 (SDM-S71/S81)...
Operating Instructions (primary manual)
Page 15
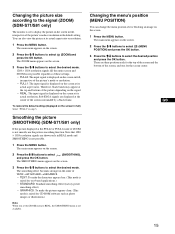
... view the picture at its actual resolution. The main menu appears on the screen. 1 Press the MENU button. Smoothing the picture (SMOOTHING) (SDM-S71/S81 only) If the picture displayed at the center of the picture's mode or resolution in the default setting. To restore the default setting (...the screen center. Therefore, black bands may appear at its actual aspect ratio. Changing the picture size according to the signal (ZOOM) (SDM-S71/S81 only) The monitor is set the ZOOM menu to REAL, the SMOOTHING menu is not available. The SMOOTHING menu appears on the screen. 3 Press the ...
... view the picture at its actual resolution. The main menu appears on the screen. 1 Press the MENU button. Smoothing the picture (SMOOTHING) (SDM-S71/S81 only) If the picture displayed at the center of the picture's mode or resolution in the default setting. To restore the default setting (...the screen center. Therefore, black bands may appear at its actual aspect ratio. Changing the picture size according to the signal (ZOOM) (SDM-S71/S81 only) The monitor is set the ZOOM menu to REAL, the SMOOTHING menu is not available. The SMOOTHING menu appears on the screen. 3 Press the ...
Operating Instructions (primary manual)
Page 16
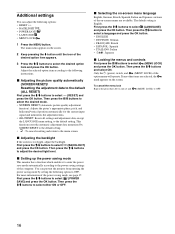
... the M/m buttons to the default setting. The default setting is too bright, adjust the backlight. x Setting up the power saving mode This monitor has a function which enables it to enter the power save mode automatically according to the power saving settings of the option menu will operate. ... option item appears. 3 Press the M/m buttons to select the desired option item and press the OK button. Additional settings You can prevent the monitor from entering the power saving mode by SCREEN RESET to the default setting. • : To cancel resetting and return to the menu screen....
... the M/m buttons to the default setting. The default setting is too bright, adjust the backlight. x Setting up the power saving mode This monitor has a function which enables it to enter the power save mode automatically according to the power saving settings of the option menu will operate. ... option item appears. 3 Press the M/m buttons to select the desired option item and press the OK button. Additional settings You can prevent the monitor from entering the power saving mode by SCREEN RESET to the default setting. • : To cancel resetting and return to the menu screen....

Operating Instructions (primary manual)
Page 17
... the screen. (See Appendix for any timing within the monitor's frequency range (horizontal: 28 - 60 kHz (SDM-S51), 28 - 92 kHz (SDM-S71/S81), vertical: 48 - 75 Hz (SDM-S51), 48 - 85 Hz (SDM-S71/S81)). If the monitor is received. Automatic picture quality adjustment function When the monitor receives an input signal, it automatically matches the signal to...
... the screen. (See Appendix for any timing within the monitor's frequency range (horizontal: 28 - 60 kHz (SDM-S51), 28 - 92 kHz (SDM-S71/S81), vertical: 48 - 75 Hz (SDM-S51), 48 - 85 Hz (SDM-S71/S81)). If the monitor is received. Automatic picture quality adjustment function When the monitor receives an input signal, it automatically matches the signal to...
Operating Instructions (primary manual)
Page 18
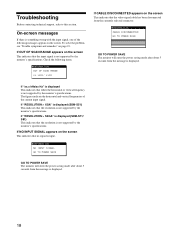
.../ x xHz If CABLE DISCONNECTED appears on the screen This indicates that the resolution is not supported by the monitor's specifications. If "RESOLUTION > XGA" is displayed (SDM-S51) This indicates that the input signal is input. Troubleshooting Before contacting technical support, refer to this section.... 5 seconds from the message is displayed. 18 On-screen messages If there is not supported by the monitor's specifications. If "RESOLUTION > SXGA" is displayed (SDM-S71/ S81) This indicates that the video signal cable has been disconnected from the message is displayed. Check...
.../ x xHz If CABLE DISCONNECTED appears on the screen This indicates that the resolution is not supported by the monitor's specifications. If "RESOLUTION > XGA" is displayed (SDM-S51) This indicates that the input signal is input. Troubleshooting Before contacting technical support, refer to this section.... 5 seconds from the message is displayed. 18 On-screen messages If there is not supported by the monitor's specifications. If "RESOLUTION > SXGA" is displayed (SDM-S71/ S81) This indicates that the video signal cable has been disconnected from the message is displayed. Check...
Operating Instructions (primary manual)
Page 19
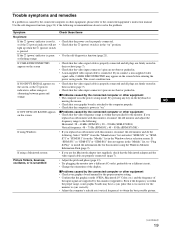
...(page 21) if the following recommendations do the following : Horizontal: 28 - 60 kHz (SDM-S51), 28 - 92 kHz (SDM-S71/S81) Vertical frequency: 48 - 75 Hz (SDM-S51), 48 - 85 Hz (SDM-S71/S81) If using the Windows Monitor Information Disk (page 9). Symptom Check these items No picture If the 1 (power) indicator ...the computer properly. • Check that the 1 (power) switch is "on " position. • Use the self-diagnostics function (page 21). Select "SONY" from the "Manufactures" list and select "SDM-S51" or "SDMS71"or "SDM-S81" from the "Models" list in the "on ." GB (continued) 19
...(page 21) if the following recommendations do the following : Horizontal: 28 - 60 kHz (SDM-S51), 28 - 92 kHz (SDM-S71/S81) Vertical frequency: 48 - 75 Hz (SDM-S51), 48 - 85 Hz (SDM-S71/S81) If using the Windows Monitor Information Disk (page 9). Symptom Check these items No picture If the 1 (power) indicator ...the computer properly. • Check that the 1 (power) switch is "on " position. • Use the self-diagnostics function (page 21). Select "SONY" from the "Manufactures" list and select "SDM-S51" or "SDMS71"or "SDM-S81" from the "Models" list in the "on ." GB (continued) 19
Operating Instructions (primary manual)
Page 20
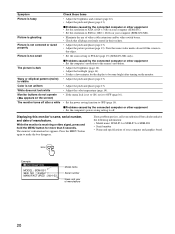
... do not operate ( appears on the screen) The monitor turns off . Displaying this monitor's name, serial number, and date of your computer and graphics board. If any problem persists, call your authorized Sony dealer and give the following information: • Model name: SDM-S51 or SDM-S71 or SDM-S81 • Serial number • Name and specifications...
... do not operate ( appears on the screen) The monitor turns off . Displaying this monitor's name, serial number, and date of your computer and graphics board. If any problem persists, call your authorized Sony dealer and give the following information: • Model name: SDM-S51 or SDM-S71 or SDM-S81 • Serial number • Name and specifications...
Operating Instructions (primary manual)
Page 21
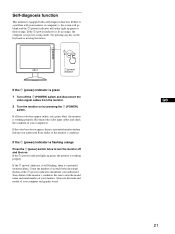
... the video input cables and check the condition of the monitor's condition. If the 1 (power) indicator lights up green or flash orange. If the 1 (power) indicator is lit in orange, the computer is equipped with your authorized Sony dealer of your computer and graphic board. If all four... color bars appear (white, red, green, blue), the monitor is flashing orange Press the 1 (power) switch twice to note the model name and ...
... the video input cables and check the condition of the monitor's condition. If the 1 (power) indicator lights up green or flash orange. If the 1 (power) indicator is lit in orange, the computer is equipped with your authorized Sony dealer of your computer and graphic board. If all four... color bars appear (white, red, green, blue), the monitor is flashing orange Press the 1 (power) switch twice to note the model name and ...
Marketing Specifications
Page 2
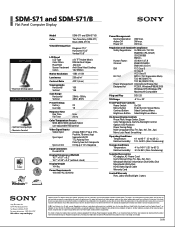
...Design • Maximize desktop space Adjustable Pivot Stand 4 Port USB Hub • Optimal Viewing Angle • Maximize Comfort Model SDM-S71 and SDM-S71/B Color Two Tone Gray (SDM-S71) Black (SDM-S71/B) Viewable Image Size Diagonal 17.0" Horizontal 13.3" Vertical 10.6" LCD Panel LCD Type Color Filters Pixel Pitch Screen Treatment Colors ...free, Ext. Purchasers must determine for energy efficiency. Reproduction in whole or in each and every particular instance. ©2002 Sony Electronics Inc. All other trademarks are a multitude of Sony. This monitor is prohibited.
...Design • Maximize desktop space Adjustable Pivot Stand 4 Port USB Hub • Optimal Viewing Angle • Maximize Comfort Model SDM-S71 and SDM-S71/B Color Two Tone Gray (SDM-S71) Black (SDM-S71/B) Viewable Image Size Diagonal 17.0" Horizontal 13.3" Vertical 10.6" LCD Panel LCD Type Color Filters Pixel Pitch Screen Treatment Colors ...free, Ext. Purchasers must determine for energy efficiency. Reproduction in whole or in each and every particular instance. ©2002 Sony Electronics Inc. All other trademarks are a multitude of Sony. This monitor is prohibited.


