Operating Instructions
Page 2
... model and serial numbers are designed to provide reasonable protection against harmful interference in a residential installation. Model No. Dangerously high voltages are cautioned that may cause harmful interference to radio communications. Do not open the cabinet. Increase the separation between the equipment and receiver. - NOTICE This notice is connected. - If shipped to the following specifications: SPECIFICATIONS Plug Type Nema-Plug 5-15p Cord...
... model and serial numbers are designed to provide reasonable protection against harmful interference in a residential installation. Model No. Dangerously high voltages are cautioned that may cause harmful interference to radio communications. Do not open the cabinet. Increase the separation between the equipment and receiver. - NOTICE This notice is connected. - If shipped to the following specifications: SPECIFICATIONS Plug Type Nema-Plug 5-15p Cord...

Operating Instructions
Page 3
Precautions 4 Identifying parts and controls 5 Setup 7 Step 1: Open the stand 7 Step 2: Connect the display to your computer 7 Step 3: Connect the power cord 8 Step 4: Secure the cords and replace the back cover 8 Step 5: Turn on the monitor and computer 9 Adjusting the tilt 9 Selecting the input signal (INPUT button 9 Customizing Your Monitor 10 Navigating the menu 10 PICTURE menu 10 SCREEN menu (analog RGB signal only 12 MENU POSITION menu 13 GB INPUT SENSING menu 14 LANGUAGE menu 14 0 RESET menu (reset to Apple Computer, Inc., registered in this manual. Table of ...
Precautions 4 Identifying parts and controls 5 Setup 7 Step 1: Open the stand 7 Step 2: Connect the display to your computer 7 Step 3: Connect the power cord 8 Step 4: Secure the cords and replace the back cover 8 Step 5: Turn on the monitor and computer 9 Adjusting the tilt 9 Selecting the input signal (INPUT button 9 Customizing Your Monitor 10 Navigating the menu 10 PICTURE menu 10 SCREEN menu (analog RGB signal only 12 MENU POSITION menu 13 GB INPUT SENSING menu 14 LANGUAGE menu 14 0 RESET menu (reset to Apple Computer, Inc., registered in this manual. Table of ...

Operating Instructions
Page 4
... in this type of installation. Installation on a wall or a mounting arm If you use a glass cleaning liquid, do not use any equipment that material deterioration or LCD screen coating degradation may occur if the monitor is exposed to lose uniformity or cause LCD panel malfunctions. • If the monitor is displayed for a long time, a residual image may appear on a flat surface. Subjecting the monitor to mechanical vibration...
... in this type of installation. Installation on a wall or a mounting arm If you use a glass cleaning liquid, do not use any equipment that material deterioration or LCD screen coating degradation may occur if the monitor is exposed to lose uniformity or cause LCD panel malfunctions. • If the monitor is displayed for a long time, a residual image may appear on a flat surface. Subjecting the monitor to mechanical vibration...

Operating Instructions
Page 5
... 9, 15) To turn the display on , and lights up in orange when the monitor is in green when the display is turned on or off , press the 1 (power) switch upward. GB 6 INPUT button (page 9) This button switches the video input signal between INPUT1 and INPUT2 when two computers are on or off . Identifying parts and controls See the pages in the menu. 5 button (page 16) This button is used to cover the sensor...
... 9, 15) To turn the display on , and lights up in orange when the monitor is in green when the display is turned on or off , press the 1 (power) switch upward. GB 6 INPUT button (page 9) This button switches the video input signal between INPUT1 and INPUT2 when two computers are on or off . Identifying parts and controls See the pages in the menu. 5 button (page 16) This button is used to cover the sensor...

Operating Instructions
Page 7
...connector (analog RGB) to the computer's DVI output connector (digital RGB) to the DVI-D input connector (digital RGB) DVI-D video signal cable (digital RGB) (supplied) to your carton: • LCD display • Power cord • HD15-HD15 video signal cable (analog RGB) • DVI-D video signal cable (digital RGB) • Cord strap • CD-ROM (utility software for Windows/Macintosh, Operating Instructions, etc.) • Warranty card • Quick Setup Guide Step 1: Open the stand Note The stand is . Be sure not to the monitor's HD15 input connector (analog RGB). Connect...
...connector (analog RGB) to the computer's DVI output connector (digital RGB) to the DVI-D input connector (digital RGB) DVI-D video signal cable (digital RGB) (supplied) to your carton: • LCD display • Power cord • HD15-HD15 video signal cable (analog RGB) • DVI-D video signal cable (digital RGB) • Cord strap • CD-ROM (utility software for Windows/Macintosh, Operating Instructions, etc.) • Warranty card • Quick Setup Guide Step 1: Open the stand Note The stand is . Be sure not to the monitor's HD15 input connector (analog RGB). Connect...
Operating Instructions
Page 9
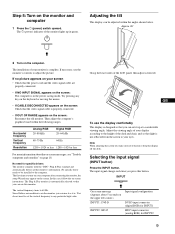
....) INPUT1 : DVI-D INPUT2 : HD15 Input signal configuration DVI-D input connector (digital RGB) for INPUT1 HD15 input connector (analog RGB) for specific drivers The monitor complies with the "DDC" Plug & Play standard and automatically detects all the monitor's information. Then adjust the computer's graphics board within the angles shown below. The vertical frequency turns to knock or drop the display off the desk. Since flickers are properly connected. • If NO INPUT SIGNAL appears on -screen instructions. The input signal change each time...
....) INPUT1 : DVI-D INPUT2 : HD15 Input signal configuration DVI-D input connector (digital RGB) for INPUT1 HD15 input connector (analog RGB) for specific drivers The monitor complies with the "DDC" Plug & Play standard and automatically detects all the monitor's information. Then adjust the computer's graphics board within the angles shown below. The vertical frequency turns to knock or drop the display off the desk. Since flickers are properly connected. • If NO INPUT SIGNAL appears on -screen instructions. The input signal change each time...

Operating Instructions
Page 11
... OK button. COLOR 9300K 6500K sRGB USER ADJUST MOVIE 1280 x1024 / 60Hz EX I T 1 Press the MENU button. The main menu appears on the screen. 2 Press the m/M buttons to select (PICTURE) and press the OK button. While "AUTO" is lowered from the default color temperature settings. The main menu appears on the screen. 2 Press the m/M buttons to select (PICTURE) and press the OK button. x Adjusting the BRIGHTNESS Adjust the picture brightness (black level). 1 Press the MENU button. The "CONTRAST" menu appears...
... OK button. COLOR 9300K 6500K sRGB USER ADJUST MOVIE 1280 x1024 / 60Hz EX I T 1 Press the MENU button. The main menu appears on the screen. 2 Press the m/M buttons to select (PICTURE) and press the OK button. While "AUTO" is lowered from the default color temperature settings. The main menu appears on the screen. 2 Press the m/M buttons to select (PICTURE) and press the OK button. x Adjusting the BRIGHTNESS Adjust the picture brightness (black level). 1 Press the MENU button. The "CONTRAST" menu appears...
Operating Instructions
Page 12
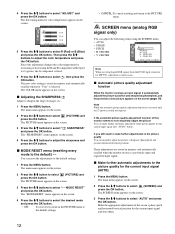
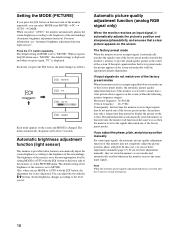
... input signal, it automatically adjusts the picture's position and sharpness (phase/pitch), and ensures that a clear picture appears on the screen. x Make further automatic adjustments to the picture quality You can make further adjustments to the picture quality for INPUT1, adjustment is activated, only the 1 (power) switch will operate. USER ADJUSTMENT R 128 G 128 B 128 1280 x1024 / 60Hz EX I T Note When receiving digital RGB signals from the DVI-D input connector for the current input signal (AUTO) 1 Press the MENU button...
... input signal, it automatically adjusts the picture's position and sharpness (phase/pitch), and ensures that a clear picture appears on the screen. x Make further automatic adjustments to the picture quality You can make further adjustments to the picture quality for INPUT1, adjustment is activated, only the 1 (power) switch will operate. USER ADJUSTMENT R 128 G 128 B 128 1280 x1024 / 60Hz EX I T Note When receiving digital RGB signals from the DVI-D input connector for the current input signal (AUTO) 1 Press the MENU button...
Operating Instructions
Page 13
... the computer is connected to the monitor's HD15 input connector (analog RGB). 1 Set the resolution to 1280 × 1024 on the screen. 7 Press the m/M buttons until the vertical stripes disappear. For Macintosh Click [Utility] t [Mac]/[Mac Utility]. 4 Press the MENU button. The "PHASE" adjustment menu appears on the computer. 2 Load the CD-ROM. 3 Start the CD-ROM, select the area and model, and display the test pattern. Adjust so that the...
... the computer is connected to the monitor's HD15 input connector (analog RGB). 1 Set the resolution to 1280 × 1024 on the screen. 7 Press the m/M buttons until the vertical stripes disappear. For Macintosh Click [Utility] t [Mac]/[Mac Utility]. 4 Press the MENU button. The "PHASE" adjustment menu appears on the computer. 2 Load the CD-ROM. 3 Start the CD-ROM, select the area and model, and display the test pattern. Adjust so that the...
Operating Instructions
Page 15
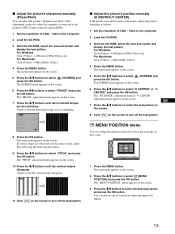
... off" mode, the input signal is DPMS (Display Power Management Standard) for Analog input/DMPM (DVI Digital Monitor Power Management) for Digital input compliant, the monitor will operate. If " MENU LOCK" has been set by the Environmental Protection Agency. 15 If the monitor is connected to a computer or video graphics board that is cut and NO INPUT SIGNAL appears on the screen. • OFF: Set " MENU LOCK" to off. Technical Features Power saving function This monitor meets the power-saving guidelines set to...
... off" mode, the input signal is DPMS (Display Power Management Standard) for Analog input/DMPM (DVI Digital Monitor Power Management) for Digital input compliant, the monitor will operate. If " MENU LOCK" has been set by the Environmental Protection Agency. 15 If the monitor is connected to a computer or video graphics board that is cut and NO INPUT SIGNAL appears on the screen. • OFF: Set " MENU LOCK" to off. Technical Features Power saving function This monitor meets the power-saving guidelines set to...
Operating Instructions
Page 16
... displayed. The default setting of MODE is set to AUTO with the appropriate default adjustments. The menu automatically disappears after about 5 seconds. If the input signal matches the factory preset mode, the picture appears on the screen. Setting the MODE (PICTURE) If you press the button on the lower side of the monitor repeatedly, you can set these adjustments manually, they are stored in the PICTURE menu. Press the button repeatedly. Each time you set MODE to MOVIE. Screen brightness changes...
... displayed. The default setting of MODE is set to AUTO with the appropriate default adjustments. The menu automatically disappears after about 5 seconds. If the input signal matches the factory preset mode, the picture appears on the screen. Setting the MODE (PICTURE) If you press the button on the lower side of the monitor repeatedly, you can set these adjustments manually, they are stored in the PICTURE menu. Press the button repeatedly. Each time you set MODE to MOVIE. Screen brightness changes...
Operating Instructions
Page 17
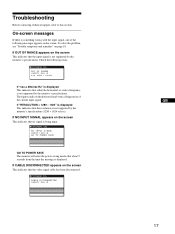
... solve the problem, see "Trouble symptoms and remedies" on the screen This indicates that no signal is not supported by the monitor's specifications. x kHz / x x xHz If "xxx.x kHz/xxx Hz" is displayed This indicates that the resolution is displayed. If "RESOLUTION > 1280 × 1024" is displayed This indicates that either the horizontal or vertical frequency is being input. The figures indicate the horizontal and vertical frequencies of the following...
... solve the problem, see "Trouble symptoms and remedies" on the screen This indicates that no signal is not supported by the monitor's specifications. x kHz / x x xHz If "xxx.x kHz/xxx Hz" is displayed This indicates that the resolution is displayed. If "RESOLUTION > 1280 × 1024" is displayed This indicates that either the horizontal or vertical frequency is being input. The figures indicate the horizontal and vertical frequencies of the following...

Operating Instructions
Page 18
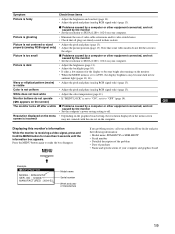
...; Check that the power cord is within the following . If the model name of the input signal are using a Macintosh system, Picture flickers, bounces, oscillates, or is scrambled • If you replaced an old monitor with this monitor. x Problems caused by a computer or other equipment connected, and not caused by the monitor • Check that specified for the monitor to sync correctly. • Adjust the computer's refresh rate (vertical frequency) to the connected equipment's instruction manual...
...; Check that the power cord is within the following . If the model name of the input signal are using a Macintosh system, Picture flickers, bounces, oscillates, or is scrambled • If you replaced an old monitor with this monitor. x Problems caused by a computer or other equipment connected, and not caused by the monitor • Check that specified for the monitor to sync correctly. • Adjust the computer's refresh rate (vertical frequency) to the connected equipment's instruction manual...
Operating Instructions
Page 19
... and graphics board Example INFORMATION MODEL : SDM-HS75P SER . Symptom Check these items Picture is incorrect x Problems caused by a computer or other equipment connected, and not caused by the monitor • Set the resolution to SXGA (1280 × 1024) on your computer. • Eliminate the use of video cable extensions and/or video switch boxes. • Check that some video modes do not operate ( appears on the screen) The monitor turns off...
... and graphics board Example INFORMATION MODEL : SDM-HS75P SER . Symptom Check these items Picture is incorrect x Problems caused by a computer or other equipment connected, and not caused by the monitor • Set the resolution to SXGA (1280 × 1024) on your computer. • Eliminate the use of video cable extensions and/or video switch boxes. • Check that some video modes do not operate ( appears on the screen) The monitor turns off...

Quick Setup Guide
Page 2
... such surface, it on an uneven surface like the edge of light (red, blue, or green) may appear constantly on the LCD screen, and irregular colored stripes or brightness may be installed near a heating vent, could occur. If a part of this unit on power connections • Use the supplied power cord. Serial No. However, black points or bright points of a desk. For the customers in the spaces provided below...
... such surface, it on an uneven surface like the edge of light (red, blue, or green) may appear constantly on the LCD screen, and irregular colored stripes or brightness may be installed near a heating vent, could occur. If a part of this unit on power connections • Use the supplied power cord. Serial No. However, black points or bright points of a desk. For the customers in the spaces provided below...

Quick Setup Guide
Page 3
... monitor to a computer. For example, HS_75_95_P_GB.pdf is written. Setup Unpacking Make sure your carton contains everything listed below. • LCD display • Power cord • HD15-HD15 video signal cable (analog RGB) • DVI-D video signal cable (digital RGB) • Cord strap • CD-ROM (utility software for the language in which each PDF file is written in British English.) To exit from the CD-ROM Click "EXIT/CD-ROM." Connect the adapter to open the window...
... monitor to a computer. For example, HS_75_95_P_GB.pdf is written. Setup Unpacking Make sure your carton contains everything listed below. • LCD display • Power cord • HD15-HD15 video signal cable (analog RGB) • DVI-D video signal cable (digital RGB) • Cord strap • CD-ROM (utility software for the language in which each PDF file is written in British English.) To exit from the CD-ROM Click "EXIT/CD-ROM." Connect the adapter to open the window...

Quick Setup Guide
Page 4
..., refer to a power outlet. 2 back cover Turning on the monitor and computer Turn on your monitor first, then a computer. 1 Press upward the 1 (power) switch on the front right of the monitor. 4 Connect the supplied power cord to the monitor's AC IN connector. 5 Connect the power cord to the Operating Instructions on the computer. The 1 (power) indicator lights up in green to the DVI-D input to the HD15 input connector (digital RGB) connector (analog RGB) INPUT 1 DVI-D INPUT 2 HD-15 DVI-D video signal cable (supplied) 3 HD15-HD15 video signal cable (supplied) 2 Turn on the CD...
..., refer to a power outlet. 2 back cover Turning on the monitor and computer Turn on your monitor first, then a computer. 1 Press upward the 1 (power) switch on the front right of the monitor. 4 Connect the supplied power cord to the monitor's AC IN connector. 5 Connect the power cord to the Operating Instructions on the computer. The 1 (power) indicator lights up in green to the DVI-D input to the HD15 input connector (digital RGB) connector (analog RGB) INPUT 1 DVI-D INPUT 2 HD-15 DVI-D video signal cable (supplied) 3 HD15-HD15 video signal cable (supplied) 2 Turn on the CD...

Quick Setup Guide
Page 5
... screen, • Check that the video signal cable is properly connected and all plugs are firmly seated in their sockets (page 3 (US)). • Check that the video signal cable is connected. Troubleshooting Trouble symptoms and remedies (If no picture appears on the screen) If no picture appears on the supplied CD-ROM. If you connect a non-supplied video signal cable, CABLE DISCONNECTED may appear on the screen, or the 1 (power) indicator is orange, • Check that the video input connector...
... screen, • Check that the video signal cable is properly connected and all plugs are firmly seated in their sockets (page 3 (US)). • Check that the video signal cable is connected. Troubleshooting Trouble symptoms and remedies (If no picture appears on the screen) If no picture appears on the supplied CD-ROM. If you connect a non-supplied video signal cable, CABLE DISCONNECTED may appear on the screen, or the 1 (power) indicator is orange, • Check that the video input connector...

Quick Setup Guide
Page 6
... kHz (analog RGB), 28-64 kHz (digital RGB) Vertical: 48-75 Hz (analog RGB), 60 Hz (digital RGB) Resolution: 1280 × 1024 or less • If you are using Windows and replaced an old monitor with this monitor's information While the monitor is within that the video frequency range is receiving a video signal, press and hold the MENU button for the monitor. Select "SONY" from the "Manufacturers" list and select "SDM-HS75P" or "SDM-HS95P" from the "Models" list...
... kHz (analog RGB), 28-64 kHz (digital RGB) Vertical: 48-75 Hz (analog RGB), 60 Hz (digital RGB) Resolution: 1280 × 1024 or less • If you are using Windows and replaced an old monitor with this monitor's information While the monitor is within that the video frequency range is receiving a video signal, press and hold the MENU button for the monitor. Select "SONY" from the "Manufacturers" list and select "SDM-HS75P" or "SDM-HS95P" from the "Models" list...
Marketing Specifications
Page 2
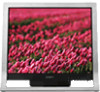
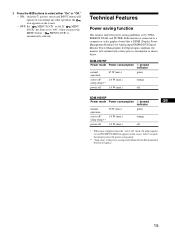
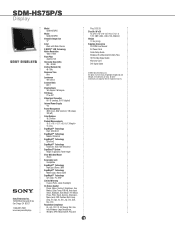
....sony.com/displays Model SDM-HS75P/S Model SDM-HS75P/B Viewable Image Size 17" Color Black with Black Chassis X-BRITE™ LCD Technology Native Resolution 1280 x 1024 Pixel Pitch .264mm H/V Horizontal Scan (kHz) 28k - 80 kHz Vertical Refresh (Hz) 48-75Hz Response Time 8ms Luminance 400 cd/m2 Contrast Ratio 600:1 Viewing Angle 160 degree/ 160 degree Tilt Range 0º to +20º Video Input Connector HD-15 (analog), DVI-D (digital) Internal Power Supply Yes Power Management 45W (max), 36W (normal), 1W (sleep), 1W (off) Color...
....sony.com/displays Model SDM-HS75P/S Model SDM-HS75P/B Viewable Image Size 17" Color Black with Black Chassis X-BRITE™ LCD Technology Native Resolution 1280 x 1024 Pixel Pitch .264mm H/V Horizontal Scan (kHz) 28k - 80 kHz Vertical Refresh (Hz) 48-75Hz Response Time 8ms Luminance 400 cd/m2 Contrast Ratio 600:1 Viewing Angle 160 degree/ 160 degree Tilt Range 0º to +20º Video Input Connector HD-15 (analog), DVI-D (digital) Internal Power Supply Yes Power Management 45W (max), 36W (normal), 1W (sleep), 1W (off) Color...


