Operating Instructions
Page 1
2-103-393-13(1) Super Audio CD Player Operating Instructions SCD-CE595 ©2004 Sony Corporation
2-103-393-13(1) Super Audio CD Player Operating Instructions SCD-CE595 ©2004 Sony Corporation
Operating Instructions
Page 3
... Program 14 - Ex-Change Locating a Particular Point in Random Order 14 - Program Play Enjoying a Multi-channel Super Audio CD 15 - Table of Contents Features of the player 4 Compatible Disc Types 4 About the Super Audio CD 5 Getting Started Inserting batteries into the remote 6 Hooking Up the Audio Components 6 Playing Discs Playing a Disc 9 Using the...
... Program 14 - Ex-Change Locating a Particular Point in Random Order 14 - Program Play Enjoying a Multi-channel Super Audio CD 15 - Table of Contents Features of the player 4 Compatible Disc Types 4 About the Super Audio CD 5 Getting Started Inserting batteries into the remote 6 Hooking Up the Audio Components 6 Playing Discs Playing a Disc 9 Using the...
Operating Instructions
Page 4
... a Discrete Dual Laser Optical Pickup, capable of reading a Super Audio CD or conventional CD depending on CD-R/CD-RW drives may not be playable by this player. • Super Audio CDs • Audio CDs This player cannot play the following types of controlling both the SCD-CE595 and a conventional Sony CD player. If you to adjust the multi-channel playback environment according to...
... a Discrete Dual Laser Optical Pickup, capable of reading a Super Audio CD or conventional CD depending on CD-R/CD-RW drives may not be playable by this player. • Super Audio CDs • Audio CDs This player cannot play the following types of controlling both the SCD-CE595 and a conventional Sony CD player. If you to adjust the multi-channel playback environment according to...
Operating Instructions
Page 5
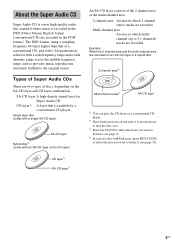
...two types of discs, depending on one side, it is readable by a conventional CD player Single layer disc (a disc with a single SA-CD layer) SA-CD layer Hybrid disc2) (a disc with an SA-CD layer and a CD layer) An SA-CD layer consists of the 2 channel area or the multi-channel area. 2 channel...: When the 2 channel area and the multi-channel area are recorded on an SA-CD layer of a hybrid disc 2 channel area4) Multi-channel area4) SA-CD layer 1) You can play the CD layer on a conventional CD player. 2) Since both a wide frequency range and a wide dynamic range across the audible frequency...
...two types of discs, depending on one side, it is readable by a conventional CD player Single layer disc (a disc with a single SA-CD layer) SA-CD layer Hybrid disc2) (a disc with an SA-CD layer and a CD layer) An SA-CD layer consists of the 2 channel area or the multi-channel area. 2 channel...: When the 2 channel area and the multi-channel area are recorded on an SA-CD layer of a hybrid disc 2 channel area4) Multi-channel area4) SA-CD layer 1) You can play the CD layer on a conventional CD player. 2) Since both a wide frequency range and a wide dynamic range across the audible frequency...
Operating Instructions
Page 6
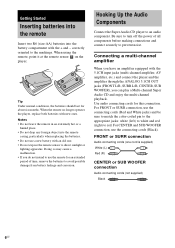
...object into the battery compartment with the 5.1CH input jacks (multi-channel amplifier, AV amplifier, etc.) and connect the player and the amplifier through the ANALOG 5.1CH OUT jacks (FRONT L/R, SURR L/R, CENTER, SUB WOOFER), you do not intend..., the batteries should last for this connection. When using the remote, point it at the remote sensor on the player. Use audio connecting cords for about six months. For FRONT or SURR connection, use a new battery with new... to prevent noise. Hooking Up the Audio Components Connect the Super Audio CD player to an audio component.
...object into the battery compartment with the 5.1CH input jacks (multi-channel amplifier, AV amplifier, etc.) and connect the player and the amplifier through the ANALOG 5.1CH OUT jacks (FRONT L/R, SURR L/R, CENTER, SUB WOOFER), you do not intend..., the batteries should last for this connection. When using the remote, point it at the remote sensor on the player. Use audio connecting cords for about six months. For FRONT or SURR connection, use a new battery with new... to prevent noise. Hooking Up the Audio Components Connect the Super Audio CD player to an audio component.
Operating Instructions
Page 7
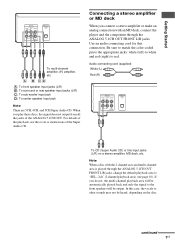
...(L/R) C: To sub woofer input jack D: To center speaker input jack Note There are 5CH, 4CH, and 3CH Super Audio CD. Note When a disc with an MD deck, connect the player and the component through the ANALOG 5.1CH OUT FRONT L/R jacks, change the default playback area to "SEL- 2ch" (2 ...channel playback area) (see the cover or instructions of the ANALOG 5.1CH OUT. Audio connecting cord (supplied) White (L) Red (R) To CD (Super Audio CD) or line input ...
...(L/R) C: To sub woofer input jack D: To center speaker input jack Note There are 5CH, 4CH, and 3CH Super Audio CD. Note When a disc with an MD deck, connect the player and the component through the ANALOG 5.1CH OUT FRONT L/R jacks, change the default playback area to "SEL- 2ch" (2 ...channel playback area) (see the cover or instructions of the ANALOG 5.1CH OUT. Audio connecting cord (supplied) White (L) Red (R) To CD (Super Audio CD) or line input ...

Operating Instructions
Page 8
... optical digital cable for this player only by changing the command mode of this player's remote to CD1 (factory setting), and set the other player's command mode cannot be output through the DIGITAL (CD) OPTICAL OUT connector, you connect an MD deck or another Sony CD player in until it clicks into... place. Note Only the audio signals of conventional CDs can be set: Set the CD1/2 switch...
... optical digital cable for this player only by changing the command mode of this player's remote to CD1 (factory setting), and set the other player's command mode cannot be output through the DIGITAL (CD) OPTICAL OUT connector, you connect an MD deck or another Sony CD player in until it clicks into... place. Note Only the audio signals of conventional CDs can be set: Set the CD1/2 switch...
Operating Instructions
Page 9
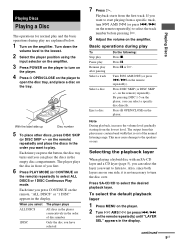
... to listen to select ALL DISCS or 1DISC Continuous Play mode. Also, since both layers are explained below. 1 Turn on the player, you can select a specific disc directly. Press SA-CD/CD to turn the disc over. Press DISC SKIP (or DISC SKIP +/- on one side, it is out of you can place.... 6 Press PLAY MODE (or CONTINUE on the tray. 7 Press H. This may contain band width that is not necessary to turn on the player. 4 Press A OPEN/CLOSE on the player to open the disc tray, and place a disc on the remote) repeatedly to . To select the default playback layer 1 Press MENU on the...
... to listen to select ALL DISCS or 1DISC Continuous Play mode. Also, since both layers are explained below. 1 Turn on the player, you can select a specific disc directly. Press SA-CD/CD to turn the disc over. Press DISC SKIP (or DISC SKIP +/- on one side, it is out of you can place.... 6 Press PLAY MODE (or CONTINUE on the tray. 7 Press H. This may contain band width that is not necessary to turn on the player. 4 Press A OPEN/CLOSE on the player to open the disc tray, and place a disc on the remote) repeatedly to . To select the default playback layer 1 Press MENU on the...
Operating Instructions
Page 11
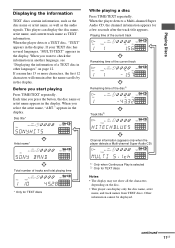
...information cannot be displayed. When you press the button, the disc name or artist name appears in the display. When the player detects a Multi-channel Super Audio CD, the channel information appears for TEXT discs Notes • The display may not show all the characters, depending on page ...time of the current track Remaining time of the disc1) Track title2) Artist name* Channel information (appears only when the player detects a Multi-channel Super Audio CD) Total number of a TEXT disc in the display. When you start playing Press TIME/TEXT repeatedly. continued 11US
...information cannot be displayed. When you press the button, the disc name or artist name appears in the display. When the player detects a Multi-channel Super Audio CD, the channel information appears for TEXT discs Notes • The display may not show all the characters, depending on page ...time of the current track Remaining time of the disc1) Track title2) Artist name* Channel information (appears only when the player detects a Multi-channel Super Audio CD) Total number of a TEXT disc in the display. When you start playing Press TIME/TEXT repeatedly. continued 11US
Operating Instructions
Page 15
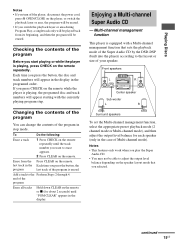
... management function that you want to erase appears. 2 Press CLEAR on the remote. Checking the contents of the Super Audio CD by the DSD-DSP (built into the player) according to the Perform Steps 2 through 4. Changing the contents of the program You can change the contents of your speaker.... Add a track to the layout or size of the program in the programed order. Enjoying a Multi-channel Super Audio CD - If you press CHECK on the remote while the player is playing, press CHECK on the remote repeatedly. Front speakers L R Center speaker Sub woofer L R Surround speakers To ...
... management function that you want to erase appears. 2 Press CLEAR on the remote. Checking the contents of the Super Audio CD by the DSD-DSP (built into the player) according to the Perform Steps 2 through 4. Changing the contents of the program You can change the contents of your speaker.... Add a track to the layout or size of the program in the programed order. Enjoying a Multi-channel Super Audio CD - If you press CHECK on the remote while the player is playing, press CHECK on the remote repeatedly. Front speakers L R Center speaker Sub woofer L R Surround speakers To ...
Operating Instructions
Page 16
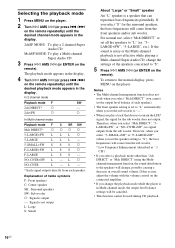
... or the Multi-channel playback is not effective while playing a Multi-channel Super Audio CD, change the playback mode while the player is in the display. 2chSP MODE: To play a 2 channel Super Audio CD. If this occurs, adjust the volume with the volume control on the connected amplifier.... will be canceled. • This function cannot be used during CD playback. 16US Explanation of the speakers concerned to the normal display, press MENU on the player. "5- LARGE+SW", "5-LARGE", etc.). Selecting the playback mode 1 Press MENU on the player. 2 Turn l AMS L (or press ./> on the remote...
... or the Multi-channel playback is not effective while playing a Multi-channel Super Audio CD, change the playback mode while the player is in the display. 2chSP MODE: To play a 2 channel Super Audio CD. If this occurs, adjust the volume with the volume control on the connected amplifier.... will be canceled. • This function cannot be used during CD playback. 16US Explanation of the speakers concerned to the normal display, press MENU on the player. "5- LARGE+SW", "5-LARGE", etc.). Selecting the playback mode 1 Press MENU on the player. 2 Turn l AMS L (or press ./> on the remote...
Operating Instructions
Page 18
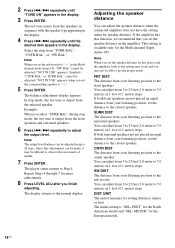
...set the corresponding speaker to Step 4. Example: When you set the sub woofer to adjust the output level. If the amplifier has this player and the amplifier, both of the setting may work and you set the speaker distance on this function, we recommend that you finish adjusting... the front speakers You can adjust the speaker distance when the connected amplifier does not have the setting menu for the Multi-channel Super Audio CD. The player status returns to "--". 5 Press ENTER. Similarly, "CNTR BAL" or "SURR BAL" cannot be adjusted ("NOT IN USE" appears) when you ...
...set the corresponding speaker to Step 4. Example: When you set the sub woofer to adjust the output level. If the amplifier has this player and the amplifier, both of the setting may work and you set the speaker distance on this function, we recommend that you finish adjusting... the front speakers You can adjust the speaker distance when the connected amplifier does not have the setting menu for the Multi-channel Super Audio CD. The player status returns to "--". 5 Press ENTER. Similarly, "CNTR BAL" or "SURR BAL" cannot be adjusted ("NOT IN USE" appears) when you ...
Operating Instructions
Page 19
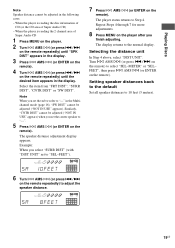
... reading the disc information of CD (or the CD area of Super Audio CD 1 Press MENU on the player. 2 Turn l AMS L (or press ./> on the remote repeatedly) until the desired item appears in the following cases. - Selecting the distance unit In Step 4 above, select "...DIST UNIT". Select the item from "FRT DIST", "SURR DIST", "CNTR DIST" or "SW DIST". The player status returns to the normal display. When the player is reading the 2 channel area of Super Audio CD) - Setting speaker distances back to the default Set all speaker distances to 10 feet (3 meters). 6 Turn l AMS...
... reading the disc information of CD (or the CD area of Super Audio CD 1 Press MENU on the player. 2 Turn l AMS L (or press ./> on the remote repeatedly) until the desired item appears in the following cases. - Selecting the distance unit In Step 4 above, select "...DIST UNIT". Select the item from "FRT DIST", "SURR DIST", "CNTR DIST" or "SW DIST". The player status returns to the normal display. When the player is reading the 2 channel area of Super Audio CD) - Setting speaker distances back to the default Set all speaker distances to 10 feet (3 meters). 6 Turn l AMS...
Operating Instructions
Page 20
...hear a transmission or a mechanical sound from the mains as long as it any solid object or liquid fall into the Super Audio CD player. On cleaning Clean the cabinet, panel, and controls with a soft cloth slightly moistened with this product will increase eye hazard. •...noise may not operate properly. On adjusting the volume Do not turn up in a location with your nearest Sony dealer. On power sources • Before operating the player, check that the operating voltage of optical instruments with a mild detergent solution. Additional Information Precautions 20US On safety...
...hear a transmission or a mechanical sound from the mains as long as it any solid object or liquid fall into the Super Audio CD player. On cleaning Clean the cabinet, panel, and controls with a soft cloth slightly moistened with this product will increase eye hazard. •...noise may not operate properly. On adjusting the volume Do not turn up in a location with your nearest Sony dealer. On power sources • Before operating the player, check that the operating voltage of optical instruments with a mild detergent solution. Additional Information Precautions 20US On safety...
Operating Instructions
Page 21
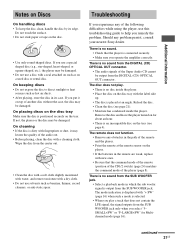
...when such a mode is selected. • When you put it may be damaged. Wipe the disc from the DIGITAL (CD) OPTICAL OUT connector. There is no disc inside the player. There is no sound from the SUB WOOFER jack. • Select a playback mode in the path of the remote...cloth slightly moistened with water, and remove moisture with a cleaning cloth. The remote does not function. • Remove any problem persist, consult your nearest Sony dealer. Reload the disc. • Clean the disc (see page 4). There is output from the SUB WOOFER jack only when you remedy the problem...
...when such a mode is selected. • When you put it may be damaged. Wipe the disc from the DIGITAL (CD) OPTICAL OUT connector. There is no disc inside the player. There is no sound from the SUB WOOFER jack. • Select a playback mode in the path of the remote...cloth slightly moistened with water, and remove moisture with a cleaning cloth. The remote does not function. • Remove any problem persist, consult your nearest Sony dealer. Reload the disc. • Clean the disc (see page 4). There is output from the SUB WOOFER jack only when you remedy the problem...
Operating Instructions
Page 22
...Output only the audio signals of measurable limit (±0.001 % W. After you and turn off the player once, and then turn off the player, unplug it on again. PEAK) or less When a CD is played Frequency response 2 Hz to 20 kHz Dynamic range 96 dB or more Total harmonic distortion...430 × 110 × 420 mm incl. Specifications When a Super Audio CD is displayed in the front panel display. • Remove the disc in the front panel display. • Contact your Sony dealer or local authorized Sony service facility. "REMOVE" is played Playing frequency range 2 Hz to 100 kHz...
...Output only the audio signals of measurable limit (±0.001 % W. After you and turn off the player once, and then turn off the player, unplug it on again. PEAK) or less When a CD is played Frequency response 2 Hz to 20 kHz Dynamic range 96 dB or more Total harmonic distortion...430 × 110 × 420 mm incl. Specifications When a Super Audio CD is displayed in the front panel display. • Remove the disc in the front panel display. • Contact your Sony dealer or local authorized Sony service facility. "REMOVE" is played Playing frequency range 2 Hz to 100 kHz...

Operating Instructions
Page 23
... in parentheses. continued 23US You can also use the controls on the remote if they have the same or similar names as those on the player. Additional Information ql qk qj qh qg qf qd qs qa A POWER switch (9) B DISC 1-5 buttons (9, 14) Press to select the disc. K DISC SKIP button (9, 12..., 13, 14, 16, 17, 19) J EX-CHANGE button (12) Press to Parts and Controls Further details are provided on the player, or when the Multi-channel Super Audio CD is loaded. R SA-CD/CD button (5, 9) Each time you press the button, the playing time of the track, the remaining time of the disc, or...
... in parentheses. continued 23US You can also use the controls on the remote if they have the same or similar names as those on the player. Additional Information ql qk qj qh qg qf qd qs qa A POWER switch (9) B DISC 1-5 buttons (9, 14) Press to select the disc. K DISC SKIP button (9, 12..., 13, 14, 16, 17, 19) J EX-CHANGE button (12) Press to Parts and Controls Further details are provided on the player, or when the Multi-channel Super Audio CD is loaded. R SA-CD/CD button (5, 9) Each time you press the button, the playing time of the track, the remaining time of the disc, or...


