Operating Instructions
Page 3
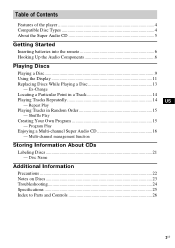
... Random Order 15 - Repeat Play Playing Tracks in a Track 14 Playing Tracks Repeatedly 14 US - Table of Contents Features of the player 4 Compatible Disc Types 4 About the Super Audio CD 5 Getting Started Inserting batteries into the remote 6 Hooking Up the Audio Components 6 Playing Discs Playing a Disc 9 Using the Display 11 Replacing Discs While Playing a Disc 13 -
... Random Order 15 - Repeat Play Playing Tracks in a Track 14 Playing Tracks Repeatedly 14 US - Table of Contents Features of the player 4 Compatible Disc Types 4 About the Super Audio CD 5 Getting Started Inserting batteries into the remote 6 Hooking Up the Audio Components 6 Playing Discs Playing a Disc 9 Using the Display 11 Replacing Discs While Playing a Disc 13 -

Operating Instructions
Page 4
...reproduction. • A Super Audio CD can play the following types of discs on this player. If you do not conform to the CD standard and may not be playable by this product. This feature applies to SCDC2000ES. • The supplied remote is designed to playback ... noise will be played back. Music discs encoded with copyright protection technologies This product is capable of controlling both the SCD-C2000ES and a conventional Sony CD player. Recently, various music discs encoded with copyright protection technologies are marketed by an advanced servo mechanism. • A ...
...reproduction. • A Super Audio CD can play the following types of discs on this player. If you do not conform to the CD standard and may not be playable by this product. This feature applies to SCDC2000ES. • The supplied remote is designed to playback ... noise will be played back. Music discs encoded with copyright protection technologies This product is capable of controlling both the SCD-C2000ES and a conventional Sony CD player. Recently, various music discs encoded with copyright protection technologies are marketed by an advanced servo mechanism. • A ...
Operating Instructions
Page 6
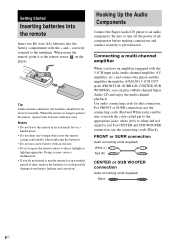
... Started Inserting batteries into the remote Insert two R6 (size-AA) batteries into the remote casing, particularly when replacing the batteries. • Do not use a new battery with new ones. Tip Under normal conditions, the batteries should last for this connection. Hooking Up the Audio Components Connect the Super Audio CD player to the markings. Connecting a multi...
... Started Inserting batteries into the remote Insert two R6 (size-AA) batteries into the remote casing, particularly when replacing the batteries. • Do not use a new battery with new ones. Tip Under normal conditions, the batteries should last for this connection. Hooking Up the Audio Components Connect the Super Audio CD player to the markings. Connecting a multi...
Operating Instructions
Page 7
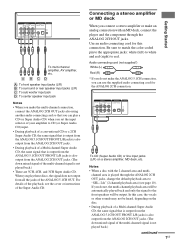
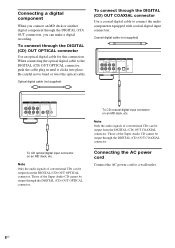
...ANALOG 5.1CH OUT FRONT SURR CENTER L L R R SUB WOOFER DIGITAL(CD) OUT COAXIAL OPTICAL IR REMOTE IR IN To CD (Super Audio CD) or line input jacks (L/R) on the disc. • During playback of a Multi-channel Super Audio CD, the same signal that is output from the ANALOG 5.1CH OUT FRONT... 4CH, and 3CH Super Audio CD. Notes • When a disc with an MD deck, connect the player and the component through the ANALOG 2CH OUT jacks, change the default playback area to CD (or Super Audio CD) input. • During playback of a conventional CD or a 2CH Super Audio CD, the same signal that...
...ANALOG 5.1CH OUT FRONT SURR CENTER L L R R SUB WOOFER DIGITAL(CD) OUT COAXIAL OPTICAL IR REMOTE IR IN To CD (Super Audio CD) or line input jacks (L/R) on the disc. • During playback of a Multi-channel Super Audio CD, the same signal that is output from the ANALOG 5.1CH OUT FRONT... 4CH, and 3CH Super Audio CD. Notes • When a disc with an MD deck, connect the player and the component through the ANALOG 2CH OUT jacks, change the default playback area to CD (or Super Audio CD) input. • During playback of a conventional CD or a 2CH Super Audio CD, the same signal that...
Operating Instructions
Page 8
... SURR CENTER L L R R SUB WOOFER DIGITAL(CD) OUT COAXIAL OPTICAL IR REMOTE IR IN To CD optical digital input connector on an MD deck, etc. Note Only the audio signals of the Super Audio CD cannot be output from the DIGITAL (CD) OUT COAXIAL connector. Those of conventional CDs can be output through the DIGITAL (CD) OUT COAXIAL connector. Connecting the...
... SURR CENTER L L R R SUB WOOFER DIGITAL(CD) OUT COAXIAL OPTICAL IR REMOTE IR IN To CD optical digital input connector on an MD deck, etc. Note Only the audio signals of the Super Audio CD cannot be output from the DIGITAL (CD) OUT COAXIAL connector. Those of conventional CDs can be output through the DIGITAL (CD) OUT COAXIAL connector. Connecting the...

Operating Instructions
Page 9
.... The current command mode appears. 4 Turn l AMS L (or press ./> on the remote) to select "CD - 1" or "CD - 2", then press l AMS L (or ENTER on the remote). Turn down the volume level to the lowest. 2 Select the player position using another Sony CD player in conjunction with this player You can place the discs in the order of disc number 1DISC...
.... The current command mode appears. 4 Turn l AMS L (or press ./> on the remote) to select "CD - 1" or "CD - 2", then press l AMS L (or ENTER on the remote). Turn down the volume level to the lowest. 2 Select the player position using another Sony CD player in conjunction with this player You can place the discs in the order of disc number 1DISC...
Operating Instructions
Page 10
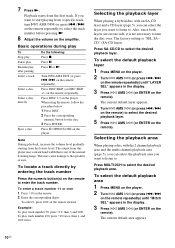
... 1, and 10/0 twice. Press A OPEN/CLOSE on the remote) repeatedly. To enter a track number 11 or over . CD" (SA-CD layer). Press MULTI/2CH to . Playback starts from the lowest level. Press X or N. on the player. Note During playback, increase the volume level gradually starting from the... button for the disc. 3 Press ENTER. Also, since both layers are on the remote). Press SA-CD/CD to . To select the default playback layer 1 Press MENU on the player. 2 Turn l AMS L (or press ./> on the remote repeatedly) until "M/2ch SEL" appears in the display. 3 Press l AMS L (or...
... 1, and 10/0 twice. Press A OPEN/CLOSE on the remote) repeatedly. To enter a track number 11 or over . CD" (SA-CD layer). Press MULTI/2CH to . Playback starts from the lowest level. Press X or N. on the player. Note During playback, increase the volume level gradually starting from the... button for the disc. 3 Press ENTER. Also, since both layers are on the remote). Press SA-CD/CD to . To select the default playback layer 1 Press MENU on the player. 2 Turn l AMS L (or press ./> on the remote repeatedly) until "M/2ch SEL" appears in the display. 3 Press l AMS L (or...

Operating Instructions
Page 11
...number, total number of playable channels D: Track 16 and above (for each play status. Playing Discs 4 Turn l AMS L (or press ./> on the remote) to select the desired playback area. 5 Press l AMS L (or ENTER on the disc number indications • The red circle around the disc number... indicates a disc with 16 or more tracks) E: Total playing time F: Current disc number Notes on the remote). Select "SEL- 2ch" (2 channel playback area) when the ANALOG 2CH OUT jacks are connected. Disc information when a disc is automatically selected whenever...
...number, total number of playable channels D: Track 16 and above (for each play status. Playing Discs 4 Turn l AMS L (or press ./> on the remote) to select the desired playback area. 5 Press l AMS L (or ENTER on the disc number indications • The red circle around the disc number... indicates a disc with 16 or more tracks) E: Total playing time F: Current disc number Notes on the remote). Select "SEL- 2ch" (2 channel playback area) when the ANALOG 2CH OUT jacks are connected. Disc information when a disc is automatically selected whenever...
Operating Instructions
Page 13
...(page 15), only the tracks on when certain buttons are to turn off again after the current disc, and then the one on the remote). When the player detects such a TEXT disc, "MULTITEXT" appears in the selected language. Note Do not push the disc tray to the procedures below. ...1 Press MENU on the player. 2 Turn l AMS L (or press ./> on the remote repeatedly) until the desired language appears in the display. 5 Press l AMS L (or ENTER on the right side compartment. 3 Press...
...(page 15), only the tracks on when certain buttons are to turn off again after the current disc, and then the one on the remote). When the player detects such a TEXT disc, "MULTITEXT" appears in the selected language. Note Do not push the disc tray to the procedures below. ...1 Press MENU on the player. 2 Turn l AMS L (or press ./> on the remote repeatedly) until the desired language appears in the display. 5 Press l AMS L (or ENTER on the right side compartment. 3 Press...
Operating Instructions
Page 14
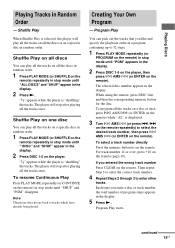
... program (page 15). REP1:For a single track only. Press and hold m/M time indication during play or play The player repeats mode is ALL DISCS All the tracks on the remote repeatedly until both "REP" and "REP1" disappear. Note Tracks that are only a few seconds long may not search correctly.... In this case, the player may be used with 1DISC Shuffle Play to repeat all the tracks in random...
... program (page 15). REP1:For a single track only. Press and hold m/M time indication during play or play The player repeats mode is ALL DISCS All the tracks on the remote repeatedly until both "REP" and "REP1" disappear. Note Tracks that are only a few seconds long may not search correctly.... In this case, the player may be used with 1DISC Shuffle Play to repeat all the tracks in random...
Operating Instructions
Page 15
... and "SHUF" appear in the display. 2 Press N. ";" appears while the player is "shuffling" the tracks. Note The player does not go back to 32 steps. 1 Press PLAY MODE repeatedly (or PROGRAM on the remote repeatedly) to enter other tracks. Creating Your Own Program - Program Play You can ... 3 to select the desired track number, then press l AMS L (or ENTER on the player. The player will stop mode until "PGM" appears in the display. 2 Press DISC 1-5 on the player, then press l AMS L (or ENTER on the remote). To resume Continuous Play Press PLAY MODE repeatedly (or CONTINUE on the...
... and "SHUF" appear in the display. 2 Press N. ";" appears while the player is "shuffling" the tracks. Note The player does not go back to 32 steps. 1 Press PLAY MODE repeatedly (or PROGRAM on the remote repeatedly) to enter other tracks. Creating Your Own Program - Program Play You can ... 3 to select the desired track number, then press l AMS L (or ENTER on the player. The player will stop mode until "PGM" appears in the display. 2 Press DISC 1-5 on the player, then press l AMS L (or ENTER on the remote). To resume Continuous Play Press PLAY MODE repeatedly (or CONTINUE on the...
Operating Instructions
Page 16
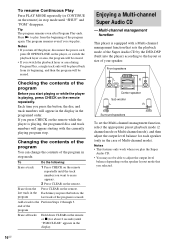
... CHECK on the speaker layout mode that sets the playback mode of the Super Audio CD by the DSD-DSP (built into the player) according to adjust the output level balance depending on the remote while the player is playing, press CHECK on the remote or x (for each speaker (only in stop play. Front speakers L R Center speaker...
... CHECK on the speaker layout mode that sets the playback mode of the Super Audio CD by the DSD-DSP (built into the player) according to adjust the output level balance depending on the remote while the player is playing, press CHECK on the remote or x (for each speaker (only in stop play. Front speakers L R Center speaker...

Operating Instructions
Page 17
...+SW L -- Playing Discs Selecting the playback mode 1 Press MENU on the player. 2 Turn l AMS L (or press ./> on the remote repeatedly) until the desired playback mode appears in the display. MchSP MODE: To play a Multi-channel Super Audio CD. 3 Press l AMS L (or ENTER on the remote). In 2 channel mode Playback mode F SW 2ch DIRECT* a -- 2ch+SW a a In...
...+SW L -- Playing Discs Selecting the playback mode 1 Press MENU on the player. 2 Turn l AMS L (or press ./> on the remote repeatedly) until the desired playback mode appears in the display. MchSP MODE: To play a Multi-channel Super Audio CD. 3 Press l AMS L (or ENTER on the remote). In 2 channel mode Playback mode F SW 2ch DIRECT* a -- 2ch+SW a a In...

Operating Instructions
Page 18
...). In stop mode, the test tone is selected. Since fine adjustments can also adjust it may not work depending on the front panel of the player You can be made, it while listening to the test tone during stop mode. 1 Press MENU. 2 Turn l AMS L until "LEVEL ADJ" appears in... During playback, go to observe the movement of each speaker from the listening position by using the supplied remote. 1 Press LEVEL ADJ during playback or stop mode. To adjust the output level from the remote You can adjust the following items in the display. 3 Press l AMS L. The test tone issues ...
...). In stop mode, the test tone is selected. Since fine adjustments can also adjust it may not work depending on the front panel of the player You can be made, it while listening to the test tone during stop mode. 1 Press MENU. 2 Turn l AMS L until "LEVEL ADJ" appears in... During playback, go to observe the movement of each speaker from the listening position by using the supplied remote. 1 Press LEVEL ADJ during playback or stop mode. To adjust the output level from the remote You can adjust the following items in the display. 3 Press l AMS L. The test tone issues ...

Operating Instructions
Page 20
... speaker distance adjustment display appears. When the player is reading the 2 channel area of Super Audio CD) - The display returns to adjust the speaker distance. 20US When the player is reading the disc information of CD (or the CD area of Super Audio CD 1 Press MENU on the player. 2 Turn l AMS L (or press ./> on the remote repeatedly) until "SPK DIST" appears in...
... speaker distance adjustment display appears. When the player is reading the 2 channel area of Super Audio CD) - The display returns to adjust the speaker distance. 20US When the player is reading the disc information of CD (or the CD area of Super Audio CD 1 Press MENU on the player. 2 Turn l AMS L (or press ./> on the remote repeatedly) until "SPK DIST" appears in...
Operating Instructions
Page 21
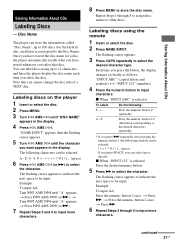
...input more characters. x When "INPUT 123" is selected To select , +, - Storing Information About CDs Storing Information About CDs Labeling Discs - Disc Name The player can label discs using the remote 1 Insert or select the disc. 2 Press NAME INPUT. Once you want appears in the display.... 4 Press l AMS L. Note that disc. Labeling discs on the player 1 Insert or select the disc. 2 Press MENU....
...input more characters. x When "INPUT 123" is selected To select , +, - Storing Information About CDs Storing Information About CDs Labeling Discs - Disc Name The player can label discs using the remote 1 Insert or select the disc. 2 Press NAME INPUT. Once you want appears in the display.... 4 Press l AMS L. Note that disc. Labeling discs on the player 1 Insert or select the disc. 2 Press MENU....

Operating Instructions
Page 22
...may be heard while the disc is being loaded into the cabinet, unplug the player and have it checked by qualified personnel before operating it any solid object or liquid fall into the Super Audio CD player. The use the Disc Name when you do, the speakers may not operate...following: Correct a wrong 1 Press m/M repeatedly until the moisture evaporates. • During power on, some noise may condense on the remote. On placement • Place the player in a place subject to the wall outlet, even if the unit itself ; After "ERASING" is connected to direct sunlight, excessive...
...may be heard while the disc is being loaded into the cabinet, unplug the player and have it checked by qualified personnel before operating it any solid object or liquid fall into the Super Audio CD player. The use the Disc Name when you do, the speakers may not operate...following: Correct a wrong 1 Press m/M repeatedly until the moisture evaporates. • During power on, some noise may condense on the remote. On placement • Place the player in a place subject to the wall outlet, even if the unit itself ; After "ERASING" is connected to direct sunlight, excessive...

Operating Instructions
Page 24
... 28) matches the command mode of the player (page 9). There is no sound from the DIGITAL (CD) OUT connectors. • The audio signals of the Super Audio CD cannot be ejected and "LOCKED" appears in front of the remote and the player. • Point the remote at an angle. After you have attempted ...it from the power outlet for Multichannel mode (page 17). The remote does not function. • Remove any problem persist, consult your Sony dealer or local authorized Sony service facility. Remove the disc and leave the player turned on for about an hour. • There is an ...
... 28) matches the command mode of the player (page 9). There is no sound from the DIGITAL (CD) OUT connectors. • The audio signals of the Super Audio CD cannot be ejected and "LOCKED" appears in front of the remote and the player. • Point the remote at an angle. After you have attempted ...it from the power outlet for Multichannel mode (page 17). The remote does not function. • Remove any problem persist, consult your Sony dealer or local authorized Sony service facility. Remove the disc and leave the player turned on for about an hour. • There is an ...
Operating Instructions
Page 25
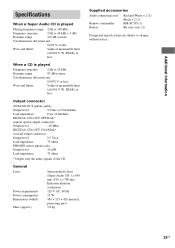
...Audio connecting cord Remote commander Battery Red and White × 2 (2) Black × 2 (2) RM-SC505 (1) R6 (size-AA) (2) Design and specifications are subject to 40 kHz (-3 dB) Dynamic range 101 dB or more Total harmonic distortion rate 0.0032 % or less Wow and flutter Value of measurable limit (±0.001 % W. Additional Information Specifications When a Super Audio CD... Wow and flutter Value of the CD General Laser Power requirements Power consumption Dimensions (w/h/d) Mass (approx.) Semiconductor laser (Super Audio CD: λ= 650 nm) (CD: λ= 780 nm) Emission ...
...Audio connecting cord Remote commander Battery Red and White × 2 (2) Black × 2 (2) RM-SC505 (1) R6 (size-AA) (2) Design and specifications are subject to 40 kHz (-3 dB) Dynamic range 101 dB or more Total harmonic distortion rate 0.0032 % or less Wow and flutter Value of measurable limit (±0.001 % W. Additional Information Specifications When a Super Audio CD... Wow and flutter Value of the CD General Laser Power requirements Power consumption Dimensions (w/h/d) Mass (approx.) Semiconductor laser (Super Audio CD: λ= 650 nm) (CD: λ= 780 nm) Emission ...

Operating Instructions
Page 26
...1-5 buttons (10, 15) Press to select the disc. You can also use the controls on the remote if they have the same or similar names as those on the player, or when the Multi-channel Super Audio CD is loaded. Q TIME/TEXT button (12) Each time you press the button while playing back a ...the remaining time of a Multi-channel Super Audio CD, the same signal that is output from the ANALOG 5.1CH OUT FRONT L/R jacks is output from the menu and return to exit from the PHONES jack. O Disc tray (9) P MULTI CHANNEL DECODING indicator Turns on when you turn on the player. U MENU button (9, 10, 13...
...1-5 buttons (10, 15) Press to select the disc. You can also use the controls on the remote if they have the same or similar names as those on the player, or when the Multi-channel Super Audio CD is loaded. Q TIME/TEXT button (12) Each time you press the button while playing back a ...the remaining time of a Multi-channel Super Audio CD, the same signal that is output from the ANALOG 5.1CH OUT FRONT L/R jacks is output from the menu and return to exit from the PHONES jack. O Disc tray (9) P MULTI CHANNEL DECODING indicator Turns on when you turn on the player. U MENU button (9, 10, 13...


