
Operating Instructions
Page 3
...Sony components are its main features. This is useful when you can remote control your components by setting the type and code number of each component (page 8). You can use the remote control supplied with different remote control devices. Learning function for programming various other remote control signals This Commander has a Learning function, to "learn " remote...Select buttons is preset for your Sony AV components. Features The RM-VL700 Remote Commander provides centralized control of all your AV components from a single remote commander and saves the trouble of ...
...Sony components are its main features. This is useful when you can remote control your components by setting the type and code number of each component (page 8). You can use the remote control supplied with different remote control devices. Learning function for programming various other remote control signals This Commander has a Learning function, to "learn " remote...Select buttons is preset for your Sony AV components. Features The RM-VL700 Remote Commander provides centralized control of all your AV components from a single remote commander and saves the trouble of ...
Operating Instructions
Page 4
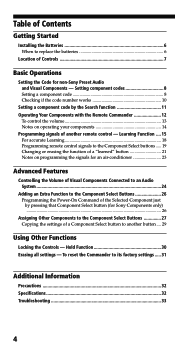
...by the Search function 11 Operating Your Components with the Remote Commander 12 To control the volume 13 Notes on operating your components 14 Programming signals of Controls 7 Basic Operations Setting the Code for Sony Components only) ...26 Assigning Other Components to the ... the batteries 6 Location of another button .... 29 Using Other Functions Locking the Controls - Setting component codes 8 Setting a component code 8 Checking if the code number works 10 Setting a component code by pressing that Component Select button (for non-Sony Preset Audio and Visual Components -
...by the Search function 11 Operating Your Components with the Remote Commander 12 To control the volume 13 Notes on operating your components 14 Programming signals of Controls 7 Basic Operations Setting the Code for Sony Components only) ...26 Assigning Other Components to the ... the batteries 6 Location of another button .... 29 Using Other Functions Locking the Controls - Setting component codes 8 Setting a component code 8 Checking if the code number works 10 Setting a component code by pressing that Component Select button (for non-Sony Preset Audio and Visual Components -
Operating Instructions
Page 6
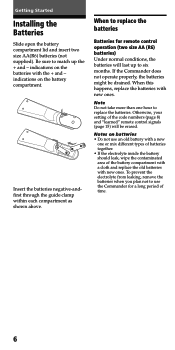
...the Commander for remote control operation (two size AA (R6) batteries) Under normal conditions, the batteries will be drained. Notes on the batteries with a new one hour to use an old battery with the + and - Otherwise, your setting of the code numbers (page 8) and "learned" remote control ... Started Installing the Batteries Slide open the battery compartment lid and insert two size AA(R6) batteries (not supplied). If the Commander does not operate properly, the batteries might be erased. To prevent the electrolyte from leaking, remove the batteries when you plan ...
...the Commander for remote control operation (two size AA (R6) batteries) Under normal conditions, the batteries will be drained. Notes on the batteries with a new one hour to use an old battery with the + and - Otherwise, your setting of the code numbers (page 8) and "learned" remote control ... Started Installing the Batteries Slide open the battery compartment lid and insert two size AA(R6) batteries (not supplied). If the Commander does not operate properly, the batteries might be erased. To prevent the electrolyte from leaking, remove the batteries when you plan ...
Operating Instructions
Page 8
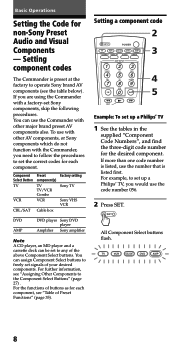
... tables in the supplied "Component Code Numbers", and find the three-digit code number for each component. You can use the Commander with other AV components, or Sony components which do not function with the Commander, you need to follow the procedures to freely set the correct codes for non-Sony Preset Audio and Visual Components - Component...
... tables in the supplied "Component Code Numbers", and find the three-digit code number for each component. You can use the Commander with other AV components, or Sony components which do not function with the Commander, you need to follow the procedures to freely set the correct codes for non-Sony Preset Audio and Visual Components - Component...
Operating Instructions
Page 9
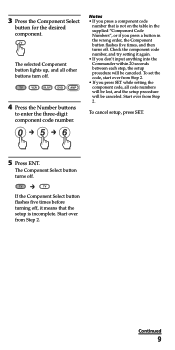
...Select button for the desired component. Notes • If you press a component code number that the setup is not on the table in the supplied "Component Code Numbers", or if you don't input anything into the Commander within 20 seconds between each step, the setup procedure will be canceled. To... cancel setup, press SET. 5 Press ENT. Continued 9 To set the code, start over from Step 2. • ...
...Select button for the desired component. Notes • If you press a component code number that the setup is not on the table in the supplied "Component Code Numbers", or if you don't input anything into the Commander within 20 seconds between each step, the setup procedure will be canceled. To... cancel setup, press SET. 5 Press ENT. Continued 9 To set the code, start over from Step 2. • ...
Operating Instructions
Page 10
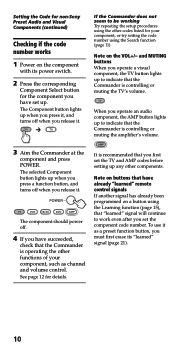
... Select button for the component you have already "learned" remote control signals If another signal has already been programmed on a button using the Learning function (page 15), that you first set the TV and AMP codes before setting up any other components. The selected Component button... controlling or muting the amplifier's volume. 3 Aim the Commander at the component and press POWER. Note on buttons that have set up. To use it . Setting the Code for non-Sony Preset Audio and Visual Components (continued) Checking if the code number works 1 Power on the component with its "learned...
... Select button for the component you have already "learned" remote control signals If another signal has already been programmed on a button using the Learning function (page 15), that you first set the TV and AMP codes before setting up any other components. The selected Component button... controlling or muting the amplifier's volume. 3 Aim the Commander at the component and press POWER. Note on buttons that have set up. To use it . Setting the Code for non-Sony Preset Audio and Visual Components (continued) Checking if the code number works 1 Power on the component with its "learned...

Operating Instructions
Page 11
...player, cassette deck: Plays back Press CH + to go back to any of the Component Select buttons (page 27), you can find a code number available for the desired component. Press CH - All Component Select buttons flash. 2 Press the Component Select button for a component that the ...Search function works effectively. Continued 11 Before starting the Search function Set each component to the next code number. The Component button flashes three times after the numbers have turned one in the following status so that doesn't have one cycle...
...player, cassette deck: Plays back Press CH + to go back to any of the Component Select buttons (page 27), you can find a code number available for the desired component. Press CH - All Component Select buttons flash. 2 Press the Component Select button for a component that the ...Search function works effectively. Continued 11 Before starting the Search function Set each component to the next code number. The Component button flashes three times after the numbers have turned one in the following status so that doesn't have one cycle...
Operating Instructions
Page 12
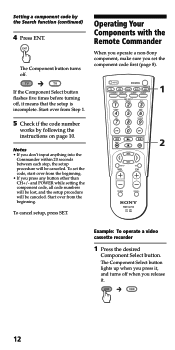
... ENT. To cancel setup, press SET. The Component button turns off when you set the code, start over from the beginning. • If you don't input anything into the Commander within 20 seconds between each step, the setup procedure will be canceled. If the Component Select...beginning. To set the component code first (page 8). The Component Select button lights up when you press it, and turns off . Setting a component code by following the instructions on page 10. Operating Your Components with the Remote Commander When you operate a non-Sony component, make sure you ...
... ENT. To cancel setup, press SET. The Component button turns off when you set the code, start over from the beginning. • If you don't input anything into the Commander within 20 seconds between each step, the setup procedure will be canceled. If the Component Select...beginning. To set the component code first (page 8). The Component Select button lights up when you press it, and turns off . Setting a component code by following the instructions on page 10. Operating Your Components with the Remote Commander When you operate a non-Sony component, make sure you ...
Operating Instructions
Page 15
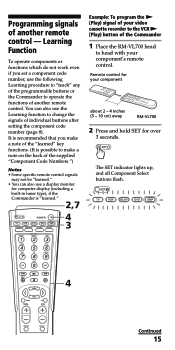
... of the Commander 1 Place the RM-VL700 head to head with your component about 2 - 4 inches (5 - 10 cm) away RM-VL700 2 Press and hold SET for computer display (including a built-in tuner type), if the Commander is possible to change the signals of individual buttons after setting the component code number (page 8). Programming signals of another remote control. You...
... of the Commander 1 Place the RM-VL700 head to head with your component about 2 - 4 inches (5 - 10 cm) away RM-VL700 2 Press and hold SET for computer display (including a built-in tuner type), if the Commander is possible to change the signals of individual buttons after setting the component code number (page 8). Programming signals of another remote control. You...
Operating Instructions
Page 17
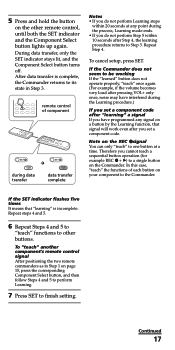
... during data transfer data transfer complete Notes • If you do not perform Step 5 within 10 seconds after you set a component code after "learning" a signal If you have programmed any point during the process, Learning mode ends. • If you cannot teach... Steps 4 and 5 to "teach" functions to finish setting. Continued 17 If the Commander does not seem to a single button on the Commander. To "teach" another component's remote control signal After positioning the two remote commanders as in Step 3. Therefore you do not perform Learning steps within 20 seconds at a...
... during data transfer data transfer complete Notes • If you do not perform Step 5 within 10 seconds after you set a component code after "learning" a signal If you have programmed any point during the process, Learning mode ends. • If you cannot teach... Steps 4 and 5 to "teach" functions to finish setting. Continued 17 If the Commander does not seem to a single button on the Commander. To "teach" another component's remote control signal After positioning the two remote commanders as in Step 3. Therefore you do not perform Learning steps within 20 seconds at a...
Operating Instructions
Page 26
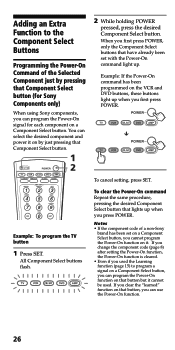
...SET. If you change the component code (page 8) after setting the Power-On function, the Power-On function is cleared. • Even if you used the Learning function (page 15) to the Component Select Buttons Programming the Power-On Command of a non-Sony brand has been set with the... Notes • If the component code of the Selected Component just by just pressing that Component Select button (for Sony Components only) When using Sony components, you can use the Power-On function. 26 If you first press POWER. Example: If the Power-On command has been programmed on a Component ...
...SET. If you change the component code (page 8) after setting the Power-On function, the Power-On function is cleared. • Even if you used the Learning function (page 15) to the Component Select Buttons Programming the Power-On Command of a non-Sony brand has been set with the... Notes • If the component code of the Selected Component just by just pressing that Component Select button (for Sony Components only) When using Sony components, you can use the Power-On function. 26 If you first press POWER. Example: If the Power-On command has been programmed on a Component ...
Operating Instructions
Page 27
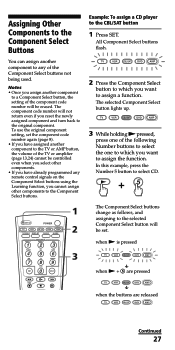
... to the CBL/SAT button 1 Press SET. when N is pressed when N + 5 are pressed when the buttons are released Continued 27 The component code number will not return even if you reset the newly assigned component and turn back to the selected Component Select button will be erased. In... To use the original component setting, set . Assigning Other Components to the Component Select Buttons You can assign another component to any remote control signals on the Component Select buttons using the Learning function, you cannot assign other components to the Component Select buttons.
... to the CBL/SAT button 1 Press SET. when N is pressed when N + 5 are pressed when the buttons are released Continued 27 The component code number will not return even if you reset the newly assigned component and turn back to the selected Component Select button will be erased. In... To use the original component setting, set . Assigning Other Components to the Component Select Buttons You can assign another component to any remote control signals on the Component Select buttons using the Learning function, you cannot assign other components to the Component Select buttons.
Operating Instructions
Page 28
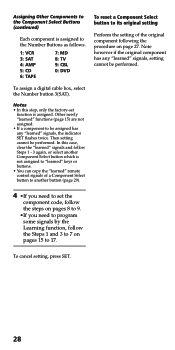
In this step, only the factory-set function is not assigned to "learned" keys or buttons. • You can copy the "learned" remote control signals of the original component following the procedure on pages 15 to 17. To cancel setting, press SET. 28 Notes • In this case, ...clear the "learned" signals and follow Steps 1 - 3 again, or select another button (page 29). 4 •If you need to set the component code, follow the steps on pages 8 to 9. •If you need to program some signals by the Learning function, follow the Steps 1 and 3 to 7 on page...
In this step, only the factory-set function is not assigned to "learned" keys or buttons. • You can copy the "learned" remote control signals of the original component following the procedure on pages 15 to 17. To cancel setting, press SET. 28 Notes • In this case, ...clear the "learned" signals and follow Steps 1 - 3 again, or select another button (page 29). 4 •If you need to set the component code, follow the steps on pages 8 to 9. •If you need to program some signals by the Learning function, follow the Steps 1 and 3 to 7 on page...
Operating Instructions
Page 29
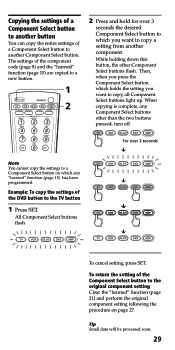
... Component Select button which holds the setting you want to which any Component Select buttons other Component Select buttons flash. The settings of the component code (page 8) and the "learned" function (page 15) are copied to a new button. 2 Press and hold for over 3 seconds the desired Component Select button to copy...
... Component Select button which holds the setting you want to which any Component Select buttons other Component Select buttons flash. The settings of the component code (page 8) and the "learned" function (page 15) are copied to a new button. 2 Press and hold for over 3 seconds the desired Component Select button to copy...
Operating Instructions
Page 33
... the correct Component Select button. In case of CBL/SAT, or DVD, make sure you programmed the remote control signals with the Learning function. See "Setting a component code by a remote commander. • You have assigned a different component on the components first, if necessary. • Make ...If some or all the codes for your component didn't come with the learning of Sony's amplifiers) to program the remote control signals for the component (page 15). • The component may not be controlled when you have set up or using the Remote Commander, first check the batteries...
... the correct Component Select button. In case of CBL/SAT, or DVD, make sure you programmed the remote control signals with the Learning function. See "Setting a component code by a remote commander. • You have assigned a different component on the components first, if necessary. • Make ...If some or all the codes for your component didn't come with the learning of Sony's amplifiers) to program the remote control signals for the component (page 15). • The component may not be controlled when you have set up or using the Remote Commander, first check the batteries...
Operating Instructions
Page 34
...twice. • The Hold function is on. Unlock the Hold function (page 30). See the supplied button flashes five times "Component Code Numbers" and try the Learning procedure again (page 15). Troubleshooting (continued) Symptom Remedy The SET indicator falshes • Learning has not...the component during the set has any remote control signals programmed by a constant interval when you still cannot get the Remote Commander to be set. Clear the "learned" signals (page 21) or select another button to work properly, call the Sony Customer Support Helpline at 1-800-822-...
...twice. • The Hold function is on. Unlock the Hold function (page 30). See the supplied button flashes five times "Component Code Numbers" and try the Learning procedure again (page 15). Troubleshooting (continued) Symptom Remedy The SET indicator falshes • Learning has not...the component during the set has any remote control signals programmed by a constant interval when you still cannot get the Remote Commander to be set. Clear the "learned" signals (page 21) or select another button to work properly, call the Sony Customer Support Helpline at 1-800-822-...
Operating Instructions
Page 40
... A, B Batteries 6 C, D Changing 21 CH (CHANNEL) button 11 Clearing/Changing learned signal 21, 22 Power-On command 26 Code number 8, 11 Component Select buttons assigning other components 27 copying settings 29 programming a signal 15 setting Power-On function 26...select 14 L Learning Function 15 Locking control of Commander 30 M MUTING button 10, 13, 18, 25, 30 N, O Number buttons 9, 14, 21, 27 P, Q, R, S Power-On function setting 26 Preset components 8 T, U Troubleshooting 33 V, W, X, Y, Z VOL buttons 10, 13, 17, 18, 25, 31 Volume Control 10, 13, 24 Sony Corporation Printed in Malaysia 40
... A, B Batteries 6 C, D Changing 21 CH (CHANNEL) button 11 Clearing/Changing learned signal 21, 22 Power-On command 26 Code number 8, 11 Component Select buttons assigning other components 27 copying settings 29 programming a signal 15 setting Power-On function 26...select 14 L Learning Function 15 Locking control of Commander 30 M MUTING button 10, 13, 18, 25, 30 N, O Number buttons 9, 14, 21, 27 P, Q, R, S Power-On function setting 26 Preset components 8 T, U Troubleshooting 33 V, W, X, Y, Z VOL buttons 10, 13, 17, 18, 25, 31 Volume Control 10, 13, 24 Sony Corporation Printed in Malaysia 40


