Operating Instructions
Page 4
... remote. Icon +RW -RWVR -RWVideo +R Meaning Functions available for DVD+RWs Functions available for DVD-RWs in VR (Video Recording) mode Functions available for DVD-RWs in video mode Functions available for DVD+Rs -RVR -RVideo DVD RAM Functions available for DVD-Rs in VR (Video Recording) mode Functions available for DVD-...You can also use the controls on the recorder if they have the same or similar names as those on the remote. • The on-screen display illustrations used in this manual may not match the graphics displayed on your TV screen. • The explanations regarding discs ...
... remote. Icon +RW -RWVR -RWVideo +R Meaning Functions available for DVD+RWs Functions available for DVD-RWs in VR (Video Recording) mode Functions available for DVD-RWs in video mode Functions available for DVD+Rs -RVR -RVideo DVD RAM Functions available for DVD-Rs in VR (Video Recording) mode Functions available for DVD-...You can also use the controls on the recorder if they have the same or similar names as those on the remote. • The on-screen display illustrations used in this manual may not match the graphics displayed on your TV screen. • The explanations regarding discs ...
Operating Instructions
Page 6
... Use Your DVD Recorder 8 How to Use the On-Screen Menus 10 Quick Guide to Disc Types 12 Recordable and Playable Discs 12 Playable Discs 15 Hookups and Settings 17 Hooking Up the Recorder 17 Step 1: Unpacking 17 Step 2: Connecting the Antenna Cable 17 Step 3: Connecting to Your TV 21 Step ... Connecting to Your AV Amplifier (Receiver 24 Step 5: Connecting the Power Cord 26 Step 6: Preparing the Remote 26 Step 7: Easy Setup 29 Connecting a VCR or Similar Device 32 Watching TV 34 Playback 36 Playing Discs 36 Playback Options 37 Playing a Title From the Title List 40 Searching for...
... Use Your DVD Recorder 8 How to Use the On-Screen Menus 10 Quick Guide to Disc Types 12 Recordable and Playable Discs 12 Playable Discs 15 Hookups and Settings 17 Hooking Up the Recorder 17 Step 1: Unpacking 17 Step 2: Connecting the Antenna Cable 17 Step 3: Connecting to Your TV 21 Step ... Connecting to Your AV Amplifier (Receiver 24 Step 5: Connecting the Power Cord 26 Step 6: Preparing the Remote 26 Step 7: Easy Setup 29 Connecting a VCR or Similar Device 32 Watching TV 34 Playback 36 Playing Discs 36 Playback Options 37 Playing a Title From the Title List 40 Searching for...
Operating Instructions
Page 17
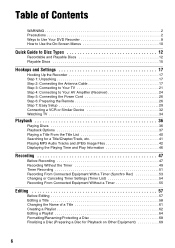
...output Cable box with the components to be connected. • You cannot connect this recorder to a TV that you reach "Connecting the Power Cord" on page 26. Hookups and Settings Hookups and Settings Hooking Up the Recorder Follow steps 1 to 7 to hook up and adjust the settings of the following ...1: Unpacking Check that does not have the following items: • Audio/video cord (phono plug × 3 y phono plug × 3) (1) • Antenna cable (1) • Remote commander (remote) (1) • Size AA (R6) batteries (2) Step 2: Connecting the Antenna Cable Select one of the...
...output Cable box with the components to be connected. • You cannot connect this recorder to a TV that you reach "Connecting the Power Cord" on page 26. Hookups and Settings Hookups and Settings Hooking Up the Recorder Follow steps 1 to 7 to hook up and adjust the settings of the following ...1: Unpacking Check that does not have the following items: • Audio/video cord (phono plug × 3 y phono plug × 3) (1) • Antenna cable (1) • Remote commander (remote) (1) • Size AA (R6) batteries (2) Step 2: Connecting the Antenna Cable Select one of the...

Operating Instructions
Page 26
...Remote Plug the recorder and TV power cords into the remote casing, particularly when replacing the batteries. 26 ONENT O OUT S VIDEO OUT LINE 1 IN LINE OUT Y VIDEO VIDEO PB L VHF/UHF IN PR R OUT AUDIO AUDIO HDMI OUT to AC outlet < Notes • If the supplied remote interferes your other Sony DVD recorder... or player, change the command mode number for a short while before operating the recorder. You can control the recorder using the remote, point it at the remote sensor on the batteries to strong ...
...Remote Plug the recorder and TV power cords into the remote casing, particularly when replacing the batteries. 26 ONENT O OUT S VIDEO OUT LINE 1 IN LINE OUT Y VIDEO VIDEO PB L VHF/UHF IN PR R OUT AUDIO AUDIO HDMI OUT to AC outlet < Notes • If the supplied remote interferes your other Sony DVD recorder... or player, change the command mode number for a short while before operating the recorder. You can control the recorder using the remote, point it at the remote sensor on the batteries to strong ...
Operating Instructions
Page 27
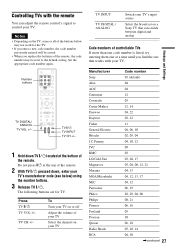
... one at a time until you find the one that can adjust the remote control's signal to the default setting. Press TV "/1 TV VOL +/- TV CH +/- TV "/1 TV INPUT TV CH +/- 1 Hold down , enter your TV's manufacturer code (see below may be reset to control your TV. Manufacturer Sony Akai AOC Centurion Coronado Curtis-Mathes Daewoo Daytron Fisher General Electric Hitachi...
... one at a time until you find the one that can adjust the remote control's signal to the default setting. Press TV "/1 TV VOL +/- TV CH +/- TV "/1 TV INPUT TV CH +/- 1 Hold down , enter your TV's manufacturer code (see below may be reset to control your TV. Manufacturer Sony Akai AOC Centurion Coronado Curtis-Mathes Daewoo Daytron Fisher General Electric Hitachi...
Operating Instructions
Page 28
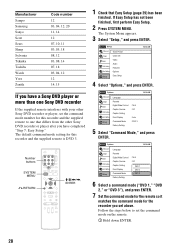
... command mode setting for this recorder and the supplied remote to one Sony DVD recorder If the supplied remote interferes with your other Sony DVD recorder or player after you have a Sony DVD player or more than one that differs from the other Sony DVD recorder or player, set the command mode number for this recorder and the supplied remote is DVD 3. Manufacturer Sampo Samsung Sanyo Scott...
... command mode setting for this recorder and the supplied remote to one Sony DVD recorder If the supplied remote interferes with your other Sony DVD recorder or player after you have a Sony DVD player or more than one that differs from the other Sony DVD recorder or player, set the command mode number for this recorder and the supplied remote is DVD 3. Manufacturer Sampo Samsung Sanyo Scott...
Operating Instructions
Page 29
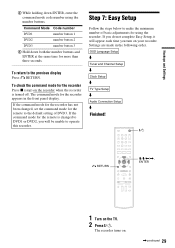
... time you will be unable to operate this recorder. If the command mode for the recorder has not been changed, set the command mode for the remote to DVD1 or DVD2, you turn on the recorder when the recorder is changed to the default setting of basic ...number button 1 DVD2 number button 2 DVD3 number button 3 C Hold down ENTER, enter the command mode code number using the recorder. OSD Language Setup m Tuner and Channel Setup m Clock Setup m TV Type Setup m Audio Connection Setup m Finished! 123 456 789 0 "/1 O RETURN M/m/ Hookups and Settings B While holding ...
... time you will be unable to operate this recorder. If the command mode for the recorder has not been changed, set the command mode for the remote to DVD1 or DVD2, you turn on the recorder when the recorder is changed to the default setting of basic ...number button 1 DVD2 number button 2 DVD3 number button 3 C Hold down ENTER, enter the command mode code number using the recorder. OSD Language Setup m Tuner and Channel Setup m Clock Setup m TV Type Setup m Audio Connection Setup m Finished! 123 456 789 0 "/1 O RETURN M/m/ Hookups and Settings B While holding ...
Operating Instructions
Page 38
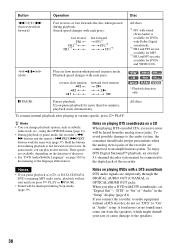
...options, such as subtitle, audio track, etc., using the OPTIONS menu (page 11). • During playback or pause mode, the recorder's m/ M buttons and the remote's .PREV/>NEXT buttons work the same way (page 37). A loud noise (or no sound) may come out from the analog ...DTS soundtracks, set "DTS" to fast forward or fast reverse. All discs z Hints • You can play a DVD with each press: reverse slow motion T T T T T T forward slow motion t t t t t t +RW +R DVD -RWVR -RWVideo -RVR -RVideo RAM VCD * * Playback direction only X PAUSE Pauses playback. To resume normal playback...
...options, such as subtitle, audio track, etc., using the OPTIONS menu (page 11). • During playback or pause mode, the recorder's m/ M buttons and the remote's .PREV/>NEXT buttons work the same way (page 37). A loud noise (or no sound) may come out from the analog ...DTS soundtracks, set "DTS" to fast forward or fast reverse. All discs z Hints • You can play a DVD with each press: reverse slow motion T T T T T T forward slow motion t t t t t t +RW +R DVD -RWVR -RWVideo -RVR -RVideo RAM VCD * * Playback direction only X PAUSE Pauses playback. To resume normal playback...
Operating Instructions
Page 88
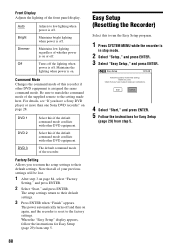
...Select "Setup," and press ENTER. 3 Select "Easy Setup," and press ENTER. For details, see "If you have a Sony DVD player or more than one Sony DVD recorder" on page 28. Auto Bright Dimmer Off Adjusts to low lighting when power is reset to the setting made all of whether ... default command mode of the supplied remote to the factory settings. Be sure to their default settings. DVD 1 DVD 2 DVD 3 Select this to make initial settings. The setup settings return to match the command mode of the recorder. Easy Setup (Resetting the Recorder) Select this if the default command...
...Select "Setup," and press ENTER. 3 Select "Easy Setup," and press ENTER. For details, see "If you have a Sony DVD player or more than one Sony DVD recorder" on page 28. Auto Bright Dimmer Off Adjusts to low lighting when power is reset to the setting made all of whether ... default command mode of the supplied remote to the factory settings. Be sure to their default settings. DVD 1 DVD 2 DVD 3 Select this to make initial settings. The setup settings return to match the command mode of the recorder. Easy Setup (Resetting the Recorder) Select this if the default command...
Operating Instructions
Page 92
... Menus or displays do not appear on the recorder. , Different command modes are weak. , The remote is protected (page 68). If the programs start at the same time, the program listed first in the menu has priority (page 52). , There is no DVD inserted in the selected mode. However, the ...actual recording itself is flashing. , The disc does not have...
... Menus or displays do not appear on the recorder. , Different command modes are weak. , The remote is protected (page 68). If the programs start at the same time, the program listed first in the menu has priority (page 52). , There is no DVD inserted in the selected mode. However, the ...actual recording itself is flashing. , The disc does not have...
Operating Instructions
Page 93
... on the TV screen. , Check that this unit is repaired, repaired parts may rise considerably inside the car. • After playing, store the disc in again. "Cannot record because of abrasive...the recorder is adding disc data to malfunction. Other Sony equipment responds to the remote. , The same command mode is set for reuse or recycling purposes. Leave the recorder off the recorder, wait...The recorder is not blocked. Dust, fingerprints, or scratches on the rear of the recorder is locked. If you press Z OPEN/CLOSE. , It may be collected for both the Sony DVD equipment....
... on the TV screen. , Check that this unit is repaired, repaired parts may rise considerably inside the car. • After playing, store the disc in again. "Cannot record because of abrasive...the recorder is adding disc data to malfunction. Other Sony equipment responds to the remote. , The same command mode is set for reuse or recycling purposes. Leave the recorder off the recorder, wait...The recorder is not blocked. Dust, fingerprints, or scratches on the rear of the recorder is locked. If you press Z OPEN/CLOSE. , It may be collected for both the Sony DVD equipment....
Operating Instructions
Page 95
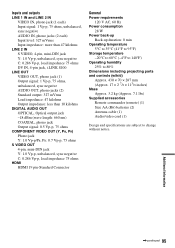
... including projecting parts and controls (w/h/d) Approx. 430 × 70 × 287 mm (Approx. 17 × 2 7/8 × 113/8 inches) Mass Approx. 3.2 kg (Approx. 7.1 lbs) Supplied accessories Remote commander (remote) (1) Size AA (R6) batteries (2) Antenna cable (1) Audio/video cord (1) Design and specifications are subject to change without notice.
... including projecting parts and controls (w/h/d) Approx. 430 × 70 × 287 mm (Approx. 17 × 2 7/8 × 113/8 inches) Mass Approx. 3.2 kg (Approx. 7.1 lbs) Supplied accessories Remote commander (remote) (1) Size AA (R6) batteries (2) Antenna cable (1) Audio/video cord (1) Design and specifications are subject to change without notice.
Operating Instructions
Page 97
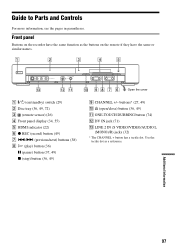
... + button has a tactile dot. Use the tactile dot as the buttons on /standby) switch (29) B Disc tray (36, 49, 72) C (remote sensor) (26) D Front panel display (34, 55) E HDMI indicator (22) F z REC (record) button (49) G ./> (previous/next) buttons (38) H H (play) button (36) X (pause) button (37, 49) x (stop) button (36, 49) - Guide to...
... + button has a tactile dot. Use the tactile dot as the buttons on /standby) switch (29) B Disc tray (36, 49, 72) C (remote sensor) (26) D Front panel display (34, 55) E HDMI indicator (22) F z REC (record) button (49) G ./> (previous/next) buttons (38) H H (play) button (36) X (pause) button (37, 49) x (stop) button (36, 49) - Guide to...
Operating Instructions
Page 98
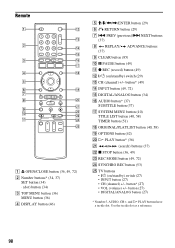
...(search) buttons (37) V x STOP button (36, 49) W REC MODE button (49, 72) X SYNCHRO REC button (53) Y TV buttons • ?/1 (on /standby) switch (29) M CH (channel) +/- button (27) • DIGITAL/ANALOG button (27) * Number ...5, AUDIO, CH +, and H PLAY buttons have a tactile dot. Remote 123 456 789 0 A Z OPEN/CLOSE button (36, 49, 72) B Number buttons* (34, 37) SET button (34)... I CLEAR button (85) J X PAUSE button (49) K z REC (record) button (49) L ?/1 (on /standby) switch (27) • INPUT button (27) • CH (channel) +/-
...(search) buttons (37) V x STOP button (36, 49) W REC MODE button (49, 72) X SYNCHRO REC button (53) Y TV buttons • ?/1 (on /standby) switch (29) M CH (channel) +/- button (27) • DIGITAL/ANALOG button (27) * Number ...5, AUDIO, CH +, and H PLAY buttons have a tactile dot. Remote 123 456 789 0 A Z OPEN/CLOSE button (36, 49, 72) B Number buttons* (34, 37) SET button (34)... I CLEAR button (85) J X PAUSE button (49) K z REC (record) button (49) L ?/1 (on /standby) switch (27) • INPUT button (27) • CH (channel) +/-
Operating Instructions
Page 103
...OUT 23 Connecting the antenna cable 17 to your AV/amplifier (receiver) 24 to your TV 21 Controlling TVs with the remote 27 "Copy" 67 Copy protection 48, 100 Copy-Free 48 Copy-Never 48 Copy... Dubbing" 74 "DV/D8 Simple Dubbing" 73 "DVD Auto Chapter" 83 DVD Editing 57 DVD VIDEO 15, 100 DVD+R 12, 100 DVD+R DL 12 DVD+RW 12, 100 DVD-R 12, 100 DVD-RAM 15 DVD-RW 12, 100 E Easy Setup 88 "Edit"... Titles" 68 F "Factory Setting" 88 Fast forward 38 Fast reverse 38 Feature settings 83 Finalizing 69 "Format DVD-RW" 84 Formatting 48, 68 "Front Display" 88 Front panel 97 Front panel display 99 H Handling discs...
...OUT 23 Connecting the antenna cable 17 to your AV/amplifier (receiver) 24 to your TV 21 Controlling TVs with the remote 27 "Copy" 67 Copy protection 48, 100 Copy-Free 48 Copy-Never 48 Copy... Dubbing" 74 "DV/D8 Simple Dubbing" 73 "DVD Auto Chapter" 83 DVD Editing 57 DVD VIDEO 15, 100 DVD+R 12, 100 DVD+R DL 12 DVD+RW 12, 100 DVD-R 12, 100 DVD-RAM 15 DVD-RW 12, 100 E Easy Setup 88 "Edit"... Titles" 68 F "Factory Setting" 88 Fast forward 38 Fast reverse 38 Feature settings 83 Finalizing 69 "Format DVD-RW" 84 Formatting 48, 68 "Front Display" 88 Front panel 97 Front panel display 99 H Handling discs...
Operating Instructions
Page 104
...101 "Protect" 59 Q Quick Timer 50 104 R Rear panel 99 REC 49 REC MODE 49 Recording 47 recordable discs 12 recording format 12 recording mode 47 Recording mode 47 Recording time 47, 50 Region code 16 Remaining time 46 Remote 26, 98 REPLAY 37 Resetting 88 Resume Play 39 Rotate 44 S SAP (Second Audio Program) ... 59, 64 TITLE LIST 40, 58 Title List 40 "Title Name" 59, 64 TOP MENU 36 Track 101 Troubleshooting 89 "Tuner Audio" 81 Tuner Preset 30 Tuner Preset settings 76 TV INPUT 27 "TV Type" 79 U "Unfinalize" 70 Unrecordable pictures 48 V "Video (HDMI)" 79 VIDEO CD 15 Video mode 12 Video settings 79...
...101 "Protect" 59 Q Quick Timer 50 104 R Rear panel 99 REC 49 REC MODE 49 Recording 47 recordable discs 12 recording format 12 recording mode 47 Recording mode 47 Recording time 47, 50 Region code 16 Remaining time 46 Remote 26, 98 REPLAY 37 Resetting 88 Resume Play 39 Rotate 44 S SAP (Second Audio Program) ... 59, 64 TITLE LIST 40, 58 Title List 40 "Title Name" 59, 64 TOP MENU 36 Track 101 Troubleshooting 89 "Tuner Audio" 81 Tuner Preset 30 Tuner Preset settings 76 TV INPUT 27 "TV Type" 79 U "Unfinalize" 70 Unrecordable pictures 48 V "Video (HDMI)" 79 VIDEO CD 15 Video mode 12 Video settings 79...


