Operating Instructions
Page 2
... and, if not installed and used in this DVD recorder is connected to the presence of uninsulated "dangerous voltage" within the product's enclosure that interference will increase eye hazard. Increase the separation between the equipment and receiver. - On power sources • Operate the recorder only on , the user is no guarantee that may condense on the laser protective housing inside the...
... and, if not installed and used in this DVD recorder is connected to the presence of uninsulated "dangerous voltage" within the product's enclosure that interference will increase eye hazard. Increase the separation between the equipment and receiver. - On power sources • Operate the recorder only on , the user is no guarantee that may condense on the laser protective housing inside the...
Operating Instructions
Page 6
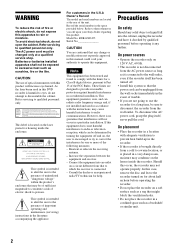
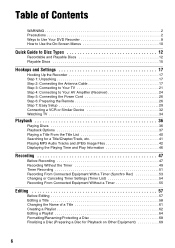
...Easy Setup 29 Connecting a VCR or Similar Device 32 Watching TV 34 Playback 36 Playing Discs 36 Playback Options 37 Playing a Title From the Title List 40 Searching for a Title/Chapter/Track, etc 41 Playing MP3 Audio Tracks and JPEG Image Files 42 Displaying the Playing Time and Play Information 46 Recording 47 Before Recording 47 Recording Without the Timer 49 Timer Recording 51 Recording From Connected Equipment With a Timer (Synchro Rec 53 Changing or Canceling Timer Settings (Timer List 54 Recording From Connected Equipment Without a Timer 55 Editing 57 Before Editing 57...
...Easy Setup 29 Connecting a VCR or Similar Device 32 Watching TV 34 Playback 36 Playing Discs 36 Playback Options 37 Playing a Title From the Title List 40 Searching for a Title/Chapter/Track, etc 41 Playing MP3 Audio Tracks and JPEG Image Files 42 Displaying the Playing Time and Play Information 46 Recording 47 Before Recording 47 Recording Without the Timer 49 Timer Recording 51 Recording From Connected Equipment With a Timer (Synchro Rec 53 Changing or Canceling Timer Settings (Timer List 54 Recording From Connected Equipment Without a Timer 55 Editing 57 Before Editing 57...

Operating Instructions
Page 10
Once you become familiar with the basic operations, you will find the recorder easy to operate this recorder. SYSTEM MENU 123 456 789 0 O RETURN M/m/ How to Use the On-Screen Menus The following three displays are mainly used to use.
Once you become familiar with the basic operations, you will find the recorder easy to operate this recorder. SYSTEM MENU 123 456 789 0 O RETURN M/m/ How to Use the On-Screen Menus The following three displays are mainly used to use.
Operating Instructions
Page 16
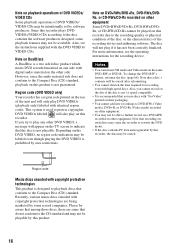
... 1x speed compatible. • It is recommended that you try to play DVD VIDEOs (playback only) labeled with identical region codes. X Region code Music discs encoded with copyright protection technologies are some playback features may be labeled even though playing the DVD VIDEO is not guaranteed. Please be aware that conform to rewrite the DVD menu. • If the disc contains PC data unrecognizable by this recorder. Since this product. 16 Region code (DVD VIDEO...
... 1x speed compatible. • It is recommended that you try to play DVD VIDEOs (playback only) labeled with identical region codes. X Region code Music discs encoded with copyright protection technologies are some playback features may be labeled even though playing the DVD VIDEO is not guaranteed. Please be aware that conform to rewrite the DVD menu. • If the disc contains PC data unrecognizable by this recorder. Since this product. 16 Region code (DVD VIDEO...
Operating Instructions
Page 22
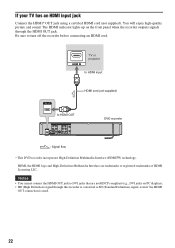
... SD (Standard Definition) signal, even if the HDMI OUT connection is used. 22 HDMI IN TV or projector to HDMI input HDMI cord (not supplied) HDMI OUT to turn off the recorder before connecting an HDMI cord. You will enjoy high-quality picture and sound. HDMI, the HDMI logo and High-Definition Multimedia Interface are not HDCP compliant (e.g., DVI jacks on the front panel when the recorder outputs signals through this recorder is converted to DVI jacks...
... SD (Standard Definition) signal, even if the HDMI OUT connection is used. 22 HDMI IN TV or projector to HDMI input HDMI cord (not supplied) HDMI OUT to turn off the recorder before connecting an HDMI cord. You will enjoy high-quality picture and sound. HDMI, the HDMI logo and High-Definition Multimedia Interface are not HDCP compliant (e.g., DVI jacks on the front panel when the recorder outputs signals through this recorder is converted to DVI jacks...
Operating Instructions
Page 23
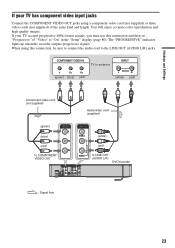
... COAXIAL DIGITAL AUDIO OUT R OUT AUDIO AUDIO (white) (red) to "On" in the "Setup" display (page 80). If your TV has component video input jacks Connect the COMPONENT VIDEO OUT jacks using this connection and then set "Progressive" of the same kind and length. When using a component video cord (not supplied) or three video cords (not supplied) of "Video" to LINE OUT (AUDIO L/R) DVD recorder : Signal flow 23 Hookups and Settings If your TV accepts progressive 480p format signals, you must use this connection...
... COAXIAL DIGITAL AUDIO OUT R OUT AUDIO AUDIO (white) (red) to "On" in the "Setup" display (page 80). If your TV has component video input jacks Connect the COMPONENT VIDEO OUT jacks using this connection and then set "Progressive" of the same kind and length. When using a component video cord (not supplied) or three video cords (not supplied) of "Video" to LINE OUT (AUDIO L/R) DVD recorder : Signal flow 23 Hookups and Settings If your TV accepts progressive 480p format signals, you must use this connection...

Operating Instructions
Page 26
... an old battery, or batteries of time, remove the batteries. - You can control the recorder using the remote, point it at the remote sensor on the front panel) to connect the power cord only after the front panel display lights up and the recorder enters standby mode. You can operate the recorder only after all connections are complete. When using the supplied remote. After you connect the power cord, you do not intend to...
... an old battery, or batteries of time, remove the batteries. - You can control the recorder using the remote, point it at the remote sensor on the front panel) to connect the power cord only after the front panel display lights up and the recorder enters standby mode. You can operate the recorder only after all connections are complete. When using the supplied remote. After you connect the power cord, you do not intend to...
Operating Instructions
Page 28
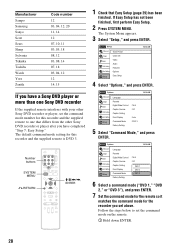
... 07, 18 03, 04, 12 12 14, 15 If you have a Sony DVD player or more than one that differs from the other Sony DVD recorder or player, set the command mode number for this recorder and the supplied remote is DVD 3. The default command mode setting for this recorder and the supplied remote to one Sony DVD recorder If the supplied remote interferes with your other Sony DVD recorder or player after you have completed "Step 7: Easy Setup."
... 07, 18 03, 04, 12 12 14, 15 If you have a Sony DVD player or more than one that differs from the other Sony DVD recorder or player, set the command mode number for this recorder and the supplied remote is DVD 3. The default command mode setting for this recorder and the supplied remote to one Sony DVD recorder If the supplied remote interferes with your other Sony DVD recorder or player after you have completed "Step 7: Easy Setup."
Operating Instructions
Page 30
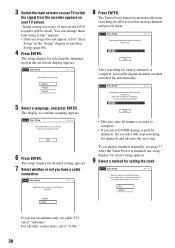
... select "Auto", this message does not appear, select "Easy Setup" in the "Setup" display to run Easy Setup (page 88). 4 Press ENTER. To stop searching for setting the clock. If you have a cable connection. Auto Manual Antenna Cable If you will be made. For all of receivable analog channels and presets them later using setup." 3 Switch the input selector on your TV so that the signal from the recorder appears on -screen display appears. The setup display for a time signal...
... select "Auto", this message does not appear, select "Easy Setup" in the "Setup" display to run Easy Setup (page 88). 4 Press ENTER. To stop searching for setting the clock. If you have a cable connection. Auto Manual Antenna Cable If you will be made. For all of receivable analog channels and presets them later using setup." 3 Switch the input selector on your TV so that the signal from the recorder appears on -screen display appears. The setup display for a time signal...
Operating Instructions
Page 35
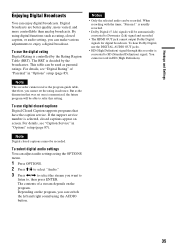
For details, see "Caption Service" in "Options" setup (page 85). Note This recorder cannot receive the program guide table, therefore, you can be used as parental ratings. By using the OPTIONS menu. 1 Press OPTIONS. 2 Press M/m to select "Audio." 3 Press If the support service number is decided by the Rating Region Table (RRT). The RRT is selected, closed caption, or audio setting, you cannot set once is controlled by the broadcaster. Digital broadcasts are better quality...
For details, see "Caption Service" in "Options" setup (page 85). Note This recorder cannot receive the program guide table, therefore, you can be used as parental ratings. By using the OPTIONS menu. 1 Press OPTIONS. 2 Press M/m to select "Audio." 3 Press If the support service number is decided by the Rating Region Table (RRT). The RRT is selected, closed caption, or audio setting, you cannot set once is controlled by the broadcaster. Digital broadcasts are better quality...
Operating Instructions
Page 62
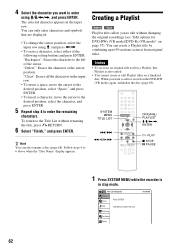
4 Select the character you want to enter using M/m/
4 Select the character you want to enter using M/m/

Operating Instructions
Page 72
... stop the tape to the "DVD Auto Chapter" setting of a DV/D8 format tape (One Touch Dubbing), see page 74. ◆How titles and chapters are created The dubbed contents on the disc become one title, and the title is then divided into chapters at either 5 or 15-minute intervals, according to select the scenes using the onscreen menu. Z OPEN/ CLOSE 123 456 789 0 INPUT SYSTEM MENU O RETURN M/m/ The recorder controls the digital video camera. Dubbing From a DV/D8 Format Tape...
... stop the tape to the "DVD Auto Chapter" setting of a DV/D8 format tape (One Touch Dubbing), see page 74. ◆How titles and chapters are created The dubbed contents on the disc become one title, and the title is then divided into chapters at either 5 or 15-minute intervals, according to select the scenes using the onscreen menu. Z OPEN/ CLOSE 123 456 789 0 INPUT SYSTEM MENU O RETURN M/m/ The recorder controls the digital video camera. Dubbing From a DV/D8 Format Tape...
Operating Instructions
Page 73
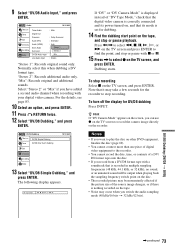
.... DV/D8 Dubbing Title List Timer DV/D8 Simple Dubbing DV/D8 One Touch Dubbing Edit DV/D8 Dubbing Disc Setting Setup 10:10 AM 13 Select "DV/D8 Simple Dubbing," and press ENTER. 9 Select "DV/D8 Audio Input," and press ENTER. Normally select this when dubbing a DV format tape. "Mix": Records original and additional sounds. Audio 10:10 AM Title List Timer Edit DV/D8 Dubbing Disc Setting Setup Tuner Audio Digital Out Downmix Audio DRC Audio (HDMI) Scan Audio Surround DV/D8 Audio Input Line Audio Input : Main : Dolby Surround : Standard : Auto : On...
.... DV/D8 Dubbing Title List Timer DV/D8 Simple Dubbing DV/D8 One Touch Dubbing Edit DV/D8 Dubbing Disc Setting Setup 10:10 AM 13 Select "DV/D8 Simple Dubbing," and press ENTER. 9 Select "DV/D8 Audio Input," and press ENTER. Normally select this when dubbing a DV format tape. "Mix": Records original and additional sounds. Audio 10:10 AM Title List Timer Edit DV/D8 Dubbing Disc Setting Setup Tuner Audio Digital Out Downmix Audio DRC Audio (HDMI) Scan Audio Surround DV/D8 Audio Input Line Audio Input : Main : Dolby Surround : Standard : Auto : On...
Operating Instructions
Page 75
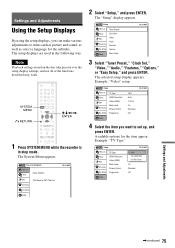
The setup displays are used in the following way. SYSTEM MENU 123 456 789 0 O RETURN M/m/ Settings and Adjustments Using the Setup Displays By using the setup displays, you can make various adjustments to items such as picture and sound, as well as select a language for the subtitles. Note Playback settings stored on the disc take priority over the setup display settings, and not all of the functions described may work.
The setup displays are used in the following way. SYSTEM MENU 123 456 789 0 O RETURN M/m/ Settings and Adjustments Using the Setup Displays By using the setup displays, you can make various adjustments to items such as picture and sound, as well as select a language for the subtitles. Note Playback settings stored on the disc take priority over the setup display settings, and not all of the functions described may work.
Operating Instructions
Page 76
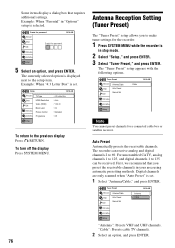
... is set . The recorder can receive analog and digital channels 2 to 135 can be received. Example: When "Parental" in "Options" setup is in your area using automatic presetting methods. Video Title List Timer Edit DV/D8 Dubbing Disc Setting TV Type HDMI Resolution Video (HDMI) Black Level Picture Control Progressive Setup 10:10 AM : 4:3 Letter Box : Auto : Y Cb Cr : On : Standard : Off To return to make tuner settings for a connected cable box or satellite receiver. To turn off the display Press SYSTEM MENU. 76 Antenna Reception Setting (Tuner...
... is set . The recorder can receive analog and digital channels 2 to 135 can be received. Example: When "Parental" in "Options" setup is in your area using automatic presetting methods. Video Title List Timer Edit DV/D8 Dubbing Disc Setting TV Type HDMI Resolution Video (HDMI) Black Level Picture Control Progressive Setup 10:10 AM : 4:3 Letter Box : Auto : Y Cb Cr : On : Standard : Off To return to make tuner settings for a connected cable box or satellite receiver. To turn off the display Press SYSTEM MENU. 76 Antenna Reception Setting (Tuner...

Operating Instructions
Page 81
... • If the HDMI OUT jack is selected. • The HDMI OUT jack cannot output Dolby Digital signals for digital broadcasts. Audio 10:10 AM Title List Timer Edit DV/D8 Dubbing Disc Setting Setup Tuner Audio Digital Out Downmix Audio DRC Audio (HDMI) Scan Audio Surround DV/D8 Audio Input Line Audio Input : Main : Dolby Surround : Standard : Auto : On : Off : Stereo 1 : Stereo Tuner Audio Selects the sound to be automatically output, even when "Dolby Digital" is connected to equipment not compatible with Dolby Digital signals, D-PCM signals will come out...
... • If the HDMI OUT jack is selected. • The HDMI OUT jack cannot output Dolby Digital signals for digital broadcasts. Audio 10:10 AM Title List Timer Edit DV/D8 Dubbing Disc Setting Setup Tuner Audio Digital Out Downmix Audio DRC Audio (HDMI) Scan Audio Surround DV/D8 Audio Input Line Audio Input : Main : Dolby Surround : Standard : Auto : On : Off : Stereo 1 : Stereo Tuner Audio Selects the sound to be automatically output, even when "Dolby Digital" is connected to equipment not compatible with Dolby Digital signals, D-PCM signals will come out...
Operating Instructions
Page 85
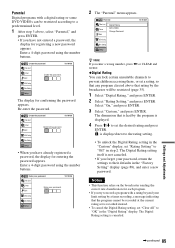
.... Create the password Title List 10:10 AM Timer Edit Create the password. Enter a 4-digit password using the number buttons. Parental Digital programs with a rating beyond your limit setting by the broadcaster will be restricted (page 35). 1 Select "Digital Rating," and press ENTER. 2 Select "Rating Setting," and press ENTER. DV/D8 Dubbing Disc Setting Setup The display for registering a new password appears. Re-enter the password. DV/D8 Dubbing Disc Setting Setup • When you try to record a program with a digital rating or some DVD VIDEOs can lock...
.... Create the password Title List 10:10 AM Timer Edit Create the password. Enter a 4-digit password using the number buttons. Parental Digital programs with a rating beyond your limit setting by the broadcaster will be restricted (page 35). 1 Select "Digital Rating," and press ENTER. 2 Select "Rating Setting," and press ENTER. DV/D8 Dubbing Disc Setting Setup The display for registering a new password appears. Re-enter the password. DV/D8 Dubbing Disc Setting Setup • When you try to record a program with a digital rating or some DVD VIDEOs can lock...

Operating Instructions
Page 86
The picture may differ from the actual view depending on the TV. 16:9 4:3 Letter Box Notes • Playback of discs without the Parental Control function cannot be limited on the disc, you may be limited according to a predetermined level, such as the age of the users. The selection items for registering a password appears, enter a new four-digit password using the number buttons. 86 DVD VIDEO Title List Rating Level Timer Edit DV/D8 Dubbing Disc Setting Setup 10...
The picture may differ from the actual view depending on the TV. 16:9 4:3 Letter Box Notes • Playback of discs without the Parental Control function cannot be limited on the disc, you may be limited according to a predetermined level, such as the age of the users. The selection items for registering a password appears, enter a new four-digit password using the number buttons. 86 DVD VIDEO Title List Rating Level Timer Edit DV/D8 Dubbing Disc Setting Setup 10...
Operating Instructions
Page 89
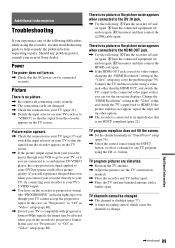
... accept the progressive signal. In this problem even when you connect your recorder directly to your TV so that is disabled (page 77). , A timer recording started, which cause the channels to some DVD programs could affect picture quality. button. TV program pictures are connected to a combination TV/VIDEO player, the copy-protection signal applied to change. Change the "HDMI Resolution" setting in the "Video" setup, and switch the TV's input back to "Off" in "Tuner Preset" setup (page 76). , Select the correct source using the INPUT button, or select a channel of any...
... accept the progressive signal. In this problem even when you connect your recorder directly to your TV so that is disabled (page 77). , A timer recording started, which cause the channels to some DVD programs could affect picture quality. button. TV program pictures are connected to a combination TV/VIDEO player, the copy-protection signal applied to change. Change the "HDMI Resolution" setting in the "Video" setup, and switch the TV's input back to "Off" in "Tuner Preset" setup (page 76). , Select the correct source using the INPUT button, or select a channel of any...
Operating Instructions
Page 103
... "Audio DRC" 82 Audio settings 81 Auto Clock Set 78 "Auto Preset" 76 B Batteries 26 "Black Level" 80 C Cable box 18, 19 "Caption Service" 87 "Caption Setting" 87 Changing or canceling timer settings (Timer List) 54 Chapter 100 "Chapter Erase" 59 "Check" 64 Child Lock 39 Cleaning discs 93 "Clock Set CH" 78 Clock Set settings 78 "Combine Titles" 65 "Command Mode" 28, 88 COMPONENT VIDEO OUT 23 Connecting the antenna cable 17 to your AV/amplifier (receiver) 24 to your TV 21 Controlling TVs with the remote 27 "Copy" 67 Copy protection...
... "Audio DRC" 82 Audio settings 81 Auto Clock Set 78 "Auto Preset" 76 B Batteries 26 "Black Level" 80 C Cable box 18, 19 "Caption Service" 87 "Caption Setting" 87 Changing or canceling timer settings (Timer List) 54 Chapter 100 "Chapter Erase" 59 "Check" 64 Child Lock 39 Cleaning discs 93 "Clock Set CH" 78 Clock Set settings 78 "Combine Titles" 65 "Command Mode" 28, 88 COMPONENT VIDEO OUT 23 Connecting the antenna cable 17 to your AV/amplifier (receiver) 24 to your TV 21 Controlling TVs with the remote 27 "Copy" 67 Copy protection...


