Operating Instructions
Page 2
...Record The model and serial numbers are designed to the presence of uninsulated "dangerous voltage" within the product's enclosure that any change or modifications not expressly approved in a residential installation. Refer to them whenever you call upon your authority to rain or moisture. RDR-VX535... your Sony dealer regarding this equipment. As the laser beam used in the recorder. • If the recorder is no...recorder and have it from the wall outlet. Should this DVD recorder is encouraged to try to disassemble the cabinet. On power sources • Operate the recorder...
...Record The model and serial numbers are designed to the presence of uninsulated "dangerous voltage" within the product's enclosure that any change or modifications not expressly approved in a residential installation. Refer to them whenever you call upon your authority to rain or moisture. RDR-VX535... your Sony dealer regarding this equipment. As the laser beam used in the recorder. • If the recorder is no...recorder and have it from the wall outlet. Should this DVD recorder is encouraged to try to disassemble the cabinet. On power sources • Operate the recorder...
Operating Instructions
Page 3
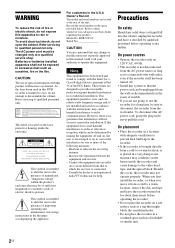
... to this apparatus during lightning storms or when unused for your nearest Sony dealer. When a cart is required when the apparatus has been damaged in any discs. • Do not place the recorder in a location near heat sources, or in a place subject to... is designed to qualified service personnel. Use of this copyright protection technology must be operated in an inclined position. IMPORTANT NOTICE Caution: This recorder is prohibited. Important Safety Instructions 1) Read these instructions. 2) Keep these instructions. 3) Heed all warnings. 4) Follow all servicing to be...
... to this apparatus during lightning storms or when unused for your nearest Sony dealer. When a cart is required when the apparatus has been damaged in any discs. • Do not place the recorder in a location near heat sources, or in a place subject to... is designed to qualified service personnel. Use of this copyright protection technology must be operated in an inclined position. IMPORTANT NOTICE Caution: This recorder is prohibited. Important Safety Instructions 1) Read these instructions. 2) Keep these instructions. 3) Heed all warnings. 4) Follow all servicing to be...

Operating Instructions
Page 4
..., see "Quick Guide to Disc Types" on the remote. The explanations do not apply to discs that are created on other recorders and played back on this recorder. • Icons, such as DVD or , listed at the top of each explanation indicate what kind of media can also use the controls on the... recorder if they have the same or similar names as those on the remote. • The on-screen display illustrations used with the...
..., see "Quick Guide to Disc Types" on the remote. The explanations do not apply to discs that are created on other recorders and played back on this recorder. • Icons, such as DVD or , listed at the top of each explanation indicate what kind of media can also use the controls on the... recorder if they have the same or similar names as those on the remote. • The on-screen display illustrations used with the...
Operating Instructions
Page 5
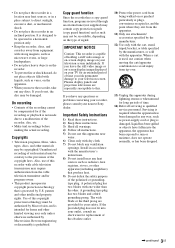
... Preparing the Remote 21 Step 7: Easy Setup 23 Connecting Another VCR or Similar Device 27 Quick Guide to Disc Types 30 Recordable and Playable Discs 30 Playable Discs 32 DVD Operation DVD/USB Playback 34 Playing Discs 34 Playback Options 35 Playing a ... 45 DVD Recording 47 Before Recording 47 DVD Recording From Connected Equipment Without the Timer 49 DVD Timer Recording From Connected Equipment 51 Changing or Canceling DVD Timer Settings (Timer List 53 Recording From Connected Equipment With a Timer (Synchro Rec 54 Recording From Another VCR or Similar Device 56 DVD Editing...
... Preparing the Remote 21 Step 7: Easy Setup 23 Connecting Another VCR or Similar Device 27 Quick Guide to Disc Types 30 Recordable and Playable Discs 30 Playable Discs 32 DVD Operation DVD/USB Playback 34 Playing Discs 34 Playback Options 35 Playing a ... 45 DVD Recording 47 Before Recording 47 DVD Recording From Connected Equipment Without the Timer 49 DVD Timer Recording From Connected Equipment 51 Changing or Canceling DVD Timer Settings (Timer List 53 Recording From Connected Equipment With a Timer (Synchro Rec 54 Recording From Another VCR or Similar Device 56 DVD Editing...
Operating Instructions
Page 6
... Selecting the Sound During Playback 73 VCR Recording 74 Before Recording 74 VCR Recording From Connected Equipment Without the Timer 75 VCR Timer Recording From Connected Equipment 77 Changing or Canceling VCR Timer Settings (Timer List 79 Recording From Connected Equipment With a Timer (Synchro Rec 80 Recording From Another VCR or Similar Device 82 Dubbing (TAPE y DVD 83 Dubbing From a VHS Tape...
... Selecting the Sound During Playback 73 VCR Recording 74 Before Recording 74 VCR Recording From Connected Equipment Without the Timer 75 VCR Timer Recording From Connected Equipment 77 Changing or Canceling VCR Timer Settings (Timer List 79 Recording From Connected Equipment With a Timer (Synchro Rec 80 Recording From Another VCR or Similar Device 82 Dubbing (TAPE y DVD 83 Dubbing From a VHS Tape...
Operating Instructions
Page 7
Additional Information 107 Troubleshooting 107 Notes About This Recorder 112 Specifications 113 About i.LINK 115 Guide to Parts and Controls 116 DVD Audio/Subtitle Language 120 Cable Box/Satellite Receiver Brand Code 121 Index 126 7US
Additional Information 107 Troubleshooting 107 Notes About This Recorder 112 Specifications 113 About i.LINK 115 Guide to Parts and Controls 116 DVD Audio/Subtitle Language 120 Cable Box/Satellite Receiver Brand Code 121 Index 126 7US
Operating Instructions
Page 8
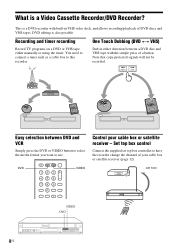
... What is also possible. Note that copy-protected signals will not be recorded. Recording and timer recording Record TV programs on a DVD or VHS tape, either direction between DVD and VCR Simply press the DVD or VIDEO button to select the media format you want to this recorder. You need to connect a tuner such as a cable box to use...
... What is also possible. Note that copy-protected signals will not be recorded. Recording and timer recording Record TV programs on a DVD or VHS tape, either direction between DVD and VCR Simply press the DVD or VIDEO button to select the media format you want to this recorder. You need to connect a tuner such as a cable box to use...
Operating Instructions
Page 9
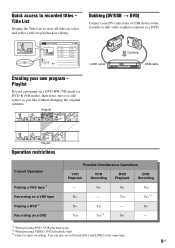
... restrictions Current Operation Playing a VHS tape*1 Recording on a VHS tape Playing a DVD*2 Recording on a DVD Possible Simultaneous Operations VCR Playback VCR Recording DVD Playback DVD Recording - i.LINK cable Dubbing USB cable Creating your DV camcorder or USB device to the recorder to dub video or photo contents to recorded titles - Quick access to a DVD. You can also record from LINE1 and LINE2 at the...
... restrictions Current Operation Playing a VHS tape*1 Recording on a VHS tape Playing a DVD*2 Recording on a DVD Possible Simultaneous Operations VCR Playback VCR Recording DVD Playback DVD Recording - i.LINK cable Dubbing USB cable Creating your DV camcorder or USB device to the recorder to dub video or photo contents to recorded titles - Quick access to a DVD. You can also record from LINE1 and LINE2 at the...
Operating Instructions
Page 10
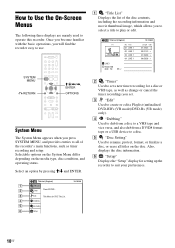
Once you become familiar with the basic operations, you will find the recorder easy to operate this recorder. How to Use the On-Screen Menus The following three displays are mainly used to use. SYSTEM MENU 123 456 789 0 O RETURN M/m/
Once you become familiar with the basic operations, you will find the recorder easy to operate this recorder. How to Use the On-Screen Menus The following three displays are mainly used to use. SYSTEM MENU 123 456 789 0 O RETURN M/m/
Operating Instructions
Page 11
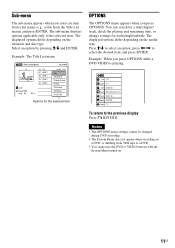
Select an option by pressing M/m and ENTER. You can search for a title/chapter/ track, check the playing and remaining time, or change settings for the selected item OPTIONS The OPTIONS menu appears when you select an item from a list menu (e.g., a title from the Title List menu), and press ENTER. The displayed options differ depending on the situation and disc type. Example: The Title List menu Title List (Original) 1/4 No. The displayed options differ depending on the media type. Press M/m to the selected item. Sub-menu The sub-menu appears when you press OPTIONS. ...
Select an option by pressing M/m and ENTER. You can search for a title/chapter/ track, check the playing and remaining time, or change settings for the selected item OPTIONS The OPTIONS menu appears when you select an item from a list menu (e.g., a title from the Title List menu), and press ENTER. The displayed options differ depending on the situation and disc type. Example: The Title List menu Title List (Original) 1/4 No. The displayed options differ depending on the media type. Press M/m to the selected item. Sub-menu The sub-menu appears when you press OPTIONS. ...
Operating Instructions
Page 12
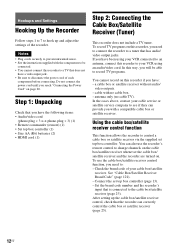
... connected to the cable box/satellite receiver (page 23). In this way, you will be connected. • You cannot connect this recorder to your cable service or satellite service company to disconnect the power cord of each component before connecting. cable with the components to be... video output jacks. Notes • Plug cords securely to record TV programs. You cannot record on . a cable box or satellite receiver without audio/ video outputs. - In the cases above, contact your VCR using your VCR connected to an antenna, connect this recorder to a TV that does not have : - You can...
... connected to the cable box/satellite receiver (page 23). In this way, you will be connected. • You cannot connect this recorder to your cable service or satellite service company to disconnect the power cord of each component before connecting. cable with the components to be... video output jacks. Notes • Plug cords securely to record TV programs. You cannot record on . a cable box or satellite receiver without audio/ video outputs. - In the cases above, contact your VCR using your VCR connected to an antenna, connect this recorder to a TV that does not have : - You can...
Operating Instructions
Page 13
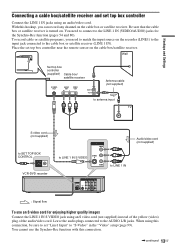
... ANT IN TO TV Antenna cable (not supplied) to antenna input TV S video cord (not supplied) to SET TOP BOX CONTROL SET TOP BOX CONTROL VCR-DVD recorder LINE 1 IN VIDEO S VIDEO to LINE 1 IN S VIDEO AUDIO to LINE 1 IN HDMI OUT SET TOP BOX CONTROL LINE 1 IN VIDEO LINE OUT AUDIO... the cable box/satellite receiver. You need to match the input source on the cable box or satellite receiver. To record cable or satellite programs, you can record any channel on the recorder (LINE1) to the input jack connected to "S-Video" in the "Video" setup (page 99). When using this connection. ,...
... ANT IN TO TV Antenna cable (not supplied) to antenna input TV S video cord (not supplied) to SET TOP BOX CONTROL SET TOP BOX CONTROL VCR-DVD recorder LINE 1 IN VIDEO S VIDEO to LINE 1 IN S VIDEO AUDIO to LINE 1 IN HDMI OUT SET TOP BOX CONTROL LINE 1 IN VIDEO LINE OUT AUDIO... the cable box/satellite receiver. You need to match the input source on the cable box or satellite receiver. To record cable or satellite programs, you can record any channel on the recorder (LINE1) to the input jack connected to "S-Video" in the "Video" setup (page 99). When using this connection. ,...

Operating Instructions
Page 14
For details, see the tuner's operating instructions. 14US z Hint You can also connect a cable box/satellite receiver to the S VIDEO and yellow VIDEO jacks at the same time. • Synchro-Recording does not work with some tuners. In this case, select "Line2" for "Connections" of "Set Top Box Control" in the "Features" setup (page 103). Notes • Do not connect to the LINE 2 IN jacks on the front panel.
For details, see the tuner's operating instructions. 14US z Hint You can also connect a cable box/satellite receiver to the S VIDEO and yellow VIDEO jacks at the same time. • Synchro-Recording does not work with some tuners. In this case, select "Line2" for "Connections" of "Set Top Box Control" in the "Features" setup (page 103). Notes • Do not connect to the LINE 2 IN jacks on the front panel.
Operating Instructions
Page 15
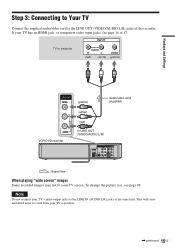
...INPUT TV or projector AUDIO R L (red) (white) VIDEO (yellow) Hookups and Settings LINE OUT VIDEO (yellow) Audio/video cord (supplied) L R AUDIO VCR-DVD recorder (white) (red) to LINE OUT (VIDEO/AUDIO L/R) HDMI OUT SET TOP BOX CONTROL LINE 1 IN VIDEO LINE OUT AUDIO OUT COMPONENT VIDEO OUT VIDEO L Y... S VIDEO L PB R R PR AUDIO AUDIO COAXIAL DIGITAL AUDIO OUT : Signal flow When playing "wide screen" images Some recorded images may not fit your TV's audio output jacks to the LINE IN (AUDIO L/R) jacks at the same time. This will cause unwanted noise...
...INPUT TV or projector AUDIO R L (red) (white) VIDEO (yellow) Hookups and Settings LINE OUT VIDEO (yellow) Audio/video cord (supplied) L R AUDIO VCR-DVD recorder (white) (red) to LINE OUT (VIDEO/AUDIO L/R) HDMI OUT SET TOP BOX CONTROL LINE 1 IN VIDEO LINE OUT AUDIO OUT COMPONENT VIDEO OUT VIDEO L Y... S VIDEO L PB R R PR AUDIO AUDIO COAXIAL DIGITAL AUDIO OUT : Signal flow When playing "wide screen" images Some recorded images may not fit your TV's audio output jacks to the LINE IN (AUDIO L/R) jacks at the same time. This will cause unwanted noise...
Operating Instructions
Page 16
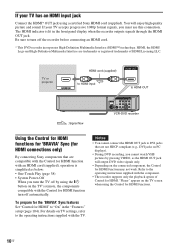
... L PB R R PR AUDIO AUDIO COAXIAL DIGITAL AUDIO OUT VCR-DVD recorder Using the Control for HDMI functions for 'BRAVIA' Sync (for HDMI connections only) By connecting Sony components that are not HDCP compliant (e.g., DVI jacks on PC displays). • During DVD recording, you must use this connection. To prepare for the 'BRAVIA...If your TV has an HDMI input jack Connect the HDMI* OUT jack using a certified Sony HDMI cord (supplied). Be sure to the operating instructions supplied with the TV. "Player" appears on the TV screen when using the Control for HDMI. If your TV accepts ...
... L PB R R PR AUDIO AUDIO COAXIAL DIGITAL AUDIO OUT VCR-DVD recorder Using the Control for HDMI functions for 'BRAVIA' Sync (for HDMI connections only) By connecting Sony components that are not HDCP compliant (e.g., DVI jacks on PC displays). • During DVD recording, you must use this connection. To prepare for the 'BRAVIA...If your TV has an HDMI input jack Connect the HDMI* OUT jack using a certified Sony HDMI cord (supplied). Be sure to the operating instructions supplied with the TV. "Player" appears on the TV screen when using the Control for HDMI. If your TV accepts ...
Operating Instructions
Page 17
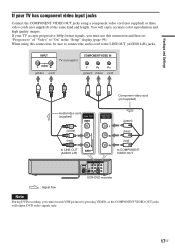
... 1 IN VIDEO LINE OUT AUDIO OUT COMPONENT VIDEO OUT VIDEO L Y S VIDEO L PB R R PR AUDIO AUDIO COAXIAL DIGITAL AUDIO OUT VCR-DVD recorder : Signal flow Note During DVD recording, you must use this connection, be sure to connect the audio cord to "On" in the "Setup" display (page 99). If your... video cord (not supplied) or three video cords (not supplied) of "Video" to the LINE OUT (AUDIO L/R) jacks. You will output DVD video signals only. 17US Hookups and Settings If your TV accepts progressive 480p format signals, you cannot watch VHS pictures by pressing VIDEO, as the...
... 1 IN VIDEO LINE OUT AUDIO OUT COMPONENT VIDEO OUT VIDEO L Y S VIDEO L PB R R PR AUDIO AUDIO COAXIAL DIGITAL AUDIO OUT VCR-DVD recorder : Signal flow Note During DVD recording, you must use this connection, be sure to connect the audio cord to "On" in the "Setup" display (page 99). If your... video cord (not supplied) or three video cords (not supplied) of "Video" to the LINE OUT (AUDIO L/R) jacks. You will output DVD video signals only. 17US Hookups and Settings If your TV accepts progressive 480p format signals, you cannot watch VHS pictures by pressing VIDEO, as the...
Operating Instructions
Page 18
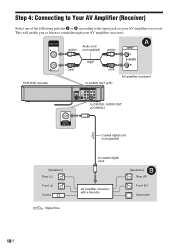
... (Receiver) Select one of the following patterns A or B, according to coaxial digital input AV amplifier (receiver) with a decoder B [Speakers] Rear (R) Front (R) Subwoofer 18US AUDIO OUT L R VCR-DVD recorder Audio cord (white) (not supplied) (white) (red) (red) A INPUT L AUDIO R to AUDIO OUT (L/R) AV amplifier (receiver) HDMI OUT SET TOP BOX CONTROL LINE 1 IN VIDEO...
... (Receiver) Select one of the following patterns A or B, according to coaxial digital input AV amplifier (receiver) with a decoder B [Speakers] Rear (R) Front (R) Subwoofer 18US AUDIO OUT L R VCR-DVD recorder Audio cord (white) (not supplied) (white) (red) (red) A INPUT L AUDIO R to AUDIO OUT (L/R) AV amplifier (receiver) HDMI OUT SET TOP BOX CONTROL LINE 1 IN VIDEO...
Operating Instructions
Page 19
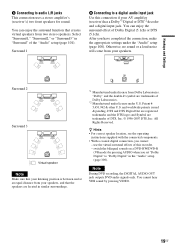
Surround 1 B Connecting to a digital audio input jack Use this recorder. - and worldwide patents issued & pending. All Rights Reserved. switch the bilingual sounds on a DVD-RW/DVD-R (VR mode) by pressing VIDEO. 19US Hookups and Settings A Connecting to "Dolby Digital" in the "Audio" setup (page 100).... has a Dolby*1 Digital or DTS*2 decoder and a digital input jack. Patent #: 5,451,942 & other U.S. Note During DVD recording, the DIGITAL AUDIO OUT jack outputs DVD audio signals only. You cannot hear VHS sound by pressing AUDIO when you cannot: - "Dolby" and the double-D symbol are...
Surround 1 B Connecting to a digital audio input jack Use this recorder. - and worldwide patents issued & pending. All Rights Reserved. switch the bilingual sounds on a DVD-RW/DVD-R (VR mode) by pressing VIDEO. 19US Hookups and Settings A Connecting to "Dolby Digital" in the "Audio" setup (page 100).... has a Dolby*1 Digital or DTS*2 decoder and a digital input jack. Patent #: 5,451,942 & other U.S. Note During DVD recording, the DIGITAL AUDIO OUT jack outputs DVD audio signals only. You cannot hear VHS sound by pressing AUDIO when you cannot: - "Dolby" and the double-D symbol are...
Operating Instructions
Page 20
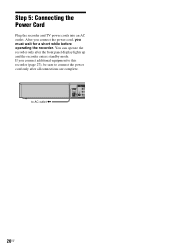
After you connect the power cord, you connect additional equipment to this recorder (page 27), be sure to AC outlet < HDMI OUT SET TOP BOX CONTROL LINE 1 IN LI VIDEO VI S VIDEO AUDIO A 20US If you must wait for a short while before operating the recorder. You can operate the recorder only after all connections are complete. to connect the power cord only after the front panel display lights up and the recorder enters standby mode. Step 5: Connecting the Power Cord Plug the recorder and TV power cords into an AC outlet.
After you connect the power cord, you connect additional equipment to this recorder (page 27), be sure to AC outlet < HDMI OUT SET TOP BOX CONTROL LINE 1 IN LI VIDEO VI S VIDEO AUDIO A 20US If you must wait for a short while before operating the recorder. You can operate the recorder only after all connections are complete. to connect the power cord only after the front panel display lights up and the recorder enters standby mode. Step 5: Connecting the Power Cord Plug the recorder and TV power cords into an AC outlet.
Operating Instructions
Page 21
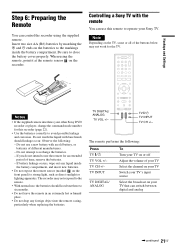
...to avoid possible leakage and corrosion. Insert two size AA (R6) batteries by matching the 3 and # ends on the recorder. Observe the following : Press TV "/1 TV VOL +/- Controlling a Sony TV with an old battery, or batteries of different manufacturers. - Do not attempt to close the battery cover properly. ...DIGITAL/ ANALOG To Turn your TV on or off Adjust the volume of your TV Select the channel on your TV Switch your other Sony DVD recorder or player, change the command mode number for an extended period of the buttons below may not respond to the remote. • With normal use...
...to avoid possible leakage and corrosion. Insert two size AA (R6) batteries by matching the 3 and # ends on the recorder. Observe the following : Press TV "/1 TV VOL +/- Controlling a Sony TV with an old battery, or batteries of different manufacturers. - Do not attempt to close the battery cover properly. ...DIGITAL/ ANALOG To Turn your TV on or off Adjust the volume of your TV Select the channel on your TV Switch your other Sony DVD recorder or player, change the command mode number for an extended period of the buttons below may not respond to the remote. • With normal use...


