Operating Instructions
Page 2
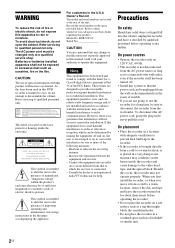
... about three hours before operating it is no guarantee that the power cord can radiate radio frequency energy and, if not installed and used in this DVD recorder is intended to alert the user to rain or moisture. The AC power cord must be sure to a warm location, remove the disc and tape and leave the recorder turned on for a Class B digital device, pursuant to which...
... about three hours before operating it is no guarantee that the power cord can radiate radio frequency energy and, if not installed and used in this DVD recorder is intended to alert the user to rain or moisture. The AC power cord must be sure to a warm location, remove the disc and tape and leave the recorder turned on for a Class B digital device, pursuant to which...
Operating Instructions
Page 5
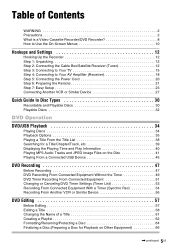
... 2: Connecting the Cable Box/Satellite Receiver (Tuner 12 Step 3: Connecting to Your TV 15 Step 4: Connecting to Your AV Amplifier (Receiver 18 Step 5: Connecting the Power Cord 20 Step 6: Preparing the Remote 21 Step 7: Easy Setup 23 Connecting Another VCR or Similar Device 27 Quick Guide to Disc Types 30 Recordable and Playable Discs 30 Playable Discs 32 DVD Operation DVD/USB Playback 34 Playing Discs 34 Playback Options 35 Playing a Title From the Title List 38 Searching for a Title/Chapter/Track, etc 39 Displaying the Playing Time...
... 2: Connecting the Cable Box/Satellite Receiver (Tuner 12 Step 3: Connecting to Your TV 15 Step 4: Connecting to Your AV Amplifier (Receiver 18 Step 5: Connecting the Power Cord 20 Step 6: Preparing the Remote 21 Step 7: Easy Setup 23 Connecting Another VCR or Similar Device 27 Quick Guide to Disc Types 30 Recordable and Playable Discs 30 Playable Discs 32 DVD Operation DVD/USB Playback 34 Playing Discs 34 Playback Options 35 Playing a Title From the Title List 38 Searching for a Title/Chapter/Track, etc 39 Displaying the Playing Time...
Operating Instructions
Page 10
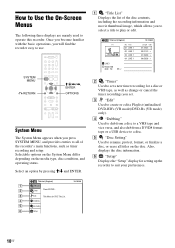
Once you become familiar with the basic operations, you will find the recorder easy to operate this recorder. How to Use the On-Screen Menus The following three displays are mainly used to use. SYSTEM MENU 123 456 789 0 O RETURN M/m/
Once you become familiar with the basic operations, you will find the recorder easy to operate this recorder. How to Use the On-Screen Menus The following three displays are mainly used to use. SYSTEM MENU 123 456 789 0 O RETURN M/m/
Operating Instructions
Page 16
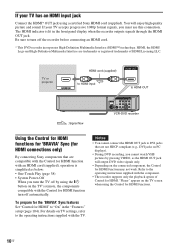
... using the "/1 button on PC displays). • During DVD recording, you cannot watch VHS pictures by using a certified Sony HDMI cord (supplied). TV or projector HDMI cord (supplied) HDMI IN to HDMI input HDMI OUT to turn the TV off the recorder before connecting an HDMI cord. * This DVD recorder incorporates High-Definition Multimedia Interface (HDMI™) technology. If your TV accepts progressive 1080p format signals, you must use this connection. Be sure to HDMI OUT : Signal flow HDMI OUT SET TOP BOX CONTROL LINE 1 IN VIDEO LINE OUT AUDIO...
... using the "/1 button on PC displays). • During DVD recording, you cannot watch VHS pictures by using a certified Sony HDMI cord (supplied). TV or projector HDMI cord (supplied) HDMI IN to HDMI input HDMI OUT to turn the TV off the recorder before connecting an HDMI cord. * This DVD recorder incorporates High-Definition Multimedia Interface (HDMI™) technology. If your TV accepts progressive 1080p format signals, you must use this connection. Be sure to HDMI OUT : Signal flow HDMI OUT SET TOP BOX CONTROL LINE 1 IN VIDEO LINE OUT AUDIO...
Operating Instructions
Page 22
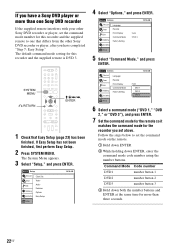
SYSTEM MENU 123 456 789 0 O RETURN M/m/ The default command mode setting for this recorder and the supplied remote is DVD 3. If you have a Sony DVD player or more than one Sony DVD recorder If the supplied remote interferes with your other Sony DVD recorder or player, set the command mode number for this recorder and the supplied remote to one that differs from the other Sony DVD recorder or player, after you have completed "Step 7: Easy Setup."
SYSTEM MENU 123 456 789 0 O RETURN M/m/ The default command mode setting for this recorder and the supplied remote is DVD 3. If you have a Sony DVD player or more than one Sony DVD recorder If the supplied remote interferes with your other Sony DVD recorder or player, set the command mode number for this recorder and the supplied remote to one that differs from the other Sony DVD recorder or player, after you have completed "Step 7: Easy Setup."
Operating Instructions
Page 24
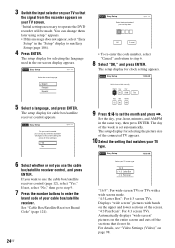
... 5 Select a language, and press ENTER. 3 Switch the input selector on your TV so that matches your TV type. See "Cable Box/Satellite Receiver Brand Code" (page 121). 24US No Disc Easy Setup Enter the brand code of the connected TV appears. 10 Select the setting that the signal from the recorder appears on your TV screen. The setup display for cable box/satellite receiver control appears. The day of the screen. Displays "wide screen" pictures with...
... 5 Select a language, and press ENTER. 3 Switch the input selector on your TV so that matches your TV type. See "Cable Box/Satellite Receiver Brand Code" (page 121). 24US No Disc Easy Setup Enter the brand code of the connected TV appears. 10 Select the setting that the signal from the recorder appears on your TV screen. The setup display for cable box/satellite receiver control appears. The day of the screen. Displays "wide screen" pictures with...
Operating Instructions
Page 38
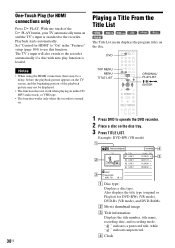
..., MP3 audio track, or VHS tape. • The function works only when the recorder is turned on and the TV's input is loaded. Also displays the title type (original or Playlist) for HDMI" to "On" in the "Features" setup (page 104) to the recorder. Notes • When using the HDMI connection, there may be a delay, before the playback picture appears on the TV screen, and the beginning portion of the H PLAY button...
..., MP3 audio track, or VHS tape. • The function works only when the recorder is turned on and the TV's input is loaded. Also displays the title type (original or Playlist) for HDMI" to "On" in the "Features" setup (page 104) to the recorder. Notes • When using the HDMI connection, there may be a delay, before the playback picture appears on the TV screen, and the beginning portion of the H PLAY button...
Operating Instructions
Page 83
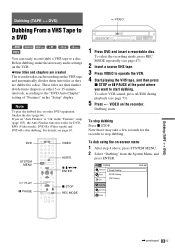
... Auto Finalize function works for DVDRWs (Video mode), DVD-Rs (Video mode) and DVD+Rs after dubbing. Note To play the dubbed disc on the VHS tape and automatically divides them into titles as they are then further divided into chapters at either 5 or 15-minute intervals, according to "On" in the "Setup" display. These titles are dubbed to a disc. Dubbing (TAPE y DVD) Dubbing From a VHS Tape to a DVD TVIDEO +RW -RWVR -RWVideo +R -RVR -RVideo You can easily record (dub) a VHS tape to a disc...
... Auto Finalize function works for DVDRWs (Video mode), DVD-Rs (Video mode) and DVD+Rs after dubbing. Note To play the dubbed disc on the VHS tape and automatically divides them into titles as they are then further divided into chapters at either 5 or 15-minute intervals, according to "On" in the "Setup" display. These titles are dubbed to a disc. Dubbing (TAPE y DVD) Dubbing From a VHS Tape to a DVD TVIDEO +RW -RWVR -RWVideo +R -RVR -RVideo You can easily record (dub) a VHS tape to a disc...
Operating Instructions
Page 84
... dubbed disc is stopped. - Dubbing Title List Timer Edit Simple Dubbing DV/D8 Dubbing USB Dubbing Dubbing Disc Setting Setup 10:10 AM VIDEO --> DVD DVD --> VIDEO 4 Select "VIDEO t DVD," and press ENTER. Note that when you record copy-protected software to a tape, picture may differ slightly from VHS tapes and other unauthorized use is prohibited under copyright law. - Before dubbing, make the necessary audio settings on the DVD recorder. the VHS video deck or the DVD deck is not a malfunction. DVD TOP MENU SYSTEM MENU 123 456 789 0 DVDt VIDEO SUBTITLE AUDIO TITLE LIST...
... dubbed disc is stopped. - Dubbing Title List Timer Edit Simple Dubbing DV/D8 Dubbing USB Dubbing Dubbing Disc Setting Setup 10:10 AM VIDEO --> DVD DVD --> VIDEO 4 Select "VIDEO t DVD," and press ENTER. Note that when you record copy-protected software to a tape, picture may differ slightly from VHS tapes and other unauthorized use is prohibited under copyright law. - Before dubbing, make the necessary audio settings on the DVD recorder. the VHS video deck or the DVD deck is not a malfunction. DVD TOP MENU SYSTEM MENU 123 456 789 0 DVDt VIDEO SUBTITLE AUDIO TITLE LIST...
Operating Instructions
Page 85
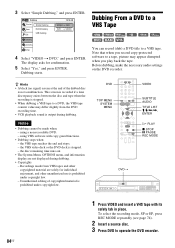
..., etc.) is played back to start dubbing. Dubbing Title List Timer Edit Simple Dubbing DV/D8 Dubbing USB Dubbing Dubbing Disc Setting Setup 10:10 AM 3 Select "Simple Dubbing," and press ENTER. The display asks for the recorder to stop dubbing Press x STOP. 4 Press TOP MENU or TITLE LIST to select a title. 5 Start playing the DVD, and then press x STOP or X PAUSE at the point where you want to the end and stops. - the DVD is the dubbed sound. To select DVD sound, language, or subtitle, press AUDIO or SUBTITLE during dubbing. • Copyrights...
..., etc.) is played back to start dubbing. Dubbing Title List Timer Edit Simple Dubbing DV/D8 Dubbing USB Dubbing Dubbing Disc Setting Setup 10:10 AM 3 Select "Simple Dubbing," and press ENTER. The display asks for the recorder to stop dubbing Press x STOP. 4 Press TOP MENU or TITLE LIST to select a title. 5 Start playing the DVD, and then press x STOP or X PAUSE at the point where you want to the end and stops. - the DVD is the dubbed sound. To select DVD sound, language, or subtitle, press AUDIO or SUBTITLE during dubbing. • Copyrights...
Operating Instructions
Page 87
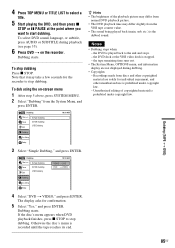
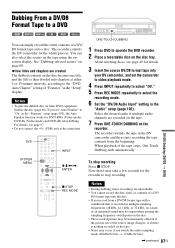
... "DVD Auto Chapter" setting of a DV/ D8 format tape onto a disc. For details, see page 67. • Do not connect the (USB) jack at either 5 or 15-minute intervals, according to "On" in the "Setup" display. The recorder controls the DV camcorder for DVD-RWs (Video mode), DVD-Rs (Video mode) and DVD+Rs after dubbing. You can simply record the entire contents of "Features" in the "Features" setup (page 103), the Auto Finalize function works...
... "DVD Auto Chapter" setting of a DV/ D8 format tape onto a disc. For details, see page 67. • Do not connect the (USB) jack at either 5 or 15-minute intervals, according to "On" in the "Setup" display. The recorder controls the DV camcorder for DVD-RWs (Video mode), DVD-Rs (Video mode) and DVD+Rs after dubbing. You can simply record the entire contents of "Features" in the "Features" setup (page 103), the Auto Finalize function works...
Operating Instructions
Page 91
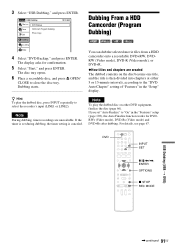
... OPEN/ CLOSE to select the recorder's input (LINE1 or LINE2). If you set during dubbing, the timer setting is set "Auto Finalize" to the "DVD Auto Chapter" setting of "Features" in the "Features" setup (page 103), the Auto Finalize function works for confirmation. 5 Select "Start," and press ENTER. Note To play the dubbed disc, press INPUT repeatedly to close the disc tray. 3 Select "USB Dubbing," and press ENTER. If the timer is canceled. No Disc USB Dubbing Title List Timer Edit DVD Backup HDD-Cam Program Dubbing Photo Copy Dubbing Disc Setting Setup 10:10 AM 4 Select...
... OPEN/ CLOSE to select the recorder's input (LINE1 or LINE2). If you set during dubbing, the timer setting is set "Auto Finalize" to the "DVD Auto Chapter" setting of "Features" in the "Features" setup (page 103), the Auto Finalize function works for confirmation. 5 Select "Start," and press ENTER. Note To play the dubbed disc, press INPUT repeatedly to close the disc tray. 3 Select "USB Dubbing," and press ENTER. If the timer is canceled. No Disc USB Dubbing Title List Timer Edit DVD Backup HDD-Cam Program Dubbing Photo Copy Dubbing Disc Setting Setup 10:10 AM 4 Select...
Operating Instructions
Page 96
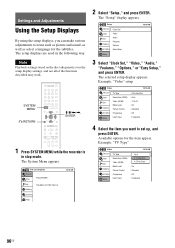
Note Playback settings stored on the disc take priority over the setup display settings, and not all of the functions described may work. Settings and Adjustments Using the Setup Displays By using the setup displays, you can make various adjustments to items such as picture and sound, as well as select a language for the subtitles. SYSTEM MENU 123 456 789 0 O RETURN M/m/ The setup displays are used in the following way.
Note Playback settings stored on the disc take priority over the setup display settings, and not all of the functions described may work. Settings and Adjustments Using the Setup Displays By using the setup displays, you can make various adjustments to items such as picture and sound, as well as select a language for the subtitles. SYSTEM MENU 123 456 789 0 O RETURN M/m/ The setup displays are used in the following way.
Operating Instructions
Page 97
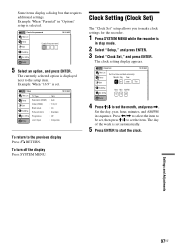
.... The clock setting display appears. Example: When "16:9" is selected. To turn off the display Press SYSTEM MENU. Month Day Year 01 01 2008 Tue Dubbing Disc Setting Setup Hour Min AM/PM 10 : 10 AM 4 Press M/m to make clock settings for the recorder. 1 Press SYSTEM MENU while the recorder is in "Options" setup is set the month, and press ,. Press Video 10:10 AM Title List Timer Edit Dubbing Disc Setting Setup TV Type Resolution (HDMI) Video (HDMI) Black Level Picture Control Progressive Line1 Input : 16:9 : Auto...
.... The clock setting display appears. Example: When "16:9" is selected. To turn off the display Press SYSTEM MENU. Month Day Year 01 01 2008 Tue Dubbing Disc Setting Setup Hour Min AM/PM 10 : 10 AM 4 Press M/m to make clock settings for the recorder. 1 Press SYSTEM MENU while the recorder is in "Options" setup is set the month, and press ,. Press Video 10:10 AM Title List Timer Edit Dubbing Disc Setting Setup TV Type Resolution (HDMI) Video (HDMI) Black Level Picture Control Progressive Line1 Input : 16:9 : Auto...
Operating Instructions
Page 98
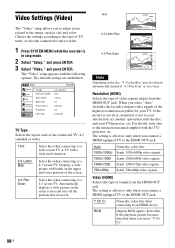
... (HDMI) Selects the type of the screen. 4:3 Pan Scan Select this when connecting to a 4:3 screen TV. 16:9 Video Settings (Video) The "Video" setup allows you select "Auto" (default), the recorder outputs video signals of the highest resolution acceptable for your TV. Sends 1920×1080i video signals. Video 10:10 AM Title List Timer Edit Dubbing Disc Setting Setup TV Type Resolution (HDMI) Video (HDMI) Black Level Picture Control Progressive Line1 Input : 4:3 Letter Box : Auto : Y Cb Cr : On : Standard : Off : Composite TV Type Selects the aspect ratio of video signals...
... (HDMI) Selects the type of the screen. 4:3 Pan Scan Select this when connecting to a 4:3 screen TV. 16:9 Video Settings (Video) The "Video" setup allows you select "Auto" (default), the recorder outputs video signals of the highest resolution acceptable for your TV. Sends 1920×1080i video signals. Video 10:10 AM Title List Timer Edit Dubbing Disc Setting Setup TV Type Resolution (HDMI) Video (HDMI) Black Level Picture Control Progressive Line1 Input : 4:3 Letter Box : Auto : Y Cb Cr : On : Standard : Off : Composite TV Type Selects the aspect ratio of video signals...
Operating Instructions
Page 100
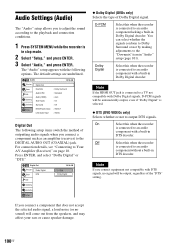
.... Audio Settings (Audio) The "Audio" setup allows you to adjust the sound according to the playback and connection conditions. 1 Press SYSTEM MENU while the recorder is connected to an audio component without a built-in DTS decoder. You can select whether the signals conform to Dolby Surround or not by making adjustments to Your AV Amplifier (Receiver)" on page 18. Audio 10:10 AM Title List Timer Edit Dubbing Disc Setting Setup Digital Out Downmix Audio DRC Audio (HDMI) Scan Audio Surround DV/D8 Audio Input Line Audio Input...
.... Audio Settings (Audio) The "Audio" setup allows you to adjust the sound according to the playback and connection conditions. 1 Press SYSTEM MENU while the recorder is connected to an audio component without a built-in DTS decoder. You can select whether the signals conform to Dolby Surround or not by making adjustments to Your AV Amplifier (Receiver)" on page 18. Audio 10:10 AM Title List Timer Edit Dubbing Disc Setting Setup Digital Out Downmix Audio DRC Audio (HDMI) Scan Audio Surround DV/D8 Audio Input Line Audio Input...
Operating Instructions
Page 104
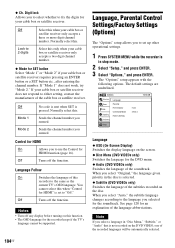
... Language, Parental Control Settings/Factory Settings (Options) The "Options" setup allows you select "Original," the language given priority in "Disc Menu," "Subtitle," or "Audio" that is in stop mode. 2 Select "Setup," and press ENTER. 3 Select "Options," and press ENTER. Options Title List Timer Edit Dubbing Disc Setting Language Parental Front Display Command Mode Factory Setting Setup : Auto : DVD 3 10:10 AM Language ◆ OSD (On-Screen Display) Switches the display language on this function. • The OSD language for SET button Select "Mode 1" or "Mode 2" if your cable...
... Language, Parental Control Settings/Factory Settings (Options) The "Options" setup allows you select "Original," the language given priority in "Disc Menu," "Subtitle," or "Audio" that is in stop mode. 2 Select "Setup," and press ENTER. 3 Select "Options," and press ENTER. Options Title List Timer Edit Dubbing Disc Setting Language Parental Front Display Command Mode Factory Setting Setup : Auto : DVD 3 10:10 AM Language ◆ OSD (On-Screen Display) Switches the display language on this function. • The OSD language for SET button Select "Mode 1" or "Mode 2" if your cable...
Operating Instructions
Page 111
...-REC indicator flashes after you have any space for recording. , Insert a recordable disc or a tape with its end. , Make sure a program has been set for timer recording. , Make sure the timer settings are set for a future time. , Check that the cable box is turned on appears in the "Features" setup (page 104), the display language on the screen automatically switches, according to the language setting of the connected TV, if you change the language settings on your TV, etc. Display language on the screen switches...
...-REC indicator flashes after you have any space for recording. , Insert a recordable disc or a tape with its end. , Make sure a program has been set for timer recording. , Make sure the timer settings are set for a future time. , Check that the cable box is turned on appears in the "Features" setup (page 104), the display language on the screen automatically switches, according to the language setting of the connected TV, if you change the language settings on your TV, etc. Display language on the screen switches...
Operating Instructions
Page 126
... on-screen displays. Digit lock" 104 Changing or canceling timer settings (Timer List) 53, 79 "Chapter Erase" 59 Child Lock 37 Cleaning discs 112 Cleaning the video heads 113 CLEAR 68 Clock Set settings 97 "Command Mode" 22, 106 COMPONENT VIDEO OUT 17 126US Connecting the cable box/satellite receiver 12 to your AV/amplifier (receiver) 18 to your TV 15 "Connections" 103 Control for HDMI 16, 104 Controlling a Sony TV with the remote 21 Copy protection 48 Copy-Free 48 Copy-Never 48 Copy...
... on-screen displays. Digit lock" 104 Changing or canceling timer settings (Timer List) 53, 79 "Chapter Erase" 59 Child Lock 37 Cleaning discs 112 Cleaning the video heads 113 CLEAR 68 Clock Set settings 97 "Command Mode" 22, 106 COMPONENT VIDEO OUT 17 126US Connecting the cable box/satellite receiver 12 to your AV/amplifier (receiver) 18 to your TV 15 "Connections" 103 Control for HDMI 16, 104 Controlling a Sony TV with the remote 21 Copy protection 48 Copy-Free 48 Copy-Never 48 Copy...
Operating Instructions
Page 127
... Copy" 95 "Picture Control" 99 PLAY 34, 68 Playable discs 32 Playback 34, 68 JPEG image files 42 MP3 audio tracks 41 Resume Play 37 Slow-motion play 36, 70 Playlist 39, 62 Power cord 20 PREV 35, 70 "Progressive" 99 "Protect" 59 Q Quick Timer 50, 75 R Rear panel 119 REC 49, 75 REC MODE 49 Recording 47, 74 recordable discs 30 recording format 30 recording mode 47 tape speed 74 Recording mode 47, 74 Recording time 47, 50 Region code 33 Remaining time 40, 76 Remote 21...
... Copy" 95 "Picture Control" 99 PLAY 34, 68 Playable discs 32 Playback 34, 68 JPEG image files 42 MP3 audio tracks 41 Resume Play 37 Slow-motion play 36, 70 Playlist 39, 62 Power cord 20 PREV 35, 70 "Progressive" 99 "Protect" 59 Q Quick Timer 50, 75 R Rear panel 119 REC 49, 75 REC MODE 49 Recording 47, 74 recordable discs 30 recording format 30 recording mode 47 tape speed 74 Recording mode 47, 74 Recording time 47, 50 Region code 33 Remaining time 40, 76 Remote 21...


