Operating Instructions
Page 2
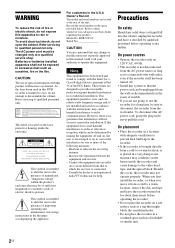
...CAUTION The use the recorder for a Class B digital device, pursuant to Part 15 of the FCC Rules. As the laser beam used in this manual could void your Sony dealer regarding this ...any further. On power sources • Operate the recorder only on a soft surface such as a bookshelf or similar unit. 2US Should this DVD recorder is brought directly from the AC power source as ...ÆTTELSE FOR STRÅLING. RDR-VX535 Serial No CAUTION You are designed to provide reasonable protection against harmful interference in the U.S.A Owner's Record The model and serial numbers are not...
...CAUTION The use the recorder for a Class B digital device, pursuant to Part 15 of the FCC Rules. As the laser beam used in this manual could void your Sony dealer regarding this ...any further. On power sources • Operate the recorder only on a soft surface such as a bookshelf or similar unit. 2US Should this DVD recorder is brought directly from the AC power source as ...ÆTTELSE FOR STRÅLING. RDR-VX535 Serial No CAUTION You are designed to provide reasonable protection against harmful interference in the U.S.A Owner's Record The model and serial numbers are not...

Operating Instructions
Page 4
You can also use the controls on the recorder if they have the same or similar names as DVD or , listed at the top of each explanation indicate what kind of media can be used in this manual may not match the graphics displayed ...on your TV screen. • The explanations regarding discs in this recorder. For details about usable discs, see "Quick...
You can also use the controls on the recorder if they have the same or similar names as DVD or , listed at the top of each explanation indicate what kind of media can be used in this manual may not match the graphics displayed ...on your TV screen. • The explanations regarding discs in this recorder. For details about usable discs, see "Quick...
Operating Instructions
Page 5
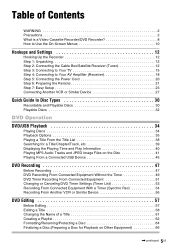
... Preparing the Remote 21 Step 7: Easy Setup 23 Connecting Another VCR or Similar Device 27 Quick Guide to Disc Types 30 Recordable and Playable Discs 30 Playable Discs 32 DVD Operation DVD/USB Playback 34 Playing Discs 34 Playback Options 35 Playing a ... 45 DVD Recording 47 Before Recording 47 DVD Recording From Connected Equipment Without the Timer 49 DVD Timer Recording From Connected Equipment 51 Changing or Canceling DVD Timer Settings (Timer List 53 Recording From Connected Equipment With a Timer (Synchro Rec 54 Recording From Another VCR or Similar Device 56 DVD Editing...
... Preparing the Remote 21 Step 7: Easy Setup 23 Connecting Another VCR or Similar Device 27 Quick Guide to Disc Types 30 Recordable and Playable Discs 30 Playable Discs 32 DVD Operation DVD/USB Playback 34 Playing Discs 34 Playback Options 35 Playing a ... 45 DVD Recording 47 Before Recording 47 DVD Recording From Connected Equipment Without the Timer 49 DVD Timer Recording From Connected Equipment 51 Changing or Canceling DVD Timer Settings (Timer List 53 Recording From Connected Equipment With a Timer (Synchro Rec 54 Recording From Another VCR or Similar Device 56 DVD Editing...
Operating Instructions
Page 6
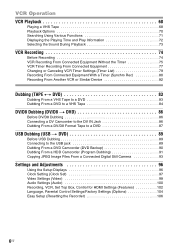
... Selecting the Sound During Playback 73 VCR Recording 74 Before Recording 74 VCR Recording From Connected Equipment Without the Timer 75 VCR Timer Recording From Connected Equipment 77 Changing or Canceling VCR Timer Settings (Timer List 79 Recording From Connected Equipment With a Timer (Synchro Rec 80 Recording From Another VCR or Similar Device 82 Dubbing (TAPE y DVD 83 Dubbing From a VHS Tape...
... Selecting the Sound During Playback 73 VCR Recording 74 Before Recording 74 VCR Recording From Connected Equipment Without the Timer 75 VCR Timer Recording From Connected Equipment 77 Changing or Canceling VCR Timer Settings (Timer List 79 Recording From Connected Equipment With a Timer (Synchro Rec 80 Recording From Another VCR or Similar Device 82 Dubbing (TAPE y DVD 83 Dubbing From a VHS Tape...
Operating Instructions
Page 7
Additional Information 107 Troubleshooting 107 Notes About This Recorder 112 Specifications 113 About i.LINK 115 Guide to Parts and Controls 116 DVD Audio/Subtitle Language 120 Cable Box/Satellite Receiver Brand Code 121 Index 126 7US
Additional Information 107 Troubleshooting 107 Notes About This Recorder 112 Specifications 113 About i.LINK 115 Guide to Parts and Controls 116 DVD Audio/Subtitle Language 120 Cable Box/Satellite Receiver Brand Code 121 Index 126 7US
Operating Instructions
Page 8
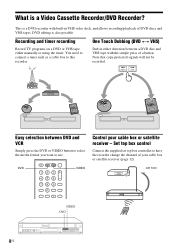
... top box control Connect the supplied set top box controller to have the recorder change the channel of your cable box or satellite receiver - Recording and timer recording Record TV programs on a DVD or VHS tape, either direction between DVD and VCR Simply press the DVD or VIDEO button to select the media format you want to this...
... top box control Connect the supplied set top box controller to have the recorder change the channel of your cable box or satellite receiver - Recording and timer recording Record TV programs on a DVD or VHS tape, either direction between DVD and VCR Simply press the DVD or VIDEO button to select the media format you want to this...
Operating Instructions
Page 9
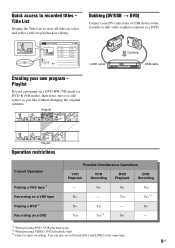
Title List Display the Title List to a DVD. Title List (Original) 1/4 No. Playlist Record a program on a DVD Possible Simultaneous Operations VCR Playback VCR Recording DVD Playback DVD Recording - No No Yes No - Yes Yes*3 No Yes - No Yes Yes*3 No - *1 When pressing DVD, VCR playback stops. *2 When pressing VIDEO, DVD playback stops. *3 Only for playback or editing. Title 01 LINE 1 02 LINE 1 03...
Title List Display the Title List to a DVD. Title List (Original) 1/4 No. Playlist Record a program on a DVD Possible Simultaneous Operations VCR Playback VCR Recording DVD Playback DVD Recording - No No Yes No - Yes Yes*3 No Yes - No Yes Yes*3 No - *1 When pressing DVD, VCR playback stops. *2 When pressing VIDEO, DVD playback stops. *3 Only for playback or editing. Title 01 LINE 1 02 LINE 1 03...
Operating Instructions
Page 10
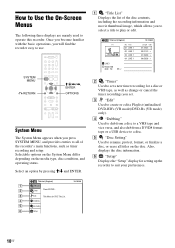
Once you become familiar with the basic operations, you will find the recorder easy to operate this recorder. SYSTEM MENU 123 456 789 0 O RETURN M/m/ How to Use the On-Screen Menus The following three displays are mainly used to use.
Once you become familiar with the basic operations, you will find the recorder easy to operate this recorder. SYSTEM MENU 123 456 789 0 O RETURN M/m/ How to Use the On-Screen Menus The following three displays are mainly used to use.
Operating Instructions
Page 11
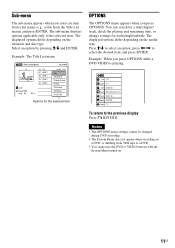
The displayed options differ depending on the media type. The displayed options differ depending on the situation and disc type. The sub-menu displays options applicable only to select an option, press Sub-menu The sub-menu appears when you press OPTIONS. You can search for a title/chapter/ track, check the playing and remaining time, or change settings for the selected item OPTIONS The OPTIONS menu appears when you select an item from a list menu (e.g., a title from the Title List menu), and press ENTER. Example: The Title List menu Title List (Original) 1/4 No. Press M/m to ...
The displayed options differ depending on the media type. The displayed options differ depending on the situation and disc type. The sub-menu displays options applicable only to select an option, press Sub-menu The sub-menu appears when you press OPTIONS. You can search for a title/chapter/ track, check the playing and remaining time, or change settings for the selected item OPTIONS The OPTIONS menu appears when you select an item from a list menu (e.g., a title from the Title List menu), and press ENTER. Example: The Title List menu Title List (Original) 1/4 No. Press M/m to ...
Operating Instructions
Page 13
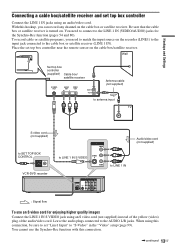
.... Place the set top box controller Connect the LINE 1 IN jacks using an audio/video cord. You need to match the input source on the recorder (LINE1) to the input jack connected to "S-Video" in the "Video" setup (page 99). When using an S video cord (not supplied) instead of the yellow... ANT IN TO TV Antenna cable (not supplied) to antenna input TV S video cord (not supplied) to SET TOP BOX CONTROL SET TOP BOX CONTROL VCR-DVD recorder LINE 1 IN VIDEO S VIDEO to LINE 1 IN S VIDEO AUDIO to LINE 1 IN HDMI OUT SET TOP BOX CONTROL LINE 1 IN VIDEO LINE OUT AUDIO OUT...
.... Place the set top box controller Connect the LINE 1 IN jacks using an audio/video cord. You need to match the input source on the recorder (LINE1) to the input jack connected to "S-Video" in the "Video" setup (page 99). When using an S video cord (not supplied) instead of the yellow... ANT IN TO TV Antenna cable (not supplied) to antenna input TV S video cord (not supplied) to SET TOP BOX CONTROL SET TOP BOX CONTROL VCR-DVD recorder LINE 1 IN VIDEO S VIDEO to LINE 1 IN S VIDEO AUDIO to LINE 1 IN HDMI OUT SET TOP BOX CONTROL LINE 1 IN VIDEO LINE OUT AUDIO OUT...
Operating Instructions
Page 15
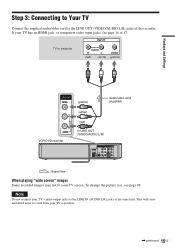
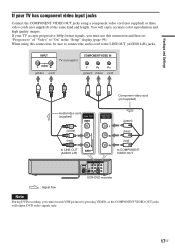
...or projector AUDIO R L (red) (white) VIDEO (yellow) Hookups and Settings LINE OUT VIDEO (yellow) Audio/video cord (supplied) L R AUDIO VCR-DVD recorder (white) (red) to come from your TV screen. This will cause unwanted noise to LINE OUT (VIDEO/AUDIO L/R) HDMI OUT SET TOP BOX CONTROL...COMPONENT VIDEO OUT VIDEO L Y S VIDEO L PB R R PR AUDIO AUDIO COAXIAL DIGITAL AUDIO OUT : Signal flow When playing "wide screen" images Some recorded images may not fit your TV's speakers. ,continued 15US To change the picture size, see page 16 or 17. Note Do not connect your TV...
...or projector AUDIO R L (red) (white) VIDEO (yellow) Hookups and Settings LINE OUT VIDEO (yellow) Audio/video cord (supplied) L R AUDIO VCR-DVD recorder (white) (red) to come from your TV screen. This will cause unwanted noise to LINE OUT (VIDEO/AUDIO L/R) HDMI OUT SET TOP BOX CONTROL...COMPONENT VIDEO OUT VIDEO L Y S VIDEO L PB R R PR AUDIO AUDIO COAXIAL DIGITAL AUDIO OUT : Signal flow When playing "wide screen" images Some recorded images may not fit your TV's speakers. ,continued 15US To change the picture size, see page 16 or 17. Note Do not connect your TV...
Operating Instructions
Page 16
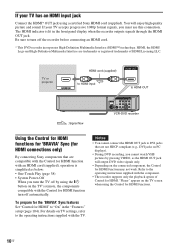
...VIDEO OUT VIDEO L Y S VIDEO L PB R R PR AUDIO AUDIO COAXIAL DIGITAL AUDIO OUT VCR-DVD recorder Using the Control for HDMI functions for 'BRAVIA' Sync (for HDMI connections only) By connecting Sony components that are compatible with the Control for HDMI. HDMI, the HDMI Logo and High-Definition Multimedia...with an HDMI cord (supplied), operation is lit in the "Features" setup (page 104). "Player" appears on TV settings, refer to "On" in the front panel display when the recorder outputs signals through the HDMI OUT jack. Refer to DVI jacks that are not HDCP compliant ...
...VIDEO OUT VIDEO L Y S VIDEO L PB R R PR AUDIO AUDIO COAXIAL DIGITAL AUDIO OUT VCR-DVD recorder Using the Control for HDMI functions for 'BRAVIA' Sync (for HDMI connections only) By connecting Sony components that are compatible with the Control for HDMI. HDMI, the HDMI Logo and High-Definition Multimedia...with an HDMI cord (supplied), operation is lit in the "Features" setup (page 104). "Player" appears on TV settings, refer to "On" in the front panel display when the recorder outputs signals through the HDMI OUT jack. Refer to DVI jacks that are not HDCP compliant ...
Operating Instructions
Page 17
...LINE 1 IN VIDEO LINE OUT AUDIO OUT COMPONENT VIDEO OUT VIDEO L Y S VIDEO L PB R R PR AUDIO AUDIO COAXIAL DIGITAL AUDIO OUT VCR-DVD recorder : Signal flow Note During DVD recording, you must use this connection, be sure to connect the audio cord to "On" in the "Setup" display (page 99). You will ...output DVD video signals only. 17US If your TV has component video input jacks Connect the COMPONENT VIDEO OUT jacks using this...
...LINE 1 IN VIDEO LINE OUT AUDIO OUT COMPONENT VIDEO OUT VIDEO L Y S VIDEO L PB R R PR AUDIO AUDIO COAXIAL DIGITAL AUDIO OUT VCR-DVD recorder : Signal flow Note During DVD recording, you must use this connection, be sure to connect the audio cord to "On" in the "Setup" display (page 99). You will ...output DVD video signals only. 17US If your TV has component video input jacks Connect the COMPONENT VIDEO OUT jacks using this...
Operating Instructions
Page 18
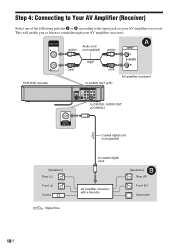
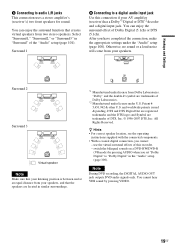
This will enable you to listen to sound through your AV amplifier (receiver). AUDIO OUT L R VCR-DVD recorder Audio cord (white) (not supplied) (white) (red) (red) A INPUT L AUDIO R to AUDIO OUT (L/R) AV amplifier (receiver) HDMI OUT SET TOP BOX CONTROL LINE 1 IN VIDEO ...
This will enable you to listen to sound through your AV amplifier (receiver). AUDIO OUT L R VCR-DVD recorder Audio cord (white) (not supplied) (white) (red) (red) A INPUT L AUDIO R to AUDIO OUT (L/R) AV amplifier (receiver) HDMI OUT SET TOP BOX CONTROL LINE 1 IN VIDEO ...
Operating Instructions
Page 19
...digital connection, you have completed the connection, make the appropriate settings under the "Audio" setup (page 100). Note During DVD recording, the DIGITAL AUDIO OUT jack outputs DVD audio signals only. "Dolby" and the double-D symbol are trademarks of DTS, Inc. © 1996-2007 DTS,... Inc. Surround 1 B Connecting to a digital audio input jack Use this recorder. - Select "Surround1," "Surround2," or "Surround3" in similar surroundings. ...
...digital connection, you have completed the connection, make the appropriate settings under the "Audio" setup (page 100). Note During DVD recording, the DIGITAL AUDIO OUT jack outputs DVD audio signals only. "Dolby" and the double-D symbol are trademarks of DTS, Inc. © 1996-2007 DTS,... Inc. Surround 1 B Connecting to a digital audio input jack Use this recorder. - Select "Surround1," "Surround2," or "Surround3" in similar surroundings. ...
Operating Instructions
Page 21
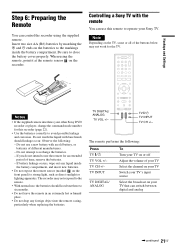
... for an extended period of your TV Select the channel on your TV Switch your TV's input source Select the broadcast on your other Sony DVD recorder or player, change the command mode number for this remote to avoid possible leakage and corrosion. TV "/1 TV INPUT TV CH +/- TV DIGITAL/ ...Do not touch the liquid with bare hands should last about three to the remote. • With normal use this recorder (page 22). • Use the batteries correctly to operate your Sony TV. Be sure to recharge the batteries. - Note Depending on the TV, some or all of different manufacturers. -...
... for an extended period of your TV Select the channel on your TV Switch your TV's input source Select the broadcast on your other Sony DVD recorder or player, change the command mode number for this remote to avoid possible leakage and corrosion. TV "/1 TV INPUT TV CH +/- TV DIGITAL/ ...Do not touch the liquid with bare hands should last about three to the remote. • With normal use this recorder (page 22). • Use the batteries correctly to operate your Sony TV. Be sure to recharge the batteries. - Note Depending on the TV, some or all of different manufacturers. -...
Operating Instructions
Page 22
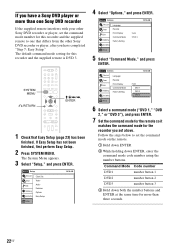
SYSTEM MENU 123 456 789 0 O RETURN M/m/ The default command mode setting for this recorder and the supplied remote to one that differs from the other Sony DVD recorder or player, set the command mode number for this recorder and the supplied remote is DVD 3. If you have a Sony DVD player or more than one Sony DVD recorder If the supplied remote interferes with your other Sony DVD recorder or player, after you have completed "Step 7: Easy Setup."
SYSTEM MENU 123 456 789 0 O RETURN M/m/ The default command mode setting for this recorder and the supplied remote to one that differs from the other Sony DVD recorder or player, set the command mode number for this recorder and the supplied remote is DVD 3. If you have a Sony DVD player or more than one Sony DVD recorder If the supplied remote interferes with your other Sony DVD recorder or player, after you have completed "Step 7: Easy Setup."
Operating Instructions
Page 24
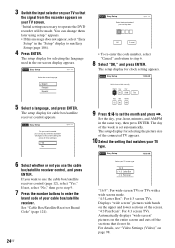
.... No Disc Easy Setup 10:10 AM Select your TV screen. Automatically displays "wide screen" pictures on page 98. appears. • If this recorder? (Changes to set automatically. The setup display for clock setting appears. The day of your set top box. For details, see "Video Settings (... return to control your cable box/satellite receiver. Set the day, year, hour, minutes, and AM/PM in the "Setup" display to operate the DVD recorder will erase all timer settings.) Yes No 6 Select whether or not you want to step 6. 8 Select "OK," and press ENTER. "Initial settings ...
.... No Disc Easy Setup 10:10 AM Select your TV screen. Automatically displays "wide screen" pictures on page 98. appears. • If this recorder? (Changes to set automatically. The setup display for clock setting appears. The day of your set top box. For details, see "Video Settings (... return to control your cable box/satellite receiver. Set the day, year, hour, minutes, and AM/PM in the "Setup" display to operate the DVD recorder will erase all timer settings.) Yes No 6 Select whether or not you want to step 6. 8 Select "OK," and press ENTER. "Initial settings ...
Operating Instructions
Page 27
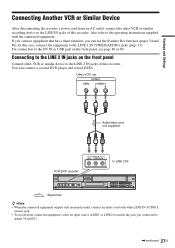
... operating instructions supplied with the connected equipment. Hookups and Settings Connecting Another VCR or Similar Device After disconnecting the recorder's power cord from connected equipment, select an input source (LINE1 or LINE2) to match the jack you can connect a second DVD player and record DVDs. In this case, connect the equipment to the LINE IN jacks...
... operating instructions supplied with the connected equipment. Hookups and Settings Connecting Another VCR or Similar Device After disconnecting the recorder's power cord from connected equipment, select an input source (LINE1 or LINE2) to match the jack you can connect a second DVD player and record DVDs. In this case, connect the equipment to the LINE IN jacks...
Operating Instructions
Page 28
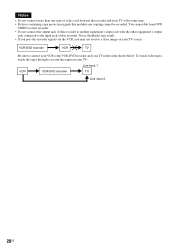
... receive a clear image on your TV screen. VCR-DVD recorder VCR TV Be sure to connect your VCR to the input jack of video cord between the recorder and your TV in the order shown below. Line input 1 VCR VCR-DVD recorder TV Line input 2 28US You cannot dub from DVD VIDEOs to this recorder. • Do not connect the output jack...
... receive a clear image on your TV screen. VCR-DVD recorder VCR TV Be sure to connect your VCR to the input jack of video cord between the recorder and your TV in the order shown below. Line input 1 VCR VCR-DVD recorder TV Line input 2 28US You cannot dub from DVD VIDEOs to this recorder. • Do not connect the output jack...


