
CLIE Handbook
Page 2
... how to customize your CLIÉ handheld. Using your CLIÉ handheld and how to use the applications. Enhancing features with your data. Introduction This manual explains the basic operations and useful features of your CLIÉ handheld.
... how to customize your CLIÉ handheld. Using your CLIÉ handheld and how to use the applications. Enhancing features with your data. Introduction This manual explains the basic operations and useful features of your CLIÉ handheld.

CLIE Handbook
Page 3
... read the supplied "Safety & Regulations Guide". b For details on your computer after you read on your computer The following manuals are automatically installed on your CLIÉ handheld. • This manual supports PEG-TJ37 and PEG-TJ27. - Read This First (Operating Instructions)* Explains how to set up your computer window using the wireless LAN function...
... read the supplied "Safety & Regulations Guide". b For details on your computer after you read on your computer The following manuals are automatically installed on your CLIÉ handheld. • This manual supports PEG-TJ37 and PEG-TJ27. - Read This First (Operating Instructions)* Explains how to set up your computer window using the wireless LAN function...

CLIE Handbook
Page 6
..., and changing the volume level 81 Adjusting the Digitizer 82 Setting the Network preferences for a wireless LAN (for PEG-TJ37 only 83 Setting a wireless LAN access point manually 83 Searching and setting a wireless LAN access point manually . . . . 85 Connecting your CLIÉ handheld to a wireless LAN access point automatically 86 Checking the wireless LAN...
..., and changing the volume level 81 Adjusting the Digitizer 82 Setting the Network preferences for a wireless LAN (for PEG-TJ37 only 83 Setting a wireless LAN access point manually 83 Searching and setting a wireless LAN access point manually . . . . 85 Connecting your CLIÉ handheld to a wireless LAN access point automatically 86 Checking the wireless LAN...

CLIE Handbook
Page 13
CLIÉ™ handheld basic operations 13 Tip Rotating while pressing the Jog Dial™ navigator In some applications, operations are executed by pressing and rotating the Jog Dial™ navigator. Basic operations Pressing the Jog Dial™ navigator Press the Jog Dial™ navigator to select an item or to the "CLIÉ Application Manual" (HTML format). b For details on the application. Note The operations you can perform using the Jog Dial™ navigator vary depending on the operations of each application, refer to start a selected application.
CLIÉ™ handheld basic operations 13 Tip Rotating while pressing the Jog Dial™ navigator In some applications, operations are executed by pressing and rotating the Jog Dial™ navigator. Basic operations Pressing the Jog Dial™ navigator Press the Jog Dial™ navigator to select an item or to the "CLIÉ Application Manual" (HTML format). b For details on the application. Note The operations you can perform using the Jog Dial™ navigator vary depending on the operations of each application, refer to start a selected application.

CLIE Handbook
Page 14
...É™ handheld basic operations 14 The screen displayed when you turn on starting applications that you can use on "Memory Stick" media in this manual as the Home screen. Tip What is used in the Home screen. On your CLIÉ handheld, the CLIE Launcher and the Palm OS Standard...
...É™ handheld basic operations 14 The screen displayed when you turn on starting applications that you can use on "Memory Stick" media in this manual as the Home screen. Tip What is used in the Home screen. On your CLIÉ handheld, the CLIE Launcher and the Palm OS Standard...

CLIE Handbook
Page 16
b For details, refer to save data manually. Starting an application Quitting an application You do with the computer. Return to save data manually on your CLIÉ handheld as follows. Switch to another application assigned to application buttons by tapping (Home), then... start another application while you need to the "CLIÉ Application Manual" (HTML format). You can select one of two methods to another application. CLIÉ™ handheld basic operations 16 Display the CLIE...
b For details, refer to save data manually. Starting an application Quitting an application You do with the computer. Return to save data manually on your CLIÉ handheld as follows. Switch to another application assigned to application buttons by tapping (Home), then... start another application while you need to the "CLIÉ Application Manual" (HTML format). You can select one of two methods to another application. CLIÉ™ handheld basic operations 16 Display the CLIE...
CLIE Handbook
Page 47
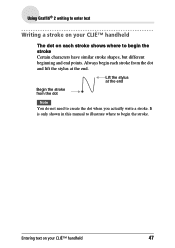
Lift the stylus at the end Begin the stroke from the dot and lift the stylus at the end. Entering text on each stroke from the dot Note You do not need to create the dot when you actually write a stroke. Always begin the stroke. It is only shown in this manual to illustrate where to begin each stroke shows where to begin the stroke Certain characters have similar stroke shapes, but different beginning and end points. Using Graffiti® 2 writing to enter text Writing a stroke on your CLIÉ™ handheld The dot on your CLIÉ™ handheld 47
Lift the stylus at the end Begin the stroke from the dot and lift the stylus at the end. Entering text on each stroke from the dot Note You do not need to create the dot when you actually write a stroke. Always begin the stroke. It is only shown in this manual to illustrate where to begin each stroke shows where to begin the stroke Certain characters have similar stroke shapes, but different beginning and end points. Using Graffiti® 2 writing to enter text Writing a stroke on your CLIÉ™ handheld The dot on your CLIÉ™ handheld 47
CLIE Handbook
Page 48
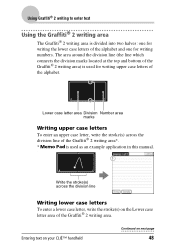
... Graffiti® 2 writing to enter text Using the Graffiti® 2 writing area The Graffiti® 2 writing area is used as an example application in this manual. • Write the stroke(s) across the division line of the Graffiti® 2 writing area*. * Memo Pad is used for writing upper case letters of the...
... Graffiti® 2 writing to enter text Using the Graffiti® 2 writing area The Graffiti® 2 writing area is used as an example application in this manual. • Write the stroke(s) across the division line of the Graffiti® 2 writing area*. * Memo Pad is used for writing upper case letters of the...

CLIE Handbook
Page 72
Note Do not disconnect your CLIÉ handheld from your computer window when the HotSync® operation starts. * From this manual, it is being performed. Check that (HotSync) is displayed in the Windows task tray (Notification area**). In this point onwards, where Windows XP...; operation is written as Windows XP. **In Windows XP, the task tray is called "Notification area". Otherwise, Palm™ Desktop for Windows XP*) - [Sony Handheld], and click [HotSync Manager]. If (HotSync) is not displayed in the task tray (Notification area) and tap (HotSync) on the screen of your CLI...
Note Do not disconnect your CLIÉ handheld from your computer window when the HotSync® operation starts. * From this manual, it is being performed. Check that (HotSync) is displayed in the Windows task tray (Notification area**). In this point onwards, where Windows XP...; operation is written as Windows XP. **In Windows XP, the task tray is called "Notification area". Otherwise, Palm™ Desktop for Windows XP*) - [Sony Handheld], and click [HotSync Manager]. If (HotSync) is not displayed in the task tray (Notification area) and tap (HotSync) on the screen of your CLI...

CLIE Handbook
Page 83
..., tap [Adhoc]. The Wireless LAN Setup screen is enabled by default. The WEP KEY Input dialog box is treated as one for PEG-TJ37 only) Setting a wireless LAN access point manually 1 Tap V at the top right corner of WEP key. To use a wireless LAN communication in this setup is displayed. 8 Enter WEP Key...
..., tap [Adhoc]. The Wireless LAN Setup screen is enabled by default. The WEP KEY Input dialog box is treated as one for PEG-TJ37 only) Setting a wireless LAN access point manually 1 Tap V at the top right corner of WEP key. To use a wireless LAN communication in this setup is displayed. 8 Enter WEP Key...
CLIE Handbook
Page 84
... displayed. 12 Tap [OK]. If the communication reception of the wireless LAN access point you want to connect to . • DNS Address: You can manually set up a Primary DNS and Secondary DNS. To cancel DHCP, tap next to [IP Address:] to change to . [Open System] is selected by ...7, you can select [Open System] or [Shared KEY] for [Network] is enabled by default. 11 Tap [OK] twice. Enable Power Save function for PEG-TJ37 only) 10 Perform the following procedures if necessary by default. Setting the Network preferences for a wireless LAN (for normal use. When DHCP is enabled by...
... displayed. 12 Tap [OK]. If the communication reception of the wireless LAN access point you want to connect to . • DNS Address: You can manually set up a Primary DNS and Secondary DNS. To cancel DHCP, tap next to [IP Address:] to change to . [Open System] is selected by ...7, you can select [Open System] or [Shared KEY] for [Network] is enabled by default. 11 Tap [OK] twice. Enable Power Save function for PEG-TJ37 only) 10 Perform the following procedures if necessary by default. Setting the Network preferences for a wireless LAN (for normal use. When DHCP is enabled by...
CLIE Handbook
Page 85
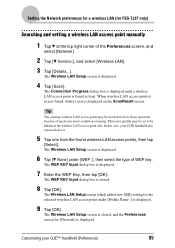
... case, your CLIÉ™ handheld (Preferences) 85 The Wireless LAN Setup screen is closed . 8 Tap [OK]. Setting the Network preferences for a wireless LAN (for PEG-TJ37 only) Searching and setting a wireless LAN access point manually 1 Tap V at the wireless LAN access point side.
... case, your CLIÉ™ handheld (Preferences) 85 The Wireless LAN Setup screen is closed . 8 Tap [OK]. Setting the Network preferences for a wireless LAN (for PEG-TJ37 only) Searching and setting a wireless LAN access point manually 1 Tap V at the wireless LAN access point side.

CLIE Handbook
Page 88
...] by access point. Setting the Network preferences for your provider and dial-up server Note For the settings specific to a peripheral device, refer to the manual of that those service templates are displayed on the Preferences screen for your Internet Service Provider.
...] by access point. Setting the Network preferences for your provider and dial-up server Note For the settings specific to a peripheral device, refer to the manual of that those service templates are displayed on the Preferences screen for your Internet Service Provider.
CLIE Handbook
Page 114
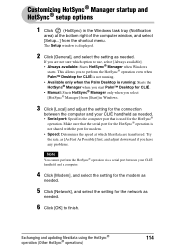
... [Local] and adjust the setting for the connection between your CLIÉ handheld as needed. 5 Click [Network], and select the setting for CLIÉ. • Manual: Starts HotSync® Manager only when you are not sure which files/data are transferred. This allows you to perform the HotSync® operation even...
... [Local] and adjust the setting for the connection between your CLIÉ handheld as needed. 5 Click [Network], and select the setting for CLIÉ. • Manual: Starts HotSync® Manager only when you are not sure which files/data are transferred. This allows you to perform the HotSync® operation even...

CLIE Handbook
Page 118
... the IrDA standard. • The infrared port of your computer To perform the IR HotSync® operation, you need to allocate a virtual port to the manual of your computer is enabled. For details on next page 118
... the IrDA standard. • The infrared port of your computer To perform the IR HotSync® operation, you need to allocate a virtual port to the manual of your computer is enabled. For details on next page 118

CLIE Handbook
Page 123
... are transferred. Exchanging and updating files/data using the HotSync® 123 operation (Other HotSync® operations) Tip You can also tap (HotSync) to the manual of the port settings, check [Modem Properties] ([Phone and Modem Options] for the modem. If it does not work properly, refer to display the HotSync...
... are transferred. Exchanging and updating files/data using the HotSync® 123 operation (Other HotSync® operations) Tip You can also tap (HotSync) to the manual of the port settings, check [Modem Properties] ([Phone and Modem Options] for the modem. If it does not work properly, refer to display the HotSync...
CLIE Handbook
Page 127
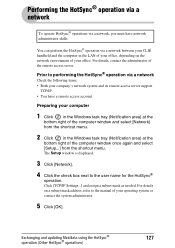
... and the computer in the Windows task tray (Notification area) at the bottom right of your office, depending on a subnet mask address, refer to the manual of the remote access server. Performing the HotSync® operation via a network To operate HotSync® operations via a network Check the following items: • Both...
... and the computer in the Windows task tray (Notification area) at the bottom right of your office, depending on a subnet mask address, refer to the manual of the remote access server. Performing the HotSync® operation via a network To operate HotSync® operations via a network Check the following items: • Both...

CLIE Handbook
Page 135
... Memory Stick" media and MagicGate compatible devices, such as the storage media. Copyrighted files/data cannot be played back on the last page of this manual. Using "Memory Stick™" media Continued on non-certified devices. b For the latest information, refer to the URL shown on devices. MagicGate is the copyright...
... Memory Stick" media and MagicGate compatible devices, such as the storage media. Copyrighted files/data cannot be played back on the last page of this manual. Using "Memory Stick™" media Continued on non-certified devices. b For the latest information, refer to the URL shown on devices. MagicGate is the copyright...
CLIE Handbook
Page 145
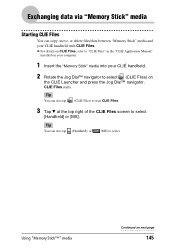
...) on the CLIE Launcher and press the Jog Dial™ navigator. b For details on CLIE Files, refer to "CLIE Files" in the "CLIÉ Application Manual" installed on next page 145
...) on the CLIE Launcher and press the Jog Dial™ navigator. b For details on CLIE Files, refer to "CLIE Files" in the "CLIÉ Application Manual" installed on next page 145
CLIE Handbook
Page 167
... can create a backup of each application. • If you can back up the following data to create a back up file. Backing up , refer to the manual of your CLIÉ handheld data by the HotSync® operation, perform a HotSync promptly after performing a hard reset. For details on page 111. Backing up...
... can create a backup of each application. • If you can back up the following data to create a back up file. Backing up , refer to the manual of your CLIÉ handheld data by the HotSync® operation, perform a HotSync promptly after performing a hard reset. For details on page 111. Backing up...

