Intellisync Lite Quick Start Guide
Page 7
... transfers data of : • Intellisync User Guide. The additional documentation consists of different formats between your handheld device. View the Intellisync User Guide from the Intellisync group on accessing online Help and user guides. It...Additional documentation The Intellisync software includes additional documentation in your PC, there's an easy way to ensure that if you install Intellisync, as well as on your handheld or device to -date information. Acrobat Reader is ...applications. This guide is available for installation on your handheld as complete your PC.
... transfers data of : • Intellisync User Guide. The additional documentation consists of different formats between your handheld device. View the Intellisync User Guide from the Intellisync group on accessing online Help and user guides. It...Additional documentation The Intellisync software includes additional documentation in your PC, there's an easy way to ensure that if you install Intellisync, as well as on your handheld or device to -date information. Acrobat Reader is ...applications. This guide is available for installation on your handheld as complete your PC.
Intellisync Lite Quick Start Guide
Page 13
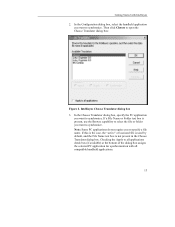
... all applications check box (if available) at the bottom of the dialog box assigns the selected PC application for synchronization with Intellisync 2. Getting Started with all compatible handheld applications. 13 Checking the Apply to synchronize. If this is the case, the "active" or...in the Choose Translator dialog box. In the Configuration dialog box, select the handheld application you to synchronize. Intellisync Choose Translator dialog box 3. Then click Choose to synchronize. Note: Some PC applications do not require you want to open the Choose Translator dialog box: ...
... all applications check box (if available) at the bottom of the dialog box assigns the selected PC application for synchronization with Intellisync 2. Getting Started with all compatible handheld applications. 13 Checking the Apply to synchronize. If this is the case, the "active" or...in the Choose Translator dialog box. In the Configuration dialog box, select the handheld application you to synchronize. Intellisync Choose Translator dialog box 3. Then click Choose to synchronize. Note: Some PC applications do not require you want to open the Choose Translator dialog box: ...

Intellisync Lite Quick Start Guide
Page 14
... Configuration dialog box - selected applications Now, the PC application you have selected. If the Options button is activated for the application you selected appears next to the handheld application name. Note the check box adjacent to the handheld application name, and a two-sided arrow appears between the handheld and PC application names. Quick Start Guide 4.
... Configuration dialog box - selected applications Now, the PC application you have selected. If the Options button is activated for the application you selected appears next to the handheld application name. Note the check box adjacent to the handheld application name, and a two-sided arrow appears between the handheld and PC application names. Quick Start Guide 4.

Intellisync Lite Quick Start Guide
Page 16
...Conflict Resolution dialog box appears, resolve any "data conflicts." The synchronization process begins, and the Progress dialog box appears. With your handheld and PC data, and uses a Conflict Resolution setting to resolve data conflicts. This file is created by the first synchronization of your systems... to the appropriate COM port on your handheld displays the message HotSync complete. 16 Quick Start Guide 10. "First run " synchronization is complete, your PC, press the sync button on the Progress dialog box, synchronization will ...
...Conflict Resolution dialog box appears, resolve any "data conflicts." The synchronization process begins, and the Progress dialog box appears. With your handheld and PC data, and uses a Conflict Resolution setting to resolve data conflicts. This file is created by the first synchronization of your systems... to the appropriate COM port on your handheld displays the message HotSync complete. 16 Quick Start Guide 10. "First run " synchronization is complete, your PC, press the sync button on the Progress dialog box, synchronization will ...

Applications Guide
Page 6
... your computer to "Music" in "CLIÉ Application Manual" (HTML format). Listening to music (for PEG-TJ35 only) You can play back music files in MP3 format on your CLIÉ handheld. • Application to "Music" in "CLIÉ Application Manual" (HTML format). 6 Transferring music ...file to your CLIÉ handheld: AeroPlayer for PC) - Play back music file on your CLIÉ handheld You can transfer music file via "Memory Stick"...
... your computer to "Music" in "CLIÉ Application Manual" (HTML format). Listening to music (for PEG-TJ35 only) You can play back music files in MP3 format on your CLIÉ handheld. • Application to "Music" in "CLIÉ Application Manual" (HTML format). 6 Transferring music ...file to your CLIÉ handheld: AeroPlayer for PC) - Play back music file on your CLIÉ handheld You can transfer music file via "Memory Stick"...

Applications Guide
Page 9
...]. Deleting an event 1 Tap an event you want to delete and tap The menu screen is displayed. 2 Tap [Delete Event...] from your CLIÉ handheld will be stored on your computer, open Palm™ Desktop for CLIÉ, and select [Open Archive...] in "Handbook" (PDF format). Tip bFor details on... entering text, refer to [Save archive copy on PC] on your CLIÉ™ handheld" in [File] of the Date Book screen. 9 Tip When the check box next to "Entering text on your computer at the next ...
...]. Deleting an event 1 Tap an event you want to delete and tap The menu screen is displayed. 2 Tap [Delete Event...] from your CLIÉ handheld will be stored on your computer, open Palm™ Desktop for CLIÉ, and select [Open Archive...] in "Handbook" (PDF format). Tip bFor details on... entering text, refer to [Save archive copy on PC] on your CLIÉ™ handheld" in [File] of the Date Book screen. 9 Tip When the check box next to "Entering text on your computer at the next ...

Applications Guide
Page 11
...8482; navigator. Tip When the check box next to delete and tap The menu screen is displayed. 2 Tap [Delete Address...] from your CLIÉ handheld will be stored on the Delete Address screen is displayed. (Menu). 3 Tap [OK]. The confirmation message is ,the deleted data from [Record]. ...Deleting an address entry 1 Tap the address you want to [Save archive copy on PC] on your computer, open Palm™ Desktop for CLIÉ, and select [Open Archive...] in [File] of the Address Book screen. 11 3 Tap...
...8482; navigator. Tip When the check box next to delete and tap The menu screen is displayed. 2 Tap [Delete Address...] from your CLIÉ handheld will be stored on the Delete Address screen is displayed. (Menu). 3 Tap [OK]. The confirmation message is ,the deleted data from [Record]. ...Deleting an address entry 1 Tap the address you want to [Save archive copy on PC] on your computer, open Palm™ Desktop for CLIÉ, and select [Open Archive...] in [File] of the Address Book screen. 11 3 Tap...

Applications Guide
Page 13
... Microsoft® Word/Excel/PowerPoint® or PDF files on your CLIÉ handheld. • Application to be used: Picsel Viewer for CLIE, Data Import and Data Export (for PC) • Required media: "Memory Stick" media • Data to be viewed from Picsel Viewer for CLIE: doc ... to install Data Export on your computer" in "CLIÉ Application Manual" (HTML format). 13 Viewing documents on your CLIÉ handheld (Picsel Viewer for CLIE) (for PEG-TJ35 only) You can view documents created in "Read This First (Operating Instructions)". b For details, refer to "Picsel Viewer for CLIE...
... Microsoft® Word/Excel/PowerPoint® or PDF files on your CLIÉ handheld. • Application to be used: Picsel Viewer for CLIE, Data Import and Data Export (for PC) • Required media: "Memory Stick" media • Data to be viewed from Picsel Viewer for CLIE: doc ... to install Data Export on your computer" in "CLIÉ Application Manual" (HTML format). 13 Viewing documents on your CLIÉ handheld (Picsel Viewer for CLIE) (for PEG-TJ35 only) You can view documents created in "Read This First (Operating Instructions)". b For details, refer to "Picsel Viewer for CLIE...

Applications Guide
Page 14
Data Export (for PC) Data Import (for CLIÉ handheld) 14 b For details on your CLIÉ handheld. 2 Connect your CLIÉ handheld to your computer with a USB cable. 3 Insert the "Memory Stick" media into your CLIÉ handheld. Use Data Import and Data Export to transfer documents to the "...Memory Stick" media inserted into your CLIÉ handheld. Transferring the documents to your CLIÉ handheld 1 Prepare the documents on your computer that you wish to view on "Memory Stick" media, refer to "Using "Memory Stick"...
Data Export (for PC) Data Import (for CLIÉ handheld) 14 b For details on your CLIÉ handheld. 2 Connect your CLIÉ handheld to your computer with a USB cable. 3 Insert the "Memory Stick" media into your CLIÉ handheld. Use Data Import and Data Export to transfer documents to the "...Memory Stick" media inserted into your CLIÉ handheld. Transferring the documents to your CLIÉ handheld 1 Prepare the documents on your computer that you wish to view on "Memory Stick" media, refer to "Using "Memory Stick"...

CLIE Handbook (primary manual)
Page 109
... updating files/data using the HotSync® 109 operation (Other HotSync® operations) For best results, your computer and your CLIÉ handheld should be displayed when the HotSync® operation is displayed. Performing the IR HotSync® operation Performing the IR HotSync® operation You ...can also tap 2 Tap [Local]. (HotSync) to display the HotSync screen. 3 Tap V, and select [IR to a PC/Handheld]. 4 Point the IR port of your CLIÉ handheld directly to the IR port of the computer. Tip You can perform the IR HotSync® operation when you have prepared...
... updating files/data using the HotSync® 109 operation (Other HotSync® operations) For best results, your computer and your CLIÉ handheld should be displayed when the HotSync® operation is displayed. Performing the IR HotSync® operation Performing the IR HotSync® operation You ...can also tap 2 Tap [Local]. (HotSync) to display the HotSync screen. 3 Tap V, and select [IR to a PC/Handheld]. 4 Point the IR port of your CLIÉ handheld directly to the IR port of the computer. Tip You can perform the IR HotSync® operation when you have prepared...

CLIE Handbook (primary manual)
Page 117
... information (Primary PC name and Primary PC address (IP address)) is displayed. Performing the HotSync® operation via a network 6 Connect a USB cable to your CLIÉ handheld for the HotSync® operation via a network, your CLIÉ handheld. Preparing your CLIÉ handheld Follow the steps below to set up your CLIÉ handheld and press...; navigator to select (HotSync) on the CLIE Launcher and press the Jog Dial™ navigator. Tip You can also tap (HotSync) to your CLIÉ handheld identifies the computer based on next page 117
... information (Primary PC name and Primary PC address (IP address)) is displayed. Performing the HotSync® operation via a network 6 Connect a USB cable to your CLIÉ handheld for the HotSync® operation via a network, your CLIÉ handheld. Preparing your CLIÉ handheld Follow the steps below to set up your CLIÉ handheld and press...; navigator to select (HotSync) on the CLIE Launcher and press the Jog Dial™ navigator. Tip You can also tap (HotSync) to your CLIÉ handheld identifies the computer based on next page 117

CLIE Handbook (primary manual)
Page 121
... the steps below to set up your CLIÉ handheld for the HotSync® operation via the LAN. 1 Rotate the Jog Dial™ navigator to select (HotSync) on next page 121 The computer information (Primary PC name and Primary PC address (IP address)) is displayed. Tip You can... Preferences screen is displayed. 4 Tap [LANSync Prefs...] from [Options]. Performing the HotSync® operation via LAN (LANSync) 6 Connect your CLIÉ handheld to your computer with a USB cable. 7 Rotate the Jog Dial™ navigator to select (HotSync) on the transferred information.
... the steps below to set up your CLIÉ handheld for the HotSync® operation via the LAN. 1 Rotate the Jog Dial™ navigator to select (HotSync) on next page 121 The computer information (Primary PC name and Primary PC address (IP address)) is displayed. Tip You can... Preferences screen is displayed. 4 Tap [LANSync Prefs...] from [Options]. Performing the HotSync® operation via LAN (LANSync) 6 Connect your CLIÉ handheld to your computer with a USB cable. 7 Rotate the Jog Dial™ navigator to select (HotSync) on the transferred information.

Troubleshooting Q&A
Page 25
... Me, click (HotSync) in the task tray (Notification area) at the bottom right of your computer. B Ensure [Local] and [IR to a PC/Handheld] in the Setup window. B The IR HotSync® operation is running . B Check that the IR port of your computer window and HotSync Manager ...174; operation if the remaining battery power is selected. The optimum distance for IR communication is inadequate. Tap [IR to a PC/handheld] are using Windows 2000 Professional/Windows XP, click (HotSync) in the task tray (Notification area) at the IR port of the Preferences screen.
... Me, click (HotSync) in the task tray (Notification area) at the bottom right of your computer. B Ensure [Local] and [IR to a PC/Handheld] in the Setup window. B The IR HotSync® operation is running . B Check that the IR port of your computer window and HotSync Manager ...174; operation if the remaining battery power is selected. The optimum distance for IR communication is inadequate. Tap [IR to a PC/handheld] are using Windows 2000 Professional/Windows XP, click (HotSync) in the task tray (Notification area) at the IR port of the Preferences screen.

Marketing Specifications
Page 1
...GTS Racing Challenge™ (Astraware)** - Purchasers must determine for PC) Memory Stick® Backup World Alarm Clock VALUE-ADDED SOFTWARE Handheld Applications - Features and specifications are required to install bundled software application...Sony add-on display. ©2003 Sony Electronics Inc. While Sony representatives or Sony authorized dealers may choose to connect. Quicktime and the Quicktime logo are trademarks of their logos are trademarks of PIM use . All other product and brand names may not include full documentation. Personal Entertainment Organizer PEG-TJ25...
...GTS Racing Challenge™ (Astraware)** - Purchasers must determine for PC) Memory Stick® Backup World Alarm Clock VALUE-ADDED SOFTWARE Handheld Applications - Features and specifications are required to install bundled software application...Sony add-on display. ©2003 Sony Electronics Inc. While Sony representatives or Sony authorized dealers may choose to connect. Quicktime and the Quicktime logo are trademarks of their logos are trademarks of PIM use . All other product and brand names may not include full documentation. Personal Entertainment Organizer PEG-TJ25...


