
Quick Start Guide
Page 3
... which business proprietors can participate voluntarily. The targeted products are trademarks or registered trademarks of your Sony VAIO® computer. Important information for energy efficiency. customers only. Microsoft, Windows, the Windows logo and Windows XP are office equipment such as computers, displays, printers, facsimiles and copiers. PS/2 is an international program that are located on the back...
... which business proprietors can participate voluntarily. The targeted products are trademarks or registered trademarks of your Sony VAIO® computer. Important information for energy efficiency. customers only. Microsoft, Windows, the Windows logo and Windows XP are office equipment such as computers, displays, printers, facsimiles and copiers. PS/2 is an international program that are located on the back...

Quick Start Guide
Page 15
Other Software Library containing the Microsoft software license agreement and Sony end-user license agreement. 15 The Quick Start also provides resources for technical support, safety guidelines and owner's information. ❑ Microsoft® Windows® XP Guide - Explains how to recover your Computer Manuals ❑ VAIO® Computer Quick Start - Provides basic information on setting up...
Other Software Library containing the Microsoft software license agreement and Sony end-user license agreement. 15 The Quick Start also provides resources for technical support, safety guidelines and owner's information. ❑ Microsoft® Windows® XP Guide - Explains how to recover your Computer Manuals ❑ VAIO® Computer Quick Start - Provides basic information on setting up...

Quick Start Guide
Page 29
...; If you may need to repeat this procedure if your system to your computer 1 Click Start in the Windows taskbar, then select Turn Off Computer. To avoid loss of time. The Turn Off Computer dialog box appears. 2 Select the Turn Off option. ✍ Respond to any peripheral devices connected to ...-the power indicator light turns off. 4 Turn off any prompts about saving your documents. 3 Wait for your computer to turn off your computer for more than six seconds to turn off the computer. You may want to use the Power button to force your system does not shut down .
...; If you may need to repeat this procedure if your system to your computer 1 Click Start in the Windows taskbar, then select Turn Off Computer. To avoid loss of time. The Turn Off Computer dialog box appears. 2 Select the Turn Off option. ✍ Respond to any peripheral devices connected to ...-the power indicator light turns off. 4 Turn off any prompts about saving your documents. 3 Wait for your computer to turn off your computer for more than six seconds to turn off the computer. You may want to use the Power button to force your system does not shut down .

Quick Start Guide
Page 32
...application continues to stop responding, contact the software publisher or designated technical support provider. If your computer to stop responding? The Turn Off Computer window appears. 3 Click Restart. The Windows Task Manager window appears. 2 From the Applications tab, locate the application that has the status message, "... files that are currently open files, if possible. 2 Press the Alt+F4 keys. VAIO Computer Quick Start Why did my computer or software stop responding or causes your computer does not respond or the application does not close the application. You can try to...
...application continues to stop responding, contact the software publisher or designated technical support provider. If your computer to stop responding? The Turn Off Computer window appears. 3 Click Restart. The Windows Task Manager window appears. 2 From the Applications tab, locate the application that has the status message, "... files that are currently open files, if possible. 2 Press the Alt+F4 keys. VAIO Computer Quick Start Why did my computer or software stop responding or causes your computer does not respond or the application does not close the application. You can try to...

Quick Start Guide
Page 34
... as drive D. Sony recommends backing up your personal data to storage media or to recover your computer at a later date if the software stops working state by using the F10 key* on notebook computers. * This feature is available for VAIO® notebook computers only. 34 You can start the VAIO Recovery Wizard from the Windows XP Start...
... as drive D. Sony recommends backing up your personal data to storage media or to recover your computer at a later date if the software stops working state by using the F10 key* on notebook computers. * This feature is available for VAIO® notebook computers only. 34 You can start the VAIO Recovery Wizard from the Windows XP Start...

Quick Start Guide
Page 35
... recover the original software programs, start the VAIO Recovery Wizard from the Windows XP Start menu, the Recovery Media Kit, or by using the F10 key on both drives. You can access this option, you lose all data and settings on notebook computers. ✍ Recovering drives C and D with...Recovery Media Kit is the only way to their original factory-installed settings. To recover drives C and D, start the VAIO Recovery Wizard from the Windows XP Start menu or from your computer's hard disk drive. With this option by using Disc 1 from your Recovery Media Kit. ❑ Perform a ...
... recover the original software programs, start the VAIO Recovery Wizard from the Windows XP Start menu, the Recovery Media Kit, or by using the F10 key on both drives. You can access this option, you lose all data and settings on notebook computers. ✍ Recovering drives C and D with...Recovery Media Kit is the only way to their original factory-installed settings. To recover drives C and D, start the VAIO Recovery Wizard from the Windows XP Start menu or from your computer's hard disk drive. With this option by using Disc 1 from your Recovery Media Kit. ❑ Perform a ...
Quick Start Guide
Page 37
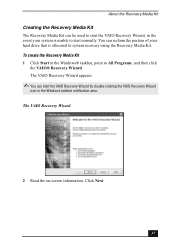
...allocated to system recovery using the Recovery Media Kit. Click Next. 37 To create the Recovery Media Kit 1 Click Start in the Windows taskbar notification area. The VAIO Recovery Wizard 2 Read the on-screen information. You can start normally. About the Recovery Media Kit Creating the Recovery Media Kit ...The Recovery Media Kit can be used to start the VAIO Recovery Wizard, in the event your hard drive that is unable to start the VAIO Recovery Wizard by double-clicking the VAIO Recovery Wizard icon in the Windows® taskbar, point to All Programs, and then click the...
...allocated to system recovery using the Recovery Media Kit. Click Next. 37 To create the Recovery Media Kit 1 Click Start in the Windows taskbar notification area. The VAIO Recovery Wizard 2 Read the on-screen information. You can start normally. About the Recovery Media Kit Creating the Recovery Media Kit ...The Recovery Media Kit can be used to start the VAIO Recovery Wizard, in the event your hard drive that is unable to start the VAIO Recovery Wizard by double-clicking the VAIO Recovery Wizard icon in the Windows® taskbar, point to All Programs, and then click the...
Quick Start Guide
Page 38
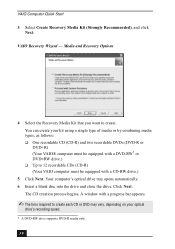
The CD creation process begins. Media and Recovery Options 4 Select the Recovery Media Kit that you want to 12 recordable CDs (CD-R) (Your VAIO computer must be equipped with a CD-RW drive.) 5 Click Next. Click Next. You can create your optical drive's recording speed. * A DVD-RW drive supports... A window with a progress bar appears. ✍ The time required to create each CD or DVD may vary, depending on your kit using a single type of media or by combining media types, as follows: ❑ One recordable CD (CD-R) and two recordable DVDs (DVD-R or DVD+R) (Your VAIO® computer must ...
The CD creation process begins. Media and Recovery Options 4 Select the Recovery Media Kit that you want to 12 recordable CDs (CD-R) (Your VAIO computer must be equipped with a CD-RW drive.) 5 Click Next. Click Next. You can create your optical drive's recording speed. * A DVD-RW drive supports... A window with a progress bar appears. ✍ The time required to create each CD or DVD may vary, depending on your kit using a single type of media or by combining media types, as follows: ❑ One recordable CD (CD-R) and two recordable DVDs (DVD-R or DVD+R) (Your VAIO® computer must ...

Quick Start Guide
Page 40
..., and click VAIO Recovery Wizard. ✍ Using the VAIO Recovery Wizard may require you cancel and exit the wizard. 2 From the Welcome window, click Next. 3 Choose one of the available menu options. VAIO Computer Quick Start Using the VAIO Recovery Wizard The VAIO® Recovery Wizard provides recovery options for your computer. 4 Wait for VAIO® notebook computers only. 40...
..., and click VAIO Recovery Wizard. ✍ Using the VAIO Recovery Wizard may require you cancel and exit the wizard. 2 From the Welcome window, click Next. 3 Choose one of the available menu options. VAIO Computer Quick Start Using the VAIO Recovery Wizard The VAIO® Recovery Wizard provides recovery options for your computer. 4 Wait for VAIO® notebook computers only. 40...

Quick Start Guide
Page 41
... using the F10 Key (for notebook computers only) 1 Turn off your notebook computer. 2 Press the power switch on the computer to turn on the power. 3 When you see the VAIO logo appear on -screen instructions. Using the VAIO Recovery Wizard To use Windows System Restore from the VAIO Recovery Wizard 1 Start the VAIO® Recovery Wizard, and click...
... using the F10 Key (for notebook computers only) 1 Turn off your notebook computer. 2 Press the power switch on the computer to turn on the power. 3 When you see the VAIO logo appear on -screen instructions. Using the VAIO Recovery Wizard To use Windows System Restore from the VAIO Recovery Wizard 1 Start the VAIO® Recovery Wizard, and click...

Quick Start Guide
Page 42
.... 4 Read the on the hard disk drive) 1 Start the VAIO® Recovery Wizard, and click Next. 2 Select Proceed with System Recovery, and click Next. VAIO Computer Quick Start To recover drive C 1 Start the VAIO Recovery Wizard, and click Next. 2 Select Proceed with System Recovery,... and click Next. To recover drives C and D (and reclaim all space on -screen information. Your computer restarts. The Custom Recovery Options window appears. 4 ...
.... 4 Read the on the hard disk drive) 1 Start the VAIO® Recovery Wizard, and click Next. 2 Select Proceed with System Recovery, and click Next. VAIO Computer Quick Start To recover drive C 1 Start the VAIO Recovery Wizard, and click Next. 2 Select Proceed with System Recovery,... and click Next. To recover drives C and D (and reclaim all space on -screen information. Your computer restarts. The Custom Recovery Options window appears. 4 ...

Quick Start Guide
Page 44
...option, you cannot return to recover. Click Next. The Recovery Options window appears. (If you want to the system recovery portion of the VAIO® Recovery Wizard without restarting your computer. 4 Select Application Recovery, and click Next. Begin Application Recovery 5 ...skip step 2.) 3 Select Custom Recovery (for Advanced Users), and click Next. VAIO Application Recovery Wizard - The Begin Application Recovery window appears. VAIO Computer Quick Start To recover software applications 1 Start the VAIO® Recovery Wizard, and click Next. 2 Select Proceed with System Recovery,...
...option, you cannot return to recover. Click Next. The Recovery Options window appears. (If you want to the system recovery portion of the VAIO® Recovery Wizard without restarting your computer. 4 Select Application Recovery, and click Next. Begin Application Recovery 5 ...skip step 2.) 3 Select Custom Recovery (for Advanced Users), and click Next. VAIO Application Recovery Wizard - The Begin Application Recovery window appears. VAIO Computer Quick Start To recover software applications 1 Start the VAIO® Recovery Wizard, and click Next. 2 Select Proceed with System Recovery,...

Quick Start Guide
Page 45
... installation error message, try recovering the software again. The Application Recovery window appears with a listing of the available software titles. 8 Click Finish. The VAIO Recovery Wizard appears. 7 Click Next. 8 Select Custom Recovery (for approximately 30 seconds, and then turn on the computer. 6 When prompted, insert the Recovery Disk 1 into the optical drive, and...
... installation error message, try recovering the software again. The Application Recovery window appears with a listing of the available software titles. 8 Click Finish. The VAIO Recovery Wizard appears. 7 Click Next. 8 Select Custom Recovery (for approximately 30 seconds, and then turn on the computer. 6 When prompted, insert the Recovery Disk 1 into the optical drive, and...

Quick Start Guide
Page 48
... and locate troubleshooting support. Your computer is supplied with Sony. ❑ VAIO® Computer User Guide - In these support options: ❑ VAIO® Computer Quick Start - The online specifications sheet describes the hardware and software configuration of your computer quickly and easily. The software's main window appears. 3 From the menu bar, click Help. VAIO Computer Quick Start Immediate Help and...
... and locate troubleshooting support. Your computer is supplied with Sony. ❑ VAIO® Computer User Guide - In these support options: ❑ VAIO® Computer Quick Start - The online specifications sheet describes the hardware and software configuration of your computer quickly and easily. The software's main window appears. 3 From the menu bar, click Help. VAIO Computer Quick Start Immediate Help and...

VAIO User Guide (primary manual)
Page 3
... the online Specifications sheet. Page 3 Provides basic information on the hardware and preinstalled software applications included with your computer. Click Start in the Windows taskbar, then click Help and Support. 2. Online Documentation VAIO® Computer User Guide - The Quick Start also provides resources for technical support, safety guidelines and owner's information. Microsoft...
... the online Specifications sheet. Page 3 Provides basic information on the hardware and preinstalled software applications included with your computer. Click Start in the Windows taskbar, then click Help and Support. 2. Online Documentation VAIO® Computer User Guide - The Quick Start also provides resources for technical support, safety guidelines and owner's information. Microsoft...

VAIO User Guide (primary manual)
Page 4
... in the text, "View the VAIO® Computer Specifications..." Click the Welcome link. Locate the link in the Windows taskbar, then click Help and Support. 2. Other Software Library containing the Microsoft software license agreement and Sony end-user license agreement. From the VAIO Help and Support Center menu, click VAIO Recovery Options. Hard Disk Drive Recovery...
... in the text, "View the VAIO® Computer Specifications..." Click the Welcome link. Locate the link in the Windows taskbar, then click Help and Support. 2. Other Software Library containing the Microsoft software license agreement and Sony end-user license agreement. From the VAIO Help and Support Center menu, click VAIO Recovery Options. Hard Disk Drive Recovery...

VAIO User Guide (primary manual)
Page 5
...Position the unit so that help reduce glare. Proper lighting adds to 26 inches directly in the proper position. Lighting - The computer's keyboard should be directly in a relaxed, comfortable position. Position the mouse at or a little below eye level. Excessive use your whole...18 to your work effectiveness. Sit with good back support and armrests. Choose a location where windows and lights do not create glare and reflection on both sides of your computer and at least eight inches of the mouse and other peripheral equipment. Ventilation - ...
...Position the unit so that help reduce glare. Proper lighting adds to 26 inches directly in the proper position. Lighting - The computer's keyboard should be directly in a relaxed, comfortable position. Position the mouse at or a little below eye level. Excessive use your whole...18 to your work effectiveness. Sit with good back support and armrests. Choose a location where windows and lights do not create glare and reflection on both sides of your computer and at least eight inches of the mouse and other peripheral equipment. Ventilation - ...

VAIO User Guide (primary manual)
Page 24
... the S keys You can reprogram the S keys to place it into the list box. 6. The Confirmation Application Name window appears. Then click Finish. the VAIO Action Setup icon, located in the list box on the right. 5. The corresponding applications appear in the... Windows taskbar, to change. 4. Click the S Key you want to launch VAIO Action 3. Select an application from the list. Page 24 Select S-key settings (VAIO Action Setup), then click VAIO Action Setup. Click Next. Changing the settings of function...
... the S keys You can reprogram the S keys to place it into the list box. 6. The Confirmation Application Name window appears. Then click Finish. the VAIO Action Setup icon, located in the list box on the right. 5. The corresponding applications appear in the... Windows taskbar, to change. 4. Click the S Key you want to launch VAIO Action 3. Select an application from the list. Page 24 Select S-key settings (VAIO Action Setup), then click VAIO Action Setup. Click Next. Changing the settings of function...

VAIO User Guide (primary manual)
Page 31
Push the PC Card gently into the PC Card slot. Safely Remove Hardware If the PC Card does not insert easily, remove it from the PC Card slot and verify that it into the slot. Carefully reinsert the PC Card, without forcing it is automatically detected and the icon appears in the Windows® taskbar. Inserting a PC Card 1. The card is not upside-down or backwards. With the label facing upwards, insert the PC Card into the slot. Inserting a PC Card 2. Page 31
Push the PC Card gently into the PC Card slot. Safely Remove Hardware If the PC Card does not insert easily, remove it from the PC Card slot and verify that it into the slot. Carefully reinsert the PC Card, without forcing it is automatically detected and the icon appears in the Windows® taskbar. Inserting a PC Card 1. The card is not upside-down or backwards. With the label facing upwards, insert the PC Card into the slot. Inserting a PC Card 2. Page 31

VAIO User Guide (primary manual)
Page 32
...the name of the system unit. Click OK. 4. Page 32 Double-click the Safely Remove Hardware icon in the Windows® taskbar. 3. When the PC Card ejects from the computer before attempting to extend the Eject button out from the PC Card slot, remove the card by holding the edges ...and pulling it out carefully. The Stop a Hardware Device window appears. Be sure to eject the card. When the message "Safe to avoid data loss. 2. Close all applications that you eject the PC Card incorrectly, your computer may access the PC Card to Remove Hardware" appears, push the ...
...the name of the system unit. Click OK. 4. Page 32 Double-click the Safely Remove Hardware icon in the Windows® taskbar. 3. When the PC Card ejects from the computer before attempting to extend the Eject button out from the PC Card slot, remove the card by holding the edges ...and pulling it out carefully. The Stop a Hardware Device window appears. Be sure to eject the card. When the message "Safe to avoid data loss. 2. Close all applications that you eject the PC Card incorrectly, your computer may access the PC Card to Remove Hardware" appears, push the ...


