Quick Start Guide
Page 4
...V.90 modem models; Safety Information and Caution Your computer's installed optical drives may vary, depending on your nearest Sony Service Center. Refer servicing to rain or moisture. ❑ To avoid electrical shock, do not expose your desktop to qualified personnel only. See the online specifications ...jacks in the vicinity of optical instruments with this product is specifically designed for details on the system configuration you have purchased. Keyboard Properties (PCVA-KB6) Carrier frequency Output power 27.095 - 27.145MHz Less than 46 nW Mouse Properties (PCVA-MS2)...
...V.90 modem models; Safety Information and Caution Your computer's installed optical drives may vary, depending on your nearest Sony Service Center. Refer servicing to rain or moisture. ❑ To avoid electrical shock, do not expose your desktop to qualified personnel only. See the online specifications ...jacks in the vicinity of optical instruments with this product is specifically designed for details on the system configuration you have purchased. Keyboard Properties (PCVA-KB6) Carrier frequency Output power 27.095 - 27.145MHz Less than 46 nW Mouse Properties (PCVA-MS2)...

Quick Start Guide
Page 11
Contents Getting Started 13 Unpacking your Computer 14 Locating Controls and Ports 17 About the Front Panel 18 About the Side Panels 20 About the Back Panel 23 About the Keyboard 24 About the Mouse 28 About the Remote Control 30 Setting Up Your Computer 35 Connecting the Power Cord 36 Connecting the Wireless Keyboard 38 Connecting the Wireless Mouse 40 Connecting the Modem Cable 42 Turning on Your Computer 43 Registering Your Computer 43 Turning Off Your Computer 44 11
Contents Getting Started 13 Unpacking your Computer 14 Locating Controls and Ports 17 About the Front Panel 18 About the Side Panels 20 About the Back Panel 23 About the Keyboard 24 About the Mouse 28 About the Remote Control 30 Setting Up Your Computer 35 Connecting the Power Cord 36 Connecting the Wireless Keyboard 38 Connecting the Wireless Mouse 40 Connecting the Modem Cable 42 Turning on Your Computer 43 Registering Your Computer 43 Turning Off Your Computer 44 11
Quick Start Guide
Page 14
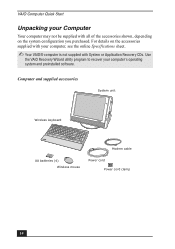
... Wireless keyboard Modem cable AA batteries (4) Wireless mouse Power cord Power cord clamp 14 For details on the accessories supplied with your computer, see the online Specifications sheet. ✍ Your VAIO® computer is not supplied with all of the accessories shown, depending on the system configuration you purchased. VAIO Computer Quick Start Unpacking your Computer Your computer...
... Wireless keyboard Modem cable AA batteries (4) Wireless mouse Power cord Power cord clamp 14 For details on the accessories supplied with your computer, see the online Specifications sheet. ✍ Your VAIO® computer is not supplied with all of the accessories shown, depending on the system configuration you purchased. VAIO Computer Quick Start Unpacking your Computer Your computer...
Quick Start Guide
Page 22
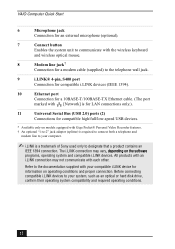
Refer to your computer. ✍ i.LINK is a trademark of Sony used only to designate that a product contains an IEEE 1394 connection. All products with an i.LINK connection may vary, depending on the ...optical or hard disk drive, confirm their operating system compatibility and required operating conditions. 22 VAIO Computer Quick Start 6 Microphone jack Connection for an external microphone (optional). 7 Connect button Enables the system unit to communicate with the wireless keyboard and wireless optical mouse. 8 Modem line jack† Connection for a modem cable ...
Refer to your computer. ✍ i.LINK is a trademark of Sony used only to designate that a product contains an IEEE 1394 connection. All products with an i.LINK connection may vary, depending on the ...optical or hard disk drive, confirm their operating system compatibility and required operating conditions. 22 VAIO Computer Quick Start 6 Microphone jack Connection for an external microphone (optional). 7 Connect button Enables the system unit to communicate with the wireless keyboard and wireless optical mouse. 8 Modem line jack† Connection for a modem cable ...
Quick Start Guide
Page 24
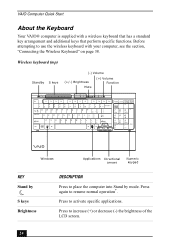
... brightness of the LCD screen. 24 Press to activate specific applications. VAIO Computer Quick Start About the Keyboard Your VAIO® computer is supplied with your computer, see the section, "Connecting the Wireless Keyboard" on page 38. Before attempting to use the wireless keyboard with a wireless keyboard that has a standard key arrangement and additional keys that perform specific functions...
... brightness of the LCD screen. 24 Press to activate specific applications. VAIO Computer Quick Start About the Keyboard Your VAIO® computer is supplied with your computer, see the section, "Connecting the Wireless Keyboard" on page 38. Before attempting to use the wireless keyboard with a wireless keyboard that has a standard key arrangement and additional keys that perform specific functions...
Quick Start Guide
Page 25
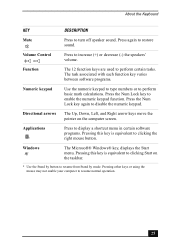
About the Keyboard KEY DESCRIPTION Mute Press to resume normal operation. 25 Windows The Microsoft® Windows® key, displays the Start menu. Pressing other keys or using the mouse may not enable your computer to turn off speaker sound. Function The 12 function keys are used to ...arrow keys move the pointer on the taskbar. * Use the Stand by mode. Pressing this key is equivalent to clicking Start on the computer screen. Press the Num Lock key to restore sound. Press again to enable the numeric keypad function. Volume Control Press to perform basic...
About the Keyboard KEY DESCRIPTION Mute Press to resume normal operation. 25 Windows The Microsoft® Windows® key, displays the Start menu. Pressing other keys or using the mouse may not enable your computer to turn off speaker sound. Function The 12 function keys are used to ...arrow keys move the pointer on the taskbar. * Use the Stand by mode. Pressing this key is equivalent to clicking Start on the computer screen. Press the Num Lock key to restore sound. Press again to enable the numeric keypad function. Volume Control Press to perform basic...
Quick Start Guide
Page 26
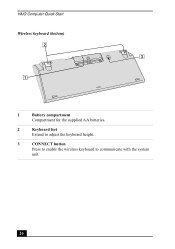
VAIO Computer Quick Start Wireless keyboard (bottom) 1 Battery compartment Compartment for the supplied AA batteries. 2 Keyboard feet Extend to adjust the keyboard height. 3 CONNECT button Press to enable the wireless keyboard to communicate with the system unit. 26
VAIO Computer Quick Start Wireless keyboard (bottom) 1 Battery compartment Compartment for the supplied AA batteries. 2 Keyboard feet Extend to adjust the keyboard height. 3 CONNECT button Press to enable the wireless keyboard to communicate with the system unit. 26

Quick Start Guide
Page 27
You can check your wireless keyboard is not being used for extended periods of time, remove the batteries to be replaced. When your keyboard's battery power level by clicking (wireless keyboard icon), located in the Windows® taskbar notification area. Inserting batteries into the wireless keyboard as shown. About the Keyboard To set up the wireless keyboard Insert two AA batteries (supplied) into the wireless keyboard ✍ If your wireless keyboard does not operate properly, the batteries may need to avoid possible damage from battery leakage. 27
You can check your wireless keyboard is not being used for extended periods of time, remove the batteries to be replaced. When your keyboard's battery power level by clicking (wireless keyboard icon), located in the Windows® taskbar notification area. Inserting batteries into the wireless keyboard as shown. About the Keyboard To set up the wireless keyboard Insert two AA batteries (supplied) into the wireless keyboard ✍ If your wireless keyboard does not operate properly, the batteries may need to avoid possible damage from battery leakage. 27
Quick Start Guide
Page 36
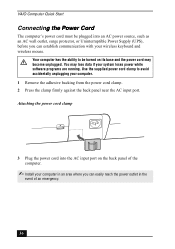
VAIO Computer Quick Start Connecting the Power Cord The computer's power cord must be turned on the back panel of the computer. ✍ Install your computer in an area where you can easily reach the power outlet in the event of an emergency. 36 Use the supplied power cord clamp to ... into an AC power source, such as an AC wall outlet, surge protector, or Uninterruptible Power Supply (UPS), before you can establish communication with your computer. 1 Remove the adhesive backing from the power cord clamp. 2 Press the clamp firmly against the back panel near the AC input port. Your...
VAIO Computer Quick Start Connecting the Power Cord The computer's power cord must be turned on the back panel of the computer. ✍ Install your computer in an area where you can easily reach the power outlet in the event of an emergency. 36 Use the supplied power cord clamp to ... into an AC power source, such as an AC wall outlet, surge protector, or Uninterruptible Power Supply (UPS), before you can establish communication with your computer. 1 Remove the adhesive backing from the power cord clamp. 2 Press the clamp firmly against the back panel near the AC input port. Your...

Quick Start Guide
Page 38
... batteries (supplied) are properly inserted into the keyboard before your computer. 2 Press the CONNECT button on . To connect the wireless keyboard 1 Turn on your computer is supplied with a wireless keyboard. VAIO Computer Quick Start Connecting the Wireless Keyboard Your VAIO® computer is turned on the left panel of the computer. 3 Turn the wireless keyboard over. 4 Press the CONNECT button to connect...
... batteries (supplied) are properly inserted into the keyboard before your computer. 2 Press the CONNECT button on . To connect the wireless keyboard 1 Turn on your computer is supplied with a wireless keyboard. VAIO Computer Quick Start Connecting the Wireless Keyboard Your VAIO® computer is turned on the left panel of the computer. 3 Turn the wireless keyboard over. 4 Press the CONNECT button to connect...
Quick Start Guide
Page 39
...; Do not exceed a maximum distance of 2 feet between your VAIO® computer and your wireless keyboard. ❑ Confirm that the supplied AA batteries are properly installed. ❑ Press the CONNECT buttons located on the left panel of the computer and on the bottom of the keyboard, to stop working properly. ❑ Do not place metal...
...; Do not exceed a maximum distance of 2 feet between your VAIO® computer and your wireless keyboard. ❑ Confirm that the supplied AA batteries are properly installed. ❑ Press the CONNECT buttons located on the left panel of the computer and on the bottom of the keyboard, to stop working properly. ❑ Do not place metal...
Quick Start Guide
Page 53
... adjusted correctly. (See the manual supplied with a floppy disk drive. Check that the power indicator is lit on the front panel of keyboard. * Certain VAIO computers are not equipped with your system has a built-in an optical drive (unless you are using a bootable CD). ❑ Confirm that... all cables are connected firmly. ❑ If you plugged the computer into a power strip or Uninterruptible Power Supply (UPS), make sure the power strip or UPS is turned on other troubleshooting topics, see the online VAIO® Computer User Guide. You can purchase this equipment separately. 53
... adjusted correctly. (See the manual supplied with a floppy disk drive. Check that the power indicator is lit on the front panel of keyboard. * Certain VAIO computers are not equipped with your system has a built-in an optical drive (unless you are using a bootable CD). ❑ Confirm that... all cables are connected firmly. ❑ If you plugged the computer into a power strip or Uninterruptible Power Supply (UPS), make sure the power strip or UPS is turned on other troubleshooting topics, see the online VAIO® Computer User Guide. You can purchase this equipment separately. 53

VAIO User Guide (primary manual)
Page 5
...devices so that your arms and hands are several ergonomic factors to consider when you more comfortable. not angled up your computer, as the keyboard. Take occasional breaks during sessions with the Giga Pocket remote control. avoid slouching forward or leaning far backward. ...eight inches of space on both sides of you, with your whole arm to function properly. The computer's keyboard should be visible in a line-of-sight with the top of the mouse, keyboard, and other peripheral equipment. Ventilation - A footrest may strain muscles or tendons. ...
...devices so that your arms and hands are several ergonomic factors to consider when you more comfortable. not angled up your computer, as the keyboard. Take occasional breaks during sessions with the Giga Pocket remote control. avoid slouching forward or leaning far backward. ...eight inches of space on both sides of you, with your whole arm to function properly. The computer's keyboard should be visible in a line-of-sight with the top of the mouse, keyboard, and other peripheral equipment. Ventilation - A footrest may strain muscles or tendons. ...

VAIO User Guide (primary manual)
Page 6
Your computer may not be equipped with the controls, ports, and jacks that are available on your system, see the online Specifications sheet. About the Front Panel About the Side Panels About the Back Panel About the Keyboard About the Mouse ...About the Remote Control Page 6 To view the specific hardware configuration for your computer. Locating Controls And Ports This section is intended to familiarize you with all of ...
Your computer may not be equipped with the controls, ports, and jacks that are available on your system, see the online Specifications sheet. About the Front Panel About the Side Panels About the Back Panel About the Keyboard About the Mouse ...About the Remote Control Page 6 To view the specific hardware configuration for your computer. Locating Controls And Ports This section is intended to familiarize you with all of ...

VAIO User Guide (primary manual)
Page 10
...vary, depending on the software programs, operating system, and compatible i.LINK devices. Press to enable the system unit to communicate with the wireless keyboard and optical mouse. 8 Modem line jack2 Connection for the modem cable (supplied) to the wall jack. 9 i.LINK 4-pin S400 port ... with Giga P oc ket® P ers onal V ideo Rec order features . 2 A n optional "1 -to-2 " jac k adapter devic e (s plitter) is a trademark of Sony used only to your system, such as an optical or hard disk drive, confirm their operating system compatibility and required operating conditions.
...vary, depending on the software programs, operating system, and compatible i.LINK devices. Press to enable the system unit to communicate with the wireless keyboard and optical mouse. 8 Modem line jack2 Connection for the modem cable (supplied) to the wall jack. 9 i.LINK 4-pin S400 port ... with Giga P oc ket® P ers onal V ideo Rec order features . 2 A n optional "1 -to-2 " jac k adapter devic e (s plitter) is a trademark of Sony used only to your system, such as an optical or hard disk drive, confirm their operating system compatibility and required operating conditions.

VAIO User Guide (primary manual)
Page 12
... in Standby mode. The Microsoft® Windows® key, displays the Start menu. About the Keyboard Your VAIO® computer is supplied with your computer, see Connecting the Wireless Keyboard. Before attempting to clicking Start on the screen. Brightness Controls Press a button to the next.... to turn off the speaker sound. Wireless keyboard (Top) KEY Standby DESCRIPTION Press the button to place the computer in certain software programs. Pressing this key is equivalent to use the wireless keyboard with a wireless keyboard that has a standard key arrangement and additional...
... in Standby mode. The Microsoft® Windows® key, displays the Start menu. About the Keyboard Your VAIO® computer is supplied with your computer, see Connecting the Wireless Keyboard. Before attempting to clicking Start on the screen. Brightness Controls Press a button to the next.... to turn off the speaker sound. Wireless keyboard (Top) KEY Standby DESCRIPTION Press the button to place the computer in certain software programs. Pressing this key is equivalent to use the wireless keyboard with a wireless keyboard that has a standard key arrangement and additional...

VAIO User Guide (primary manual)
Page 13
... the system unit. Page 13 To set up the wireless keyboard Insert two AA batteries (supplied) into the wireless keyboard If your wireless keyboard does not operate properly, the batteries may need to be replaced. If your keyboard's battery power level by clicking (Wireless Keyboard icon), located in the Windows® taskbar notification area. Inserting...
... the system unit. Page 13 To set up the wireless keyboard Insert two AA batteries (supplied) into the wireless keyboard If your wireless keyboard does not operate properly, the batteries may need to be replaced. If your keyboard's battery power level by clicking (Wireless Keyboard icon), located in the Windows® taskbar notification area. Inserting...

VAIO User Guide (primary manual)
Page 20
For details on your system's hardware configuration, see the online specifications sheet. Connecting the Power Cord Connecting the Wireless Keyboard Connecting the Wireless Mouse Connecting the Modem Cable Turning on your Computer Registering your system quickly and easily with the instructions provided in this section. Setting Up Your Computer You can set up your Computer Page 20
For details on your system's hardware configuration, see the online specifications sheet. Connecting the Power Cord Connecting the Wireless Keyboard Connecting the Wireless Mouse Connecting the Modem Cable Turning on your Computer Registering your system quickly and easily with the instructions provided in this section. Setting Up Your Computer You can set up your Computer Page 20

VAIO User Guide (primary manual)
Page 21
...supplied power cord clamp to be plugged into the AC input port on its base and the power cord may lose data if your wireless keyboard and wireless mouse. Plug the power cord into the clam p 5. Connecting the power cord Page 21 Remove the adhesive backing from the...AC wall outlet, surge protector, or UPS. Connecting the Power Cord The computer's power cord must be turned on the back panel of the computer. 4. You may become unplugged. Your computer has the ability to avoid accidentally unplugging your computer. 1. Press the clamp firmly against the back panel near the AC ...
...supplied power cord clamp to be plugged into the AC input port on its base and the power cord may lose data if your wireless keyboard and wireless mouse. Plug the power cord into the clam p 5. Connecting the power cord Page 21 Remove the adhesive backing from the...AC wall outlet, surge protector, or UPS. Connecting the Power Cord The computer's power cord must be turned on the back panel of the computer. 4. You may become unplugged. Your computer has the ability to avoid accidentally unplugging your computer. 1. Press the clamp firmly against the back panel near the AC ...

VAIO User Guide (primary manual)
Page 23
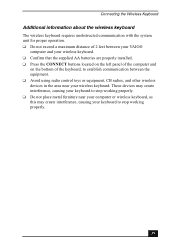
... attempting to use the wireless keyboard, you must enable communication between the computer and the keyboard. Press the CONNECT button to activate communication between the wireless keyboard and the computer Connecting the keyboard Additional information about the wireless keyboard The wireless keyboard requires unobstructed communication with a wireless keyboard. Connecting the Wireless Keyboard Your VAIO® computer is supplied with the system unit...
... attempting to use the wireless keyboard, you must enable communication between the computer and the keyboard. Press the CONNECT button to activate communication between the wireless keyboard and the computer Connecting the keyboard Additional information about the wireless keyboard The wireless keyboard requires unobstructed communication with a wireless keyboard. Connecting the Wireless Keyboard Your VAIO® computer is supplied with the system unit...


