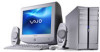
Quick Start Guide
Page 2
... of products with this product meets the ENERGY STAR® guidelines for Canadian customers: Your new VAIO computer includes certain software versions or upgrades, and Internet services or offers that effectively reduce energy consumption. Product activation procedures and privacy policies ... FOR ANY PARTICULAR PURPOSE WITH REGARD TO THIS MANUAL, THE SOFTWARE, OR SUCH OTHER INFORMATION. Sony Electronics Inc. The software described herein is prohibited. Sony, VAIO, the VAIO logo, VAIO Smart, Giga Pocket, MovieShaker, DVgate, Handycam, Memory Stick, the Memory Stick logo, Net MD...
... of products with this product meets the ENERGY STAR® guidelines for Canadian customers: Your new VAIO computer includes certain software versions or upgrades, and Internet services or offers that effectively reduce energy consumption. Product activation procedures and privacy policies ... FOR ANY PARTICULAR PURPOSE WITH REGARD TO THIS MANUAL, THE SOFTWARE, OR SUCH OTHER INFORMATION. Sony Electronics Inc. The software described herein is prohibited. Sony, VAIO, the VAIO logo, VAIO Smart, Giga Pocket, MovieShaker, DVgate, Handycam, Memory Stick, the Memory Stick logo, Net MD...
Quick Start Guide
Page 58
..., and upgrading your VAIO computer. To access the online manual: 1 Click Start in the text, "View the VAIO® Computer Specifications..." 58 You can also provide troubleshooting support, if problems occur. ❑ VAIO® Computer User Guide - This support resource offers a variety of your computer. The Quick... enabling you to set up connection to the Internet. Your computer is supplied with Sony, and establish a dial-up your hard copy guides and supplements, or by accessing the online Computer User Guide and the individual software Help files. The Quick Start...
..., and upgrading your VAIO computer. To access the online manual: 1 Click Start in the text, "View the VAIO® Computer Specifications..." 58 You can also provide troubleshooting support, if problems occur. ❑ VAIO® Computer User Guide - This support resource offers a variety of your computer. The Quick... enabling you to set up connection to the Internet. Your computer is supplied with Sony, and establish a dial-up your hard copy guides and supplements, or by accessing the online Computer User Guide and the individual software Help files. The Quick Start...
Quick Start Guide
Page 60
... telephone. You can access the Web site at http://www.sony.com/pcsupport. Sony Computing Support Web site Online help and support are available 24 hours a day, seven days a week, when you visit the Sony Computing Support Web site. VAIO Digital Studio Computer Quick Start Contacting Sony for Help and Support If the information provided with your question...
... telephone. You can access the Web site at http://www.sony.com/pcsupport. Sony Computing Support Web site Online help and support are available 24 hours a day, seven days a week, when you visit the Sony Computing Support Web site. VAIO Digital Studio Computer Quick Start Contacting Sony for Help and Support If the information provided with your question...
System Reference Manual
Page 2
... and additions to change without prior written approval. Important information for Canadian customers: Your new VAIO computer includes certain software versions or upgrades, and Internet services or offers that are subject to software may require a fee and credit...and Pentium are trademarks or registered trademarks of the Microsoft Corporation. Subscriptions to any time without written permission is subject to U.S. Sony, VAIO, the VAIO logo, VAIO Smart, Giga Pocket, MovieShaker, DVgate, Handycam, Memory Stick, the Memory Stick logo, Net MD, Network Walkman, OpenMG,...
... and additions to change without prior written approval. Important information for Canadian customers: Your new VAIO computer includes certain software versions or upgrades, and Internet services or offers that are subject to software may require a fee and credit...and Pentium are trademarks or registered trademarks of the Microsoft Corporation. Subscriptions to any time without written permission is subject to U.S. Sony, VAIO, the VAIO logo, VAIO Smart, Giga Pocket, MovieShaker, DVgate, Handycam, Memory Stick, the Memory Stick logo, Net MD, Network Walkman, OpenMG,...
System Reference Manual
Page 12
...xii VAIO Digital Studio System Reference Manual Chapter 3 - CMOS Setup Options 57 Main Screen 59 Advanced Screen 61 Power Screen 63 Boot Screen 64 Exit Screen 65 Upgrading and Maintaining Components 23 Removing the Side Panel 24 To remove the side panel (PCV-RZ series model 24 To remove the side panel (PCV-...RX series model 25 Replacing the Side Panel 26 To replace the side panel (PCV-RZ series model 26 To ...
...xii VAIO Digital Studio System Reference Manual Chapter 3 - CMOS Setup Options 57 Main Screen 59 Advanced Screen 61 Power Screen 63 Boot Screen 64 Exit Screen 65 Upgrading and Maintaining Components 23 Removing the Side Panel 24 To remove the side panel (PCV-RZ series model 24 To remove the side panel (PCV-...RX series model 25 Replacing the Side Panel 26 To replace the side panel (PCV-RZ series model 26 To ...

System Reference Manual
Page 37
Before opening the system unit, save and close all open files, exit all open applications, turn off the power to all attached peripheral devices, shut down the computer, and unplug the power cord. ✍ System configuration may not include all of the hardware features shown in the illustrations of this section. 23 Your computer may vary, depending on the model purchased. Chapter 3 Upgrading and Maintaining Components This chapter describes upgrade and maintenance procedures. !
Before opening the system unit, save and close all open files, exit all open applications, turn off the power to all attached peripheral devices, shut down the computer, and unplug the power cord. ✍ System configuration may not include all of the hardware features shown in the illustrations of this section. 23 Your computer may vary, depending on the model purchased. Chapter 3 Upgrading and Maintaining Components This chapter describes upgrade and maintenance procedures. !

System Reference Manual
Page 39
Removing the side panel (PCV-RX series model) Upgrading and Maintaining Components 25 To remove the side panel (PCV-RX series model) 1 Shut down your computer and turn off all peripheral devices, such as your printer. 2 Unplug your computer and any peripheral devices. 3 Locate the tab on the upper right side of the rear panel, and pull it back until the side panel releases. 4 Lift the side panel away from the unit and set aside.
Removing the side panel (PCV-RX series model) Upgrading and Maintaining Components 25 To remove the side panel (PCV-RX series model) 1 Shut down your computer and turn off all peripheral devices, such as your printer. 2 Unplug your computer and any peripheral devices. 3 Locate the tab on the upper right side of the rear panel, and pull it back until the side panel releases. 4 Lift the side panel away from the unit and set aside.

System Reference Manual
Page 41
Replacing the side panel (PCV-RX series model) Upgrading and Maintaining Components 27 To replace the side panel (PCV-RX series model) 1 Align the tabs on the side panel to the chassis rim. 2 Press the side panel firmly against the unit until it snaps into place.
Replacing the side panel (PCV-RX series model) Upgrading and Maintaining Components 27 To replace the side panel (PCV-RX series model) 1 Align the tabs on the side panel to the chassis rim. 2 Press the side panel firmly against the unit until it snaps into place.

System Reference Manual
Page 43
Removing the slot cover ❑ Install the add-on cards. Upgrading and Maintaining Components 29 ! You may need to temporarily remove add-on cards or other components that may be careful not to remove. When removing a slot cover, be next to the slot cover you want to damage components on the system board or add-on card by inserting it into the expansion slot and secure it with the screw from the expansion slot cover.
Removing the slot cover ❑ Install the add-on cards. Upgrading and Maintaining Components 29 ! You may need to temporarily remove add-on cards or other components that may be careful not to remove. When removing a slot cover, be next to the slot cover you want to damage components on the system board or add-on card by inserting it into the expansion slot and secure it with the screw from the expansion slot cover.

System Reference Manual
Page 45
...✍ Align the card's bracket so that the bottom of the bracket fits into the PCI slot. Upgrading and Maintaining Components 31 Installing an Add-On Card ! Use a gentle rocking motion, pressing down the computer, and unplug the power cord. 1 Remove the side panel (see "Removing the Side Panel" on... page 24). 2 Locate an available expansion slot. 3 Remove the slot cover adjacent to the selected slot (see "Removing a Slot Cover" on page 42). 4 Insert the add-on card (PCV-RX series model...
...✍ Align the card's bracket so that the bottom of the bracket fits into the PCI slot. Upgrading and Maintaining Components 31 Installing an Add-On Card ! Use a gentle rocking motion, pressing down the computer, and unplug the power cord. 1 Remove the side panel (see "Removing the Side Panel" on... page 24). 2 Locate an available expansion slot. 3 Remove the slot cover adjacent to the selected slot (see "Removing a Slot Cover" on page 42). 4 Insert the add-on card (PCV-RX series model...

System Reference Manual
Page 47
... the Side Panel" on page 24). Do not disassemble it or dispose of all attached peripheral devices, shut down the computer, and unplug the power cord. Upgrading and Maintaining Components 33 Replacing the Lithium Battery ! When you restore the BIOS settings later. 4 Select Exit Discarding Changes... time settings" appears during the reboot sequence, press F2 during the reboot process to replace the lithium battery if your computer by selecting Shut Down... Although the computer can skip all remaining steps. 3 Compare all values stored in fire. You may need to access the BIOS Setup...
... the Side Panel" on page 24). Do not disassemble it or dispose of all attached peripheral devices, shut down the computer, and unplug the power cord. Upgrading and Maintaining Components 33 Replacing the Lithium Battery ! When you restore the BIOS settings later. 4 Select Exit Discarding Changes... time settings" appears during the reboot sequence, press F2 during the reboot process to replace the lithium battery if your computer by selecting Shut Down... Although the computer can skip all remaining steps. 3 Compare all values stored in fire. You may need to access the BIOS Setup...
System Reference Manual
Page 49
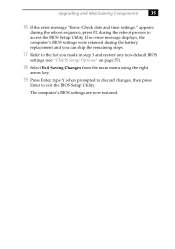
Upgrading and Maintaining Components 35 16 If the error message "Error: Check date and time settings." appears during the reboot sequence, press F2 during the battery ... menu using the right arrow key. 19 Press Enter, type Y when prompted to discard changes, then press Enter to access the BIOS Setup Utility. The computer's BIOS settings are now restored. If no error message displays, the computer's BIOS settings were retained during the reboot process to exit the BIOS Setup Utility.
Upgrading and Maintaining Components 35 16 If the error message "Error: Check date and time settings." appears during the reboot sequence, press F2 during the battery ... menu using the right arrow key. 19 Press Enter, type Y when prompted to discard changes, then press Enter to access the BIOS Setup Utility. The computer's BIOS settings are now restored. If no error message displays, the computer's BIOS settings were retained during the reboot process to exit the BIOS Setup Utility.
System Reference Manual
Page 51
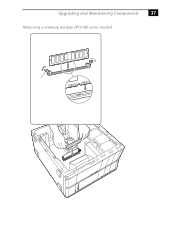
Upgrading and Maintaining Components 37 Removing a memory module (PCV-RZ series model)
Upgrading and Maintaining Components 37 Removing a memory module (PCV-RZ series model)
System Reference Manual
Page 53
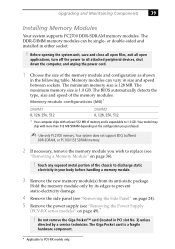
... size and speed of the chassis to PCV-RX models only. Memory module configurations (MB)* DIMM1 0, 128, 256, 512 DIMM2 0, 128, 256, 512 * Your computer ships with more than 512 MB SDRAM ...Giga Pocket card is expandable to all open files, exit all attached peripheral devices, shut down the computer, and unplug the power cord. 1 Choose the size of the memory module and configuration as shown ... 3 Remove the new memory module(s) from its edges to replace (see "Removing the Power Supply (PCV-RX series models)" on page 36). ! Touch any exposed metal portion of the memory modules. The...
... size and speed of the chassis to PCV-RX models only. Memory module configurations (MB)* DIMM1 0, 128, 256, 512 DIMM2 0, 128, 256, 512 * Your computer ships with more than 512 MB SDRAM ...Giga Pocket card is expandable to all open files, exit all attached peripheral devices, shut down the computer, and unplug the power cord. 1 Choose the size of the memory module and configuration as shown ... 3 Remove the new memory module(s) from its edges to replace (see "Removing the Power Supply (PCV-RX series models)" on page 36). ! Touch any exposed metal portion of the memory modules. The...
System Reference Manual
Page 55
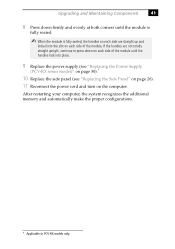
Upgrading and Maintaining Components 41 8 Press down firmly and evenly at both corners until the module is fully seated. ✍ When the module is fully seated, the handles on each side are not totally straight upright, continue to PCV-RX models only. After restarting your computer, the system recognizes the additional memory and automatically...
Upgrading and Maintaining Components 41 8 Press down firmly and evenly at both corners until the module is fully seated. ✍ When the module is fully seated, the handles on each side are not totally straight upright, continue to PCV-RX models only. After restarting your computer, the system recognizes the additional memory and automatically...

System Reference Manual
Page 57
Upgrading and Maintaining Components 43 Covering an Open I /O slot cover. This may damage some components, especially the main processor, which generates the most heat. 1 Slide the ... opening the system unit, save and close all open files, exit all open I/O slot (PCV-RX series model) 2 Push the slot cover down the computer, and unplug the power cord. If air escapes, the components inside the computer cannot be properly cooled. Covering an open applications, turn off the power to secure the...
Upgrading and Maintaining Components 43 Covering an Open I /O slot cover. This may damage some components, especially the main processor, which generates the most heat. 1 Slide the ... opening the system unit, save and close all open files, exit all open I/O slot (PCV-RX series model) 2 Push the slot cover down the computer, and unplug the power cord. If air escapes, the components inside the computer cannot be properly cooled. Covering an open applications, turn off the power to secure the...
System Reference Manual
Page 59
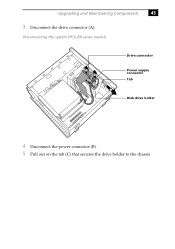
Upgrading and Maintaining Components 45 3 Disconnect the drive connector (A). Disconnecting the system (PCV-RX series model) A B C Drive connector Power supply connector Tab Disk drive holder 4 Disconnect the power connector (B). 5 Pull out on the tab (C) that secures the drive holder to the chassis.
Upgrading and Maintaining Components 45 3 Disconnect the drive connector (A). Disconnecting the system (PCV-RX series model) A B C Drive connector Power supply connector Tab Disk drive holder 4 Disconnect the power connector (B). 5 Pull out on the tab (C) that secures the drive holder to the chassis.

System Reference Manual
Page 61
Installing an internal hard disk drive (PCV-RX series model) C E B D A Drive connectors Power connectors Tab Disk drive holder 11 Connect the inner drive cable connector (B) to the first drive. 12 Connect the ... the first drive. 14 Connect the second power connector (E) to the second drive. 15 Replace the side panel (see "Replacing the Side Panel" on your computer. Upgrading and Maintaining Components 47 9 Slide the drive holder back into the chassis so that the edge of the holder is flush with the chassis. 10...
Installing an internal hard disk drive (PCV-RX series model) C E B D A Drive connectors Power connectors Tab Disk drive holder 11 Connect the inner drive cable connector (B) to the first drive. 12 Connect the ... the first drive. 14 Connect the second power connector (E) to the second drive. 15 Replace the side panel (see "Replacing the Side Panel" on your computer. Upgrading and Maintaining Components 47 9 Slide the drive holder back into the chassis so that the edge of the holder is flush with the chassis. 10...
System Reference Manual
Page 63
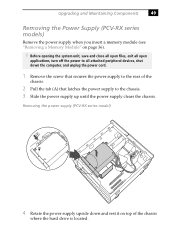
Upgrading and Maintaining Components 49 Removing the Power Supply (PCV-RX series models) Remove the power supply when you insert a memory module (see "Removing a Memory Module" on top of the chassis. 2 Pull the tab (A) that ... off the power to all attached peripheral devices, shut down and rest it on page 36). ! Removing the power supply (PCV-RX series model) A 4 Rotate the power supply upside down the computer, and unplug the power cord. 1 Remove the screw that secures the power supply to the rear of the chassis where...
Upgrading and Maintaining Components 49 Removing the Power Supply (PCV-RX series models) Remove the power supply when you insert a memory module (see "Removing a Memory Module" on top of the chassis. 2 Pull the tab (A) that ... off the power to all attached peripheral devices, shut down and rest it on page 36). ! Removing the power supply (PCV-RX series model) A 4 Rotate the power supply upside down the computer, and unplug the power cord. 1 Remove the screw that secures the power supply to the rear of the chassis where...

Online Help Center (VAIO User Guide)
Page 42
... may want to perform basic upgrades and maintenance on upgrading your computer, see your model's System Reference Manual. For more information on your VAIO computer. This section describes how to increase the functionality of your system. You can download the System Reference Manual from the Sony Web site at http://www.sony.com/pcsupport. Overview ...
... may want to perform basic upgrades and maintenance on upgrading your computer, see your model's System Reference Manual. For more information on your VAIO computer. This section describes how to increase the functionality of your system. You can download the System Reference Manual from the Sony Web site at http://www.sony.com/pcsupport. Overview ...


