Quick Start Guide
Page 2
..., IMAGES, VIDEO, OR AUDIO FROM ANY DESCRIBED WEB SITE. Sony Electronics Inc. Intel and Pentium are available to the model and serial numbers when you call your Sony VAIO® computer. registered trademark of the IBM Corporation. Owner's Record The model number and serial number are located on the back panel of the computer, and may not necessarily be transported or used outside the United States. This manual and the software...
..., IMAGES, VIDEO, OR AUDIO FROM ANY DESCRIBED WEB SITE. Sony Electronics Inc. Intel and Pentium are available to the model and serial numbers when you call your Sony VAIO® computer. registered trademark of the IBM Corporation. Owner's Record The model number and serial number are located on the back panel of the computer, and may not necessarily be transported or used outside the United States. This manual and the software...
Quick Start Guide
Page 12
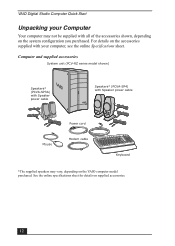
...) Speakers* (PCVA-SP3A) with Speaker power cable Speakers* (PCVA-SP4) with all of the accessories shown, depending on the system configuration you purchased. See the online specifications sheet for details on the VAIO computer model purchased. VAIO Digital Studio Computer Quick Start Unpacking your computer, see the online Specifications sheet. For details on the accessories supplied with your Computer Your computer may not be supplied with Speaker power cable Power cord Mouse Modem cable Keyboard *The supplied speakers...
...) Speakers* (PCVA-SP3A) with Speaker power cable Speakers* (PCVA-SP4) with all of the accessories shown, depending on the system configuration you purchased. See the online specifications sheet for details on the VAIO computer model purchased. VAIO Digital Studio Computer Quick Start Unpacking your computer, see the online Specifications sheet. For details on the accessories supplied with your Computer Your computer may not be supplied with Speaker power cable Power cord Mouse Modem cable Keyboard *The supplied speakers...
Quick Start Guide
Page 18
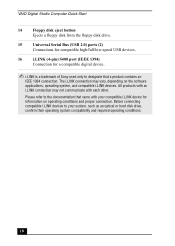
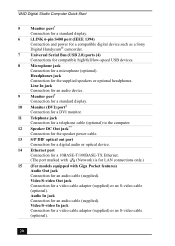
... connection. All products with your system, such as an optical or hard disk drive, confirm their operating system compatibility and required operating conditions. 18 VAIO Digital Studio Computer Quick Start 14 Floppy disk eject button Ejects a floppy disk from the floppy disk drive. 15 Universal Serial Bus (USB 2.0) ports (2) Connections for compatible high/full/low-speed USB devices. 16 i.LINK (4-pin) S400 port (IEEE 1394) Connection for information on the software applications, operating system, and compatible i.LINK devices...
... connection. All products with your system, such as an optical or hard disk drive, confirm their operating system compatibility and required operating conditions. 18 VAIO Digital Studio Computer Quick Start 14 Floppy disk eject button Ejects a floppy disk from the floppy disk drive. 15 Universal Serial Bus (USB 2.0) ports (2) Connections for compatible high/full/low-speed USB devices. 16 i.LINK (4-pin) S400 port (IEEE 1394) Connection for information on the software applications, operating system, and compatible i.LINK devices...
Quick Start Guide
Page 20
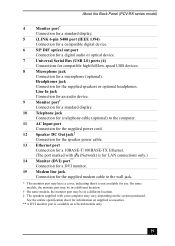
... cable (optional) to the computer. 12 Speaker DC Out jack** Connection for the speaker power cable. 13 S/P DIF optical out port Connection for a digital audio or optical device. 14 Ethernet port Connection for a 10BASE-T/100BASE-TX Ethernet. (The port marked with (Network) is for LAN connections only.) 15 (For models equipped with Giga Pocket features) Audio Out jack Connection for a video cable adapter (supplied) or an S-video cable (optional). 20 Video/S-video In jack Connection for an audio cable (supplied). Video/S-video Out jack Connection for the supplied speakers or optional...
... cable (optional) to the computer. 12 Speaker DC Out jack** Connection for the speaker power cable. 13 S/P DIF optical out port Connection for a digital audio or optical device. 14 Ethernet port Connection for a 10BASE-T/100BASE-TX Ethernet. (The port marked with (Network) is for LAN connections only.) 15 (For models equipped with Giga Pocket features) Audio Out jack Connection for a video cable adapter (supplied) or an S-video cable (optional). 20 Video/S-video In jack Connection for an audio cable (supplied). Video/S-video Out jack Connection for the supplied speakers or optional...
Quick Start Guide
Page 23
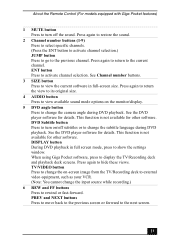
... software. Press again to restore the sound. 2 Channel number buttons (1-9) Press to select specific channels. (Press the ENT button to activate channel selection.) JUMP button Press to go to activate channel selection. Press again to turn on -screen image from the TV/Recording deck to external video equipment, such as your VCR. (Note: You cannot change the subtitle language during DVD playback. About the Remote Control (For models...
... software. Press again to restore the sound. 2 Channel number buttons (1-9) Press to select specific channels. (Press the ENT button to activate channel selection.) JUMP button Press to go to activate channel selection. Press again to turn on -screen image from the TV/Recording deck to external video equipment, such as your VCR. (Note: You cannot change the subtitle language during DVD playback. About the Remote Control (For models...
Quick Start Guide
Page 29
... speaker power cable. 13 Ethernet port Connection for a 10BASE-T/100BASE-TX Ethernet. (The port marked with your computer may have a cover, indicating that it is not available for a telephone cable (optional) to the wall jack. * This monitor port may vary, depending on selected models only. 29 Line In jack Connection for an audio device. 9 Monitor port† Connection for a standard display. 10 Telephone jack Connection for use. About the Back Panel (PCV-RX series model) 4 Monitor port* Connection for a standard display. 5 i.LINK 6-pin...
... speaker power cable. 13 Ethernet port Connection for a 10BASE-T/100BASE-TX Ethernet. (The port marked with your computer may have a cover, indicating that it is not available for a telephone cable (optional) to the wall jack. * This monitor port may vary, depending on selected models only. 29 Line In jack Connection for an audio device. 9 Monitor port† Connection for a standard display. 10 Telephone jack Connection for use. About the Back Panel (PCV-RX series model) 4 Monitor port* Connection for a standard display. 5 i.LINK 6-pin...
Quick Start Guide
Page 32
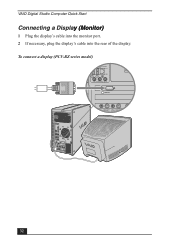
VAIO Digital Studio Computer Quick Start Connecting a Display (Monitor) 1 Plug the display's cable into the monitor port. 2 If necessary, plug the display's cable into the rear of the display. To connect a display (PCV-RZ series model) 32
VAIO Digital Studio Computer Quick Start Connecting a Display (Monitor) 1 Plug the display's cable into the monitor port. 2 If necessary, plug the display's cable into the rear of the display. To connect a display (PCV-RZ series model) 32
Quick Start Guide
Page 54
... a yellow question mark. The VAIO welcome window appears. The System Properties dialog box appears. 3 From the Hardware tab, click the Device Manager button. 4 Right-click to select the unknown device* or the device that requires the driver installation and click Update Driver from the optical drive, click Start in the next section to access the Windows® desktop. 2 Insert Application Recovery CD #1 into the optical disc drive. A shortcut menu appears. 4 Click Properties. A shortcut...
... a yellow question mark. The VAIO welcome window appears. The System Properties dialog box appears. 3 From the Hardware tab, click the Device Manager button. 4 Right-click to select the unknown device* or the device that requires the driver installation and click Update Driver from the optical drive, click Start in the next section to access the Windows® desktop. 2 Insert Application Recovery CD #1 into the optical disc drive. A shortcut menu appears. 4 Click Properties. A shortcut...

Online Help Center (VAIO User Guide)
Page 19
... back panel locate and identify the ports and jacks on your computer contains the ports for a compatible digital device. 6 S/P DIF optical out port Page 19 About the Back Panel (PCV-RX series model) The back panel of your computer. RX series m odel) 1 Mouse port Connection for a PS/2® mouse. 2 Keyboard port Connection for a PS/2 Keyboard. 3 Printer port Connection for a parallel device, such as a printer or scanner. 4 Monitor port1 Connection for a standard display. 5 i.LINK 6-pin S400 port (IEEE 1394) Connection for supplied and optional accessories...
... back panel locate and identify the ports and jacks on your computer contains the ports for a compatible digital device. 6 S/P DIF optical out port Page 19 About the Back Panel (PCV-RX series model) The back panel of your computer. RX series m odel) 1 Mouse port Connection for a PS/2® mouse. 2 Keyboard port Connection for a PS/2 Keyboard. 3 Printer port Connection for a parallel device, such as a printer or scanner. 4 Monitor port1 Connection for a standard display. 5 i.LINK 6-pin S400 port (IEEE 1394) Connection for supplied and optional accessories...

Online Help Center (VAIO User Guide)
Page 22
Setting Up Your Computer Your computer may not be equipped with all of these hardware features and the location of the controls, ports, and jacks may vary from the illustrations shown in this section. See the online specifications sheet for your system's hardware configuration. Connecting a Display (Monitor) Connecting the Speakers Connecting the Keyboard and Mouse Connecting the Power Cords Turning On your Computer Page 22
Setting Up Your Computer Your computer may not be equipped with all of these hardware features and the location of the controls, ports, and jacks may vary from the illustrations shown in this section. See the online specifications sheet for your system's hardware configuration. Connecting a Display (Monitor) Connecting the Speakers Connecting the Keyboard and Mouse Connecting the Power Cords Turning On your Computer Page 22

Online Help Center (VAIO User Guide)
Page 50
...add-on cards you may have removed. Replace the side panel. See About the Side Panel. The end latches snap into position. 2. Rotate the power supply unit to its original position and slide it into the chassis until the tab snaps into position, holding the module in place. To avoid damaging a memory module slot..., move the end latches slightly outward to the chassis. 10. To Reinstall the power supply (for PCV-RX series models only) 1. Replace the screw that secures the power supply to relieve pressure. Press down evenly against the...
...add-on cards you may have removed. Replace the side panel. See About the Side Panel. The end latches snap into position. 2. Rotate the power supply unit to its original position and slide it into the chassis until the tab snaps into position, holding the module in place. To avoid damaging a memory module slot..., move the end latches slightly outward to the chassis. 10. To Reinstall the power supply (for PCV-RX series models only) 1. Replace the screw that secures the power supply to relieve pressure. Press down evenly against the...
Online Help Center (VAIO User Guide)
Page 51
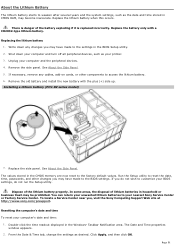
... to the settings in the BIOS Setup utility. 2. Page 51 See About the Side Panel. To locate a Service Center near you may have made to the BIOS settings. Double-click the time readout displayed in the CMOS memory are now reset to the factory default values. Replace the lithium battery when this occurs. Replace the battery only with the plus (+) side up. Remove the old battery and install the new battery with a CR2032-type lithium battery. Click...
... to the settings in the BIOS Setup utility. 2. Page 51 See About the Side Panel. To locate a Service Center near you may have made to the BIOS settings. Double-click the time readout displayed in the CMOS memory are now reset to the factory default values. Replace the lithium battery when this occurs. Replace the battery only with the plus (+) side up. Remove the old battery and install the new battery with a CR2032-type lithium battery. Click...
Online Help Center (VAIO User Guide)
Page 52
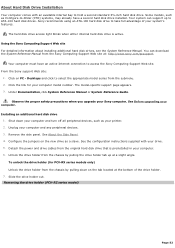
... active Internet connection to select the appropriate model series from the original hard disk drive that is active. Configure the jumpers on PC - Observe the proper safety precautions when you upgrade your computer and any peripheral devices. 3. Using the Sony Computing Support Web site For detailed information about installing additional hard disk drives, see the System Reference Manual. See About the Side Panel. 4. See the configuration instructions supplied with an available internal bay to ATA-100 hard disk drives...
... active Internet connection to select the appropriate model series from the original hard disk drive that is active. Configure the jumpers on PC - Observe the proper safety precautions when you upgrade your computer and any peripheral devices. 3. Using the Sony Computing Support Web site For detailed information about installing additional hard disk drives, see the System Reference Manual. See About the Side Panel. 4. See the configuration instructions supplied with an available internal bay to ATA-100 hard disk drives...

Online Help Center (VAIO User Guide)
Page 54
... instructions supplied with pin 1 on the new drive. 14. Reconnect the power and drive cables to align pin 1 on the red side of the ribbon cable with the drive. Orient the connector to the original hard disk drive. 13. See About the Side Panel. 16. Click Start in Windows NT file system (NTFS) format. 1. The Computer Management window appears. 4. Replacing the driv e holder (PCV- Reconnect the power cord to the new drive. Page 54 Connect the second drive connector...
... instructions supplied with pin 1 on the new drive. 14. Reconnect the power and drive cables to align pin 1 on the red side of the ribbon cable with the drive. Orient the connector to the original hard disk drive. 13. See About the Side Panel. 16. Click Start in Windows NT file system (NTFS) format. 1. The Computer Management window appears. 4. Replacing the driv e holder (PCV- Reconnect the power cord to the new drive. Page 54 Connect the second drive connector...
Online Help Center (VAIO User Guide)
Page 62
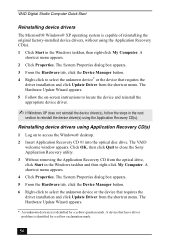
... device driver(s) using the Application Recovery CD(s). 1. Follow the on-screen instructions to select the unknown device1 or the device that has a driver problem is identified by a yellow exc lamation mark. The System Properties dialog box appears. 3. A devic e that requires the driver installation and click Update Driver from the shortcut menu. Reinstalling device drivers The Microsoft® Windows® XP operating system is capable of reinstalling the original factory-installed device drivers, without using...
... device driver(s) using the Application Recovery CD(s). 1. Follow the on-screen instructions to select the unknown device1 or the device that has a driver problem is identified by a yellow exc lamation mark. The System Properties dialog box appears. 3. A devic e that requires the driver installation and click Update Driver from the shortcut menu. Reinstalling device drivers The Microsoft® Windows® XP operating system is capable of reinstalling the original factory-installed device drivers, without using...

Online Help Center (VAIO User Guide)
Page 63
... seconds, and turn on the software application or driver you want to select the option, Install from the optical drive. 15. Page 63 A shortcut menu appears. 4. Click to restore. Click OK to return to close the Sony Application Recovery utility. 3. Click Finish and remove the Application Recovery CD from a list or specific location (Advanced). Select the check box for the device you wish to open the drivers folder and click...
... seconds, and turn on the software application or driver you want to select the option, Install from the optical drive. 15. Page 63 A shortcut menu appears. 4. Click to restore. Click OK to return to close the Sony Application Recovery utility. 3. Click Finish and remove the Application Recovery CD from a list or specific location (Advanced). Select the check box for the device you wish to open the drivers folder and click...

Online Help Center (VAIO User Guide)
Page 66
... Port Mode and press Enter. Why is placed over its location. 1. You can change the parallel port2 type using the directional arrow keys. 6. For information on the taskbar and select Properties from the Setup Utility screen. 4. To access the online User Guide: 1. Click Start in the Windows taskbar and then select Control Panel. 2. Change the Screen resolution and Color quality to Save and Exit. Click Start in the Windows taskbar and select Turn...
... Port Mode and press Enter. Why is placed over its location. 1. You can change the parallel port2 type using the directional arrow keys. 6. For information on the taskbar and select Properties from the Setup Utility screen. 4. To access the online User Guide: 1. Click Start in the Windows taskbar and then select Control Panel. 2. Change the Screen resolution and Color quality to Save and Exit. Click Start in the Windows taskbar and select Turn...

Online Help Center (VAIO User Guide)
Page 68
... or DVD media? To access SonicStage software Help 1. To Use the System Restore Wizard 1. You can play music on your system or create a custom restore point. Click Start in the Windows® taskbar and click Help and Support. About Software Your computer may vary, depending on the hardware configuration purchased. Under Pick a Help topic, click Performance and maintenance. 3. Under Pick a task, click Run the System Restore Wizard...
... or DVD media? To access SonicStage software Help 1. To Use the System Restore Wizard 1. You can play music on your system or create a custom restore point. Click Start in the Windows® taskbar and click Help and Support. About Software Your computer may vary, depending on the hardware configuration purchased. Under Pick a Help topic, click Performance and maintenance. 3. Under Pick a task, click Run the System Restore Wizard...
Online Help Center (VAIO User Guide)
Page 77
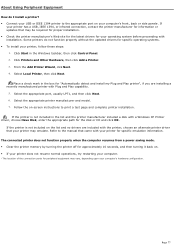
... the latest drivers for your c omputer's hardware c onfiguration. The connected printer does not function properly when the computer resumes from a power saving mode. Clear the printer memory by turning the printer off for approximately 10 seconds, and then turning it back on -screen instructions to the manual that may vary, depending upon your operating system before proceeding with a Windows XP Printer driver, choose Have Disk, enter the...
... the latest drivers for your c omputer's hardware c onfiguration. The connected printer does not function properly when the computer resumes from a power saving mode. Clear the printer memory by turning the printer off for approximately 10 seconds, and then turning it back on -screen instructions to the manual that may vary, depending upon your operating system before proceeding with a Windows XP Printer driver, choose Have Disk, enter the...
Online Help Center (VAIO User Guide)
Page 85
... User Guide provides information about configuring, maintaining, and upgrading your VAIO computer. Specifications - Preinstalled software Help files - Click Start in the Windows taskbar and point to set up connection to quickly view specific information using context-sensitive search features. The Help file appears. 1 Y ou c an loc ate the online H elp for Sony s oftware applic ations by pointing to use the software and locate troubleshooting support, should problems occur. To access the online manual...
... User Guide provides information about configuring, maintaining, and upgrading your VAIO computer. Specifications - Preinstalled software Help files - Click Start in the Windows taskbar and point to set up connection to quickly view specific information using context-sensitive search features. The Help file appears. 1 Y ou c an loc ate the online H elp for Sony s oftware applic ations by pointing to use the software and locate troubleshooting support, should problems occur. To access the online manual...


