Quick Start Guide
Page 3
Contents Getting Started 5 Unpacking Your Computer 6 Planning An Ergonomic Work Space 8 Locating Controls And Ports 9 About The Front Panel 10 About The Back Panel 12 Setting Up Your Computer 15 Connecting A Display (Monitor 16 Connecting The Speakers 17 Connecting The Keyboard And Mouse 19 Connecting The Telephone And Modem Cables......20 Connecting The Power Cord(s 21 Turning On Your Computer 22 Registering Your Computer 23 Setting Up Your Dial-up Connection 24 Turning Off Your Computer 27 3
Contents Getting Started 5 Unpacking Your Computer 6 Planning An Ergonomic Work Space 8 Locating Controls And Ports 9 About The Front Panel 10 About The Back Panel 12 Setting Up Your Computer 15 Connecting A Display (Monitor 16 Connecting The Speakers 17 Connecting The Keyboard And Mouse 19 Connecting The Telephone And Modem Cables......20 Connecting The Power Cord(s 21 Turning On Your Computer 22 Registering Your Computer 23 Setting Up Your Dial-up Connection 24 Turning Off Your Computer 27 3
Quick Start Guide
Page 6
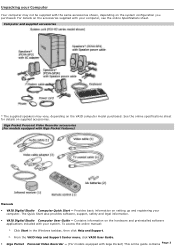
VAIO Digital Studio Computer Quick Start Unpacking Your Computer Your computer may vary, depending on supplied accessories. 6 For details on the system configuration you purchased. See the online specifications sheet for details on the VAIO computer model purchased. Computer and supplied accessories System Unit Speakers* (PCVA-SP3) with AC Adapter Speakers* (PCVA-SP3A) with Speaker Power Cable Modem Cable Keyboard Mouse Power Cord * The supplied speakers may not be supplied with all of the accessories shown, depending...
VAIO Digital Studio Computer Quick Start Unpacking Your Computer Your computer may vary, depending on supplied accessories. 6 For details on the system configuration you purchased. See the online specifications sheet for details on the VAIO computer model purchased. Computer and supplied accessories System Unit Speakers* (PCVA-SP3) with AC Adapter Speakers* (PCVA-SP3A) with Speaker Power Cable Modem Cable Keyboard Mouse Power Cord * The supplied speakers may not be supplied with all of the accessories shown, depending...

Quick Start Guide
Page 11
... mode. 8 i.LINK 4-pin port (IEEE 1394) Connection for a compatible digital device. 9 Optical drive 1 eject button Ejects a disc from Optical drive 1. 10 Optical drive 2 eject button Ejects a disc from Optical drive 2. 11 Memory Stick® media slot Reads and writes data from and to a Memory Stick media. 12 Floppy disk eject button Ejects a floppy disk. 13 Universal Serial Bus (USB) 2.0 ports (4) High-speed connections for compatible USB devices. ✍ For your convenience, your computer includes USB and i.LINK ports on both the front and back panels. The 4-pin...
... mode. 8 i.LINK 4-pin port (IEEE 1394) Connection for a compatible digital device. 9 Optical drive 1 eject button Ejects a disc from Optical drive 1. 10 Optical drive 2 eject button Ejects a disc from Optical drive 2. 11 Memory Stick® media slot Reads and writes data from and to a Memory Stick media. 12 Floppy disk eject button Ejects a floppy disk. 13 Universal Serial Bus (USB) 2.0 ports (4) High-speed connections for compatible USB devices. ✍ For your convenience, your computer includes USB and i.LINK ports on both the front and back panels. The 4-pin...
Quick Start Guide
Page 13
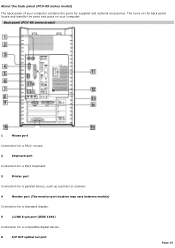
... Ethernet. (The port marked with (Network) is for LAN connections only.) 14 Monitor (DVI) port (DVI port is not available on all models) Connection for a DVI monitor. 15 Modem line jack Connection for the supplied modem cable to the wall jack. * The speaker model supplied with your computer may vary between models) Connection for a standard display. 5 i.LINK 6-pin port (IEEE 1394) Connection for a compatible digital device. 6 S/P DIF optical out port Connection for a digital audio or optical device. 7 Universal Serial Bus 2.0 (USB) ports (4) Connection for compatible USB devices...
... Ethernet. (The port marked with (Network) is for LAN connections only.) 14 Monitor (DVI) port (DVI port is not available on all models) Connection for a DVI monitor. 15 Modem line jack Connection for the supplied modem cable to the wall jack. * The speaker model supplied with your computer may vary between models) Connection for a standard display. 5 i.LINK 6-pin port (IEEE 1394) Connection for a compatible digital device. 6 S/P DIF optical out port Connection for a digital audio or optical device. 7 Universal Serial Bus 2.0 (USB) ports (4) Connection for compatible USB devices...
Quick Start Guide
Page 34
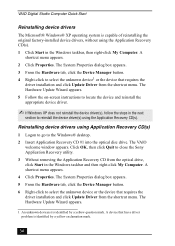
... Device Manager button. 4 Right-click to the Windows® desktop. 2 Insert Application Recovery CD #1 into the optical disc drive. Reinstalling device drivers using Application Recovery CD(s) 1 Logon to go to select the unknown device1 or the device that requires the driver installation and click Update Driver from the shortcut menu. The VAIO welcome window appears. The Hardware Update Wizard appears. 1 An unknown device(s) is capable of reinstalling the original factory-installed device drivers, without using the Application Recovery CD(s). A shortcut menu...
... Device Manager button. 4 Right-click to the Windows® desktop. 2 Insert Application Recovery CD #1 into the optical disc drive. Reinstalling device drivers using Application Recovery CD(s) 1 Logon to go to select the unknown device1 or the device that requires the driver installation and click Update Driver from the shortcut menu. The VAIO welcome window appears. The Hardware Update Wizard appears. 1 An unknown device(s) is capable of reinstalling the original factory-installed device drivers, without using the Application Recovery CD(s). A shortcut menu...

Quick Start Guide
Page 40
...; Increasing the system memory may also help. How do I /O Device Configuration and press Enter. 5 Use the arrow keys to highlight Parallel Port Mode and press Enter. ✍ You can change the parallel port type to Save and Exit. 40 Select Restart. 2 When the Sony screen displays, press the F2 key on installing memory, please see the online VAIO User Guide. VAIO Digital Studio Computer Quick Start Why is my system running slowly? ❑ The system...
...; Increasing the system memory may also help. How do I /O Device Configuration and press Enter. 5 Use the arrow keys to highlight Parallel Port Mode and press Enter. ✍ You can change the parallel port type to Save and Exit. 40 Select Restart. 2 When the Sony screen displays, press the F2 key on installing memory, please see the online VAIO User Guide. VAIO Digital Studio Computer Quick Start Why is my system running slowly? ❑ The system...
Quick Start Guide
Page 47
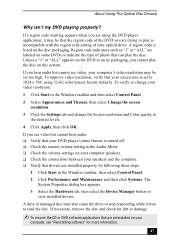
... settings on your computer speakers. ❑ Check the connections between your speakers and the computer. ❑ Verify that are installed properly, by following these steps: 1 Click Start in the Windows taskbar, then select Control Panel. 2 Click Performance and Maintenance and then click Systems. The System Properties dialog box appears. 3 Select the Hardware tab, then select the Device Manager button to play the disc on your computer, see video, your screen...
... settings on your computer speakers. ❑ Check the connections between your speakers and the computer. ❑ Verify that are installed properly, by following these steps: 1 Click Start in the Windows taskbar, then select Control Panel. 2 Click Performance and Maintenance and then click Systems. The System Properties dialog box appears. 3 Select the Hardware tab, then select the Device Manager button to play the disc on your computer, see video, your screen...
Quick Start Guide
Page 56
... came with a Windows XP Printer driver, choose Have Disk, enter the appropriate path for the disk or CD and click OK. Some printers do not function properly without the updated drivers for specific emulation information. 56 Refer to the manual that your printer for specific operating systems. ✍ If the printer is not included on the list and no drivers are included with installation.
... came with a Windows XP Printer driver, choose Have Disk, enter the appropriate path for the disk or CD and click OK. Some printers do not function properly without the updated drivers for specific emulation information. 56 Refer to the manual that your printer for specific operating systems. ✍ If the printer is not included on the list and no drivers are included with installation.
Quick Start Guide
Page 58
... Support Center, click VAIO User Guide. 3 Click Welcome from the menu displayed in the right frame. 4 Locate the link in the Windows® taskbar 2 Click Help and Support. The Quick Start can view your computer quickly and easily. This support resource offers a variety of installed memory, identify optical drive specifications, and more. Your computer is provided with Sony, and establish a dial-up your system's processor speed, determine the amount of available topics, enabling...
... Support Center, click VAIO User Guide. 3 Click Welcome from the menu displayed in the right frame. 4 Locate the link in the Windows® taskbar 2 Click Help and Support. The Quick Start can view your computer quickly and easily. This support resource offers a variety of installed memory, identify optical drive specifications, and more. Your computer is provided with Sony, and establish a dial-up your system's processor speed, determine the amount of available topics, enabling...

Quick Start Guide
Page 74
... Modem 50 Mouse 53 Optical Disk Drive(s) 46 Preinstalled software 49 Speakers 49 Using peripheral devices 55 Floppy disk drive 10 Front Panel 10 H Headphones jack 13 Help and support 57 I i.LINK (4-pin) port 11 (6-pin) port 13 Internet connecting to 24 K keyboard connecting 19 port 12 troubleshooting 54 L left-hand settings for the mouse 54 Lighting workspace planning 8 Limited warranty 23 Line In jack 13 lithium battery disposal 71 safety precautions 71 M Memory Stick slot 11 Microphone...
... Modem 50 Mouse 53 Optical Disk Drive(s) 46 Preinstalled software 49 Speakers 49 Using peripheral devices 55 Floppy disk drive 10 Front Panel 10 H Headphones jack 13 Help and support 57 I i.LINK (4-pin) port 11 (6-pin) port 13 Internet connecting to 24 K keyboard connecting 19 port 12 troubleshooting 54 L left-hand settings for the mouse 54 Lighting workspace planning 8 Limited warranty 23 Line In jack 13 lithium battery disposal 71 safety precautions 71 M Memory Stick slot 11 Microphone...
Online Help Center
Page 3
... software, support, safety and legal information. VAIO Digital Studio Com puter User Guide - Click Start in the Windows taskbar, then click Help and Support. 2. Com puter and supplied accessories * The supplied speakers may not be supplied with your computer, see the online Specifications sheet. To access the online manual: 1. Unpacking your Computer Your computer may vary, depending on the VAIO computer model purchased. See the online specifications sheet for details on setting...
... software, support, safety and legal information. VAIO Digital Studio Com puter User Guide - Click Start in the Windows taskbar, then click Help and Support. 2. Com puter and supplied accessories * The supplied speakers may not be supplied with your computer, see the online Specifications sheet. To access the online manual: 1. Unpacking your Computer Your computer may vary, depending on the VAIO computer model purchased. See the online specifications sheet for details on setting...
Online Help Center
Page 15
RX series m odel) 1 Mouse port Connection for a PS/2® mouse. 2 Keyboard port Connection for a PS/2 Keyboard. 3 Printer port Connection for a parallel device, such as a printer or scanner. 4 Monitor port (The monitor port location may vary between models) Connection for a standard display. 5 i.LINK 6-pin port (IEEE 1394) Connection for supplied and optional accessories. About the back panel (PCV-RX series model) The back panel of your computer. The icons on the back panel locate and identify the ports and jacks on your computer contains the ports for a compatible...
RX series m odel) 1 Mouse port Connection for a PS/2® mouse. 2 Keyboard port Connection for a PS/2 Keyboard. 3 Printer port Connection for a parallel device, such as a printer or scanner. 4 Monitor port (The monitor port location may vary between models) Connection for a standard display. 5 i.LINK 6-pin port (IEEE 1394) Connection for supplied and optional accessories. About the back panel (PCV-RX series model) The back panel of your computer. The icons on the back panel locate and identify the ports and jacks on your computer contains the ports for a compatible...

Online Help Center
Page 54
... configuration you add or remove the memory in a static-free bag. Push down your computer and turn off all peripheral devices, such as your local retailer. Rem ov ing/Installing m em ory (PCV- RZ series m odel) Page 54 To remove memory 1. Shut down on the latches located on its side. For memory replacement or upgrades, use only 2.5 V, 64-bit, PC2100 DDR-SDRAM Dual Inline Memory Modules (DIMM). See Removing the Side Panel...
... configuration you add or remove the memory in a static-free bag. Push down your computer and turn off all peripheral devices, such as your local retailer. Rem ov ing/Installing m em ory (PCV- RZ series m odel) Page 54 To remove memory 1. Shut down on the latches located on its side. For memory replacement or upgrades, use only 2.5 V, 64-bit, PC2100 DDR-SDRAM Dual Inline Memory Modules (DIMM). See Removing the Side Panel...

Online Help Center
Page 56
To avoid damaging a DIMM slot, move the end latches slightly outward to the chassis. 13. Reinstall the power supply by following these steps: 1. Replace the side panel. Reinstall any components or add-on cards you may have removed. 12. Press down evenly against the DIMM's upper corners. See Replacing the Side Panel. The end latches snap into place. 11. The module...
To avoid damaging a DIMM slot, move the end latches slightly outward to the chassis. 13. Reinstall the power supply by following these steps: 1. Replace the side panel. Reinstall any components or add-on cards you may have removed. 12. Press down evenly against the DIMM's upper corners. See Replacing the Side Panel. The end latches snap into place. 11. The module...
Online Help Center
Page 57
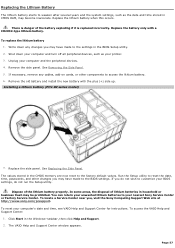
.... 3. Installing a lithium battery (PCV- To locate a Service Center near you may be prohibited. The VAIO Help and Support Center window appears. See Replacing the Side Panel. Replace the lithium battery when this occurs. Unplug your computer's date and time, see VAIO Help and Support Center for instructions. In some areas, the disposal of lithium batteries in the CMOS memory are now reset to customize your BIOS settings, do not run the Setup utility. You can return your nearest Sony Service Center...
.... 3. Installing a lithium battery (PCV- To locate a Service Center near you may be prohibited. The VAIO Help and Support Center window appears. See Replacing the Side Panel. Replace the lithium battery when this occurs. Unplug your computer's date and time, see VAIO Help and Support Center for instructions. In some areas, the disposal of lithium batteries in the CMOS memory are now reset to customize your BIOS settings, do not run the Setup utility. You can return your nearest Sony Service Center...
Online Help Center
Page 58
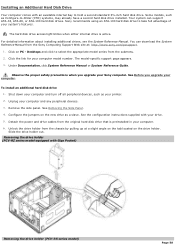
... driv e holder (PCV- See Removing the Side Panel. 4. RZ series m odel equipped with your system's features. Detach the power and drive cables from the original hard disk drive that is active. Some models, such as your computer model number. Your system can download the System Reference Manual from the Sony Computing Support Web site at a slight angle on the tab located on the drive holder. The model-specific support page appears. 3. Desktops and click to...
... driv e holder (PCV- See Removing the Side Panel. 4. RZ series m odel equipped with your system's features. Detach the power and drive cables from the original hard disk drive that is active. Some models, such as your computer model number. Your system can download the System Reference Manual from the Sony Computing Support Web site at a slight angle on the tab located on the drive holder. The model-specific support page appears. 3. Desktops and click to...

Online Help Center
Page 68
... My Computer. Page 68 Reinstalling device drivers The Microsoft® Windows® XP operating system is capable of reinstalling the original factory-installed device drivers, without using the Application Recovery CD(s). 1 A n unknown devic e(s ) is identified by a yellow ques tion mark. From the Hardware tab, click the Device Manager button. 4. Click Start in the next section to reinstall the device driver(s) using the Application Recovery CD(s). 1. A shortcut menu appears. 2. Right-click to locate the device...
... My Computer. Page 68 Reinstalling device drivers The Microsoft® Windows® XP operating system is capable of reinstalling the original factory-installed device drivers, without using the Application Recovery CD(s). 1 A n unknown devic e(s ) is identified by a yellow ques tion mark. From the Hardware tab, click the Device Manager button. 4. Click Start in the next section to reinstall the device driver(s) using the Application Recovery CD(s). 1. A shortcut menu appears. 2. Right-click to locate the device...

Online Help Center
Page 69
... Application Recovery CD #1 into the optical disc drive. Click Finish and remove the Application Recovery CD from the optical drive. 15. Select the check box for Include this location in the Windows taskbar, select Turn Off Computer. A shortcut menu appears. 4. Reinstalling device drivers using Application Recovery CD(s) 1. The System Properties dialog box appears. 5. The Hardware Update Wizard appears. 7. Navigate to the optical drive and click to cancel the option, Search removable media (floppy, CD-ROM...). 9.
... Application Recovery CD #1 into the optical disc drive. Click Finish and remove the Application Recovery CD from the optical drive. 15. Select the check box for Include this location in the Windows taskbar, select Turn Off Computer. A shortcut menu appears. 4. Reinstalling device drivers using Application Recovery CD(s) 1. The System Properties dialog box appears. 5. The Hardware Update Wizard appears. 7. Navigate to the optical drive and click to cancel the option, Search removable media (floppy, CD-ROM...). 9.
Online Help Center
Page 106
... installing a recently manufactured printer with Plug and Play capability. 5. Click Start in the box for your operating system before proceeding with a Windows XP Printer driver, choose Have Disk, enter the appropriate path for specific emulation information. Select the appropriate printer manufacturer and model. 7. Page 106 Refer to print a test page and complete printer installation. How do not function properly without the updated drivers for specific operating...
... installing a recently manufactured printer with Plug and Play capability. 5. Click Start in the box for your operating system before proceeding with a Windows XP Printer driver, choose Have Disk, enter the appropriate path for specific emulation information. Select the appropriate printer manufacturer and model. 7. Page 106 Refer to print a test page and complete printer installation. How do not function properly without the updated drivers for specific operating...
Online Help Center
Page 116
...a variety of installed memory, identify optical drive specifications, and more. To access the online User Guide: 1. Click VAIO User Guide. Specifications - You can also provide troubleshooting support, if problems occur. VAIO Computer User Guide - From the VAIO Help and Support Center, click VAIO User Guide. 3. Click Start in the Windows® taskbar 2. Click the desired software application.3 The software's main window appears. 3. The online User Guide1 provides information about configuring, maintaining, and upgrading your VAIO computer. Click Start in the...
...a variety of installed memory, identify optical drive specifications, and more. To access the online User Guide: 1. Click VAIO User Guide. Specifications - You can also provide troubleshooting support, if problems occur. VAIO Computer User Guide - From the VAIO Help and Support Center, click VAIO User Guide. 3. Click Start in the Windows® taskbar 2. Click the desired software application.3 The software's main window appears. 3. The online User Guide1 provides information about configuring, maintaining, and upgrading your VAIO computer. Click Start in the...


