Online Help Center
Page 7
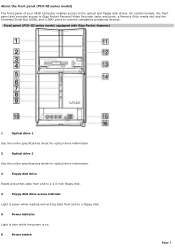
... series model) The front panel of your VAIO Computer enables access to connect compatible peripheral devices. Front panel (PCV- On certain models, the front panel also provides access to Giga Pocket Personal Video Recorder jacks and ports, a Memory Stick media slot and the Universal Serial Bus (USB), and i.LINK® ports to the optical...
... series model) The front panel of your VAIO Computer enables access to connect compatible peripheral devices. Front panel (PCV- On certain models, the front panel also provides access to Giga Pocket Personal Video Recorder jacks and ports, a Memory Stick media slot and the Universal Serial Bus (USB), and i.LINK® ports to the optical...

Online Help Center
Page 8
... and off. 7 Stand by indicator Light is red when the computer is placed in Stand by mode. 8 Optical drive access indicator Light is amber while reading and writing data from and to the hard disk. 10 (... Optical drive 1 eject button Ejects a disc from Optical drive 1. 12 Optical drive 2 eject button Ejects a disc from Optical drive 2. 13 Memory Stick media slot Reads and writes data from and to a Memory Stick® media. 14 Floppy disk eject button Ejects a floppy disk from and to the optical drives. 9 Hard disk drive...
... and off. 7 Stand by indicator Light is red when the computer is placed in Stand by mode. 8 Optical drive access indicator Light is amber while reading and writing data from and to the hard disk. 10 (... Optical drive 1 eject button Ejects a disc from Optical drive 1. 12 Optical drive 2 eject button Ejects a disc from Optical drive 2. 13 Memory Stick media slot Reads and writes data from and to a Memory Stick® media. 14 Floppy disk eject button Ejects a floppy disk from and to the optical drives. 9 Hard disk drive...
Online Help Center
Page 10
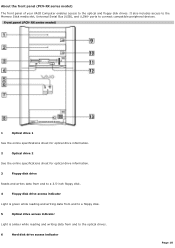
... series model) The front panel of your VAIO Computer enables access to connect compatible peripheral devices. It also includes access to the Memory Stick media slot, Universal Serial Bus (USB), and i.LINK® ports to the optical and floppy disk drives. Front panel (PCV- RX series m odel) 1 Optical drive 1 See the online specifications sheet...
... series model) The front panel of your VAIO Computer enables access to connect compatible peripheral devices. It also includes access to the Memory Stick media slot, Universal Serial Bus (USB), and i.LINK® ports to the optical and floppy disk drives. Front panel (PCV- RX series m odel) 1 Optical drive 1 See the online specifications sheet...

Online Help Center
Page 11
... button Ejects a disc from Optical drive 1. 10 Optical drive 2 eject button Ejects a disc from Optical drive 2. 11 Memory Stick® media slot Reads and writes data from and to a Memory Stick media. 12 Floppy disk eject button Ejects a floppy disk. 13 Universal Serial Bus (USB) 2.0 ports (4) High-...speed connections for compatible USB devices. The indicator light is blue while the power is on and amber when the computer is amber while reading ...
... button Ejects a disc from Optical drive 1. 10 Optical drive 2 eject button Ejects a disc from Optical drive 2. 11 Memory Stick® media slot Reads and writes data from and to a Memory Stick media. 12 Floppy disk eject button Ejects a floppy disk. 13 Universal Serial Bus (USB) 2.0 ports (4) High-...speed connections for compatible USB devices. The indicator light is blue while the power is on and amber when the computer is amber while reading ...
Online Help Center
Page 34
... Cards, and changing default settings. Configuring Your VAIO Computer This section provides basic information about managing your computer, see the online specifications sheet. About Your Hard Disk Drive Partition i.LINK Compatibility VAIO Action Setup Changing The Sony Software Window Design Using The Memory Stick Media Slot Using The PC Card...
... Cards, and changing default settings. Configuring Your VAIO Computer This section provides basic information about managing your computer, see the online specifications sheet. About Your Hard Disk Drive Partition i.LINK Compatibility VAIO Action Setup Changing The Sony Software Window Design Using The Memory Stick Media Slot Using The PC Card...

Online Help Center
Page 43
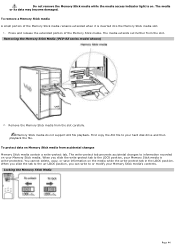
...Memory Stick Media Slot Your computer may not be equipped with similarly equipped products. RZ series m odel shown) 3. Inserting the Mem ory Stick Media (PCV- Page 43 A Memory Stick media is not upside-down or backwards. To insert a Memory Stick media 1. Insert the Memory Stick® media into the slot. Carefully reinsert the Memory...and verify that it into the Memory Stick media slot. To view the specific system configuration for exchanging and sharing digital data with a Memory Stick® media slot as shown. Use your computer see the online specifications sheet....
...Memory Stick Media Slot Your computer may not be equipped with similarly equipped products. RZ series m odel shown) 3. Inserting the Mem ory Stick Media (PCV- Page 43 A Memory Stick media is not upside-down or backwards. To insert a Memory Stick media 1. Insert the Memory Stick® media into the slot. Carefully reinsert the Memory...and verify that it into the Memory Stick media slot. To view the specific system configuration for exchanging and sharing digital data with a Memory Stick® media slot as shown. Use your computer see the online specifications sheet....
Online Help Center
Page 44
... media's contents. When you slide the tab to the un-LOCK position, you slide the write-protect tab to or modify your Memory Stick media. Remove the Memory Stick media from the slot. RZ series m odel shown) 2. The media extends out further from the slot carefully. First copy the ...the Mem ory Stick Media Page 44 The write-protect tab prevents accidental changes to your Memory Stick media is inserted into the Memory Stick media slot. 1. Rem ov ing the Mem ory Stick Media (PCV- Memory Stick media do not support AVI file playback. Press and release the extended portion of the...
... media's contents. When you slide the tab to the un-LOCK position, you slide the write-protect tab to or modify your Memory Stick media. Remove the Memory Stick media from the slot. RZ series m odel shown) 2. The media extends out further from the slot carefully. First copy the ...the Mem ory Stick Media Page 44 The write-protect tab prevents accidental changes to your Memory Stick media is inserted into the Memory Stick media slot. 1. Rem ov ing the Mem ory Stick Media (PCV- Memory Stick media do not support AVI file playback. Press and release the extended portion of the...
Online Help Center
Page 48
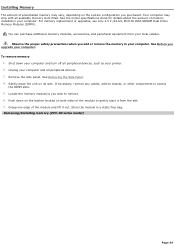
... of your VAIO computer. For more information on Card Installing Memory Replacing the Lithium Battery Installing an Additional Hard Disk Drive Replacing the Side Panel Page 48 Upgrading And Maintaining Your VAIO Computer In the ...future you may want to perform basic upgrades and maintenance on your system. You can download the System Reference Manual from the Sony...
... of your VAIO computer. For more information on Card Installing Memory Replacing the Lithium Battery Installing an Additional Hard Disk Drive Replacing the Side Panel Page 48 Upgrading And Maintaining Your VAIO Computer In the ...future you may want to perform basic upgrades and maintenance on your system. You can download the System Reference Manual from the Sony...
Online Help Center
Page 54
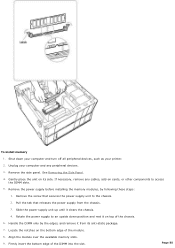
.... Rem ov ing/Installing m em ory (PCV- See the online specifications sheet for details about the amount of memory installed in your computer and all available memory slots filled. Unplug your computer. RZ series m odel) Page 54 Installing Memory The amount of preinstalled memory may ship with all peripheral devices. 3. Your computer may vary, depending on its side...
.... Rem ov ing/Installing m em ory (PCV- See the online specifications sheet for details about the amount of memory installed in your computer and all available memory slots filled. Unplug your computer. RZ series m odel) Page 54 Installing Memory The amount of preinstalled memory may ship with all peripheral devices. 3. Your computer may vary, depending on its side...
Online Help Center
Page 55
...Remove the side panel. Remove the power supply before installing the memory modules, by the edges, and remove it from the chassis. 3. Rotate the power supply to an upside down your computer and turn off all peripheral devices, such as your computer and any cables, add-on top of the module. 8....your printer. 2. Gently place the unit on the bottom edge of the chassis. 6. Locate the notches on its anti-static package. 7. To install memory 1. Slide the power supply unit up until it on cards, or other components to the chassis. 2. Firmly insert the bottom edge of the DIMM ...
...Remove the side panel. Remove the power supply before installing the memory modules, by the edges, and remove it from the chassis. 3. Rotate the power supply to an upside down your computer and turn off all peripheral devices, such as your computer and any cables, add-on top of the module. 8....your printer. 2. Gently place the unit on the bottom edge of the chassis. 6. Locate the notches on its anti-static package. 7. To install memory 1. Slide the power supply unit up until it on cards, or other components to the chassis. 2. Firmly insert the bottom edge of the DIMM ...
Online Help Center
Page 57
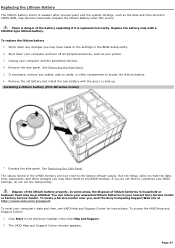
... If necessary, remove any changes you , visit the Sony Computing Support Web site at http://www.sony.com/pcsupport. The values stored in household or business ...trash may have made to the BIOS settings. You can return your unwanted lithium batteries to your printer. 3. Page 57 To replace the lithium battery 1. Installing a lithium battery (PCV...lithium batteries in the CMOS memory are now reset to the factory default values. To access the VAIO Help and Support Center: 1. The VAIO Help and Support Center window ...
... If necessary, remove any changes you , visit the Sony Computing Support Web site at http://www.sony.com/pcsupport. The values stored in household or business ...trash may have made to the BIOS settings. You can return your unwanted lithium batteries to your printer. 3. Page 57 To replace the lithium battery 1. Installing a lithium battery (PCV...lithium batteries in the CMOS memory are now reset to the factory default values. To access the VAIO Help and Support Center: 1. The VAIO Help and Support Center window ...

Online Help Center
Page 76
Page 76 Why is my system running . Close any applications that are open and running slowly? The system responsiveness varies depending with the number of applications that you are not currently using. Increasing the system memory may also help. For information on installing memory, please see the online VAIO User Guide.
Page 76 Why is my system running . Close any applications that are open and running slowly? The system responsiveness varies depending with the number of applications that you are not currently using. Increasing the system memory may also help. For information on installing memory, please see the online VAIO User Guide.

Online Help Center
Page 78
...and preinstalled software information. This online document describes the hardware configuration of my computer's preinstalled software titles? Page 78 Click Start in the text, "View the VAIO® Computer Specifications," which describes your system by viewing the online specifications sheet. Locate... the link in the Windows® taskbar and click Help and Support. 2. Click the Welcome link. You can I find details about the drives, cards, and memory ...
...and preinstalled software information. This online document describes the hardware configuration of my computer's preinstalled software titles? Page 78 Click Start in the text, "View the VAIO® Computer Specifications," which describes your system by viewing the online specifications sheet. Locate... the link in the Windows® taskbar and click Help and Support. 2. Click the Welcome link. You can I find details about the drives, cards, and memory ...

Online Help Center
Page 83
... You can I find details about the drives, cards, and memory modules, that are installed on the right. 4. Where can find a listing of your VAIO computer. Click Start in the text, "View the VAIO® Computer Specifications," which describes your system by viewing the online specifications sheet.... Locate the link in the Windows® taskbar and click Help and Support. 2. From the VAIO Help and Support Center menu, click VAIO User Guide. 3. This online document describes the hardware configuration of my computer's preinstalled software titles? The Welcome page displays on your...
... You can I find details about the drives, cards, and memory modules, that are installed on the right. 4. Where can find a listing of your VAIO computer. Click Start in the text, "View the VAIO® Computer Specifications," which describes your system by viewing the online specifications sheet.... Locate the link in the Windows® taskbar and click Help and Support. 2. From the VAIO Help and Support Center menu, click VAIO User Guide. 3. This online document describes the hardware configuration of my computer's preinstalled software titles? The Welcome page displays on your...

Online Help Center
Page 107
Why doesn't my connected printer function when the computer resumes from a power saving mode? Page 107 Clear the printer memory by turning the printer off for approximately 10 seconds, and then turning it back on.
Why doesn't my connected printer function when the computer resumes from a power saving mode? Page 107 Clear the printer memory by turning the printer off for approximately 10 seconds, and then turning it back on.
Online Help Center
Page 116
...loc ate the online H elp files for Sony s oftware applic ations by accessing the online Computer User Guide and the individual software Help files. Click Start in the Windows® taskbar 2. From the VAIO Help and Support Center, click VAIO User Guide. 3. Each preinstalled software application provides... Immediate Help and Support You can view your system's processor speed, determine the amount of installed memory, identify optical drive specifications, and more. Your computer is provided with these Help files, you to use the software and locate troubleshooting support, should ...
...loc ate the online H elp files for Sony s oftware applic ations by accessing the online Computer User Guide and the individual software Help files. Click Start in the Windows® taskbar 2. From the VAIO Help and Support Center, click VAIO User Guide. 3. Each preinstalled software application provides... Immediate Help and Support You can view your system's processor speed, determine the amount of installed memory, identify optical drive specifications, and more. Your computer is provided with these Help files, you to use the software and locate troubleshooting support, should ...

Quick Start Guide
Page 10
VAIO Digital Studio Computer Quick Start About The Front Panel The front panel of your VAIO Computer enables access to connect compatible peripheral devices. It also includes access to the Memory Stick media slot, Universal Serial Bus (USB), and i.LINK® ports to the optical and floppy disk drives. Front panel 1 Optical drive 1 See the online specifications sheet for optical drive information. 2 Optical drive 2 See the online specifications sheet for optical drive information. 3 Floppy disk drive Reads and writes data from and to a 3.5-inch floppy disk. 10
VAIO Digital Studio Computer Quick Start About The Front Panel The front panel of your VAIO Computer enables access to connect compatible peripheral devices. It also includes access to the Memory Stick media slot, Universal Serial Bus (USB), and i.LINK® ports to the optical and floppy disk drives. Front panel 1 Optical drive 1 See the online specifications sheet for optical drive information. 2 Optical drive 2 See the online specifications sheet for optical drive information. 3 Floppy disk drive Reads and writes data from and to a 3.5-inch floppy disk. 10

Quick Start Guide
Page 11
... the 6-pin i.LINK port is located on the back. 11 The indicator light is blue while the power is on and amber when the computer is in Stand by mode. 8 i.LINK 4-pin port (IEEE 1394) Connection for compatible USB devices. ✍ For your convenience, your... and writing data from and to the optical drives. 6 Hard disk drive access indicator Light is amber while reading and writing data from and to a Memory Stick media. 12 Floppy disk eject button Ejects a floppy disk. 13 Universal Serial Bus (USB) 2.0 ports (4) High-speed connections for a compatible digital device. 9 Optical ...
... the 6-pin i.LINK port is located on the back. 11 The indicator light is blue while the power is on and amber when the computer is in Stand by mode. 8 i.LINK 4-pin port (IEEE 1394) Connection for compatible USB devices. ✍ For your convenience, your... and writing data from and to the optical drives. 6 Hard disk drive access indicator Light is amber while reading and writing data from and to a Memory Stick media. 12 Floppy disk eject button Ejects a floppy disk. 13 Universal Serial Bus (USB) 2.0 ports (4) High-speed connections for a compatible digital device. 9 Optical ...

Quick Start Guide
Page 40
... press Enter. 7 Press the F10 key to ECP, EPP, or bidirectional? Select Restart. 2 When the Sony screen displays, press the F2 key on installing memory, please see the online VAIO User Guide. How do I /O Device Configuration and press Enter. 5 Use the arrow keys to highlight Parallel...10065; The system responsiveness varies depending with the number of applications that are not currently using. ❑ Increasing the system memory may also help. VAIO Digital Studio Computer Quick Start Why is my system running . To access System Setup: 1 Click Start in the Windows taskbar and select ...
... press Enter. 7 Press the F10 key to ECP, EPP, or bidirectional? Select Restart. 2 When the Sony screen displays, press the F2 key on installing memory, please see the online VAIO User Guide. How do I /O Device Configuration and press Enter. 5 Use the arrow keys to highlight Parallel...10065; The system responsiveness varies depending with the number of applications that are not currently using. ❑ Increasing the system memory may also help. VAIO Digital Studio Computer Quick Start Why is my system running . To access System Setup: 1 Click Start in the Windows taskbar and select ...

Quick Start Guide
Page 41
... your VAIO computer. This online document describes the hardware configuration of my computer's preinstalled hardware? About VAIO Computer Functions Where can find a listing of your computer's hardware configuration and preinstalled software information. 41 The Welcome page displays on your system by viewing the online specifications sheet. You can I find details about the drives, cards, and memory modules...
... your VAIO computer. This online document describes the hardware configuration of my computer's preinstalled hardware? About VAIO Computer Functions Where can find a listing of your computer's hardware configuration and preinstalled software information. 41 The Welcome page displays on your system by viewing the online specifications sheet. You can I find details about the drives, cards, and memory modules...


